Flask
優(yōu)勢:
- 相對主流框架,功能組件全
- 教科書式框架
劣勢:
- 服務資源浪費
- 開發(fā)繁瑣
重量級的web框架,開發(fā)效率高,MTV框架,自帶ORM,admin后臺管理,自帶的sqlite數(shù)據(jù)庫和開發(fā)測試用的服務器,模板引擎,支持jinja模板引擎,適合做企業(yè)級的網(wǎng)站開發(fā)
Flask
優(yōu)勢:
- 節(jié)省資源 輕量級框架
- 開發(fā)簡便 速度快
劣勢:
組件極少 Session
- 第三方組件 非常全 Flask-Session
- Flask 更新 組件第三方的 穩(wěn)定性相對較差
輕量級web框架,默認依賴兩個外部庫:jinja2和Werkzeug WSGI工具
適用于做小型網(wǎng)站以及web服務的API,開發(fā)大型網(wǎng)站無壓力,但架構需要自己設計
與關系型數(shù)據(jù)庫的結合不弱于Django
pc,pyo,pyc,pyd區(qū)別
py是源文件,
pyc是源文件編譯后的文件
pyo是源文件優(yōu)化編譯后的文件
pyd是其他語言寫的python庫
Flask
flask是一個典型的MVC框架
Flask框架依賴組件?
Route(路由)
templates(模板)
Models(orm模型)
blueprint(藍圖)
Jinja2模板引擎
什么是g
在flask,g對象是專門用來存儲用戶數(shù)據(jù)的,它是global的縮寫,g是全局變量,在整個request生命周期內生效。
Response
1."HW"
2.render_template("he.html")
3.redirect("/url")
4.jsonify() # 返回標準JSON格式數(shù)據(jù) 在響應頭中 Content-Type:application/json
5.send_file() # 打開并返回文件 自動識別文件類型 Content-Type:文件類型
@app.route('/get_file')
def get_file():
    return send_file("3.mpa")
Request
1.args 保存URL中傳遞的參數(shù)數(shù)據(jù) to_dict() 字典形式取值  ImmutableMultiDict([('name', 'as')])
print(request.args.to_dict())  #{'name': 'asd'}
2.form  獲取FormData中的數(shù)據(jù) to_dict() 字典形式取值
3.method  判斷請求方式
4.*path 路由地址   /post_data    就是@app.route('/post_data',methods=['GET','POST'])
5.*url 訪問地址    http://127.0.0.1:5000/post_data
6.*host 主機地址   127.0.0.1:5000
7.*host_url 主機訪問地址   http://127.0.0.1:5000/
8.files 獲取所有數(shù)據(jù)中的文件數(shù)據(jù)  (圖片,文件等)
9.data   b"" 獲取原始請求體中的數(shù)據(jù) Content-Type 不包含 form-data的數(shù)據(jù),b’’里邊就有值
10.json    獲取當請求頭中帶有 Content-Type:application/json 請求體中的數(shù)據(jù)  None Content-Type:application/json -> dict()
<input type="file" name="my_file">
<input type="submit" value="提交">
aa = request.files.get('my_file')
aa.save(aa.filename)
例子:
from flask import Flask, render_template, jsonify, request
import time
import os
import base64

app = Flask(__name__)
UPLOAD_FOLDER = 'upload'
app.config['UPLOAD_FOLDER'] = UPLOAD_FOLDER #上傳文件夾
basedir = os.path.abspath(os.path.dirname(__file__))
ALLOWED_EXTENSIONS = set(['txt', 'png', 'jpg', 'xls', 'JPG', 'PNG', 'xlsx', 'gif', 'GIF'])


# 用于判斷文件后綴
def allowed_file(filename):
    # print(1111,'.' in filename and filename.rsplit('.', 1)[1] in ALLOWED_EXTENSIONS)
    return '.' in filename and filename.rsplit('.', 1)[1] in ALLOWED_EXTENSIONS


# 用于測試上傳,稍后用到
@app.route('/test/upload')
def upload_test():
    return render_template('upload.html')

from flask import send_file
# 上傳文件
@app.route('/api/upload', methods=['POST'], strict_slashes=False)
def api_upload():
    file_dir = os.path.join(basedir, app.config['UPLOAD_FOLDER'])
    print(file_dir)
    if not os.path.exists(file_dir):
        os.makedirs(file_dir)
    f = request.files['myfile']  # 從表單的file字段獲取文件,myfile為該表單的name值
    print(11,f,f.filename)
    if f and allowed_file(f.filename):  # 判斷是否是允許上傳的文件類型

        fname = f.filename       #上傳文件的名字
        print(22,fname)
        ext = fname.rsplit('.', 1)[1]  # 獲取文件后綴
        unix_time = int(time.time())
        new_filename = str(unix_time) + '.' + ext  # 修改了上傳的文件名
        print(4,new_filename)
        f.save(os.path.join(file_dir, new_filename))  # 保存文件到upload目錄
        token = base64.b64encode(b'new_filename')


        return jsonify({"errno": 0, "errmsg": "上傳成功", "token": token})
    else:
        return jsonify({"errno": 1001, "errmsg": "上傳失敗"})


from flask import request, jsonify, send_from_directory, abort
import os
# 下載
@app.route('/download/<filename>')
def download(filename):
    if request.method == "GET":
        if os.path.isfile(os.path.join('upload', filename)):
            # as_attachment=True  表示文件作為附件下載
            return send_from_directory('upload', filename, as_attachment=True)  #用send_file也可以,
            #send_file:為了直接實現(xiàn)用戶訪問某一個 URL 時就可以下載到文件,我們就使用 send_file 來實現(xiàn)。
        abort(404)
if __name__ == '__main__':
    app.run(debug=True)
    # pass
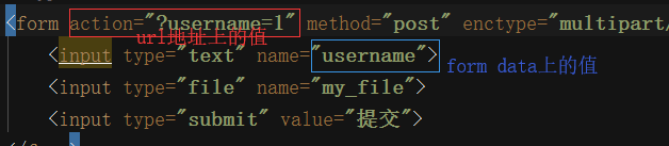
values 保存 URL + FormData 坑!
兩個key一樣,先獲取form的值,后獲取url地址的值,最后url覆蓋form的值。
print(4,request.values.to_dict())
結果{'username': '1'}
jinjia2:
{{ }} :執(zhí)行 和調用 引用 {% %}: 所有邏輯代碼 可以使用()【】
Markup :不需要轉義
def index():
    input_str=Markup("<input type='text' name='username'>")
    return render_template('my_func.html',input_str=input_str)
裝飾器
給多個函數(shù)加裝飾器有兩種:
1)導入 from functools import wraps,在裝飾器里寫上@wraps(func)
查看原視圖函數(shù)的名稱 : 視圖名稱.name
def war(func):
     @wraps(func)  #裝飾多個函數(shù),為防止所有函數(shù)名都變成inner
    def inner(*args,**kwargs):
        if session.get('username'):
            ret = func(*args,**kwargs)
            return ret
        else:
            return redirect('/login')
return inner
2)在app.route里添加endpoint=‘xxx’
@app.route('/index',endpoint='index')
特殊裝飾器
1.@app.before_request 請求進入視圖函數(shù)之前處理
2.@app.after_request  響應返回客戶端之前
執(zhí)行順序 :正常 be1 - be2 – vf(視圖函數(shù)) - af2 - af1
		 異常 be1 - af2 - af1  (只要有響應,有返回值,after全部倒序執(zhí)行)
3.@app.errorhandler(404) 重定義錯誤返回信息
1.methods 當前視圖函數(shù)允許的請求方式 methods=[‘get’,’post’] 是修改不是追加
2.endpoint URL視圖映射 路由對照表重要的Key 唯一值
-
url_for(endpoint) 反向生成URL地址
@app.route('/index',endpoint='asd ‘)
print(url_for('asd')) 結果是/indexs
endpoint說明:每個app中都存在一個url_map,這個url_map 中包含了url到endpoint的映射
endpoint作用: 當request請求傳來一個url的時候,會在url_map中先通過rule找到endpoint,然后再在view_functions 中根據(jù)endpoint 再找到對應的視圖函數(shù) view_func. endpoint默認是視圖函數(shù)的名稱。
例子:
from flask import Flask,Response
app = Flask(__name__)
@app.route('/test')
def test():
    return 'test'

@app.route('/hello',endpoint='out_set')
def hello_world():
    print(app.view_functions)
    print(app.url_map)
    return 'hello world'


if __name__ == '__main__':

    app.run()
可以通過view_functions查看當前endpoint與視圖函數(shù)的對應情況
可以通過url_map查看當前url與endpoint的綁定情況
結果如下:
{'static': <bound method _PackageBoundObject.send_static_file of <Flask 'app'>>, 'test': <function test at 0x000001810DE5A0D0>, 'out_set':     <function hello_world at 0x000001810DE44E18>}
Map([<Rule '/hello' (HEAD, GET, OPTIONS) -> out_set>,
 <Rule '/test' (HEAD, GET, OPTIONS) -> test>,
 <Rule '/static/<filename>' (HEAD, GET, OPTIONS) -> static>])
- url_for實現(xiàn)反轉
靜態(tài)文件引入: url_for("static",filename='文件路徑')
定義路由: url_for("模塊名.視圖名",變量=參數(shù))
-
app.add_url_rule(rule,endpoint=None,view_funv=None)
view_func:指定視圖函數(shù)的名稱
例子:def my_test():
return 'my_test'
app.add_url_rule(rule='/test',view_func=my_test,endpoint='test')
3.strict_slashes 是否嚴格遵循路由地址規(guī)范
4.redirect_to=’/index1’ 永久重定向 301/308 (就是輸入index,就跳轉到index1),節(jié)省內存
5.動態(tài)參數(shù)路由:
            /index/<int:page>
	/index/<string:page>
	/index/<page>  #默認是string
	/index/<path>/<file_name>
例:
@app.route('/index1/<path>/<file_name>',methods=['GET','POsT'], endpoint='asda' )
def index(file_name,path):
    aa = os.path.join(path,file_name)
    return send_file(aa)
Flask中的參數(shù)配置
1.Flask實例化配置
app = Flask(__name__,
        template_folder  #模板文件存儲的文件夾
        static_folder	#靜態(tài)文件存儲的文件夾
        static_url_path   #靜態(tài)文件訪問路徑 默認情況幾下 /+static_folder
        *static_host="http://222.222.222.222:2222", # 靜態(tài)文件服務器
        *host_matching=False, # app.config["SERVER_NAME"] 127.0.0.1:5000
        *subdomain_matching=False, # app.config["SERVER_NAME"]
        **instance_path=None, # 指向實例
)
2.Flask對象配置
app.default_config 參考Flask配置項 (所有的配置都在這里,忘記的,點他就行)
1)新建一個setting配置文件:
 class DebugSetting(object):  debug階段
		DEBUG = True
		SECRET_KEY = "ABCDEFGHI"
		SESSION_COOKIE_NAME = "I am Not Session"   #給session起個假名
		PERMANENT_SESSION_LIFETIME = 1   #1天
class TestSetting(object):    測試階段
		TESTING = True
		SECRET_KEY = "@#$%^&*$%&^&**&^&$%*^T&Y*%^&&$%&&*(J"
		SESSION_COOKIE_NAME = "!@#%$^&()"
		PERMANENT_SESSION_LIFETIME = 7
2)在一個py文件導入
from setting import DebugSetting
from setting import TestSetting
app.config.from_object(DebugSetting)   # 快速進行OBJ配置
app.config.from_object(TestSetting)
Blueprint
把藍圖當做不能夠被run的Flask實例, 也沒有config, 只有執(zhí)行run才有config
功能代碼隔離
用法:
Flask.register_blueprint
url_prefix='/my_bp' 是url前綴,就是在訪問bpindex時訪問不到,必須/my_bp/bpindex才行。
例:
s4_bp.py文件
from flask import Blueprint
bp = Blueprint('bp',__name__,url_prefix='/my_bp')  #必須傳兩個參數(shù)

@bp.route('/bpindex')
def bpindex():
    return ' i am bpindex'
S4.py文件
from flask import Flask
from s4_bp import bp   導入的是等號左邊的bp
app = Flask(__name__)
app.debug=True
app.register_blueprint(bp)  注冊上bp
if __name__ == '__main__':
    app.run()
** 作用:**
將不同的功能模塊化
構建大型應用
優(yōu)化項目結構
增強可讀性,易于維護(跟Django的view功能相似)
Flask中多app應用是怎么完成?
請求進來時,可以根據(jù)URL的不同,交給不同的APP處理
Session 會話
當前的Session是個公共對象,可能會涉及到被改寫的情況 FLask的實現(xiàn)機制是 請求上下文機制
交由客戶端保管機制 Cookie
使用到Flask中的session ,使用session必須有secret_key
app.secret_key = "!@#\(%^&U*\)%^&*()"
如何在Flask中訪問會話?
會話(seesion)會話數(shù)據(jù)存儲在服務器上.會話是客戶端登錄到服務器并注銷的時間間隔.需要在此會話中進行的數(shù)據(jù)存儲在服務器上的臨時目錄中.
from flask import session 導入會話對象
session['name'] = 'admin' 給會話添加變量
session.pop('username', None) 刪除會話的變量
**Flask-Session **
使用session時不用再寫app.secret_key='$#%#4',導入redis就行
    from redis import Redis
from flask_session import Session
from flask import session
app = Flask(__name__)
app.config["SESSION_TYPE"] = "redis"
app.config["SESSION_REDIS"] = Redis("127.0.0.1",6379)
    Session(app)

    @app.route('/index',methods=['GET','POST'])
    def index():
        session['username']='alexss'
        return jsonify({'name':666})
瀏覽器 cookie = {"session":"2b89a941-1fa2-4da9-941b-11b6ca7ffae3"}
app.session_cookie_name + sid
在終端redis-cli get "session:2b89a941-1fa2-4da9-941b-11b6ca7ffae3"
websocket
@app.route('/ws')
def my_ws():
    # print(request.environ)
    user_socket=request.environ.get('wsgi.websocket')
    print(user_socket)
    return '200 ko'
if __name__ == '__main__':
    server=WSGIServer(('0.0.0.0',9527),app,handler_class=WebSocketHandler)
    server.serve_forever()
列舉使用過的Flask第三方組件?
flask_bootstrap
flask-WTF
flask_sqlalchemy
wtforms組件的作用?
WTForms是一個支持多個web框架的form組件,主要用于對用戶請求數(shù)據(jù)進行驗證
Flask中多app應用是怎么完成?
請求進來時,可以根據(jù)URL的不同,交給不同的APP處理
Flask框架默認session處理機制?
Flask的默認session利用了Werkzeug的SecureCookie,把信息做序列化(pickle)后編碼(base64),放到cookie里了.
過期時間是通過cookie的過期時間實現(xiàn)的.
為了防止cookie內容被篡改,session會自動打上一個叫session的hash串,這個串是經(jīng)過session內容、SECRET_KEY計算出來的,看得出,這種設計雖然不能保證session里的內容不泄露,但至少防止了不被篡改.
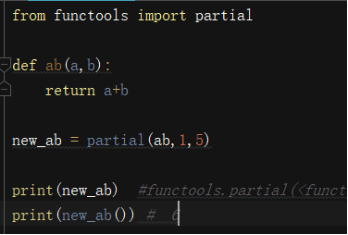
偏函數(shù)
線程安全
既保證速度又保證安全
import time
from flask import Flask
from threading import Thread,local

class Foo(local):
# class Foo(object):
    num = 0
foo = Foo()
def add(i):
    foo.num+=i
    # time.sleep(0.5)#
    print(foo.num)    # 1.3 6.10,......190
if __name__ == '__main__':
    for i in range(20):
        # add(i)
        task = Thread(target=add,args=(i,))
        task.start()
正確結果: 0,1,2....19
捕獲異常
-
http主動跑出異常
abort方法: 拋出一個給定狀態(tài)代碼的http exception 或者指定響應。例如,想要用一個頁面為找到異常來終止請求,可以調用abort(404) -
捕獲錯誤
errorhandle裝飾器:注冊一個錯誤程序,當程序拋出指定錯誤狀態(tài)碼時,就會調用該裝飾器所裝飾的方法
例子:統(tǒng)一處理狀態(tài)碼為500的錯誤給用戶友好的提示處理所有500類型的異常
@app.errorhandler(500)
def internal_server_error(e):
return '服務器搬家了'處理特定的異常項
@app.errorhandler(ZeroDivisionError)
def zero_division_error(e):
return '除數(shù)不能為0'
上下文管理流程:
1、'請求剛進來':
將request,session封裝在RequestContext類中
app,g封裝在AppContext類中
并通過LocalStack將requestcontext和appcontext放入Local類中
 LocalStack = {
    _local :{
      __storage__:{9527:{'stack':[ctx.r.s]}}
      __ident_func__:get_ident  獲取線程協(xié)成id
    }
  }
2、'視圖函數(shù)中':
通過localproxy--->執(zhí)行偏函數(shù)--->localstack--->local取值
3、'請求響應時':
先執(zhí)行save.session()再各自執(zhí)行pop(),將local中的g數(shù)據(jù)清除
為什么要Flask把Local對象中的值stack維護程一個列表
因為通過維護成列表,可以實現(xiàn)一個棧的數(shù)據(jù)結構,進棧出棧時只取一個數(shù)據(jù),巧妙的簡化了問題。
還有,在多app應用時,可以實現(xiàn)數(shù)據(jù)隔離;列表里不會加數(shù)據(jù),而是會生成一個新的列表
local是一個字典,字典里key(stack)是唯一標識,value是一個列表
人工智能
1.語音合成 嘴巴 tts 把字轉換成語音
2.語音識別 耳朵 asr 把音頻轉成漢字
3.nlp自然語言處理
4.Tuling 智能對話
音頻文件轉碼
ffmpeg -y -i 16k.wav -acodec pcm_s16le -f s16le -ac 1 -ar 16000 16k.pcm
ffmpeg –i 1.amv   1.mp3
4.圖靈網(wǎng)址
tuling123.com
https://www.kancloud.cn/turing/www-tuling123-com/718227
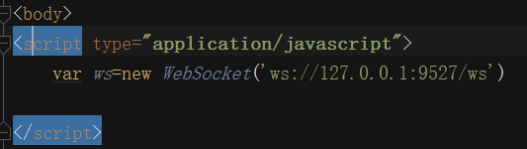
websocket原理
首先websocket建立客戶端連接,就是往web服務器上發(fā)了一個http請求
在使用new websocket那一剎那,就發(fā)起一個http請求,
http里邊帶著一個upgrade=websocket,wsji發(fā)現(xiàn)upgrade不是http時,需要交給另一人取處理,WebSocketHandler在里邊找到一個字符串(秘鑰),要跟公鑰進行拼接,sha1被base64重新加密,然后客戶端給我發(fā)的私鑰,我就給客戶端發(fā)去我的私鑰,websockethandler不會主動斷開,把鏈接存到一個位置上,斷不斷開由客戶端決定,客戶端拿accept校驗兩邊的是不是一樣,不一樣連接斷開,一樣就不斷開,比對成功之后,就可以互相通信了。
MongoDB
使用nosql 選中代碼,按ctrl+enter
MongoDB缺陷-犧牲掉大部分磁盤空間
1.概念
MongoDB - NoSql 非關系型數(shù)據(jù)庫
使用了不存在的對象即創(chuàng)建改對象
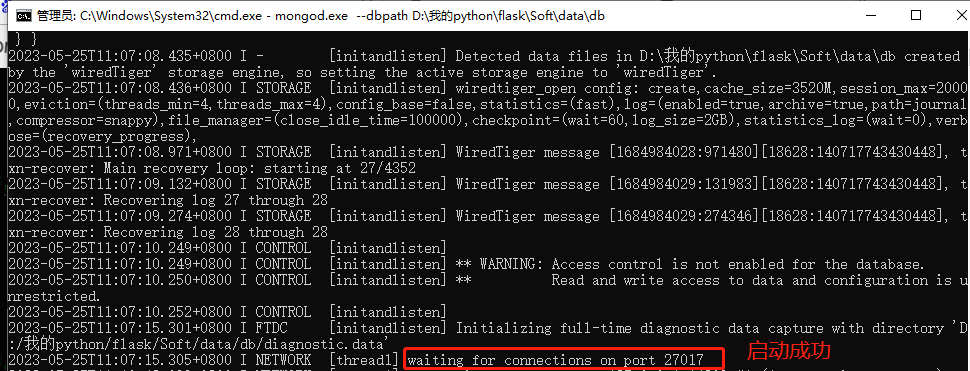
補充怎么啟動MongoDB
-
打開MongoDB下載的路徑,cmd進入到D:\我的python\flask\Soft\mongoDB\bin
2.任意位置新建名為data的文件夾,在data文件夾下新建db文件夾,db文件夾用于存儲MongoDB數(shù)據(jù)。(我的在D:\我的python\flask\Soft\data\db)
3.啟動命令:mongod.exe --dbpath D:\我的python\flask\Soft\data\db
![]()
-
不關閉這個窗口,在bin文件夾先在重新啟動一個窗口,啟動命令: mongo ,此時就OK了。
2.命令1.mongod 啟動MongoDB服務
- -dbpath = D:\我的python\flask\Soft\data\db("數(shù)據(jù)庫存放路徑")
2.mongo 開啟mongoDB控制臺客戶端
點save&connection,就可以使用nosql了
3.show databases 查看當前服務器磁盤上的數(shù)據(jù)庫
4.use dbname 在內存中創(chuàng)建數(shù)據(jù)庫或使用磁盤上的數(shù)據(jù)庫
5.show tables 查看當前數(shù)據(jù)庫磁盤中的數(shù)據(jù)表
6.db.tabalename 在內存中創(chuàng)建數(shù)據(jù)表 或使用磁盤中的數(shù)據(jù)表
當dbname 存在時切換
當dbname 不存在時在內存中創(chuàng)建數(shù)據(jù)庫
7. db 代指當前使用的數(shù)據(jù)庫 查詢當前使用的數(shù)據(jù)庫名
**3. MongoDB的增刪改查 **
from bson import ObjectId
1.增    db.tabalename.insert({name:1})
2.查db.tabalename.find({查詢條件))
	查詢條件-db.tabalename.find({name:888,age:16})
3.刪  db.tabalename.remove(刪除條件)  所有符合條件的數(shù)據(jù)(不寫條件是刪除所有)
	db.users.remove({'name':'alex'})
4.改  db.tabalename.update({查詢條件},{$修改器:{修改內容}})  #沒有就是創(chuàng)建,有就是修改
	 $set: 用來強制修改某值,符合不存在即創(chuàng)建的邏輯
	 db.tabalename.update({}, {$set:{name:"亞歷山大"}})
**在mongodb 查詢 **
例:查詢事件在12月20號,并且du_title 包含 疾控 的詞語
#使用正則 模糊查詢
db.a617a540880582c3aaca1e68bs.find({'create_time':{'$gte':'2021-12-20T00:00:00.000Z'},'du_title':/^.*疾病.*$/}).count()
#或者
db.a617a540880582c3aaca1e68bs.find({'create_time':{'$gte':'2021-12-20T00:00:00.000Z'},'du_title':{'$regex':/^.*疾病.*$/}}).count()

#按pv升序,查找時間在2022-01-07間的
db.a617a540880582c3aaca1e68bs.find({'create_time':{'$regex':"^2022-01-07"}}).sort({"pv":-1})
在 pymongo 例查詢
 #使用正則 模糊查詢
 result =self.kefudata_resource.find({'create_time': {'$gte': '2021-12-20T00:00:00.000Z'}, 'du_title': re.compile('疾控')})   #  包含關    系
    for i in result:
        print(i)
#不包含某個字段為  '' 空的  值
result = self.kefudata_resource.find({'create_time':{ "$regex": "^2021-11-19"},'du_scrid':{"$nin":['']}}).limit(1000)
按pv升序,查找時間在2022-01-07間的
db.a617a540880582c3aaca1e68bs.find({'create_time':{'$regex':"^2022-01-07"}}).sort([('pv',-1)])})

<b>sort 字段,在python中只能使用列表進行排序,不能使用字典</b>
在 pymongo 新增或更改數(shù)據(jù)
 def save_resource(self):
    count=0
    for line in fileinput.input('ph_1.txt'):
        linestd=line.strip()
        linearr=linestd.split('\t')
        # print len(linearr)
        # print linearr
        name=linearr[2]
        address = linearr[3]
        phone = linearr[4].split('\n')[0]
        prov = linearr[0]
        city = linearr[1]
        district=""
        print(address)
        print (name)

        if len(linearr)==6:
            district=linearr[5]
        query = {"title": name + '熱線電話',"phone_list.phone":phone}
        response_1 = self.kefudata_resource.find_one(query)
        if response_1:
                print( str(name) )
        else:
            data={
                "phone_list": [
                    {
                        "phone": phone,
                        "order_weight": 0,
                        "name": "聯(lián)系電話 "
                    }
                ],
                "key": name + '客服',
                "title": name+"熱線電話",
                "url": "https://haoma.baidu.com/",
                "showurl": "https://haoma.baidu.com/",
                "key_list": name,
                "source": "hm_public",
                "create_time": "2021-11-19T12:12:00.000Z",
                "update_time": (datetime.now() - timedelta(hours=8)).strftime(
                    "%Y-%m-%d{}%H:%M:%S{}".format('T', '.000Z')),
                "card_pctext": {
                    "d_name" : "企業(yè)官方號碼",
                    "t_name" : "",
                    "d_color" : "",
                    "d_prefix" : "",
                    "t_prefix" : "",
                    "t_color" : "",
                    "d_type" : "tag",
                    "t_type" : "text"
                },
                "card_wisetext": {
                    "d_name" : "企業(yè)官方號碼",
                    "t_name" : "",
                    "d_color" : "",
                    "d_prefix" : "以下號碼為",
                    "t_prefix" : "類型:",
                    "t_color" : "",
                    "d_type" : "tag",
                    "t_type" : "text"
                },
                "page_pctext": {
                    "d_name" : "企業(yè)官方號碼",
                    "t_name" : "",
                    "d_color" : "",
                    "d_prefix" : "",
                    "t_prefix" : "",
                    "t_color" : "",
                    "d_type" : "tag",
                    "t_type" : "text"
                },
                "page_wisetext": {
                    "d_name" : "企業(yè)官方號碼",
                    "t_name" : "",
                    "d_color" : "",
                    "d_prefix" : "以下號碼為",
                    "t_prefix" : "類型:",
                    "t_color" : "",
                    "d_type" : "tag",
                    "t_type" : "text"
                },
                "bg_peak": {
                    "bgHeight" : "1.01",
                    "gradientPoint" : "0,0,1,1",
                    "endColor" : "#4E6EF2",
                    "bgColor" : "#4E6EF2",
                    "startColor" : "#4E6EF2",
                    "type" : "1"
                },
                "is_out": 1,
                "is_pay": 0,
                "is_sort": "0",
                "longitude": "0",
                "latitude": "0",
                "iscicaopay": "0",
                "create_at": datetime.now(),
                "update_at": datetime.now(),
                "__v": 0,
                "url_error": "1",
                "word_audit": "1",
                "status": "0",
                "address":address,
                "key_items": {
                    "phone_type": phone.replace('-',''),
                    "area": " ",
                    "brand": "住房公積金管理中心"
                },
                "arealoc": {
                    "prov": prov,
                    "city": city,
                    "district":district,
                    "town":""

                }
            }
            print (data)
            count+=1
            self.kefudata_resource.save(data)
        print(count)

# 更改字段
# def update_resource(self):
#     count=0
#     l = ['國網(wǎng)','電網(wǎng)','電力服務','國家電網(wǎng)']
#     for line in fileinput.input('ph_1.txt'):
#         linestd=line.strip()
#         linearr=linestd.split('\t')
#         # print len(linearr)
#         # print linearr
#         name=linearr[2]
#         address = linearr[3]
#         phone = linearr[4].split('\n')[0]
#         prov = linearr[0]
#         city = linearr[1]
#         district=""
#         print(address)
#         print (name)
#         query = {"title": name + '熱線電話', "phone_list.phone": phone}
#         result_list = self.kefudata_resource.find(query)
#         if result_list:
#             for kefu_data in result_list:
#
#                 kefu_data["key_items"]["brand"] ='國網(wǎng),'+'電網(wǎng),'+'電力服務,'+'國家電網(wǎng)'
#
#                 kefu_data["update_time"] = (datetime.now() - timedelta(hours=8)).strftime(
#                     "%Y-%m-%d{}%H:%M:%S{}".format('T', '.000Z'))
#
#                 count+=1
#                 self.kefudata_resource.save(kefu_data)
#         print(result_list)
#         # print (count )
補充: 3.2版本推薦寫法
查: db.users.find({})    db.users.findOne({})只顯示第一條
增: insertOne({})只插入一條     insertMany({},{})插入多條  insert  官方不推薦了
·Inserted_id          inserted_ids
改: updateOne({},{$修改器:{預修改值}})只更新第一條符合條件的    updateMany({},{$修改器:{預修改值})更新所有符合條件的數(shù)據(jù)    update({})官方不推薦寫法
刪:  deleteOne({})  只刪除第一條符合條件的     deleteMany({})刪除所有符合條件的   remove({})  //官方不推薦  沒有delete
數(shù)據(jù)類型
在MongoDB中dict叫object,列表叫Arrays數(shù)組
首先我們要先了解一下MongoDB中有什么樣的數(shù)據(jù)類型:
    Object ID :Documents 自生成的 _id #不能被json
String: 字符串,必須是utf-8
Boolean:布爾值,true 或者false (這里有坑哦~在我們大Python中 True False 首字母大寫)
Integer:整數(shù) (Int32 Int64 你們就知道有個Int就行了,一般我們用Int32)
Double:浮點數(shù) (沒有float類型,所有小數(shù)都是Double)
Arrays:數(shù)組或者列表,多個值存儲到一個鍵 (list哦,大Python中的List哦)
Object:如果你學過Python的話,那么這個概念特別好理解,就是Python中的字典,這個數(shù)據(jù)類型就是字典
Null:空數(shù)據(jù)類型 , 一個特殊的概念,在python中是None,其他的都是 Null
Timestamp:時間戳
Date:存儲當前日期或時間unix時間格式 (我們一般不用這個Date類型,時間戳可以秒殺一切時間類型)  db.users.insert({time:ISODate()})
$數(shù)學比較符-
  $lt 小于 		db.users.find({age:{$lt:50}})
$lte 小于等于 	db.users.find({age:{$lte:50}})
$gt 大于		db.users.find({age:{$gt:50}})
$gte 大于等于	db.users.find({age:{$gte:50}})
$eq	等于		db.users.find({age:{$eq:24}})
$ne 不等于	db.users.find({age:{$ne:24}}) #age不等于24和連age字段都沒有的,也都查出來
$關鍵字
保存符合條件元素的下標索引 - Array
只能存儲第一層Array的下標
db.users.update({'user_info.hobby':'aa'},{'$set':{'user_info.hobby.$':'132456'}})
$修改器
$set:強制修改器 $set:{"name":123}
db.users.update({'user_info.hobby':'aa'},{'$set':{'user_info.hobby.$':'132456'}})
$unset:強制刪除字段 $unset:{"name":1} 整數(shù)代表刪除
db.users.update({age:45}, {$unset:{age:1}})
$inc:引用增加 $inc:{"age":1} 只能加不能減
db.users.update({'user_info.name':'dd'},{$inc:{'user_info.age':5}}) 5是加5,-5是減5
array:
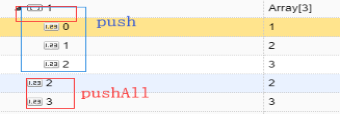
$push 對array數(shù)據(jù)類型追加數(shù)據(jù)
db.users.update({name:999},{$push:{li:8}})
$pushAll 打散Array逐一添加
db.users.update({name:999},{$pushAll:{li:[0,9,10,11,12]}})
$pull 對array數(shù)據(jù)類型減少數(shù)據(jù)
db.users.update({name:999},{$pull: {li:12}})
\(pullAll 在 Array 中刪除多個符合條件的元素 \)pop 刪除Array中的最后一個(正數(shù))或者是第一個(負數(shù))數(shù)據(jù)
db.users.update({name:999},{$pop: {li:-1}})
$查詢關鍵字
$in 或條件查詢 在相同字段之間的or查詢
db.users.find({name:{$in:[777,999]}}) #意思是(name是777或者999的)
$all 子集查詢
db.users.find({li:{$all:[8,2,5]}}) #8,5,2是Array里的數(shù),不是索引,有一個不存在就找不到
$or 或條件查詢 在不同字段之間的or查詢
db.users.find({$or:[{name:999},{age:17}]})
//db.tablename.find({$or:[{age:6},{age:10}]})
意思是符合{name:999}或者符合{age:17}的
$and 與逗號 與條件查詢
db.users.find({$and:[{name:777},{age:17}]})
組合條件查詢
db.users.find({$or:[{name:999},{name:888,age:24}]}
在MongoDB里邊使用
1. 查詢條件
這節(jié)來說說mongodb條件操作符,"\(lt", "\)lte", "\(gt", "\)gte", "$ne"就是全部的比較操作符,對應于"<", "<=", ">", ">=","!="。
原子操作符:"\(and“, "\)or“, "$nor“。
or查詢有兩種方式:一種是用\(in來查詢一個鍵的多個值,另一種是用\)or來完成多個鍵值的任意給定值。$in相當于SQL語句的in操作。
$nin不屬于。
$not與正則表達式聯(lián)合使用時候極其有用,用來查詢哪些與特定模式不匹配的文檔。
$slice相當于數(shù)組函數(shù)的切片,檢索一個數(shù)組文檔并獲取數(shù)組的一部分。限制集合中大量元素節(jié)省帶寬。理論上可以通過 limit() 和 skip() 函數(shù)來實現(xiàn),但是,對于數(shù)組就無能為力了。 $slice可以指定兩個參數(shù)。第一個參數(shù)表示要返回的元素總數(shù)。第二個參數(shù)是可選的。如果使用的話,第一個參數(shù)定義的是偏移量,而第二個參數(shù)是限定的個數(shù)。第二個參數(shù)還可以指定一個負數(shù)。
$mod取摸操作。
$size操作符允許對結果進行篩選,匹配指定的元素數(shù)的數(shù)組。
\(exists操作符允許返回一個特定的對象。注意:當前版本\)exists是無法使用索引的,因此,使用它需要全表掃描。
$type操作符允許基于BSON類型來匹配結果
1)sort 排序 1 正序 -1倒序 字典{}
db.users.find({}).sort({ _id:-1 })
2)limit 限制選取
db.users.find({}).limit(5)
db.users.find({}).limit(5).sort({ _id:-1 })  //選取排序邏輯順序 , 先排序 再選取
3).skip 跳過
db.users.find({}).skip(9) // 跳過 ,從第10個開始
db.users.find({}).skip(2).sort({ _id:-1 }) // 跳過排序邏輯熟悉怒 先排序 后跳過
4)混合用法
db.users.find({}).limit(5).skip(5) // 邏輯順序 先跳過再選取
db.users.find({}).limit(5).skip(5).sort({ _id:-1 }) // 排序跳過選取,邏輯順序 1.先排序 2.跳過 3.選取
在pymongo里邊(pycham) find查詢寫上list才顯示數(shù)據(jù)
1)sort 排序 元祖(,)
不寫p/ymongo.ASCENDING默認是升序,pymongo.ASCENDING是降序 1 或是-1 也行
import pymongo
res=db.users.find({}).sort('_id',pymongo.ASCENDING)
print(res)
2)limit
res = db.users.find({}).limit(5)
res_list=list(res)
# print(list(res),len(res))  求長度不能這樣寫,他是生成器
print(res_list,len(list(res_list)))
3)skip
res = db.users.find({}).skip(5)
res_list=list(res)
# print(list(res),len(res))  求長度不能這樣寫,他是生成器
print(res_list,len(list(res_list)))
4)分頁
res = db.users.find({}).limit(2).sort('_id',-1).skip(0)
print(list(res))

規(guī)律
Num (page-1) num
2 (1-1)2
2 (2-1)2
2 (3-1)2
查
Db.users.find({})   //  <pymongo.cursor
list(Db.users.find({})) // {'_id': ObjectId('5cfdf1a89d500620c47e605e'),
增
res= db.users.insert_one/insert_many
res. Inserted_id          inserted_ids
刪
db.users.delete_one({})
db.users.delete_many({})
改
res = db.users.update({'name':'2','hobby':'11'},{'$set':{'hobby.$':'吃'}})
print(res)
for index,item in enumerate(res.get('hobby')):
    print(index,item)
    if item == '吃':
        res['hobby'][index]='吃飯'
print(res)
db.users.update_one({'name':'2'},{'$set':res})  #把修改的數(shù)據(jù)放到數(shù)據(jù)庫
MUI
使用Mui進行app開發(fā)
MUI是一個面向對象的圖形用戶界面來創(chuàng)建和維護系統(tǒng)
Mui代碼塊搭建頁面
Mui + Html5 PLUS = 移動端App(JS)
手機+pad 移動端App開發(fā)
J2ME 移動端應用
J2EE web應用
J2SE 桌面應用
開發(fā)工具 - HBuilder or HBuilder X
夜聲模擬器 62001
**html5 plus是什么? **
它是增強版的手機瀏覽器引擎, 讓HTML5達到原生水平, 它提供WebApp的規(guī)范.
它結合MUI(前端框架) + HBuilder(開發(fā)工具) 即可迅速實現(xiàn)開發(fā)一個app.
代碼塊激活字符:
Md 重新構建HTML
mhe 帶返回箭頭的header
mbo :div標簽
msl輪播圖
mg九宮格
mli 圖片居左
mta : mb  button按鈕
ming :mui.init({})
Dga: document.getElementById('login').addEventListener('tap',function () {
Mdt: mui.toast('123')  打印的意思
mui 會屏蔽掉onclink 事件
dga :  document.getElementById('pl').addEventListener('tap',function () {})
//點擊pl跳轉到user_info的頁面

#打開新窗口
mui.openWindow({
        	url:'user_info.html',
        	id:'user_info.html'
        })
Html5plus webview
1.mui.plusReady(function(){當html5plus加載完成后立即觸發(fā)的事件})//在mui代碼中加在HTML5plus
2.ajaxpost請求提交數(shù)據(jù)
mui.post(‘url’,{data},SCB,’json’)  只支持form表單
            mui.post('http://192.168.43.216:9527/login',{
				username:u,
				password:p
			},function(data){
				mui.toast(data.msg)
			},'json'
		);
mui的自定義事件
Fire
Mui.fire(targetWebview,’事件名稱’,{數(shù)據(jù)})
例:
     Var player=null
    player=plus.webview.getWebviewById('player.html')
    document.getElementById('stop').addEventListener('tap',function () {
                mui.fire(player,'callplayer',{'action':'stop'});
        })
Targetwebview;
Document.addEventListener(‘事件名稱’,function(event){
            Event.detail—數(shù)據(jù)})
例:
 window.addEventListener('callplayer',function(event){
        if (event.detail.action=='play'){
            p.play();
        }else{
            p.stop();
        }
    })
Html5plus
plusaudio 通過plusaudio實現(xiàn)音頻播放
創(chuàng)建一個對象:Plusaudio.createPlaer(“url”)
返回值:audioPlayer
Audioplayer.play()
Audioplayer.pause()
Audioplayer.resume()
例:
var p=null;
mui.plusReady(function () {
    p=plus.audio.createPlayer('http://192.168.43.216:9527/get_music')
});
document.getElementById('play').addEventListener('tap',function () {
    p.play();    //播放
});
document.getElementById('pause').addEventListener('tap',function () {
        p.pause();//暫停
});
document.getElementById('resume').addEventListener('tap',function () {
        p.resume();//繼續(xù)
})
plusuploader : 從本地上傳文件到服務器
plus.audio.getRecorder();創(chuàng)建錄音管理對象
plus.audio.getRecorder();創(chuàng)建音頻管理對象
plus.uploader.createupload();上傳任務管理對象
uploader用法 文件上傳
例:1)
 document.getElementById('reco').addEventListener('hold',function () {
        console.log('按住了');
        reco.record( {filename:"_doc/audio/",format:"amr"}, function (recordFile) {
				console.log(recordFile);//此處可以執(zhí)行上傳任務
				startUpload(recordFile);  //上傳文件
        });
2)
   function startUpload(filename){
Varuptask=plus.uploader.createUpload('http://192.168.43.216:9527/uploader',{},function(upload,status){
		console.log(upload);
		console.log(status);
        console.log(JSON.stringify(upload));
		console.log(JSON.parse(upload.responseText).msg);
})
	uptask.addFile(filename,{key:'my_record'});
	uptask.addData('k1','v1');
	uptask.start();
}
3)
@app.route('/uploader')
def uploader():
    print(request.form)
    print(request.form)
    file = request.files.get('my_record')
    file.save(file.filename)
    return jsonify({'code':0,'msg':'上傳成功'})
機器學習:
1.jieba 模塊 中文分詞
將 | 一句話 | 拆分 | 成 | 詞語
jieba.cut()
['太上皇', '打天下', '到', '一半兒', '掛', '了']
將 | 一 | 句 | 話 | 拆分 | 成 | 詞語
將 | 一句話 | 一 | 句 | 話 | 拆分 | 成 | 詞語
打 | 天下 | 打天下 |
jieba.cut_for_search(a)
['太上', '太上皇', '天下', '打天下', '到', '一半', '半兒', '一半兒', '掛', '了']
2.pypinyin 模塊 將漢語轉換為漢語拼音
**3.Gensim 機器學習綜合模塊 **
語料庫-概念 問題庫
詞袋 - 中文詞語或者是字 轉化為數(shù)字
向量 - 概念
稀疏矩陣相似度算法 - 兩組詞語或句子相似度得分
# nlp_simnet()
Sqlalchemy
https://blog.csdn.net/wly55690/article/details/131683846
使用ORM操作數(shù)據(jù)庫
優(yōu)勢 :代碼易讀 忽略原生SQL
劣勢 :執(zhí)行效率低 - 將方法轉換為原生SQL 原生SQL還不一定是最優(yōu)的
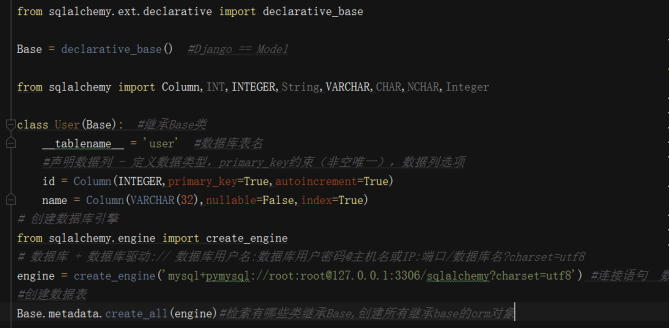
Base = declarative_base()  #相當于Django的models.model
class User(Base):  #繼承Base類
    __tablename__ = 'user'  #數(shù)據(jù)庫表名
    Id=column()聲明數(shù)據(jù)列
數(shù)據(jù)類型:
INT,INTEGER,String,VARCHAR,CHAR,NCHAR,Integer
primary_key=True
autoincrement=True
nullable=False:不為空
index=True #創(chuàng)建索引
創(chuàng)建數(shù)據(jù)庫引擎
from sqlalchemy.engine import create_engine
數(shù)據(jù)庫 + 數(shù)據(jù)庫驅動:// 數(shù)據(jù)庫用戶名:數(shù)據(jù)庫用戶密碼@主機名或IP:端口/數(shù)據(jù)庫名?charset=utf8
engine = create_engine('mysql+pymysql://root:root@127.0.0.1:3306/')#數(shù)據(jù)庫連接語句(字符串)
from sqlalchemy.orm import sessionmaker
from create_table import engine
Session = sessionmaker(engine)  #鎖定創(chuàng)建會話窗口的數(shù)據(jù)庫引擎
db_session = Session() #db_session 就是查詢窗口
from create_table import User
1.增加數(shù)據(jù)
單條
user = User(name='alex') # insert into
db_session.add(user) # 將 insert into 寫入到 db_session 窗口中
db_session.commit() # 執(zhí)行語句
db_session.close() # 關閉查詢窗口 db_session
多條操作
user_list = [
    User(name='JWB'),User(name='DragonFire')
]
# for i in user_list:
#     db_session.add(i)
db_session.add_all(user_list)
db_session.commit()
2.查詢
res = db_session.query(User).first()#查單條
print(res.id,res.name)
res = db_session.query(User).all() #查多條
for i in res:
print(i.id,i.name)
條件查詢
res = db_session.query(User).filter(User.id == 1).all()   #是個列表
for i in res:
print(i.id,i.name)
res = db_session.query(User).filter(User.id == 1).first()  查詢第一條
print(res.name)
3.修改
res = db_session.query(User).filter(User.id ==1).update({'name':'alexdsb'})
db_session.commit()
4.刪除
db_session.query(User).filter(User.id == 1).delete()
db_session.commit()
高級查詢
from sqlalchemy import or_,and_
res = db_session.query(User).filter(
    or_(User.id==3,User.name == 'JWD'),
    and_(User.id==3,User.name=='DragonFire')
).all()
for i in res:
  print(i.name)
排序 desc()降序
res = db_session.query(User).order_by(User.id.desc()).all()
for i in res:
    print(i.id)
范圍取值
# res = db_session.query(User).filter(User.id.between(1,2)).all()
# for i in res:
#     print(i.name)

res = db_session.query(User).filter(User.id.in_([1,2])).all()
for i in res:
    print(i.name)
SQLAlchemy如何執(zhí)行原生SQL?
使用execute方法直接操作SQL語句(導入create_engin、sessionmaker)
engine=create_engine('mysql://root:pwd@127.0.0.1/database?charset=utf8')
  DB_Session = sessionmaker(bind=engine)
  session = DB_Session()
  session.execute('select * from table...;')

 浙公網(wǎng)安備 33010602011771號