【Ray Tracing The Next Week 超詳解】 光線追蹤2-6 Cornell box
Chapter 6:Rectangles and Lights
今天,我們來學(xué)習(xí)長方形區(qū)域光照
先看效果
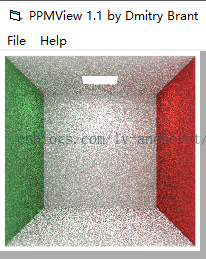
light
首先我們需要設(shè)計(jì)一個(gè)發(fā)光的材質(zhì)
/// light.hpp

// -----------------------------------------------------
// [author]        lv
// [begin ]        2019.1
// [brief ]        the areaLight-class for the ray-tracing project
//                from the 《ray tracing the next week》
// -----------------------------------------------------

#pragma once


namespace rt
{

//the statement of areaLight class

class areaLight :public material
    {
public:
    areaLight() {  }

    areaLight(texture* mat) :_emit(mat) {  }

    virtual bool scatter(const ray& InRay, const hitInfo& info, rtvec& attenuation, ray& scattered)const { return false; }

    virtual rtvec emitted(rtvar u, rtvar v, const rtvec& p)const { return _emit->value(u, v, p); }

private:
    texture* _emit;
    };

} // rt namespace
關(guān)于設(shè)計(jì)方面,我們需要把發(fā)光函數(shù)設(shè)為可繼承虛函數(shù),基類也要添加,但是不是所有的材質(zhì)都需要發(fā)光,所以,基類中的發(fā)光函數(shù)并不需要設(shè)置為純虛
/// material.hpp

// -----------------------------------------------------
// [author]        lv
// [begin ]        2018.12
// [brief ]        the material-class for the ray-tracing project
//                from the 《ray tracing in one week》
// -----------------------------------------------------

#pragma once

namespace rt
{

// the statement of material class

class material
    {
public:

    /*
    @brief: produce a scattered ray
    @param: InRay -> Incident light
            info -> the information of intersect-point(hit-point)
            attenuation -> when scattered, how much the ray should be attenuated by tis reflectance R
            scattered -> as we talk, it is a new sight; or
                         it is the scattered ray with the intersect-point
    @retur: the function calculate a scattered ray or not
    */
    virtual bool scatter(const ray& InRay, const hitInfo& info, rtvec& attenuation, ray& scattered)const = 0;


    /*
    @brief: 自發(fā)光
    @param: 紋理所需信息
    @retur: 紋理像素值
    */
    virtual rtvec emitted(rtvar u, rtvar v, const rtvec& p)const { return rtvec(); }

    };

}
這樣的話,一般的材質(zhì)繼承之后,發(fā)光為黑色即不發(fā)光,較為合理
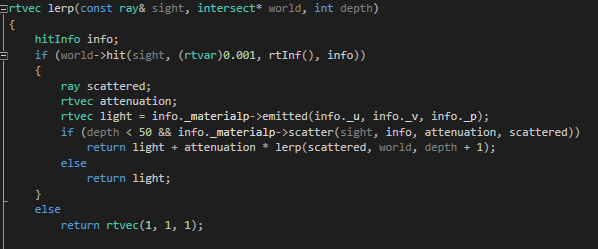
我們既然添加了光照,那么計(jì)算插值函數(shù)時(shí)候也要將它加進(jìn)去
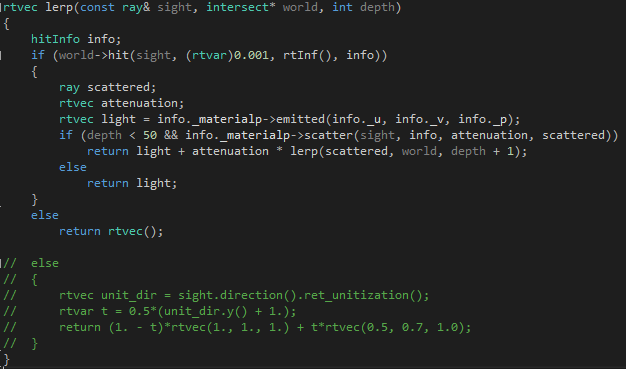
到此,我們的發(fā)光材質(zhì)就設(shè)置妥當(dāng)了
rectangle
我們定義的長方形均為平行于軸的
(引用書上一張圖)
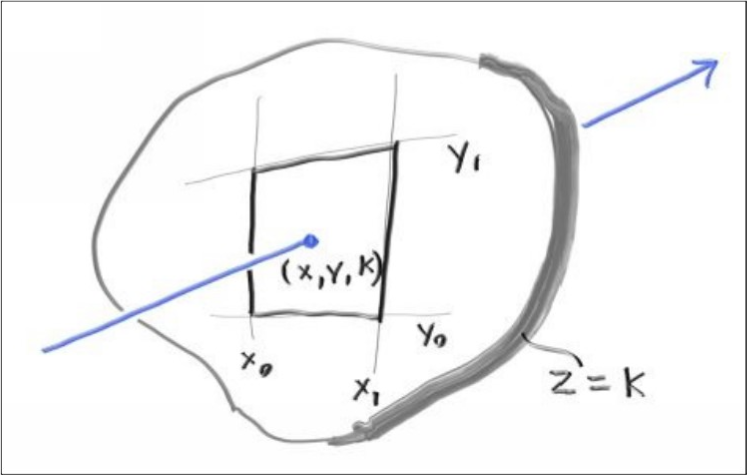
假設(shè)長方形位于 z = k 平面,x和y邊界如上,交點(diǎn)為P(x,y,k)
我們?nèi)绾未_定光線參數(shù)t?
已知:
光線:p(t) = eye + t * direction
則,z方向的方程為:z(t) = eye.z + t * direction.z
那么,若滿足z = k,則
t = (k - eye.z) / direction.z
同理可得x和y的等式
如果,得到的x坐標(biāo)或者y坐標(biāo)不在邊界之內(nèi),那么就沒有相交,反之則光線和長方形相交
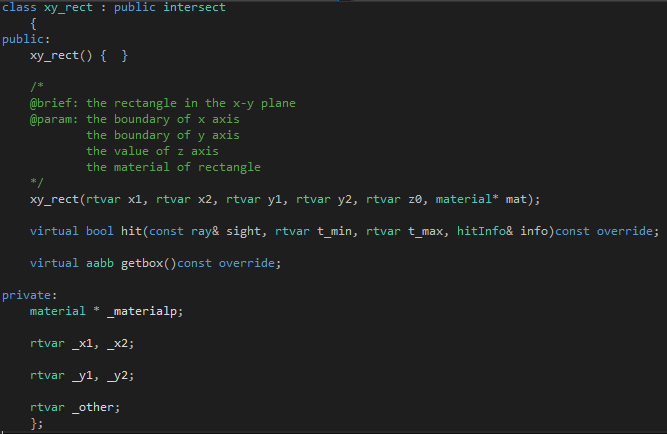

上面的代碼都比較簡單,那個(gè) hit 呢,就是,根據(jù)已知的一個(gè)分量求出t,然后,把這個(gè)解帶入求出對應(yīng)的其他兩個(gè)分量,如果其他兩個(gè)分量不在邊界內(nèi),那么返回false
反之,我們求取該點(diǎn)的紋理坐標(biāo),以及其他碰撞點(diǎn)信息記錄之
獲取包圍盒嘛,理論上面無厚薄,線無粗細(xì),但是實(shí)際中面有厚薄,我們可以將厚度設(shè)置為0.0002,以此模擬理論厚度
同理寫出其他兩個(gè)平面類即可。
這個(gè)沒什么問題,我們就往下進(jìn)行
我們來做Cornell box

相機(jī)參數(shù)設(shè)置:

得到的圖如下:
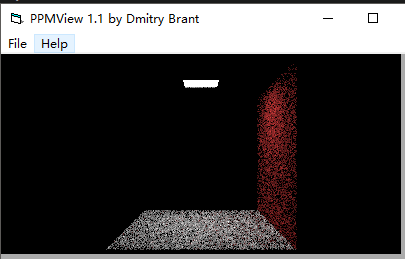
有幾個(gè)面是黑色的??也就是根本沒畫出來
我們細(xì)細(xì)看一下,發(fā)現(xiàn),長方形的法向量是關(guān)鍵
比如畫出來的紅墻,對面與之平行的面的法線是朝左邊的,展現(xiàn)在我們視線中的是背面
所以,我們有時(shí)候需要反轉(zhuǎn)一下法向量
/// flip_normal.hpp

// -----------------------------------------------------
// [author]        lv
// [begin ]        2019.1
// [brief ]        the flip_normal-class for the ray-tracing project
//                from the 《ray tracing the next week》
// -----------------------------------------------------

#pragma once


namespace rt
{

class flip_normal: public intersect
    {
public:
    flip_normal(intersect * p) :_p(p) {  }

    virtual bool hit(const ray& sight, rtvar t_min, rtvar t_max, hitInfo& info)const override
        {
        if (_p->hit(sight, t_min, t_max, info))
            {
            info._n = -info._n;
            return true;
            }
        return false;
        }

    virtual aabb getbox()const override
        {
        return _p->getbox();
        }

private:
    intersect* _p;
    };

} // rt namespace
這樣就可以了,我們改一下場景
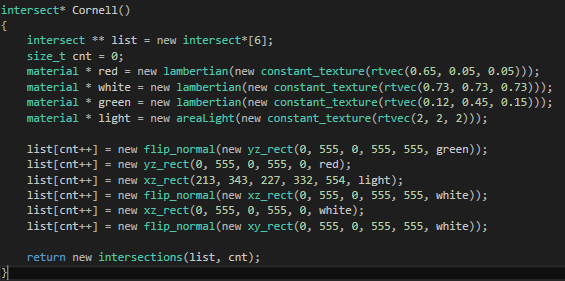
如下:

此外,我們還需要注意的是,light對應(yīng)的紋理中的數(shù)值越大光強(qiáng)越強(qiáng)
我們可以試一下
material * light = new areaLight(new constant_texture(rtvec(20, 20, 20)));
如下:
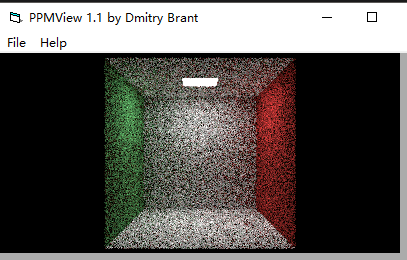
可以看出來兩張圖對比之下,第二張亮多了
但是我們依舊看著很不舒服,好多黑點(diǎn)點(diǎn),太難受了
我想啊想,為什么這么多黑點(diǎn)??可能是因?yàn)楸尘笆呛谏模吘故锹瓷洌绻S機(jī)反射失敗那就是黑色,所以隨機(jī)反射點(diǎn)可能產(chǎn)生好多黑色小點(diǎn),你千萬別想著換成鏡面材質(zhì),那個(gè)更無語
所以啊,我想了下,把背景改為白色,那樣更好,畢竟色彩中摻雜一點(diǎn)白色,無傷大雅
如是,我改了下,效果可觀
此法只適用于Cornell box本身,具體場景下的畫面優(yōu)化請見下一篇

感謝您的閱讀,生活愉快~

 浙公網(wǎng)安備 33010602011771號