OMG-LLaVA學習記錄---模型跑通
OMG-LLaVA學習記錄---模型跑通
環境配置
我們先按照項目文檔要求創建一個Python環境并且激活
conda create -n omg-llava python==3.10
source activate omg-llava
接著我們來安裝torch
# install pytorch with cuda 11.8
pip install torch==2.1.2 torchvision==0.16.2 torchaudio==2.1.2 --index-url https://download.pytorch.org/whl/cu118
然后安裝omg-seg這個模型所需的依賴
python -m pip install https://github.com/open-mmlab/mmengine/archive/refs/tags/v0.8.5.zip
TORCH_CUDA_ARCH_LIST="8.0" TORCH_NVCC_FLAGS="-Xfatbin -compress-all" CUDA_HOME=$(dirname $(dirname $(which nvcc))) LD_LIBRARY_PATH=$(dirname $(dirname $(which nvcc)))/lib MMCV_WITH_OPS=1 FORCE_CUDA=1 python -m pip install git+https://github.com/open-mmlab/mmcv.git@4f65f91db6502d990ce2ee5de0337441fb69dd10
這里注意 先檢查現在GPU物理架構是什么,然后去查找TORCH_CUDA_ARCH_LIST, 這里論文中的GPU是A100架構,所以是8.0
python -m pip install \
https://github.com/open-mmlab/mmdetection/archive/refs/tags/v3.1.0.zip \
https://github.com/open-mmlab/mmsegmentation/archive/refs/tags/v1.1.1.zip \
https://github.com/open-mmlab/mmpretrain/archive/refs/tags/v1.0.1.zip
安裝其他依賴,注意進入到項目根目錄中,也就是....../omg_llava/
# install other requirements
pip install -e '.[all]'
注意
這里可能會報一個warning,說NumPy和PyTorch不兼容,我們把NumPy降級到1.26.4,接著又warning說和opencv-python不兼容,我們直接把opencv-python版本降下去就好了,這里最重要的是PyTorch的版本
然后去Hugging Face上把預訓練權重和LLM模型下載下來,有意思的是,雖然是OMG-LLaVA, 但是LLM沒有直接用LLaVA, 而是用了Internlm-chat-7b這個模型
然后按這個方式放置文件
 |--- pretrained
    |--- omg_llava
        internlm2-chat-7b
        convnext_large_d_320_CocoPanopticOVDataset.pth
        omg_seg_convl.pth
        omg_llava_7b_pretrain_8gpus.pth
        omg_llava_7b_finetune_8gpus.pth
        finetuned_refseg.pth
        finetuned_gcg.pth
根據文檔,我們現在可以運行Demo了
python omg_llava/tools/app.py \
    ${PATH_TO_CONFIG} \
    ${PATH_TO_DeepSpeed_PTH}

# for example
python omg_llava/tools/app.py omg_llava/configs/finetune/omg_llava_7b_finetune_8gpus.py \
    ./pretrained/omg_llava/omg_llava_7b_finetune_8gpus.pth
我是把pretrained放在了項目根目錄omg_llava/(第一個omg_llava)下,那么運行的指令和這里面的example應該是一樣的
我們嘗試執行一下看看,大概率會報這樣一個錯誤
.to is not supported for 4-bit 或 8-bit bitsandbytes models. Please use the model as it is, since the model has already been set to the correct devices and casted to the correct dtype。
出錯的原因是(詢問自Gemini 2.5 pro)
- 當我們使用bitsandbytes進行4位或8位量化時,模型已經被自動:
- 分配到正確的設備(GPU)
- 轉換為正確的數據類型
- 不能在手動調用
.to()方法
AI給出的解決方法主要有兩種
- 移除所有
-.to()調用 - 在創建時用
device_map = "auto"自動分配到可用設備
但是經過一番對配置文件的“魔改”依然出錯,后來經過不斷嘗試和github上網友們的智慧找到了兩種方法
- 將
transformers庫升級到4.47.0版本,經過實測,Demo能正常運行,但是這樣之后會出問題,當我們去微調和評估模型的時候會用到Xtuner庫,而這個庫已經被提前裝進整個項目中的代碼倉庫中, 版本已經被錨死在了0.1.21了,經過多次嘗試和查找資料,這個版本的Xtuner匹配的transformers的版本只有4.36.0,也就是我們原來的版本,走到死胡同里面了,一旦改到原來的transformers就會報錯 - 最終解決方案 ----- 把
accelerate的版本降到0.26.0,這兩個問題都解決了(感覺很玄,完全就是試出來的)
然后在運行,大概率會發現顯存爆掉了
runtimeError: CUDA out of memory xxxxxxxx
原因:代碼中支持4-bit量化,但是沒有默認啟動,我們要手動啟動
python omg_llava/tools/app.py \
  omg_llava/configs/finetune/omg_llava_7b_finetune_8gpus.py \
  ./pretrained/omg_llava/omg_llava_7b_finetune_8gpus.pth \
  --bits 4 --torch-dtype auto
至于--torch-dtype auto
-
功能:指定模型加載和運行時使用的數據類型(auto 表示讓框架自動選擇最合適的類型,如 GPU 支持則優先用 bf16,否則用 fp16)
-
作用:
平衡計算精度和速度:fp16/bf16比fp32計算更快,顯存占用更低,適合大模型推理。
兼容性:auto會根據硬件自動適配(如老GPU可能不支持bf16,自動降級為fp16)。
如果還是爆顯存
我們來修改一下app.py中的配置
 # build llm
    llm = model.llm
    tokenizer = model.tokenizer
    #==================================================================#
    # model.cuda()
    #==================================================================#
    #修改#
    #===================================================================#
    device = torch.device('cuda' if torch.cuda.is_available() else 'cpu')
    if device.type == 'cuda':
        if args.bits is None:
            model.to(device)
        else:
            model.visual_encoder.to(device)
            model.projector.to(device)
            if getattr(model, 'projector_text2vision', None) is not None:
                model.projector_text2vision.to(device)
    else:
        warnings.warn('CUDA 不可用,模型將在 CPU 上運行,這會極大影響推理速度。', RuntimeWarning)
    #=======================================================================#
原因: 我們只有在全參數訓練的時候才把整個模型加載到GPU上,運行時只讓視覺分支在GPU上
然后就能運行Demo了
如果遇到TypeError升級一下gradio試一下
運行結果
- Grounded Caption Generation接地對話生成(混合任務:圖像級 + 像素級)
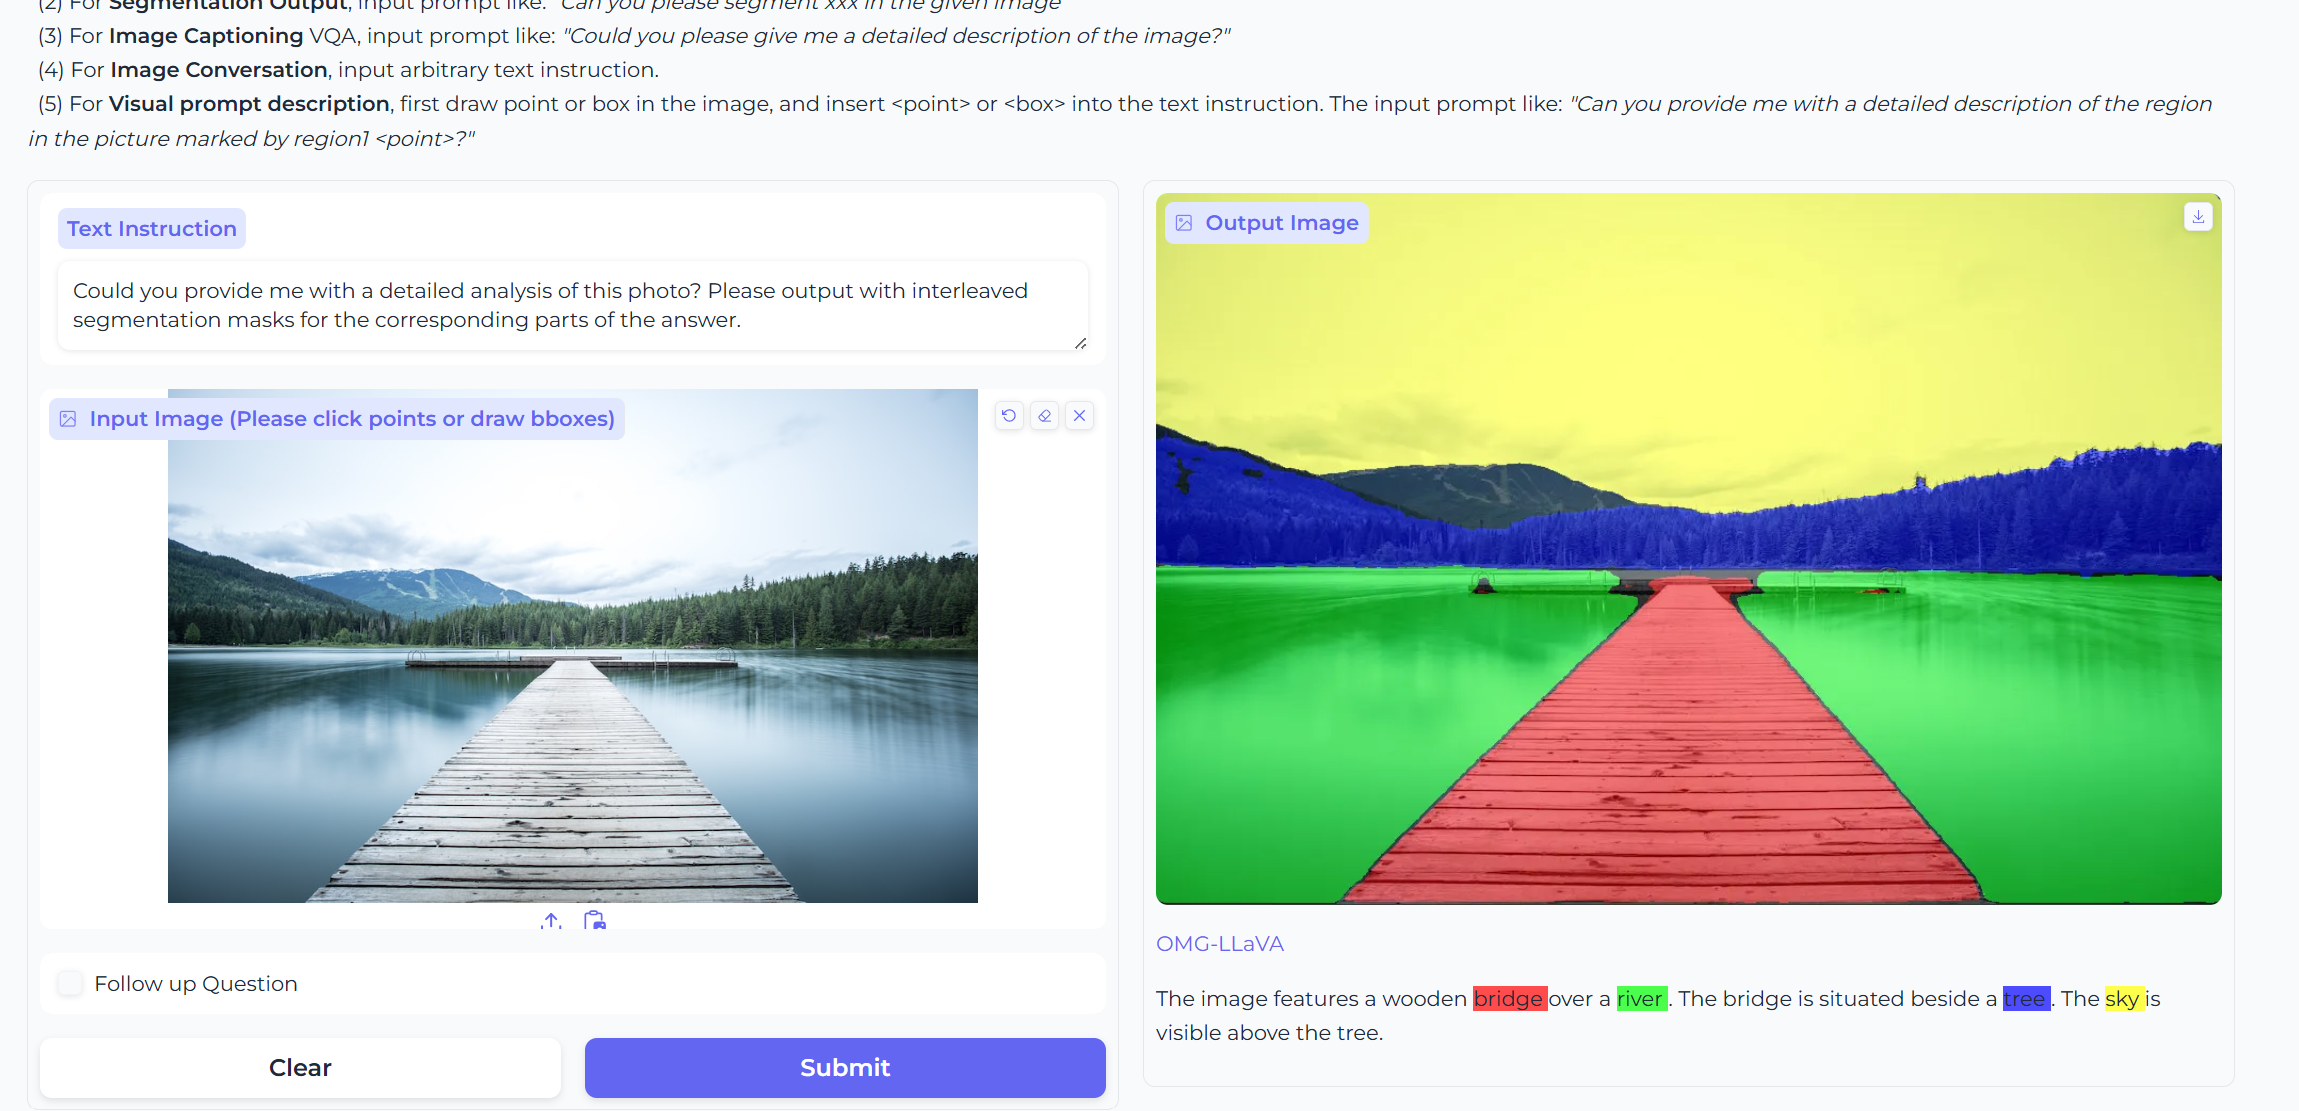
- Segmentation Output圖像分割(像素級)
- RES指代性分割
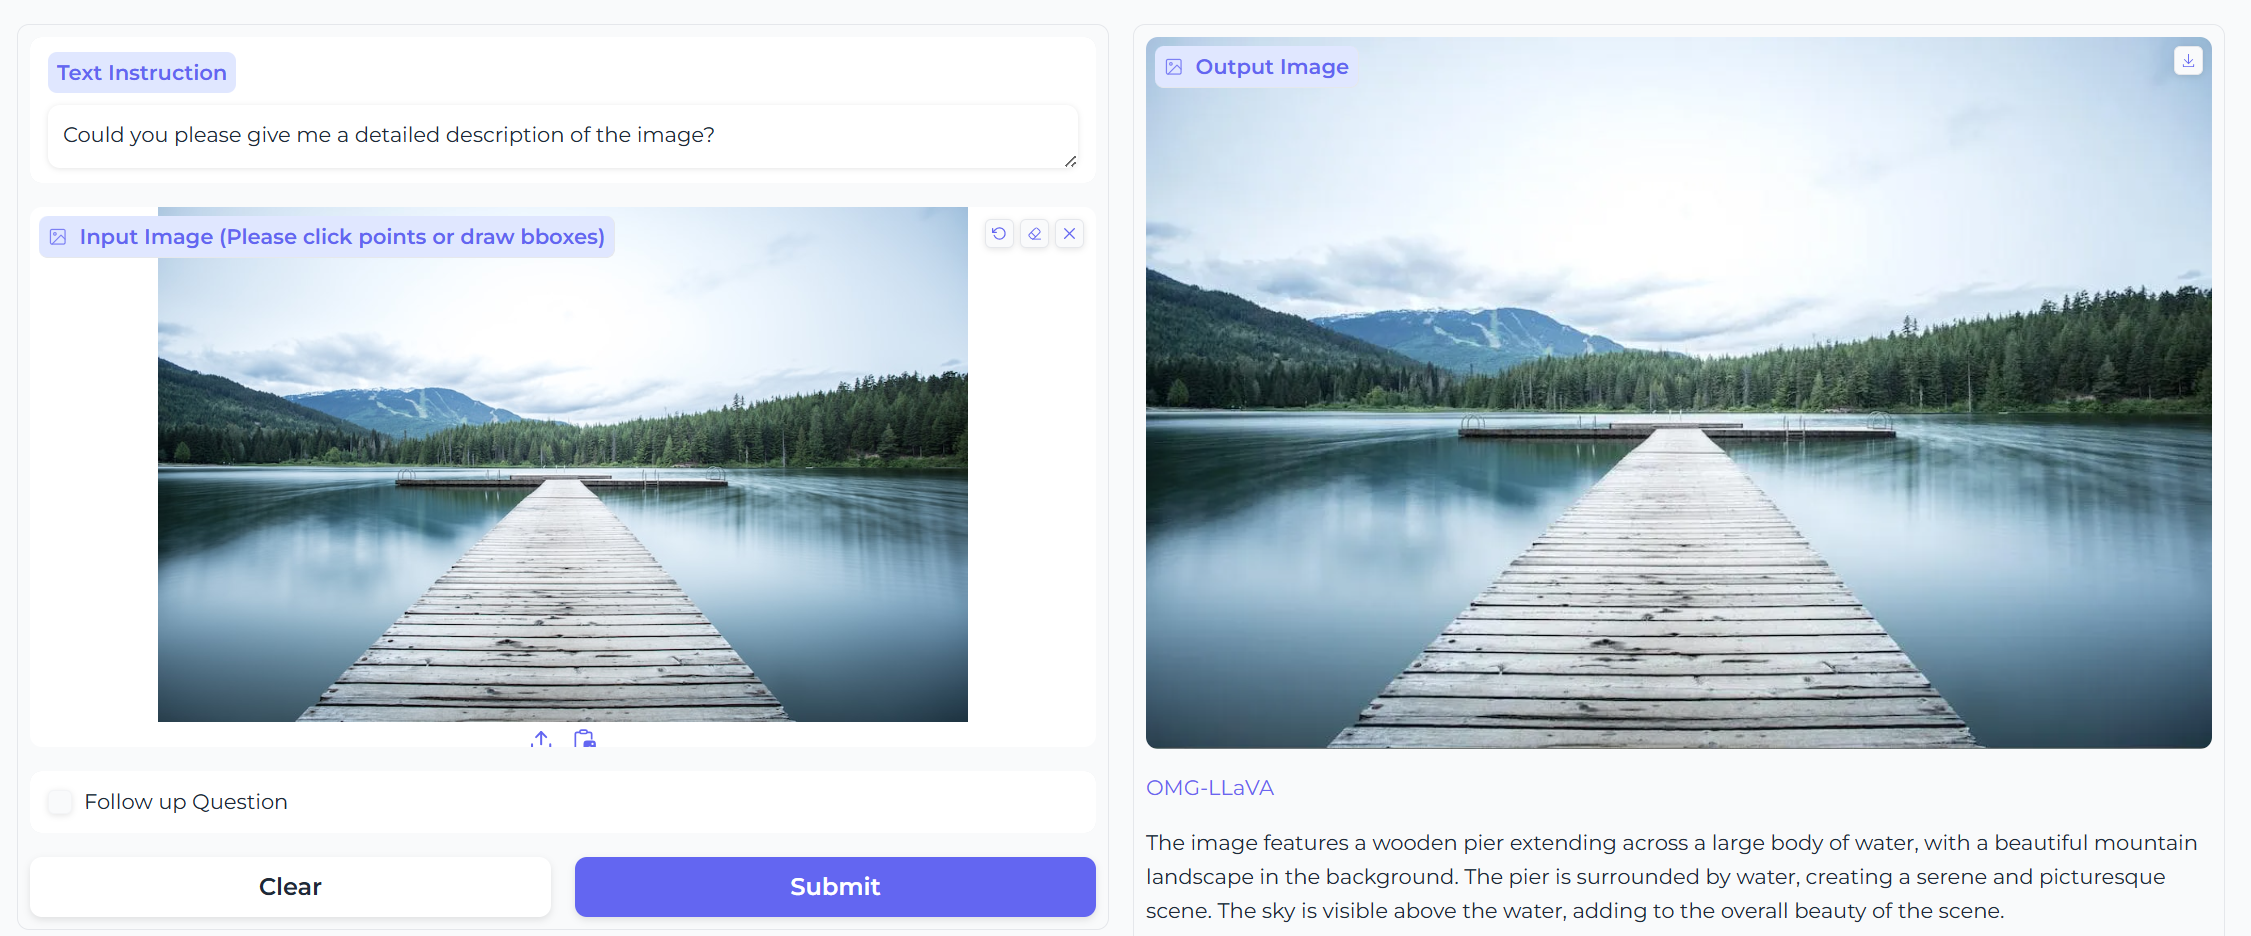
- Image Captioning圖像描述(圖像級別)
- Visual prompt description視覺提示描述(對象級)

- 聊天、推理(對象級)
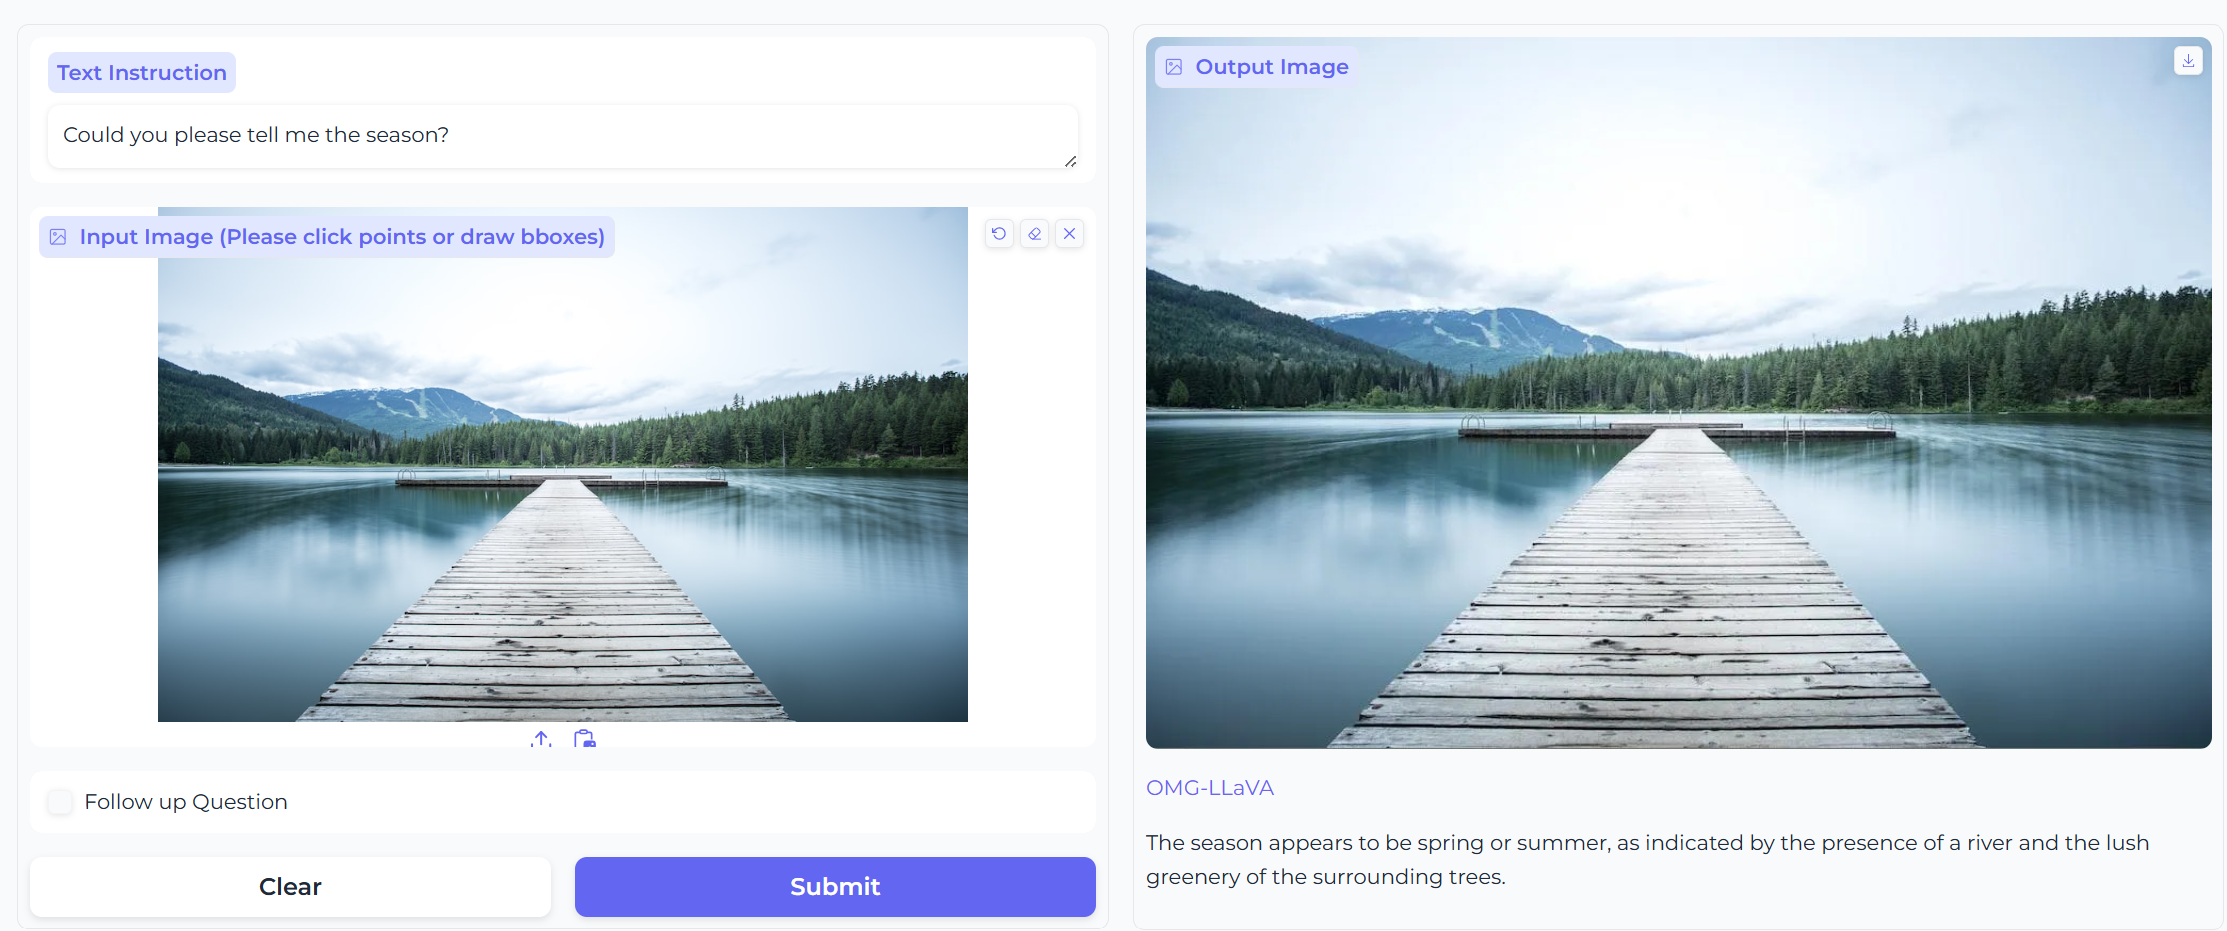
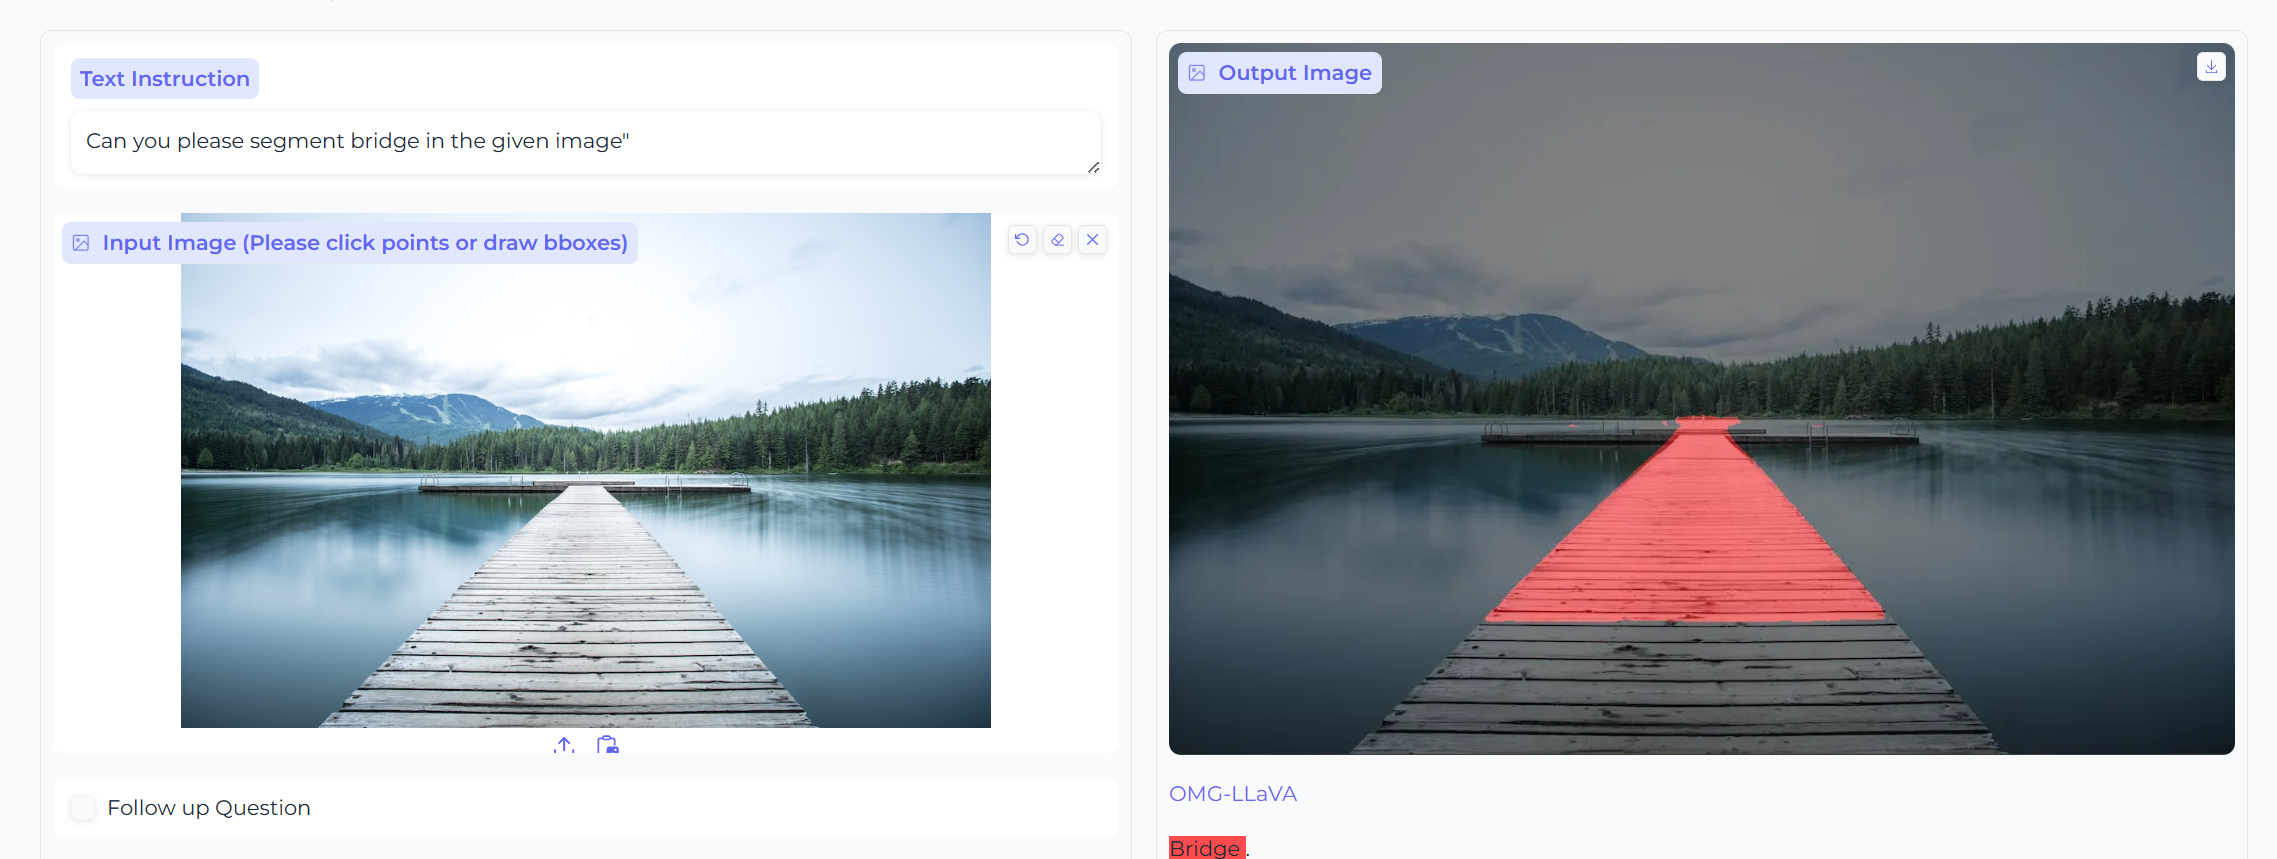
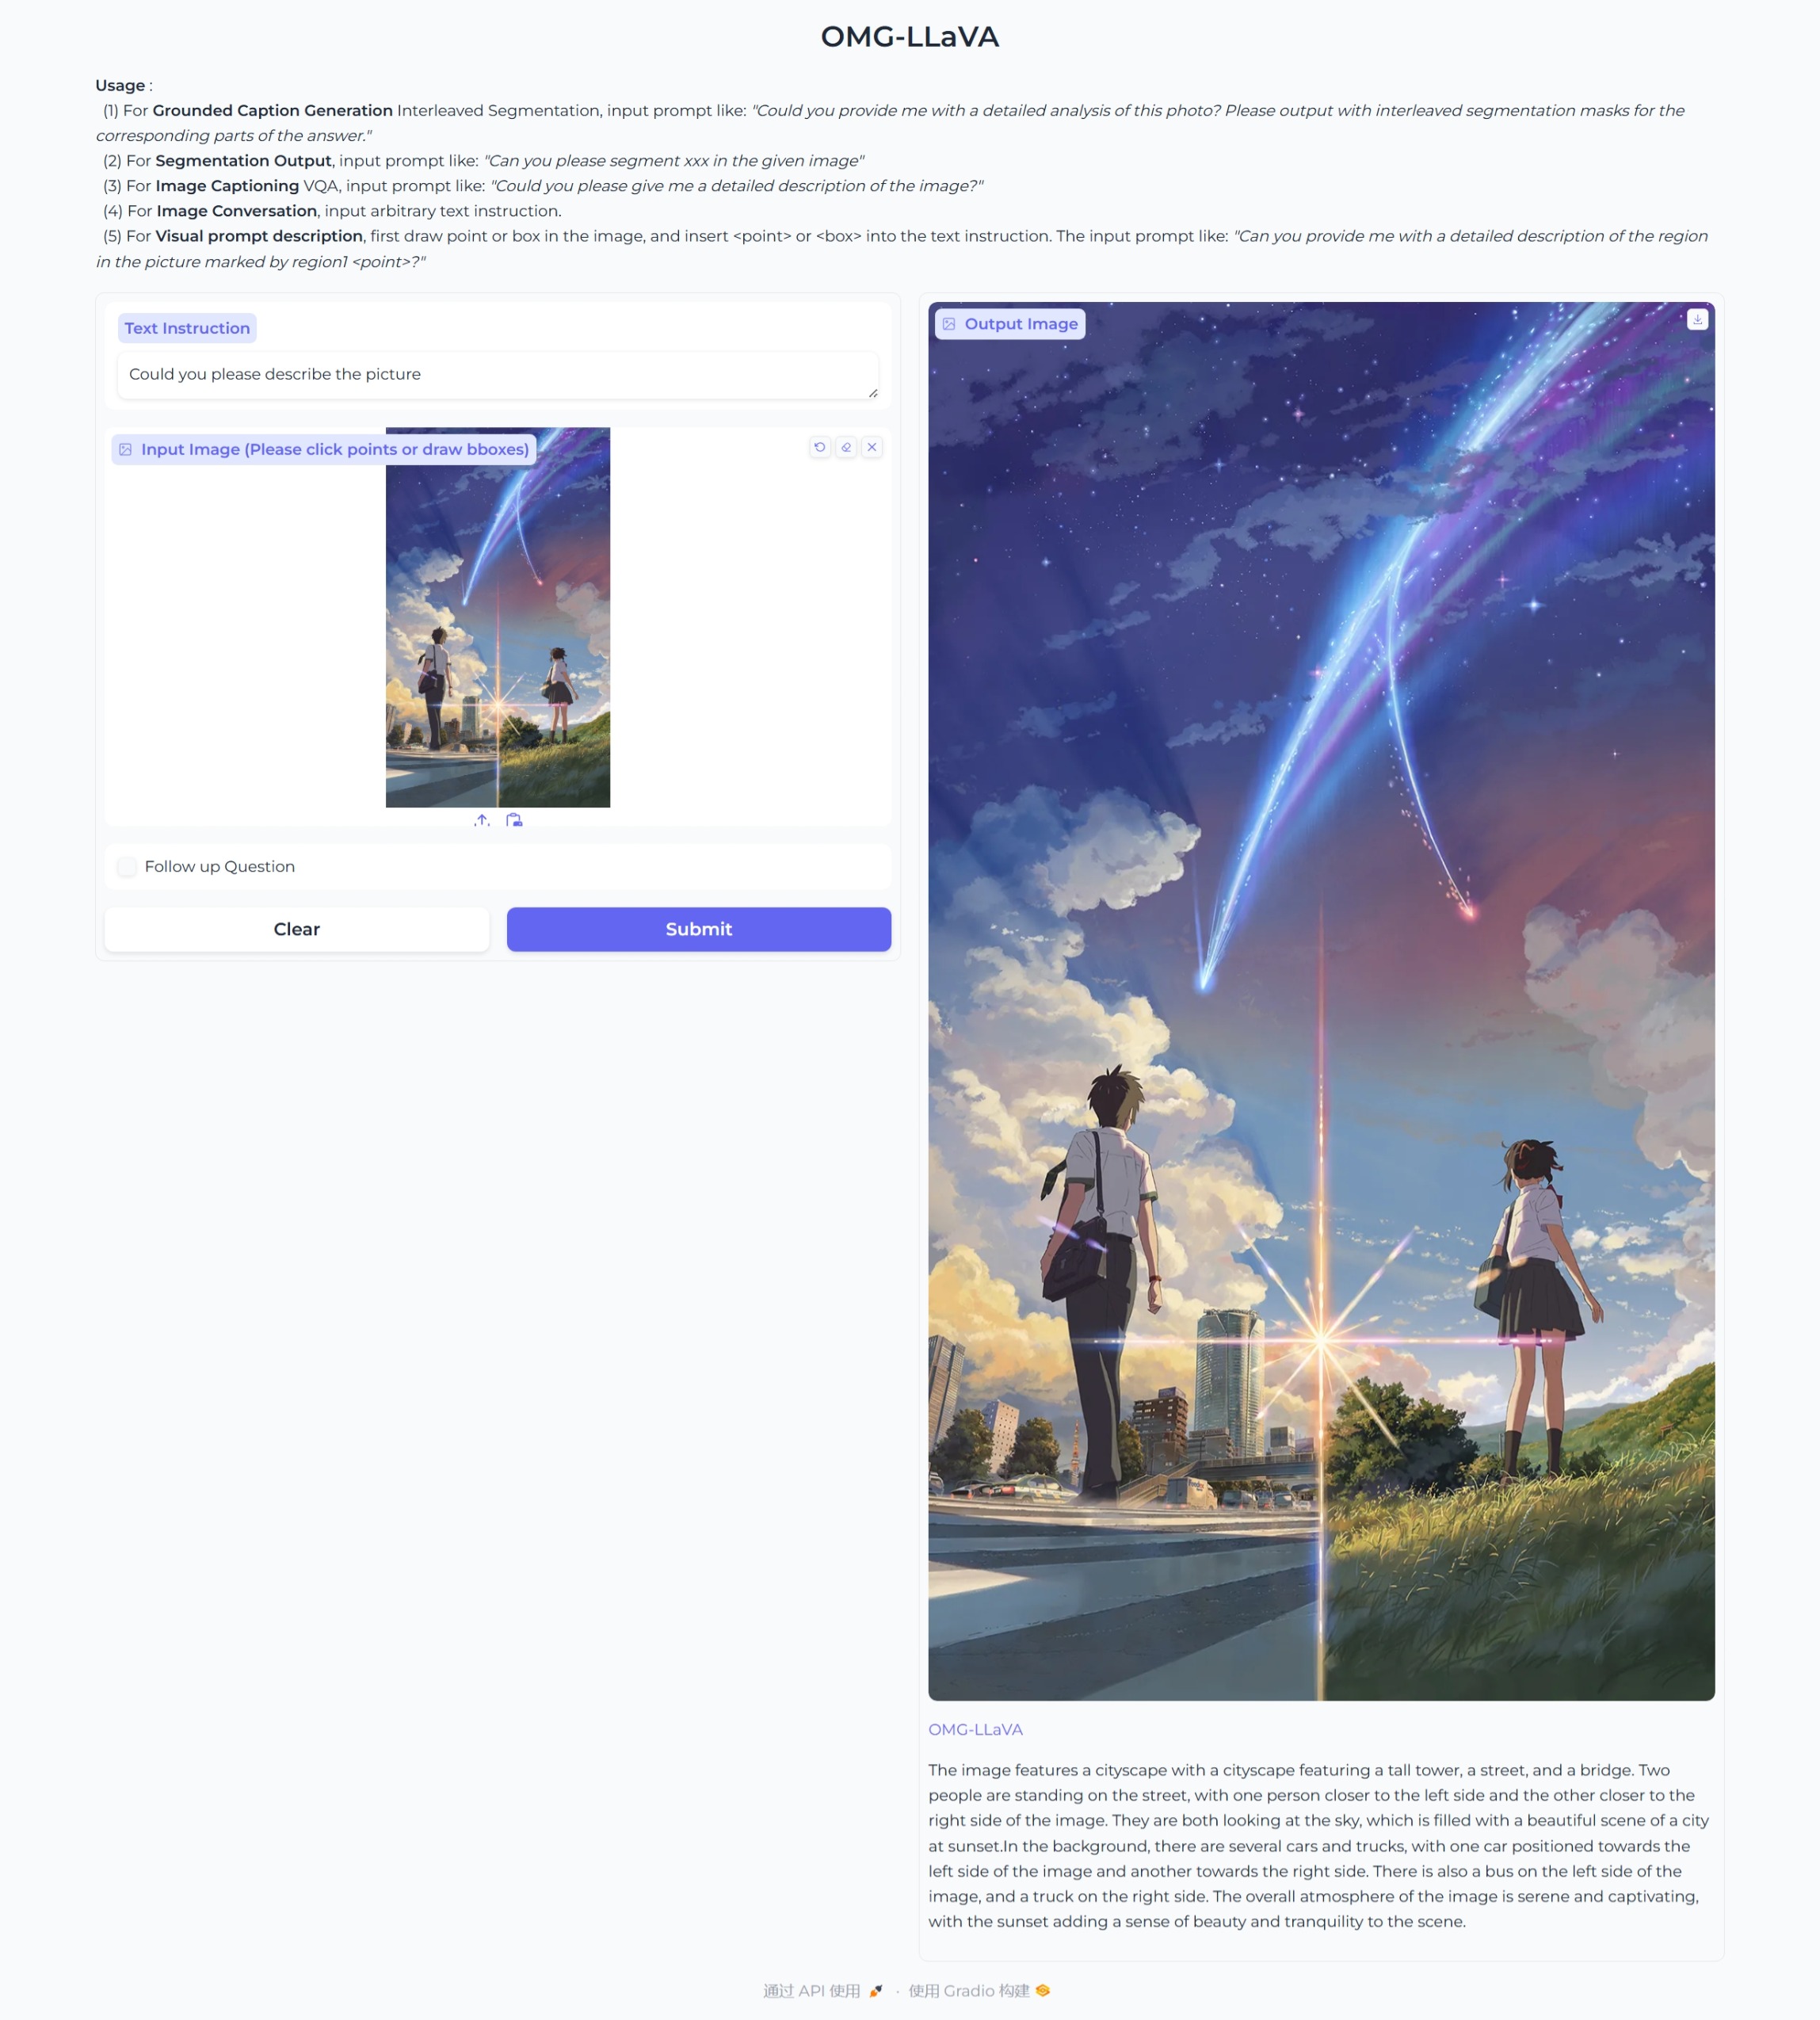
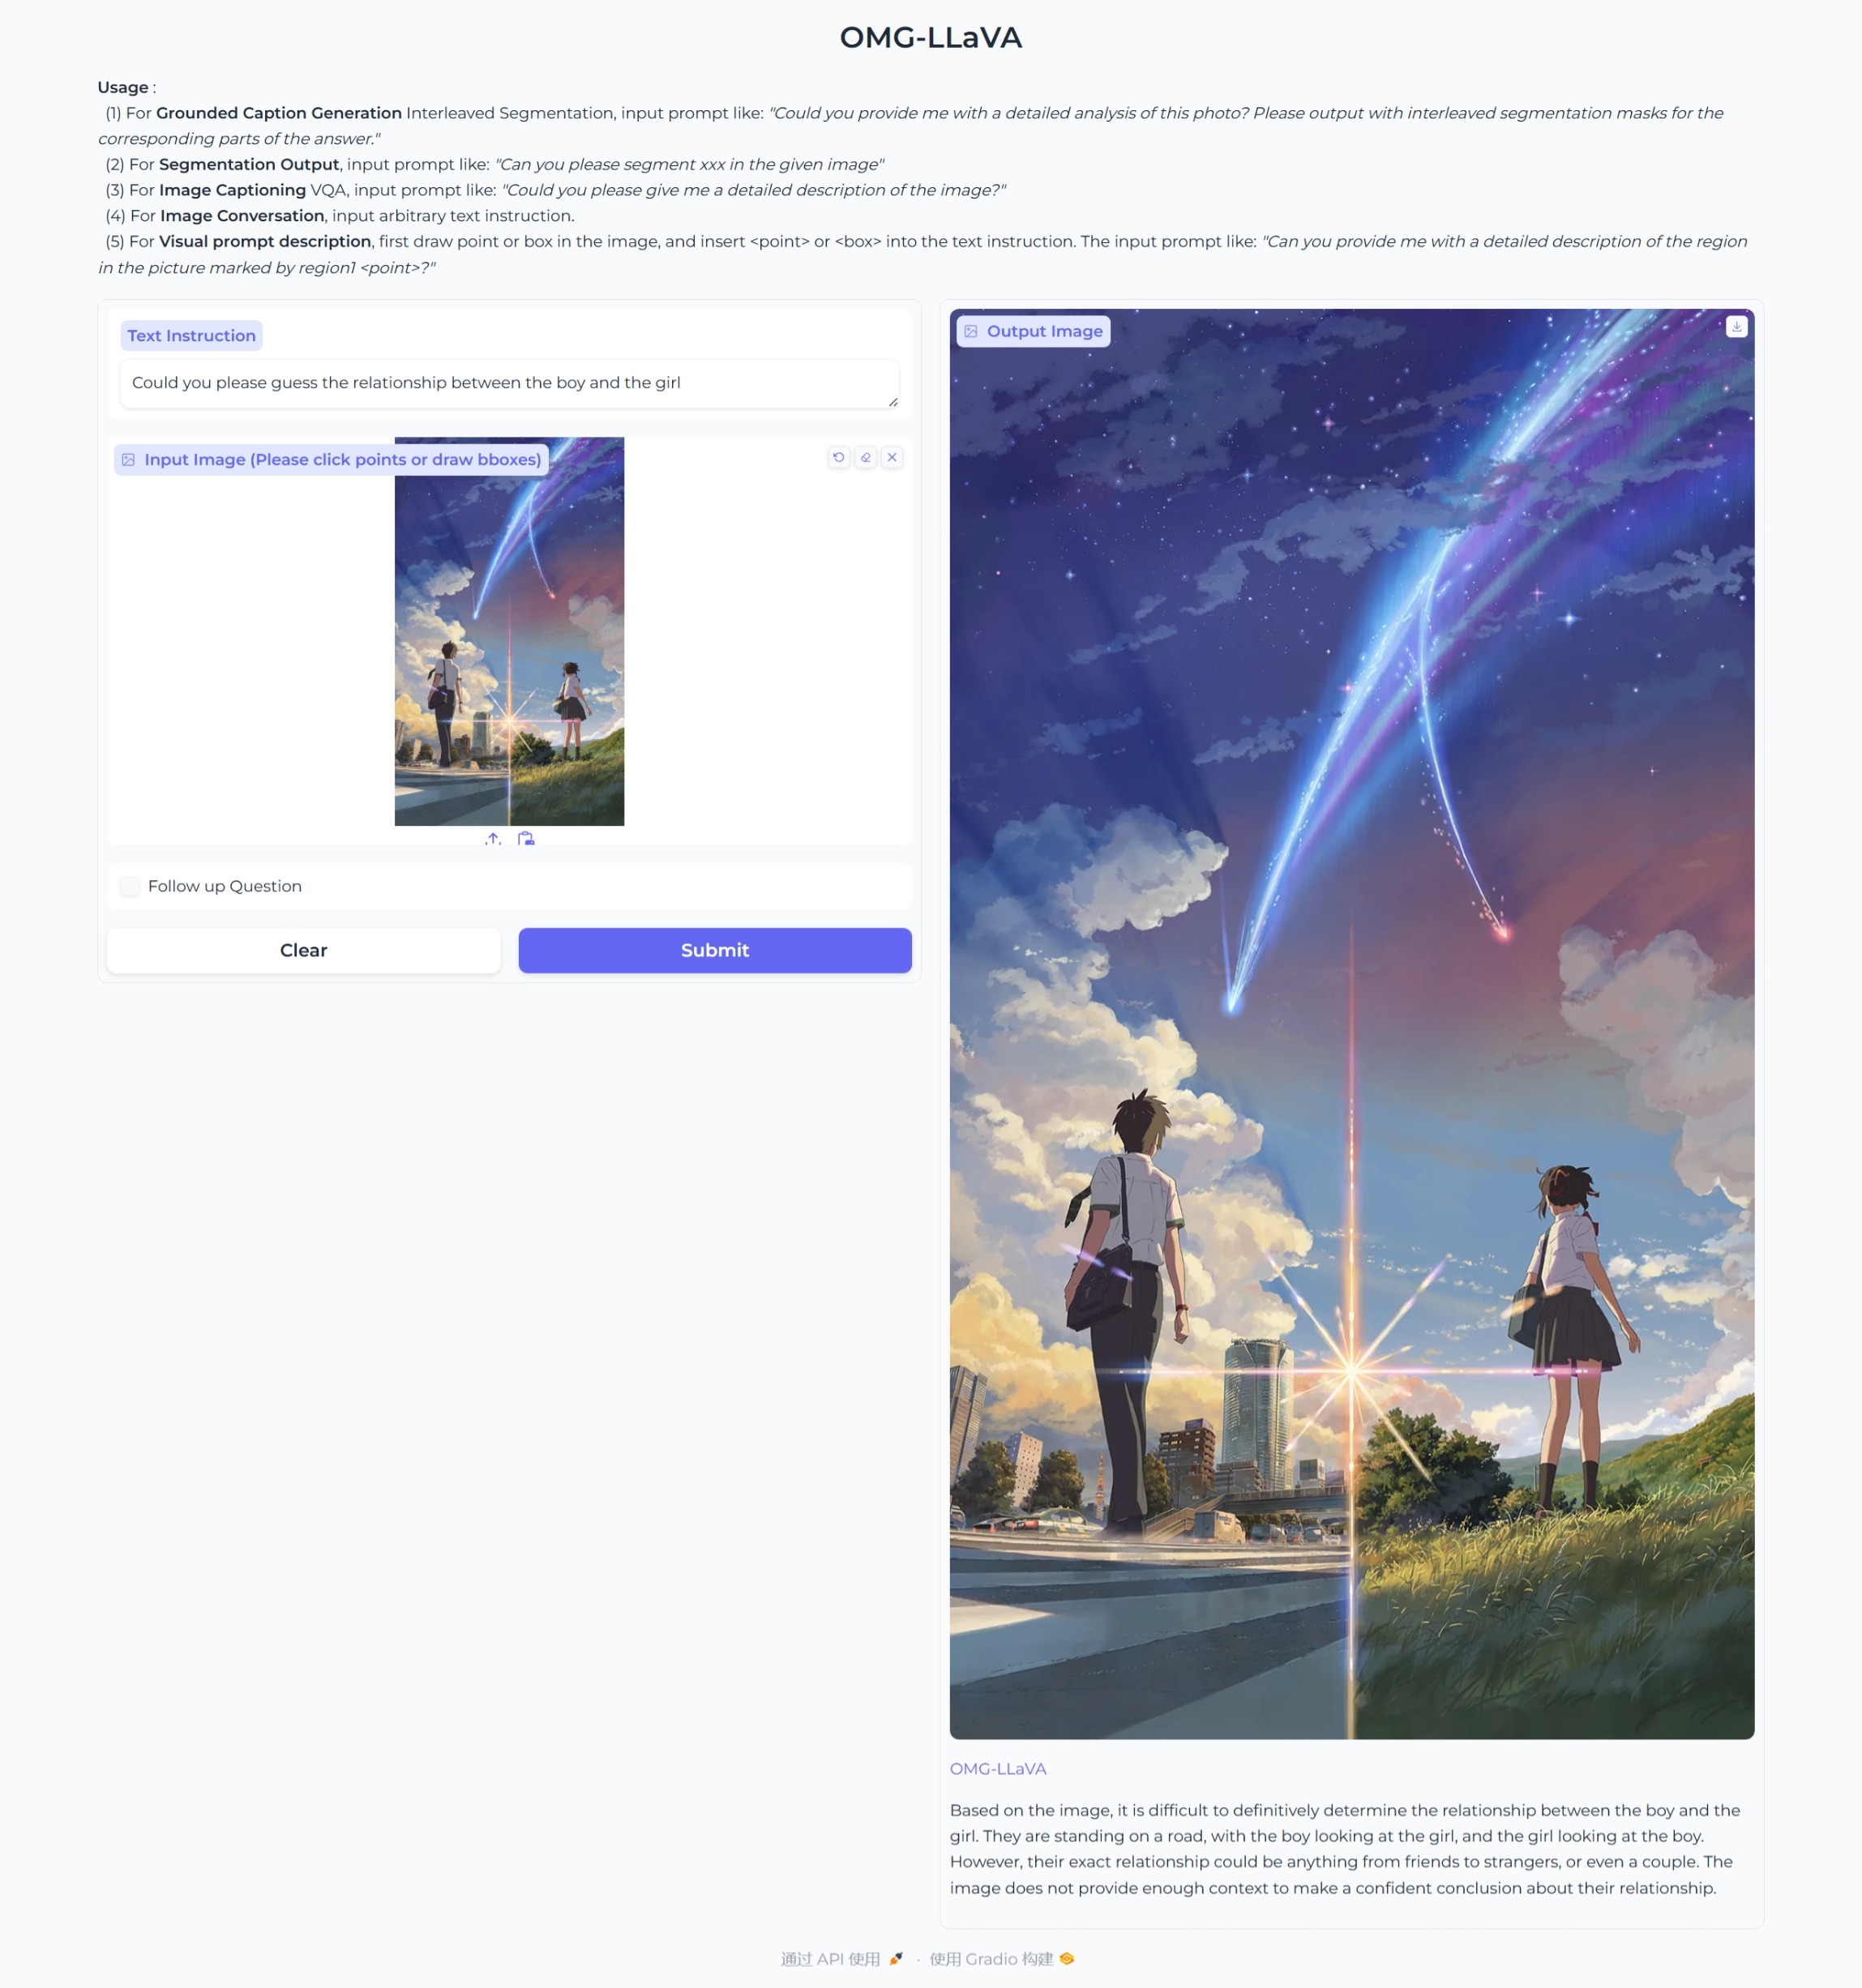
再用其他圖片測試一下
- GCG接地對話生成(混合任務 圖像級 + 像素級)
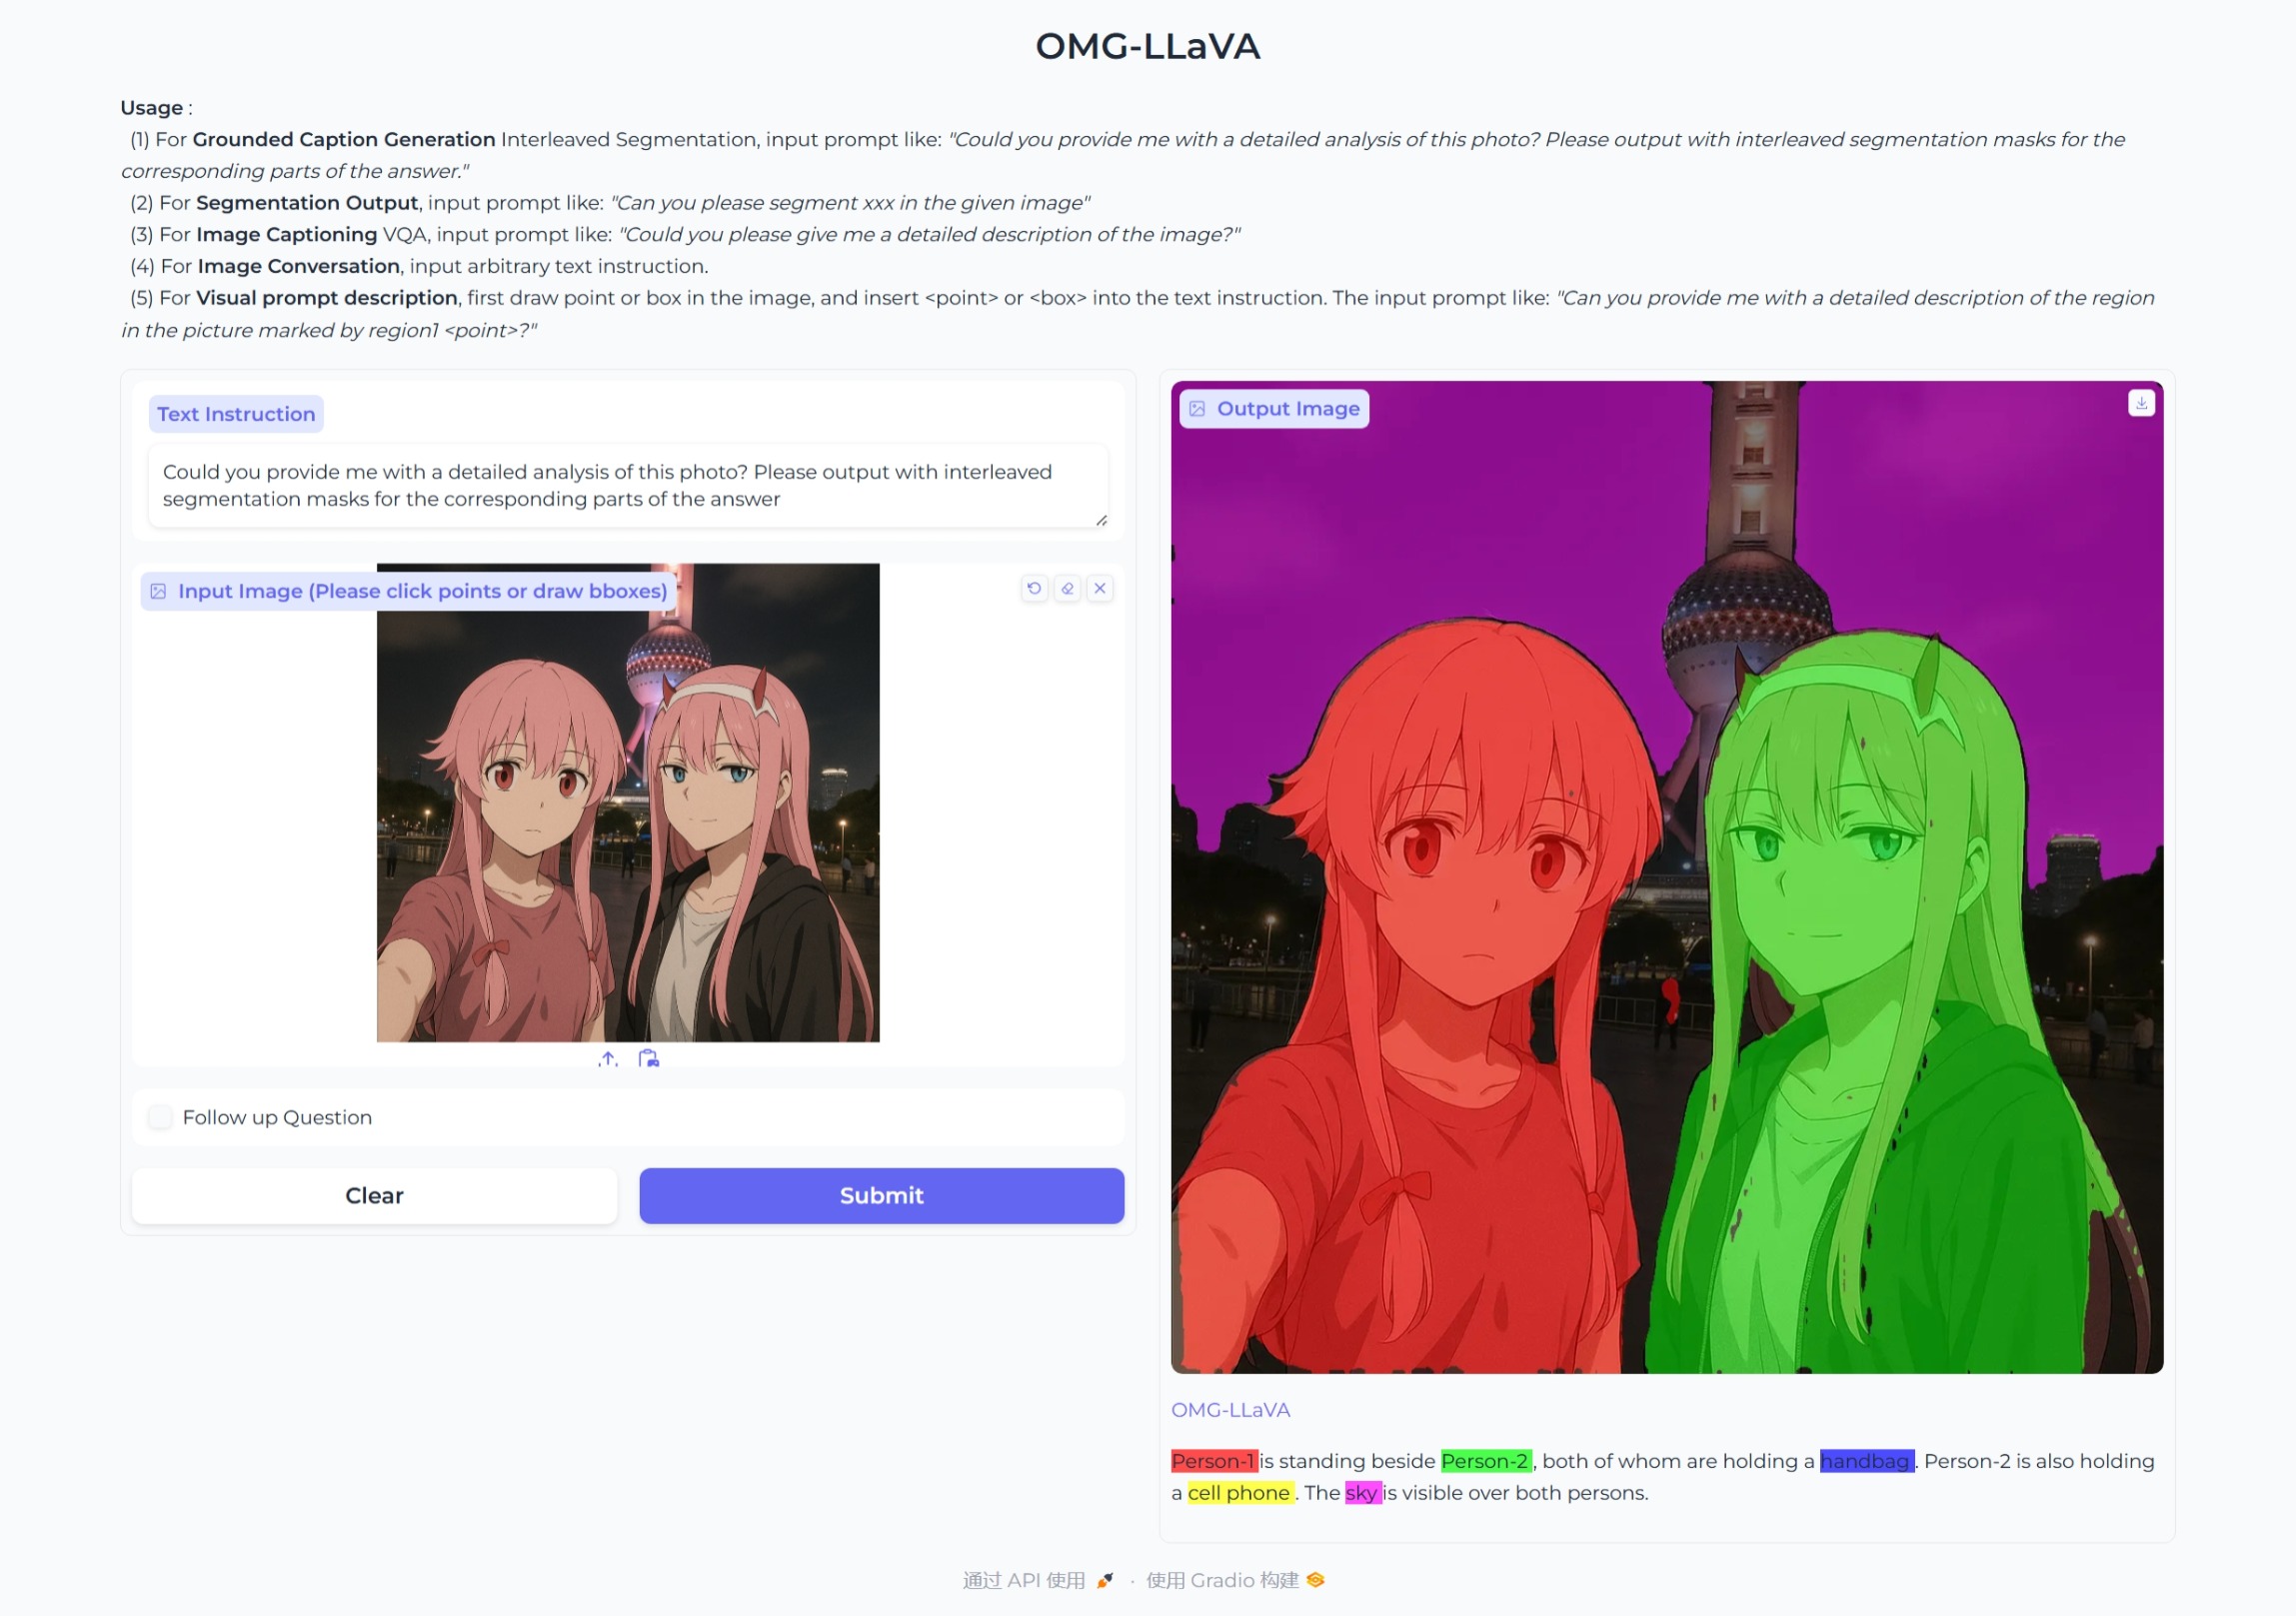

這里看出這個圖分割得不是特別好,推測原因是圖像的信息可能比較多
-
視覺提示描述(對象級)
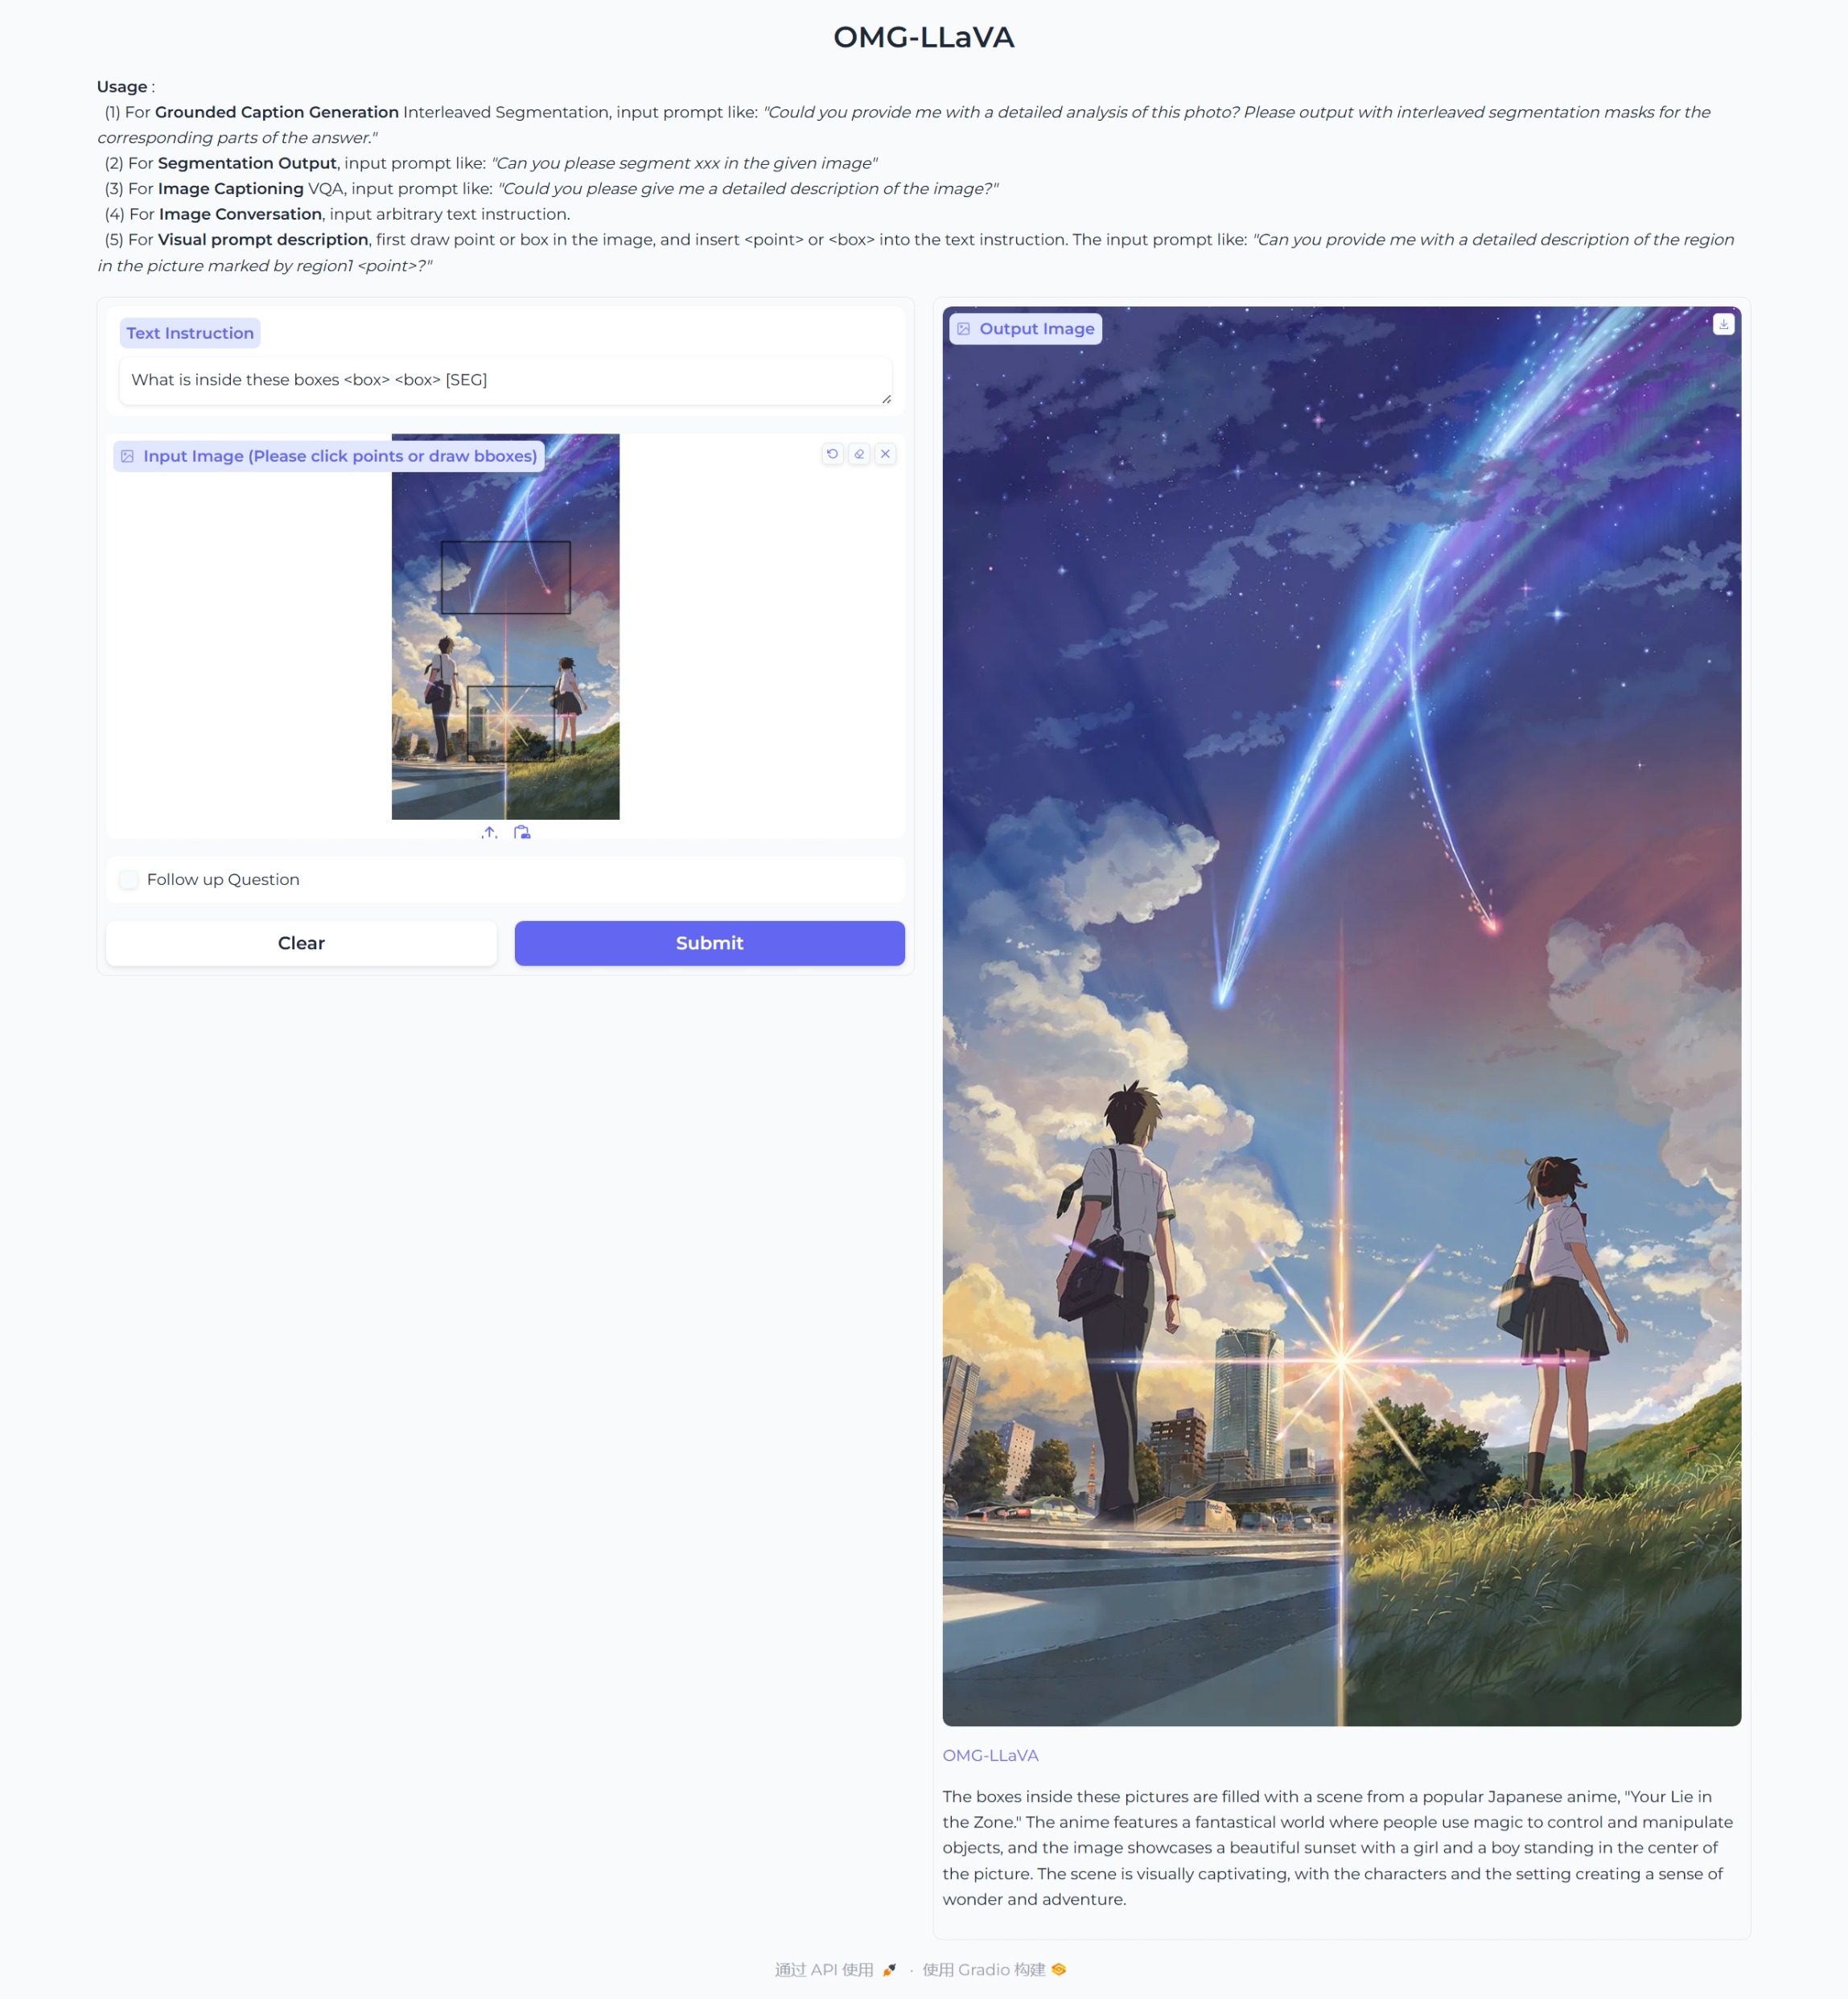
-
對話和推理(圖像級)

- RES指代性分割 --這里比較有迷惑性的信息效果就不是很好了
.jpeg)
這里把男生當成了女生
.jpeg)
這里就正常了
Chat
我們試Chat---和模型對話
python omg_llava/tools/chat_omg_llava.py \
  omg_llava/configs/finetune/omg_llava_7b_finetune_8gpus.py \
  ./pretrained/omg_llava/omg_llava_7b_finetune_8gpus.pth \
  --image ./test.jpg
對話結果
- 聊天
-
描述圖像

-
圖像分割
double enter to end input (EXIT: exit chat, RESET: reset history) >>> hello
prompt_text: <|im_start|>user
<image>
hello<|im_end|>
<|im_start|>assistant
torch.Size([1, 121, 4096])
Hello! How can I help you today? Is there something specific you would like to know or discuss? I'm here to provide information and answer any questions you may have.<|im_end|>
tensor([ 1, 9843, 346, 2745, 777, 489, 1638, 629, 3514, 345, 2313, 1194,
2650, 3317, 629, 1178, 1217, 442, 1560, 607, 4420, 345, 489, 2940,
1734, 442, 3572, 2145, 454, 4384, 1030, 4917, 629, 1377, 746, 281],
device='cuda:0')
double enter to end input (EXIT: exit chat, RESET: reset history) >>> please describe the picture
prompt_text: <|im_start|>user
please describe the picture<|im_end|>
<|im_start|>assistant
torch.Size([1, 171, 4096])
The image features a wooden bridge with a beautiful view of a lake. The bridge is located near the water, providing a serene and picturesque setting. The bridge is the main focus of the image, with the lake and surrounding landscape serving as the background.<|im_end|>
tensor([ 1, 918, 2321, 4581, 395, 22643, 14304, 579, 395, 6389,
1800, 446, 395, 22055, 281, 707, 14304, 505, 7553, 3308,
410, 3181, 328, 8373, 395, 1566, 2104, 454, 9315, 722,
6399, 281, 707, 14304, 505, 410, 2036, 5404, 446, 410,
2321, 328, 579, 410, 22055, 454, 14723, 18566, 13622, 569,
410, 4160, 281], device='cuda:0')
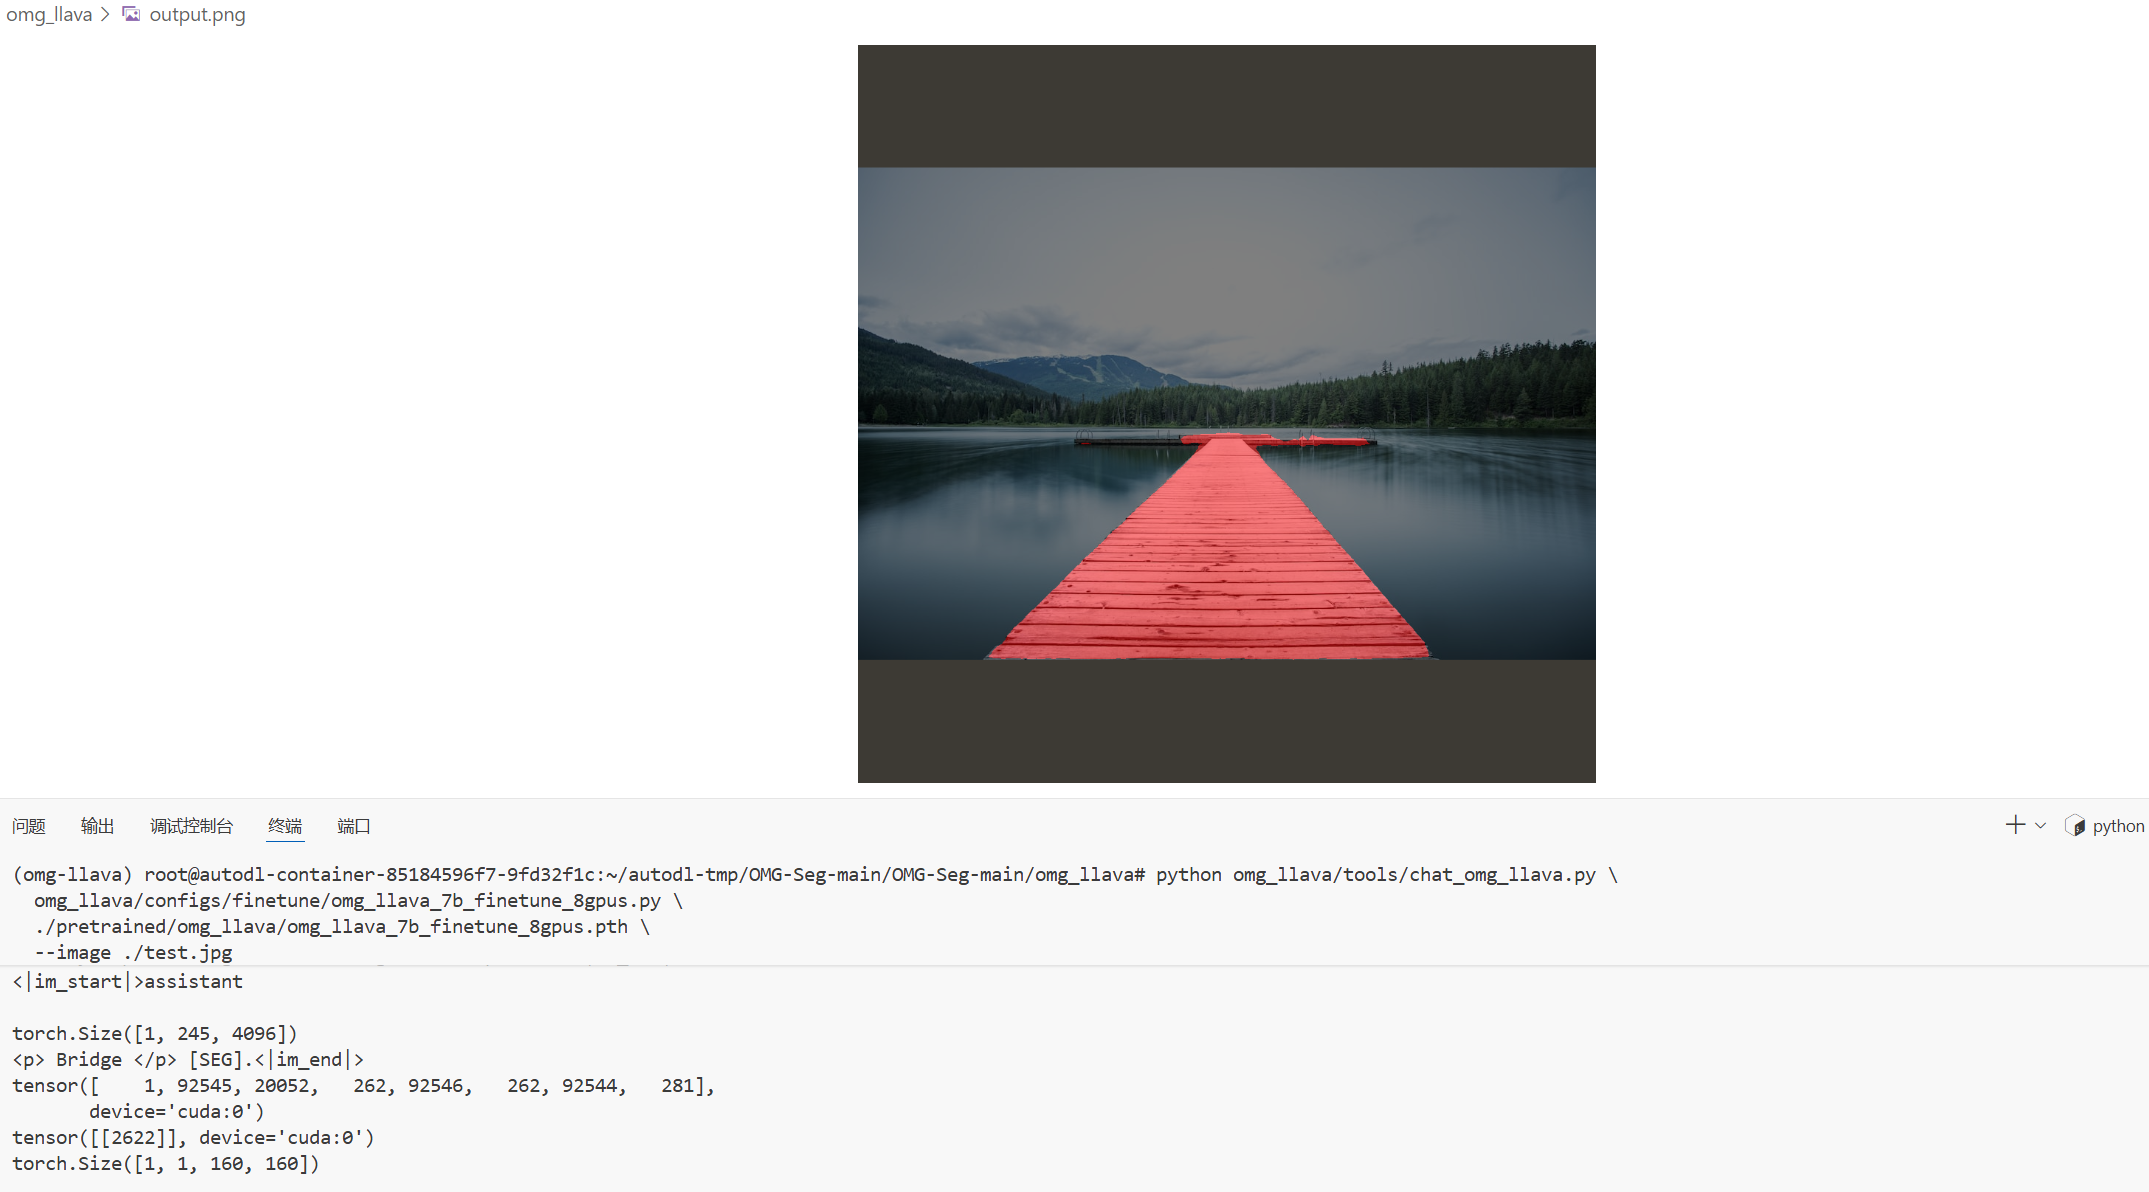
double enter to end input (EXIT: exit chat, RESET: reset history) >>> Could you please segment the bridge in the picture?
prompt_text: <|im_start|>user
Could you please segment the bridge in the picture?<|im_end|>
<|im_start|>assistant
torch.Size([1, 245, 4096])
<p> Bridge </p> [SEG].<|im_end|>
tensor([ 1, 92545, 20052, 262, 92546, 262, 92544, 281],
device='cuda:0')
tensor([[2622]], device='cuda:0')
torch.Size([1, 1, 160, 160])
讓我們結合論文分析一下這個對話
第一輪對話
-
輸入:
hello -
模型處理
prompt_text: <|im_start|>user\n<image>\nhello<|im_end|>\n<|im_start|>assistant
這是發給LLM的完整提示,它遵循了internlm2-chat的格式
其中<image>這個token。在這一步,我們上傳的圖片已經被視覺編碼器處理成了 visual tokens , 并在代碼層面替換了<image>token, 與文字"hello"一起被送進了LLMtorch.Size([1, 121, 4096])這個是輸入給LLM的embeddings(嵌入向量)的維度,1是批處理的大小, 4096是LLM的隱藏層維度,121是輸入序列的總長度(包含了文字的token和圖像的視覺token)
第二輪對話
-
輸入 :
please describe the picture -
模型處理 :
torch.Size([1, 171, 4096]), 序列長度從 121 增加到了 171。這是因為這次的輸入不僅包含了新的問題"please describe the picture",還包含了上一輪的對話歷史,以維持上下文。
第三輪對話
模型輸出
<p>Bridge</p>表示模型識別出了要分割的核心物體“橋”
[SEG] : 重要的token, 當檢測到LLM輸出這個token,它就知道這不是一次普通的對話,而是需要執行一次分割操作
token([.....]) : 模型輸出的token ID序列
tensor([[2622]], device='cuda:0'): 與[SEG]對應的特征向量,準備送給視覺解碼器
torch.Size([1, 1, 160, 160]) : 最終的產物, 一個160 x 160的分割掩碼,視覺解碼器接收到上一步的指令向量后,成功地分割出了橋

 浙公網安備 33010602011771號