
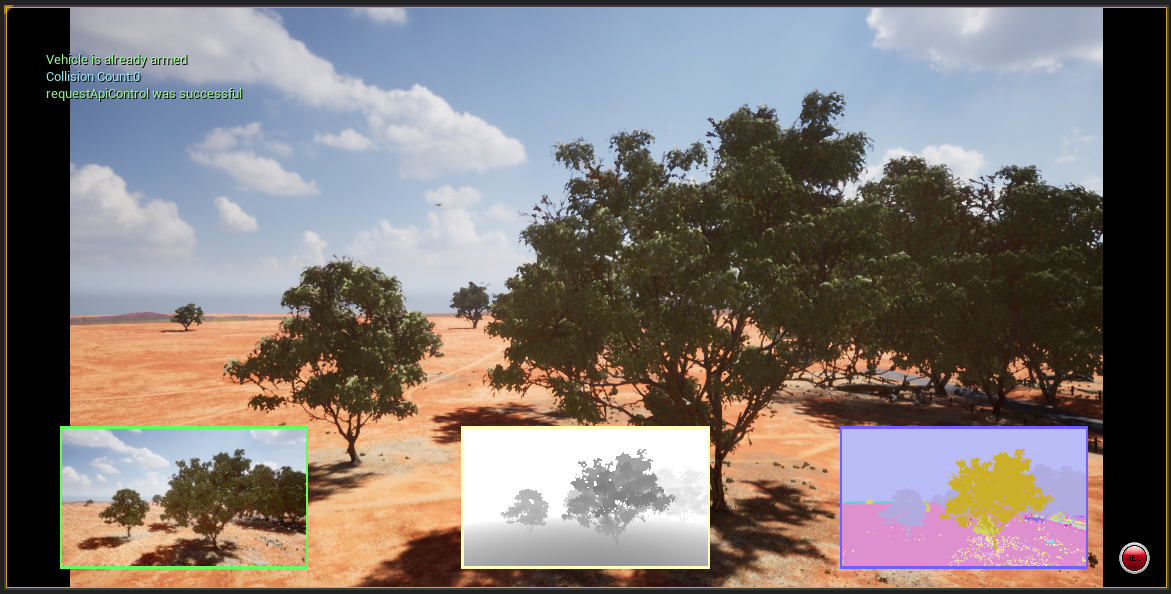
AirSim在UE4中運行時顯示第一人稱捕獲圖像窗口
參考鏈接: 【AirSim】
具體效果可以關注博主的小紅書: 42891122102,上面有效果視頻
第一種方法
通過settings.json配置“subwindows”字段去顯示

settings.json
{
    "SettingsVersion": 1.2,
    "SeeDocsAt": "https://github.com/Microsoft/AirSim/blob/master/docs/settings.md",
    "SimMode": "Multirotor",
    "ViewMode": "FlyWithMe",
    "SubWindows": [
        {
            "WindowID": 0,
            "CameraName": "front_center_custom",
            "ImageType": 0,
            "Visible": true,
            "ImageSize": [480, 270],
            "CameraPosition": [0.0, 0.0, -2.5],
            "CameraRotation": [0.0, 0.0, 0.0]
        },
        {
            "WindowID": 1,
            "CameraName": "front_center_custom",
            "ImageType": 3,
            "Visible": true,
            "ImageSize": [480, 270],
            "CameraPosition": [0.0, 0.0, -2.5],
            "CameraRotation": [0.0, 0.0, 0.0]
        },
        {
            "WindowID": 2,
                "CameraName": "front_center_custom",
                "ImageType": 5,
                "Visible": true,
                "ImageSize": [480, 270],
                "CameraPosition": [0.0, 0.0, -2.5],
                "CameraRotation": [0.0, 0.0, 0.0]
        }
    ],
    "Vehicles": {
        "Drone": {
            "VehicleType": "SimpleFlight",
            "DisplayName": "My First Drone",
            "AutoCreate": true
        }
    }
}
第二種方法
利用pygame繪制窗口并獲取無人機FPV實時圖像呈現
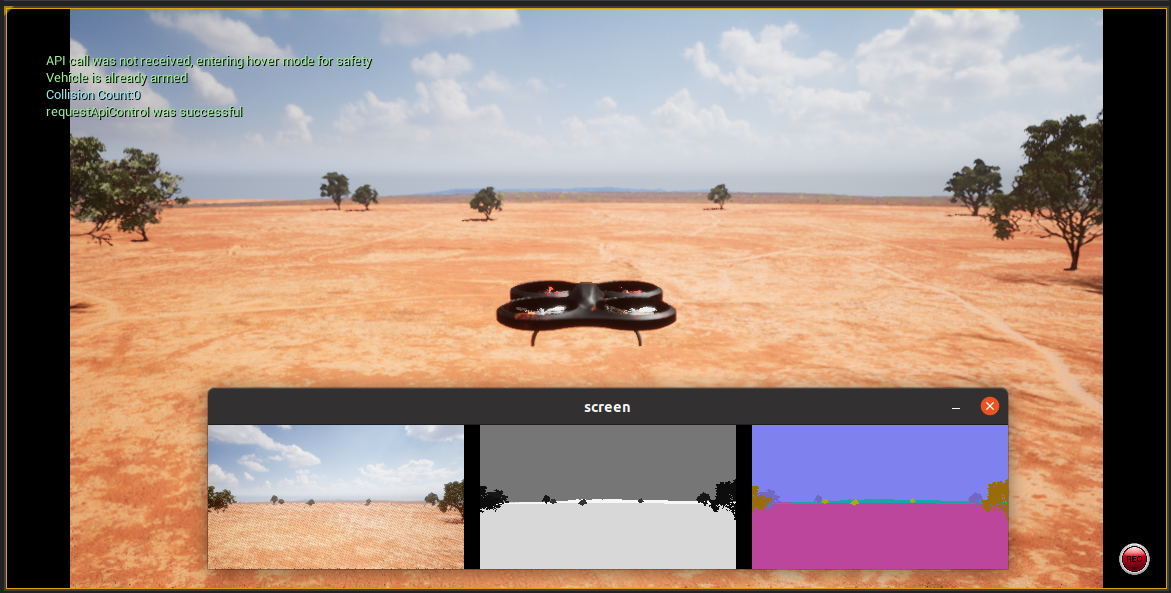
鍵盤控制及攝像機實時顯示.py
import sys
import time
import airsim
import pygame
import cv2
import numpy as np

# >------>>>  pygame settings   <<<------< #
pygame.init()

screen = pygame.display.set_mode((800, 144))
pygame.display.set_caption("screen")
screen.fill((0, 0, 0))

# >------>>>  AirSim settings   <<<------< #
# 這里改為你要控制的無人機名稱(settings文件里面設置的)
vehicle_name = "Drone"
AirSim_client = airsim.MultirotorClient()
AirSim_client.confirmConnection()
AirSim_client.enableApiControl(True, vehicle_name=vehicle_name)
AirSim_client.armDisarm(True, vehicle_name=vehicle_name)
AirSim_client.takeoffAsync(vehicle_name=vehicle_name).join()
image_types = {
    "scene": airsim.ImageType.Scene,
    "depth": airsim.ImageType.DepthVis,
    "seg": airsim.ImageType.Segmentation,
    "normals": airsim.ImageType.SurfaceNormals,
    "segmentation": airsim.ImageType.Segmentation,
    "disparity": airsim.ImageType.DisparityNormalized,
    "Infrared": airsim.ImageType.Infrared
}

# 基礎的控制速度(m/s)
vehicle_velocity = 2.0
# 設置臨時加速比例
speedup_ratio = 10.0
# 用來設置臨時加速
speedup_flag = False

# 基礎的偏航速率
vehicle_yaw_rate = 5.0

while True:
    yaw_rate = 0.0
    velocity_x = 0.0
    velocity_y = 0.0
    velocity_z = 0.0

    time.sleep(0.02)

    for event in pygame.event.get():
        if event.type == pygame.QUIT:
            sys.exit()

    scan_wrapper = pygame.key.get_pressed()

    # 按下空格鍵加速10倍
    if scan_wrapper[pygame.K_SPACE]:
        scale_ratio = speedup_ratio
    else:
        scale_ratio = speedup_ratio / speedup_ratio

    # 根據 "A" 和 "D" 按鍵來設置偏航速率變量
    if scan_wrapper[pygame.K_a] or scan_wrapper[pygame.K_d]:
        yaw_rate = (scan_wrapper[pygame.K_d] - scan_wrapper[pygame.K_a]) * scale_ratio * vehicle_yaw_rate

    # 根據 "UP" 和 "DOWN" 按鍵來設置pitch軸速度變量(NED坐標系,x為機頭向前)
    if scan_wrapper[pygame.K_UP] or scan_wrapper[pygame.K_DOWN]:
        velocity_x = (scan_wrapper[pygame.K_UP] - scan_wrapper[pygame.K_DOWN]) * scale_ratio

    # 根據 "LEFT" 和 "RIGHT" 按鍵來設置roll軸速度變量(NED坐標系,y為正右方)
    if scan_wrapper[pygame.K_LEFT] or scan_wrapper[pygame.K_RIGHT]:
        velocity_y = -(scan_wrapper[pygame.K_LEFT] - scan_wrapper[pygame.K_RIGHT]) * scale_ratio

    # 根據 "W" 和 "S" 按鍵來設置z軸速度變量(NED坐標系,z軸向上為負)
    if scan_wrapper[pygame.K_w] or scan_wrapper[pygame.K_s]:
        velocity_z = -(scan_wrapper[pygame.K_w] - scan_wrapper[pygame.K_s]) * scale_ratio

    # print(f": Expectation gesture: {velocity_x}, {velocity_y}, {velocity_z}, {yaw_rate}")

    # 設置速度控制以及設置偏航控制
    AirSim_client.moveByVelocityBodyFrameAsync(vx=velocity_x, vy=velocity_y, vz=velocity_z, duration=1,
                                               yaw_mode=airsim.YawMode(True, yaw_or_rate=yaw_rate),
                                               vehicle_name=vehicle_name)

    temp_image1 = AirSim_client.simGetImage("0", image_types["scene"], vehicle_name=vehicle_name)
    image1 = cv2.imdecode(airsim.string_to_uint8_array(temp_image1), cv2.IMREAD_COLOR)
    cv2.imwrite("/home/yehuo/python_learning/AirSim_learning/screen4/visual1.png", image1)
    # 利用pygame庫加載保存的第一視角圖像,
    screen_image1 = pygame.image.load("/home/yehuo/python_learning/AirSim_learning/screen4/visual1.png")
    # 圖像坐標系,左上角為(0, 0),在此放置圖片
    screen.blit(screen_image1, (0, 0))
    pygame.display.flip()
    pygame.display.update()

    temp_image2 = AirSim_client.simGetImage("0", image_types["Infrared"], vehicle_name=vehicle_name)
    image2 = cv2.imdecode(airsim.string_to_uint8_array(temp_image2), cv2.IMREAD_COLOR)
    cv2.imwrite("/home/yehuo/python_learning/AirSim_learning/screen4/visual2.png", image2)
    # 利用pygame庫加載保存的第一視角圖像,
    screen_image2 = pygame.image.load("/home/yehuo/python_learning/AirSim_learning/screen4/visual2.png")
    # 圖像坐標系,左上角為(0, 0),在此放置圖片
    screen.blit(screen_image2, (272, 0))
    pygame.display.flip()
    pygame.display.update()

    temp_image3 = AirSim_client.simGetImage("0", image_types["segmentation"], vehicle_name=vehicle_name)
    image3 = cv2.imdecode(airsim.string_to_uint8_array(temp_image3), cv2.IMREAD_COLOR)
    cv2.imwrite("/home/yehuo/python_learning/AirSim_learning/screen4/visual3.png", image3)
    # 利用pygame庫加載保存的第一視角圖像,
    screen_image3 = pygame.image.load("/home/yehuo/python_learning/AirSim_learning/screen4/visual3.png")
    # 圖像坐標系,左上角為(0, 0),在此放置圖片
    screen.blit(screen_image3, (544, 0))
    pygame.display.flip()
    pygame.display.update()

    if scan_wrapper[pygame.K_ESCAPE]:
        pygame.quit()
        sys.exit()

 浙公網安備 33010602011771號