十八、k8s細粒度流量管理:服務網格
十八、k8s細粒度流量管理:服務網格
1、服務網格
1.1 服務網格初識
Service Mesh(服務網格)是由Buoyant公司的CEO William Morgan發起,目標為解決微服務之間復雜的鏈路關系。
Service Mesh將程序開發的網絡功能和程序本身解耦,網絡功能下沉到基礎架構,由服務網格實現服務之間的負載均衡等功能,并且除網絡功能外,也提供了其他更高級的功能,比如全鏈路加密、監控、鏈路追蹤等。
1.2 服務網格核心功能
- 負載均衡
- 服務發現
- 熔斷降級
- 動態路由
- 故障注入
- 錯誤重試
- 安全通信
- 語言無關
2、Istio初識
2.1 什么是Istio?
Istio是一個開源的服務網格(Service Mesh)產品,專為微服務架構設計,用于透明地管理服務間通信、安全、監控和流量策略。Istio通過Sidecar攔截并控制服務間的所有流量,將復雜的微服務治理(如流量管理、安全策略)從業務代碼中剝離,并下沉到基礎設施層,使開發者更專注于業務邏輯,以提升開發效率。
2.2 Istio功能
Istio幾乎無需修改任何代碼就可以實現如下功能:
- 雙向TLS加密
- HTTP、gRPC、WebSocket和TCP流量的自動負載均衡
- 錯誤重試、故障轉移和故障注入等
- 訪問控制、限流、認證、鑒權等
- 可觀測性指標、鏈路追蹤、日志等
- 集群內入口和出口的流量管理
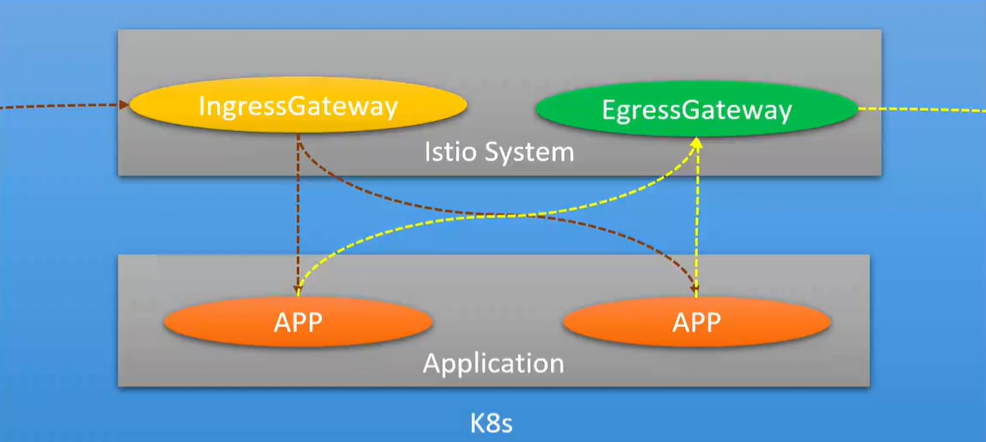
2.3 Istio架構平臺
Istio從邏輯上分數據平面和控制平面:
- 控制平面:Control Plane負責管理和配置數據平面的流量策略,由管理員創建的Istio資源會解析成相關的配置下發到數據平面
- 數據平面:Data Plane負責攔截并處理所有入站(Inbound)和出站(Outbound)流量,用來執行由控制平臺下發的策略,比如路由、負載均衡、重試、熔斷、TLS加密等,同時數據平臺還可以收集流量目標、日志和追蹤數據,并發送給監控系統。
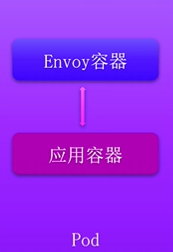
- Sidecar模式:此模式會為集群中啟動的每個pod都部署一個Envoy代理,或者為在虛擬機上運行的服務運行一個Envoy代理
- Ambient模式:此模式在每個節點上啟動一個四層代理,也可以為每個命名空間啟動一個Envoy代理實現七層功能(1.22版本之后新加入的)

2.4 Istio Sidecar和Ambient模式對比
| 對比項 | 對比維度 | Sidecar模式 | Ambient模式 |
| 核心架構 | |||
| 代理部署方式 | 每個Pod注入一個Envoy Sidecar容器 | 分層部署: L4:每個階段部署一個Ztunnel代理 L7:每個空間部署一個或多個Waypoint代理 |
|
| 流量管理 | 通過iptables/IPVS規則劫持Pod的進出流量 | 四層由Ztunnel處理,七層由Waypoint處理 | |
| 覆蓋范圍 | 所有注入Sidecar的Pod | 默認納入所有Pod,無需添加任何注解 | |
| 故障可用性 | 只影響某個故障的Pod | 影響當前節點或當前空間下的所有服務 | |
| 資源開銷 | |||
| 代理數量 | 每一個Pod一個Envoy | Ztunnel:每一個節點一個代理 Waypoint:通常每個命名空間一個或多個 |
|
| 內存/CPU消耗 | 較高 | 較低 | |
| 啟動延遲 | Pod啟動需等待Sidecar就緒 | Pod啟動無需等待代理,延遲更低 | |
| 性能對比 | 調用延遲 | 每個請求經過兩次Ztunnel代理 | L4經過Ztunnel,L7經過由Waypoint,可能更多 |
2.5 Istio控制平面組件介紹
Istiod為Istio的控制平面,提供服務發現、配置、證書管理、加密通信和認證。早期的Istio控制平臺并沒有Istiod這個容器,而是由Mixer(新版本已廢棄)、Pilot、Citadel共同組成,后來為了簡化Istio的架構,將其合并為Istiod,所有對新版本的Istio(V1.5+),部署后僅能看見Istiod一類Pod。
- Pilot:主要用于監聽APIServer,動態獲取集群中Service和Endpoints信息,并將配置的路由規則、負載均衡策略轉換為Envoy可理解的配置,并下發至各個Sidecar中
- Citadel:主要用于提供強大的服務與服務之間的最終用戶身份驗證,可用于升級服務網格中未加密的流量,實現雙向TLS加密
- Galley:負責配置管理的組件,用于驗證配置信息的格式和正確性。galley使用網格配置協議(Mesh Configuration Protocol)和其它組件進行配置的交互
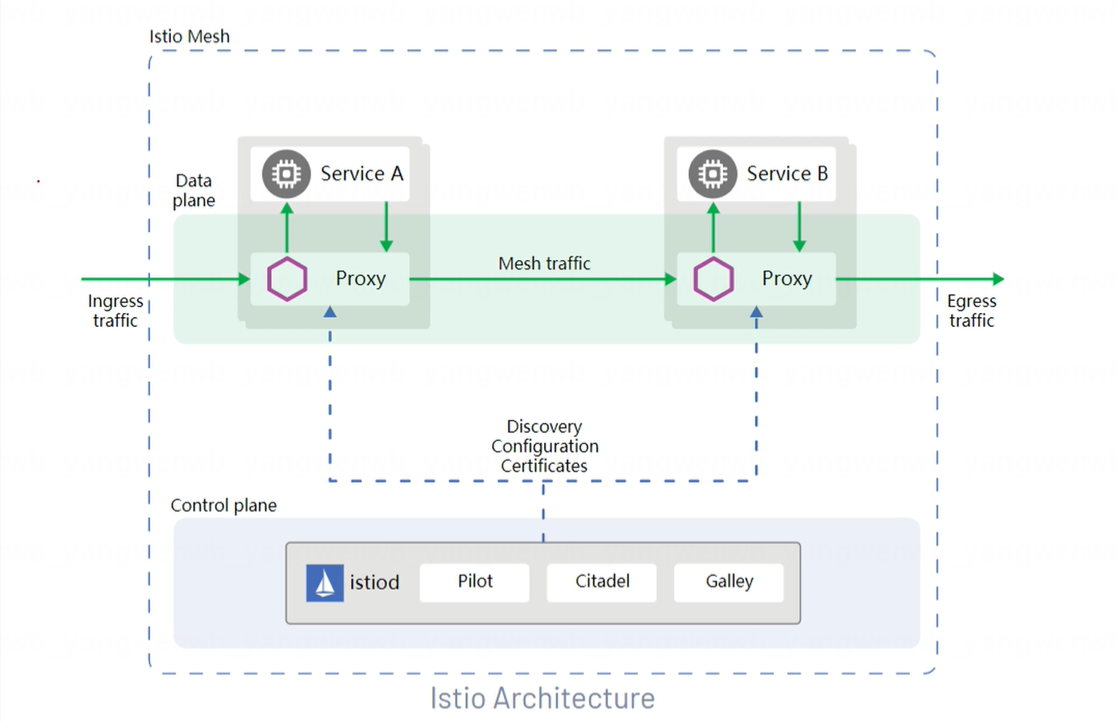
2.6 Istio數據平面組件介紹
Istio的數據平面使用的是Envoy,Envoy是用C++開發的高性能代理,用于調解服務網格中所有服務的所有入站和出站流量。Envoy代理是唯一一個與數據平面流量交互的Istio組件,并以Sidecar的方式注入到網格中的每一個Pod中。
主要提供如下功能:
- 動態服務發現
- 負載均衡
- HTTP/2 & gRPC代理
- 熔斷器
- 健康檢查
- 基于百分比流量拆分的灰度發布
- 故障注入
- 豐富的度量指標
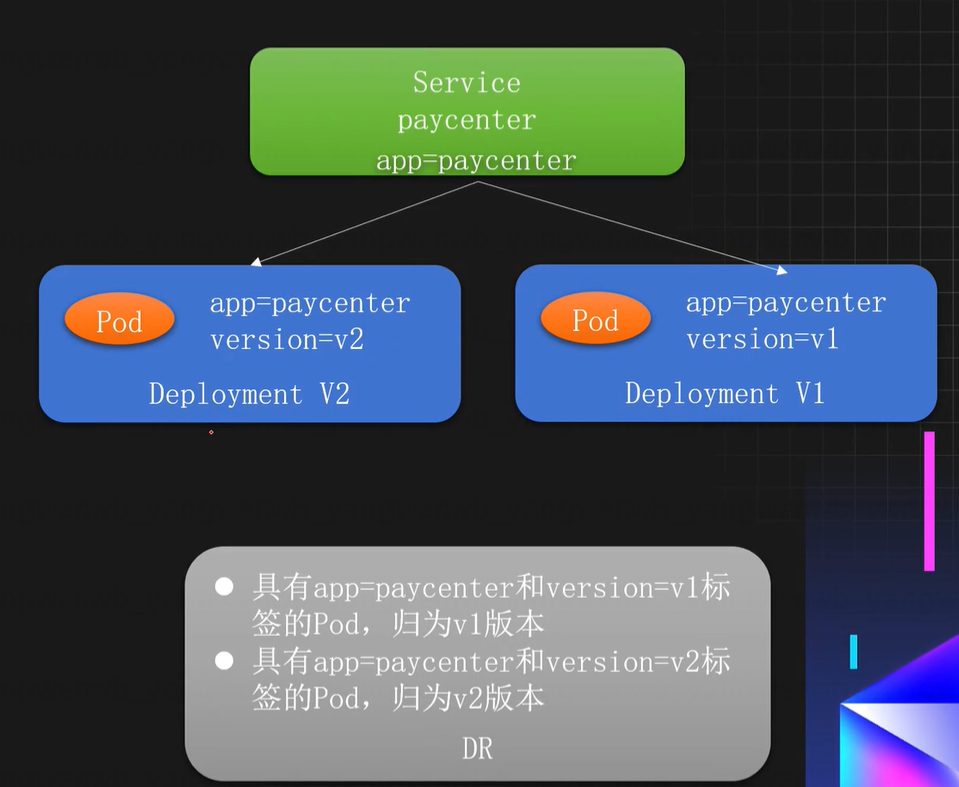
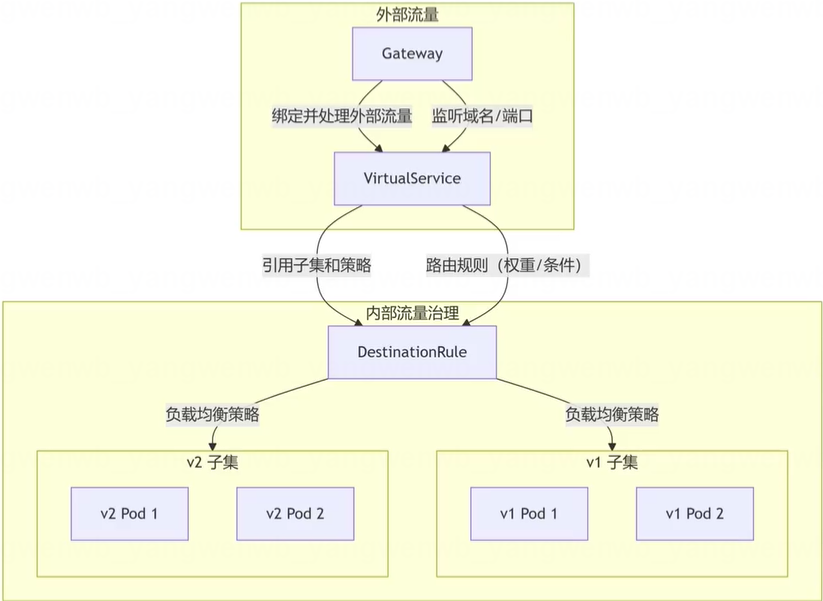
2.7 Istio核心資源DestinationRule介紹
DestinationRule:目標規劃,主要用于將服務劃分為多個版本(子集),同時可以對不同的版本進行配置負載均衡和連接池等策略。
使用場景:
- 版本劃分:根據標簽劃分同一個服務的不同版本
- 負載均衡策略:支持配置各種負載均衡算法(如輪詢、隨機、最少連接)
- 熔斷器:支持配置最大連接數、熔斷等
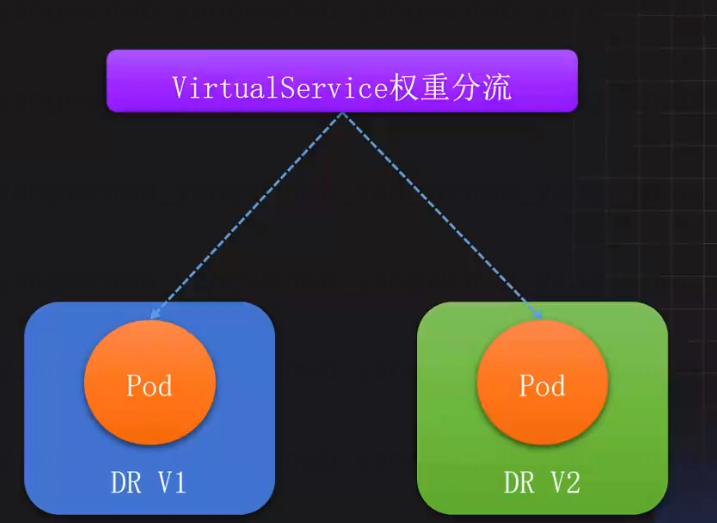
2.8 Istio核心資源VirtualService介紹
VirtualService:虛擬主機,是Istio路由規則的核心,用于控制流量走向,和Ingress類似,支持HTTP、gRPC、TCP等協議。通常和DestinationRule結合實現更細粒度的流量分配。
主要應用場景:
- 灰度發布:支持基于比例的流量分配
- A/B測試:支持基于請求頭、URI、權重等條件的流量分配
- 重試:支持錯誤重試、故障注入、鏈接超時等策略
2.9 Istio核心資源Gateway介紹
Gateway:網關,Istio集群的出入口網關,主要用于處理對外的流量。通常和VirtualService結合實現內外流量的統一治理。
主要應用場景:
- 端口監聽:可根據協議指定對外暴露的端口
- TLS:可以添加域名證書提供http訪問
- 域名:可以根據域名進行路由分發
- 出口管控:可以將出口的流量固定從EgressGateway的服務中代理出去
2.10 Istio核心資源關系總結
- DestinationRule:定義服務子集和流量策略,路由的最終目標。
- VirtualService:路由規則的核心,控制流量去向。
- Gateway:管理外部流量入口和出口,與VirtualService協同實現內外流量統一治理
3、Istio 安裝
版本選擇: https://istio.io/latest/docs/releases/supported-releases/#support-status-of-istioreleases
3.1 使用 istioctl 部署 Istio
首先下載 Istio 的安裝包:
# 下載 Istio 的安裝包
[root@k8s-master01 ~]# wget https://github.com/istio/istio/releases/download/1.26.0/istio-1.26.0-linux-amd64.tar.gz

# 解壓后,將 Istio 的客戶端工具 istioctl,移動到/usr/local/bin 目錄下:
[root@k8s-master01 ~]# tar xf istio-1.26.0-linux-amd64.tar.gz
[root@k8s-master01 ~]# mv istio-1.26.0/bin/istioctl /usr/local/bin/

# 查看安裝版本,這個報錯是因為還沒有安裝istio-system
[root@k8s-master01 ~]# istioctl version
Istio is not present in the cluster: no running Istio pods in namespace "istio-system"
client version: 1.26.0
之后通過定義 IstioOperator 資源,在 Kubernetes 中安裝 Istio:
[root@k8s-master01 ~]# cd istio-1.26.0
[root@k8s-master01 istio-1.26.0]# vim istio-operator.yaml
[root@k8s-master01 istio-1.26.0]# cat istio-operator.yaml
apiVersion: install.istio.io/v1alpha1
kind: IstioOperator
metadata:
  name: example-istio
  namespace: istio-system
spec:
  components:
    base:
      enabled: true
    cni:
      enabled: false
    egressGateways:
    - enabled: false
      name: istio-egressgateway
    pilot:
      k8s:
        hpaSpec:
          minReplicas: 2        # 默認為 1
          maxReplicas: 5        # 默認為 5
        resources:              # 注意資源配置,練習環境可以把 requests 調小
          limits:
            cpu: "2"
            memory: 2Gi
          requests:
            cpu: "100m"         # 生產環境調整為 2Gi
            memory: 512Mi       # 生產環境調整為 2Gi
    ingressGateways:
    - enabled: true
      name: istio-ingressgateway
      k8s:
        hpaSpec:
          minReplicas: 2        # 默認為 1
          maxReplicas: 5        # 默認為 5
        resources:              # 注意資源配置,練習環境可以把 requests 調小
          limits:
            cpu: "2"
            memory: 2Gi
          requests:
            cpu: "100m"         # 生產環境調整為 2Gi
            memory: 512Mi       # 生產環境調整為 2Gi
        service:
          type: NodePort        # 將 Service 類型改成 NodePort
          ports:
          - port: 15020
            nodePort: 30520
            name: status-port
          - port: 80            # 流量入口 80 端口映射到 NodePort 的 30080,之后通過節點IP+30080 即可訪問 Istio 服務
            nodePort: 30080
            name: http2
            targetPort: 8080
          - port: 443
            nodePort: 30443
            name: https
            targetPort: 8443
  hub: m.daocloud.io/docker.io/istio
  meshConfig:
    accessLogEncoding: JSON
    accessLogFile: /dev/stdout
  profile: default
更多 Istio 安裝配置:https://istio.io/latest/docs/setup/additional-setup/customize-installation/
安裝 Istio:
[root@k8s-master01 istio-1.26.0]# istioctl install -f istio-operator.yaml
        |\
        | \
        |  \
        |   \
      /||    \
     / ||     \
    /  ||      \
   /   ||       \
  /    ||        \
 /     ||         \
/______||__________\
____________________
  \__       _____/
     \_____/

This will install the Istio 1.26.0 profile "default" into the cluster. Proceed? (y/N) y
? Istio core installed ??
? Istiod installed ??
? Ingress gateways installed ??
? Installation complete
查看創建的 Service 和 Pod:
[root@k8s-master01 istio-1.26.0]# kubectl get pod,svc -n istio-system
NAME                                       READY   STATUS    RESTARTS   AGE
pod/istio-ingressgateway-d97b99d5d-czzp7   1/1     Running   0          103s
pod/istio-ingressgateway-d97b99d5d-wtbjl   1/1     Running   0          88s
pod/istiod-554d99f48b-7xfhs                1/1     Running   0          111s
pod/istiod-554d99f48b-wz7kn                1/1     Running   0          97s

NAME                           TYPE        CLUSTER-IP      EXTERNAL-IP   PORT(S)                                      AGE
service/istio-ingressgateway   NodePort    10.103.74.144   <none>        15020:30520/TCP,80:30080/TCP,443:30443/TCP   103s
service/istiod                 ClusterIP   10.101.187.27   <none>        15010/TCP,15012/TCP,443/TCP,15014/TCP        112s
3.2 Istio 自動注入 Sidecar
Istio 注入 Sidecar 的常用方式有兩種:
- Namespace 級別:添加
istio-injection=enabled(disabled關閉自動注入)的標簽到指
定的 Namespace,那么該 Namespace 下的 Pod 都會被自動注入一個 Sidecar- Pod 級別:添加
sidecar.istio.io/inject=true(false 關閉自動注入)的標簽到指定的 Pod,那么該 Pod 會被注入一個 Sidecar
3.2.1 Namespace 級別
接下來創建一個測試的 Namespace,并添加一個 istio-injection=enabled 的標簽,之后在該 Namespace 下創建 Pod,測試 Istio Sidecar 的自動注入。
# 創建 Namespace 并添加 Label:
[root@k8s-master01 istio-1.26.0]# kubectl create ns istio-test
[root@k8s-master01 istio-1.26.0]# kubectl label namespace istio-test istio-injection=enabled
切換目錄至 istio 的安裝包,然后創建測試應用,此時創建的 Pod 會被自動注入一個istioproxy 的容器:
# 更改測試服務的鏡像地址
[root@k8s-master01 istio-1.26.0]# sed -i 's|image: curlimages|image: crpi-q1nb2n896zwtcdts.cn-beijing.personal.cr.aliyuncs.com/ywb01|' samples/sleep/sleep.yaml

[root@k8s-master01 istio-1.26.0]# grep -rn "image:" samples/sleep/sleep.yaml
55:        image: crpi-q1nb2n896zwtcdts.cn-beijing.personal.cr.aliyuncs.com/ywb01/curl


# 創建測試服務
[root@k8s-master01 istio-1.26.0]# kubectl create -f samples/sleep/sleep.yaml -n istio-test
# 查看部署的容器:
[root@k8s-master01 istio-1.26.0]# kubectl get po -n istio-test
NAME                    READY   STATUS    RESTARTS   AGE
sleep-85fb677ff-57n27   2/2     Running   0          43s
查看 Pod 詳情:
[root@k8s-master01 istio-1.26.0]# kubectl describe po sleep-85fb677ff-57n27 -n istio-test

如果想要關閉該 Namespace 的自動注入,直接去除標簽即可(已注入的 Pod 不受影響, 下次重建后,不再有 isito-proxy 的容器):
[root@k8s-master01 istio-1.26.0]# kubectl label namespace istio-test istio-injection-

# 此時 Pod 不受影響:
[root@k8s-master01 istio-1.26.0]# kubectl get po -n istio-test
NAME                    READY   STATUS    RESTARTS   AGE
sleep-85fb677ff-57n27   2/2     Running   0          30m

# 重建后不會再有 istio-proxy:
[root@k8s-master01 istio-1.26.0]# kubectl delete po sleep-85fb677ff-57n27 -n istio-test

[root@k8s-master01 istio-1.26.0]# kubectl get po -n istio-test
NAME                    READY   STATUS    RESTARTS   AGE
sleep-85fb677ff-bjjdg   1/1     Running   0          11s
如果某個服務不想被 istio 注入,可以添加 sidecar.istio.io/inject=false 的標簽即可:
[root@k8s-master01 istio-1.26.0]# cat samples/sleep/sleep.yaml
....
  template:
    metadata:
      labels:
        app: sleep
        sidecar.istio.io/inject: "false"
    spec:
      terminationGracePeriodSeconds: 0
      serviceAccountName: sleep
....
3.2.2 Pod 級別
如果需要給 Pod 單獨添加 istio-proxy,可以給 Pod 添加 sidecar.istio.io/inject=true 標簽即可:
[root@k8s-master01 istio-1.26.0]# vim samples/sleep/sleep.yaml
[root@k8s-master01 istio-1.26.0]# cat samples/sleep/sleep.yaml
....
  template:
    metadata:
      labels:
        app: sleep
        sidecar.istio.io/inject: "true"
    spec:
      terminationGracePeriodSeconds: 0
      serviceAccountName: sleep
....

[root@k8s-master01 istio-1.26.0]# kubectl replace -f samples/sleep/sleep.yaml -n istio-test

[root@k8s-master01 istio-1.26.0]# kubectl get po -n istio-test
NAME                    READY   STATUS    RESTARTS   AGE
sleep-774748f5b-tnvhh   2/2     Running   0          30s
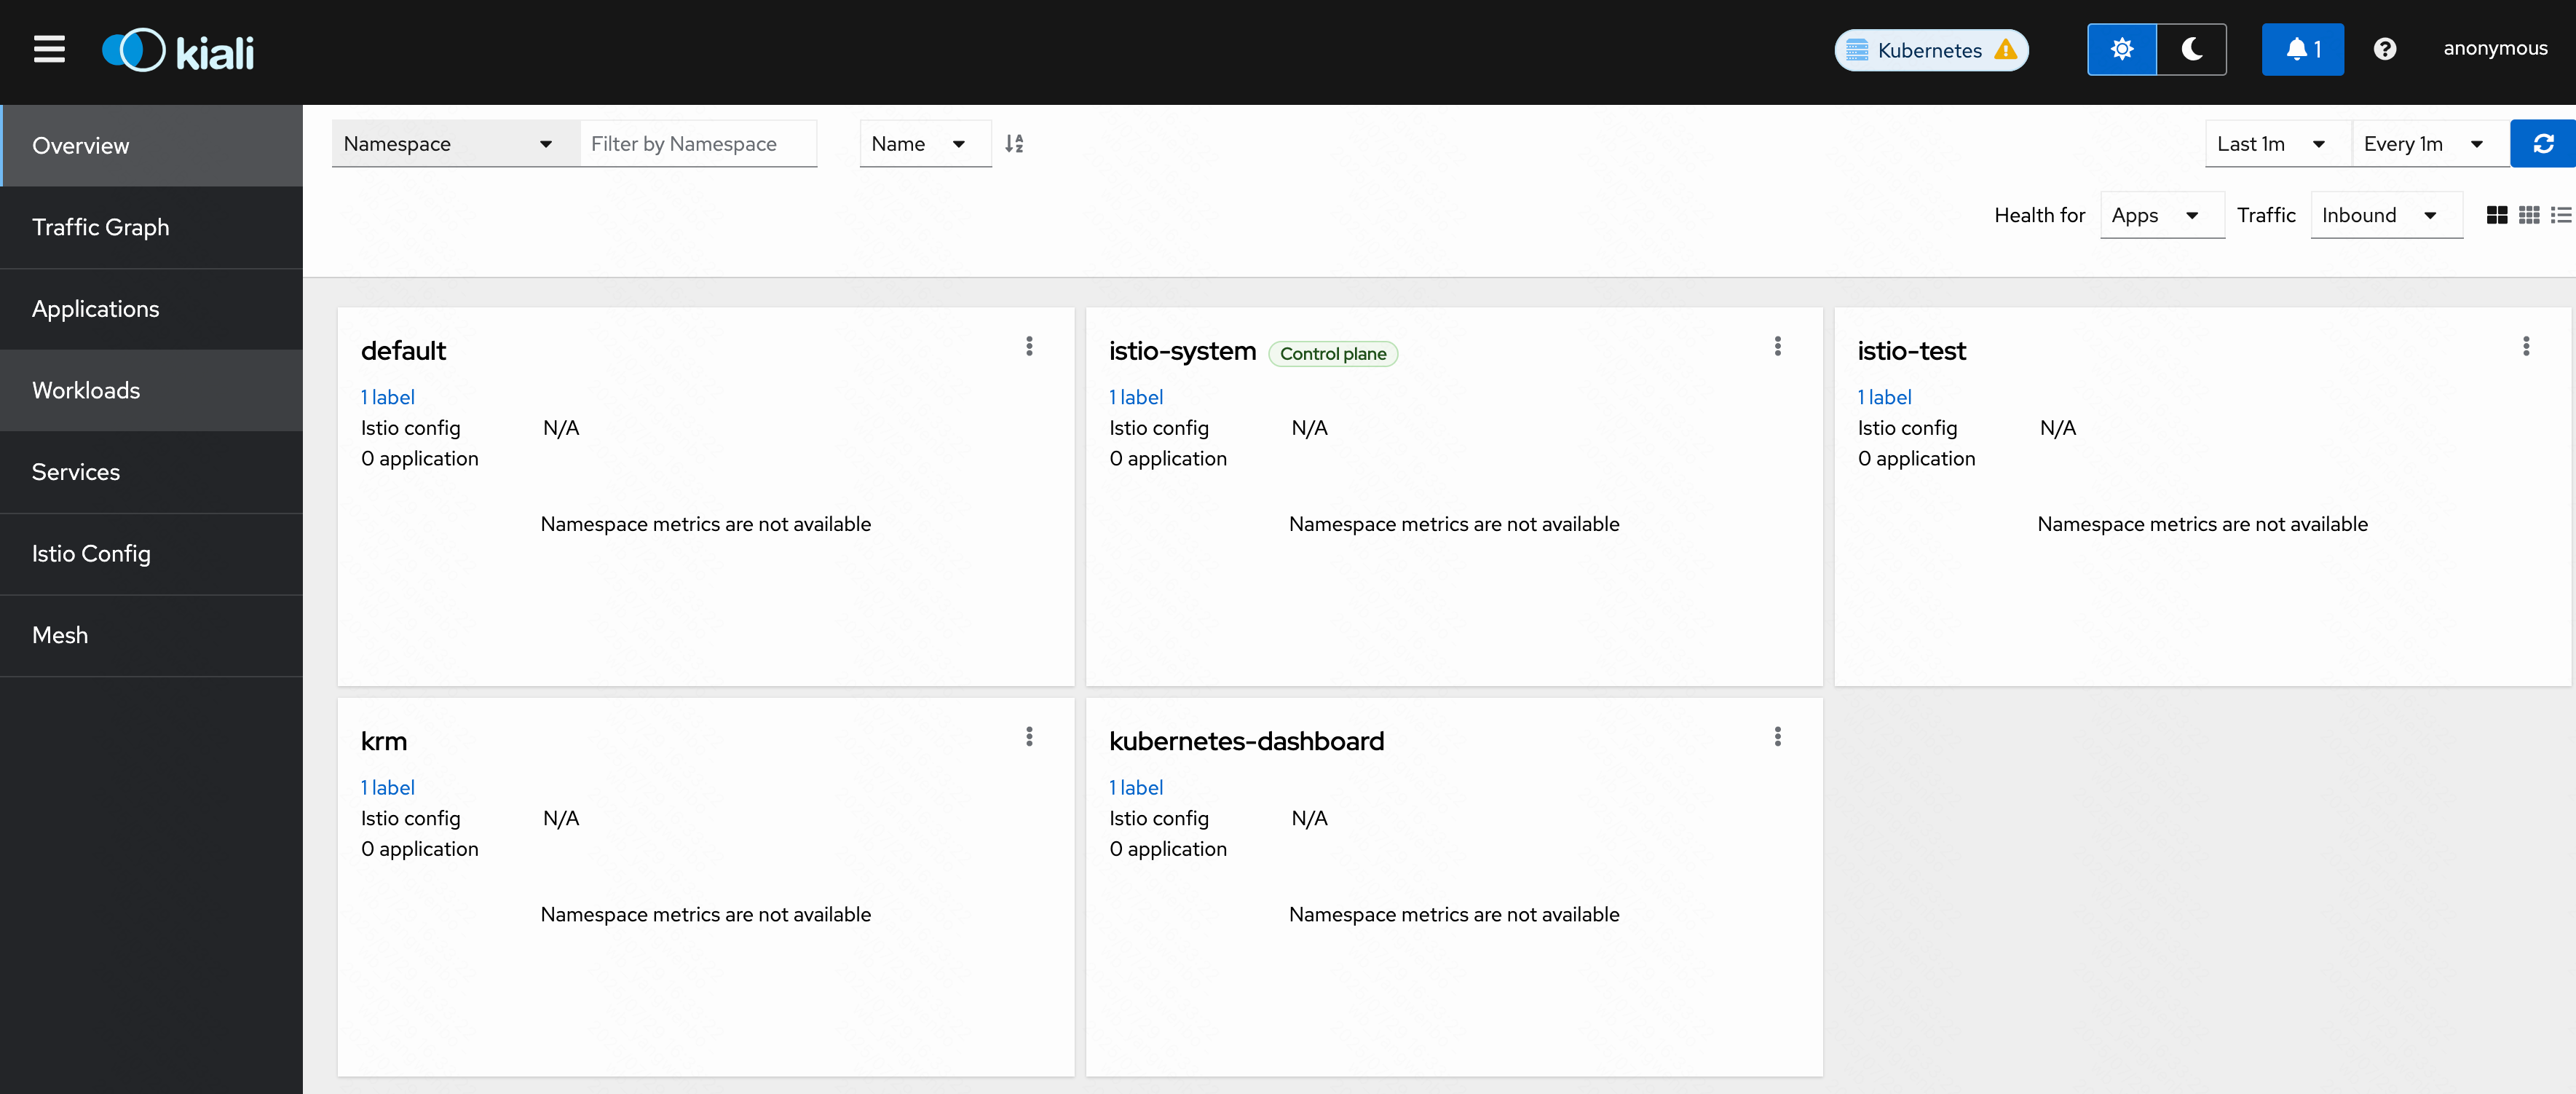
3.3 可視化工具 Kiali
Kiali 為 Istio 提供了可視化的界面,可以在 Kiali 上進行觀測流量的走向、調用鏈,同時還可以使用 Kiali 進行配置管理,給用戶帶來了很好的體驗。
接下來在 Kubernetes 中安裝 Kiali 工具:
# 修改 kiali 的 Service 類型為 NodePor
[root@k8s-master01 istio-1.26.0]# vim samples/addons/kiali.yaml
[root@k8s-master01 istio-1.26.0]# cat samples/addons/kiali.yaml
....
apiVersion: v1
kind: Service
metadata:
  name: kiali
  namespace: "istio-system"
....
  annotations:
spec:
  type: NodePort
....


# 安裝Kiali服務
[root@k8s-master01 istio-1.26.0]# kubectl create -f samples/addons/kiali.yaml

# 查看部署狀態:
[root@k8s-master01 istio-1.26.0]# kubectl get po,svc -n istio-system -l app=kiali
NAME                         READY   STATUS    RESTARTS   AGE
pod/kiali-6d774d8bb8-ckszt   1/1     Running   0          110s

NAME            TYPE       CLUSTER-IP      EXTERNAL-IP   PORT(S)                          AGE
service/kiali   NodePort   10.106.203.41   <none>        20001:31365/TCP,9090:32392/TCP   110s
之后可以通過 任意IP+31365 訪問 Kiali 服務:
除了 Kiali 之外,還可以安裝一個鏈路追蹤的工具,安裝該工具可以在 Kiali 的 Workloads 頁面,查看某個服務的 Traces 信息:
# 首先更改鏡像地址
[root@k8s-master01 istio-1.26.0]# sed -i 's|docker.io/jaegertracing|crpi-q1nb2n896zwtcdts.cn-beijing.personal.cr.aliyuncs.com/ywb01|' samples/addons/jaeger.yaml

[root@k8s-master01 istio-1.26.0]# grep -rn "image:" samples/addons/jaeger.yaml
23:          image: "crpi-q1nb2n896zwtcdts.cn-beijing.personal.cr.aliyuncs.com/ywb01/all-in-one:1.67.0"


# 創建服務
[root@k8s-master01 istio-1.26.0]# kubectl create -f samples/addons/jaeger.yaml
# 查看部署狀態:
[root@k8s-master01 istio-1.26.0]# kubectl get po,svc -n istio-system -l app=jaeger
NAME                          READY   STATUS    RESTARTS   AGE
pod/jaeger-6498f6596f-tcbq8   1/1     Running   0          73s

NAME                       TYPE        CLUSTER-IP      EXTERNAL-IP   PORT(S)                                          AGE
service/jaeger-collector   ClusterIP   10.98.59.72     <none>        14268/TCP,14250/TCP,9411/TCP,4317/TCP,4318/TCP   73s
service/tracing            ClusterIP   10.96.238.231   <none>        80/TCP,16685/TCP                                 73s
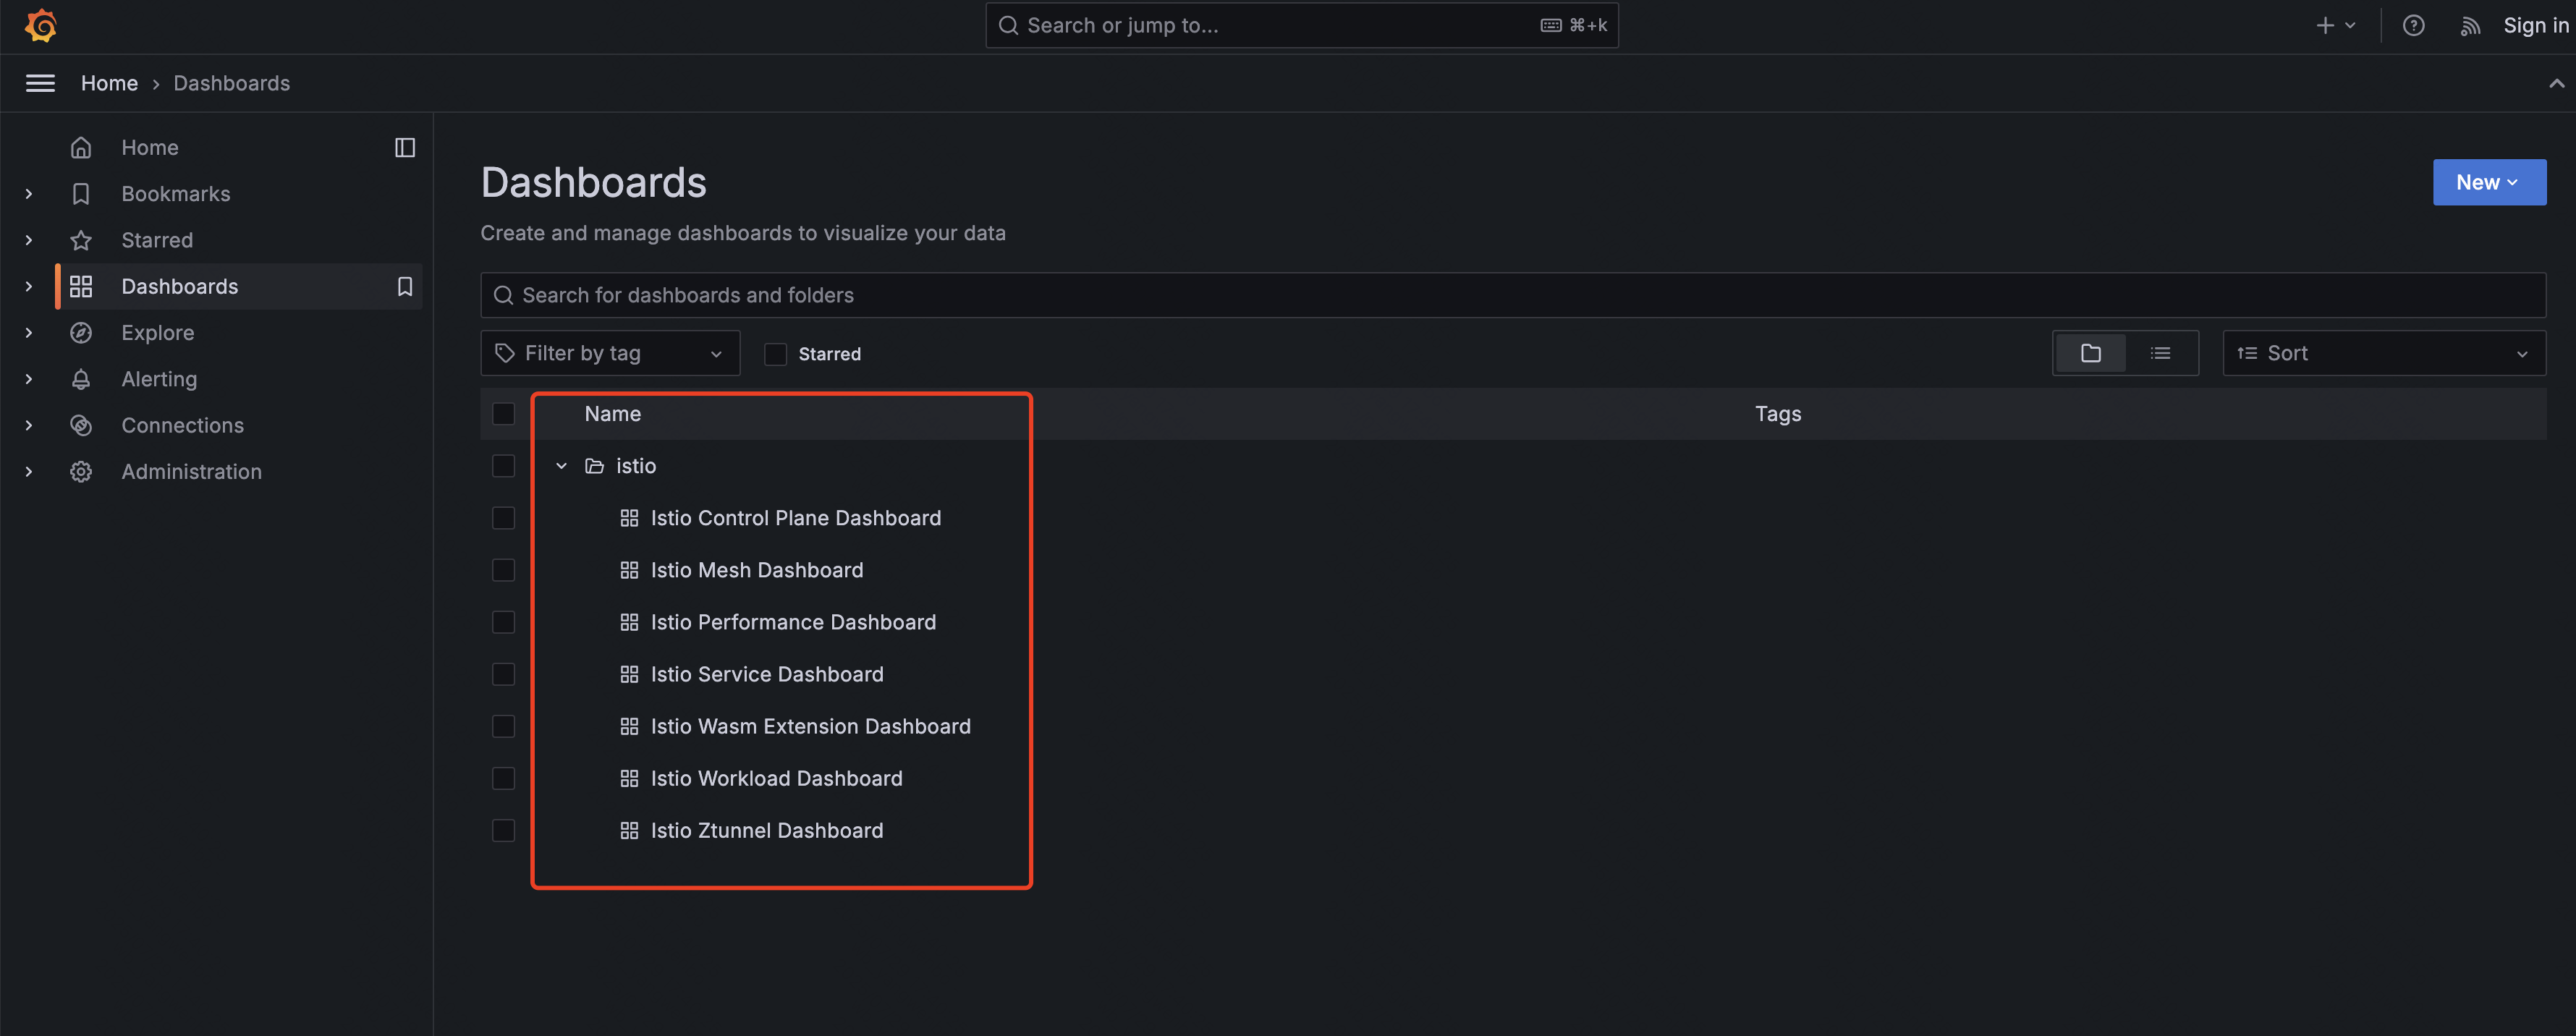
3.4 Prometheus 和 Grafana
Istio 默認暴露了很多監控指標,比如請求數量統計、請求持續時間以及 Service 和工作負載的指標,這些指標可以使用 Prometheus 進行收集,Grafana 進行展示。
Istio內置了Prometheus 和Grafana的安裝文件,直接安裝即可(也可以使用外置的 Prometheus 和 Grafana):
# 同樣需要修改鏡像地址
[root@k8s-master01 istio-1.26.0]# sed -i 's|image: "prom|image: "crpi-q1nb2n896zwtcdts.cn-beijing.personal.cr.aliyuncs.com/ywb01|' samples/addons/prometheus.yaml

[root@k8s-master01 istio-1.26.0]# sed -i 's|docker.io/grafana|crpi-q1nb2n896zwtcdts.cn-beijing.personal.cr.aliyuncs.com/ywb01|' samples/addons/grafana.yaml


[root@k8s-master01 istio-1.26.0]# grep -rn "image:" samples/addons/prometheus.yaml samples/addons/grafana.yaml
samples/addons/prometheus.yaml:487:          image: "ghcr.io/prometheus-operator/prometheus-config-reloader:v0.81.0"
samples/addons/prometheus.yaml:515:          image: "crpi-q1nb2n896zwtcdts.cn-beijing.personal.cr.aliyuncs.com/ywb01/prometheus:v3.2.1"
samples/addons/grafana.yaml:142:          image: "crpi-q1nb2n896zwtcdts.cn-beijing.personal.cr.aliyuncs.com/ywb01/grafana:11.3.1"
# 將 Service 類型改成 NodePort
[root@k8s-master01 istio-1.26.0]# sed -i "s|ClusterIP|NodePort|" samples/addons/prometheus.yaml
[root@k8s-master01 istio-1.26.0]# sed -i "s|ClusterIP|NodePort|" samples/addons/grafana.yaml

[root@k8s-master01 istio-1.26.0]# grep -rn NodePort samples/addons/prometheus.yaml samples/addons/grafana.yaml
samples/addons/prometheus.yaml:445:  type: "NodePort"
samples/addons/grafana.yaml:93:  type: NodePort
# 修改時區
[root@k8s-master01 istio-1.26.0]# sed -i 's/"timezone":"utc"/"timezone": "Asia\/Shanghai"/g' samples/addons/grafana.yaml
# 創建服務
[root@k8s-master01 istio-1.26.0]# kubectl create -f samples/addons/prometheus.yaml -f samples/addons/grafana.yaml

# 查看部署狀態:
[root@k8s-master01 istio-1.26.0]#  kubectl get po,svc -n istio-system | egrep "prometheus|grafana"
pod/grafana-5574c54c77-wf6zh               1/1     Running   0          36s
pod/prometheus-687c9cbcd7-kbdsj            2/2     Running   0          36s
service/grafana                NodePort    10.102.66.151   <none>        3000:31875/TCP                                   36s
service/prometheus             NodePort    10.108.187.88   <none>        9090:31225/TCP                                   36s
同樣的方式,將 Grafana 的 Service 改成 NodePort 或者添加 Ingress,之后訪問即可:
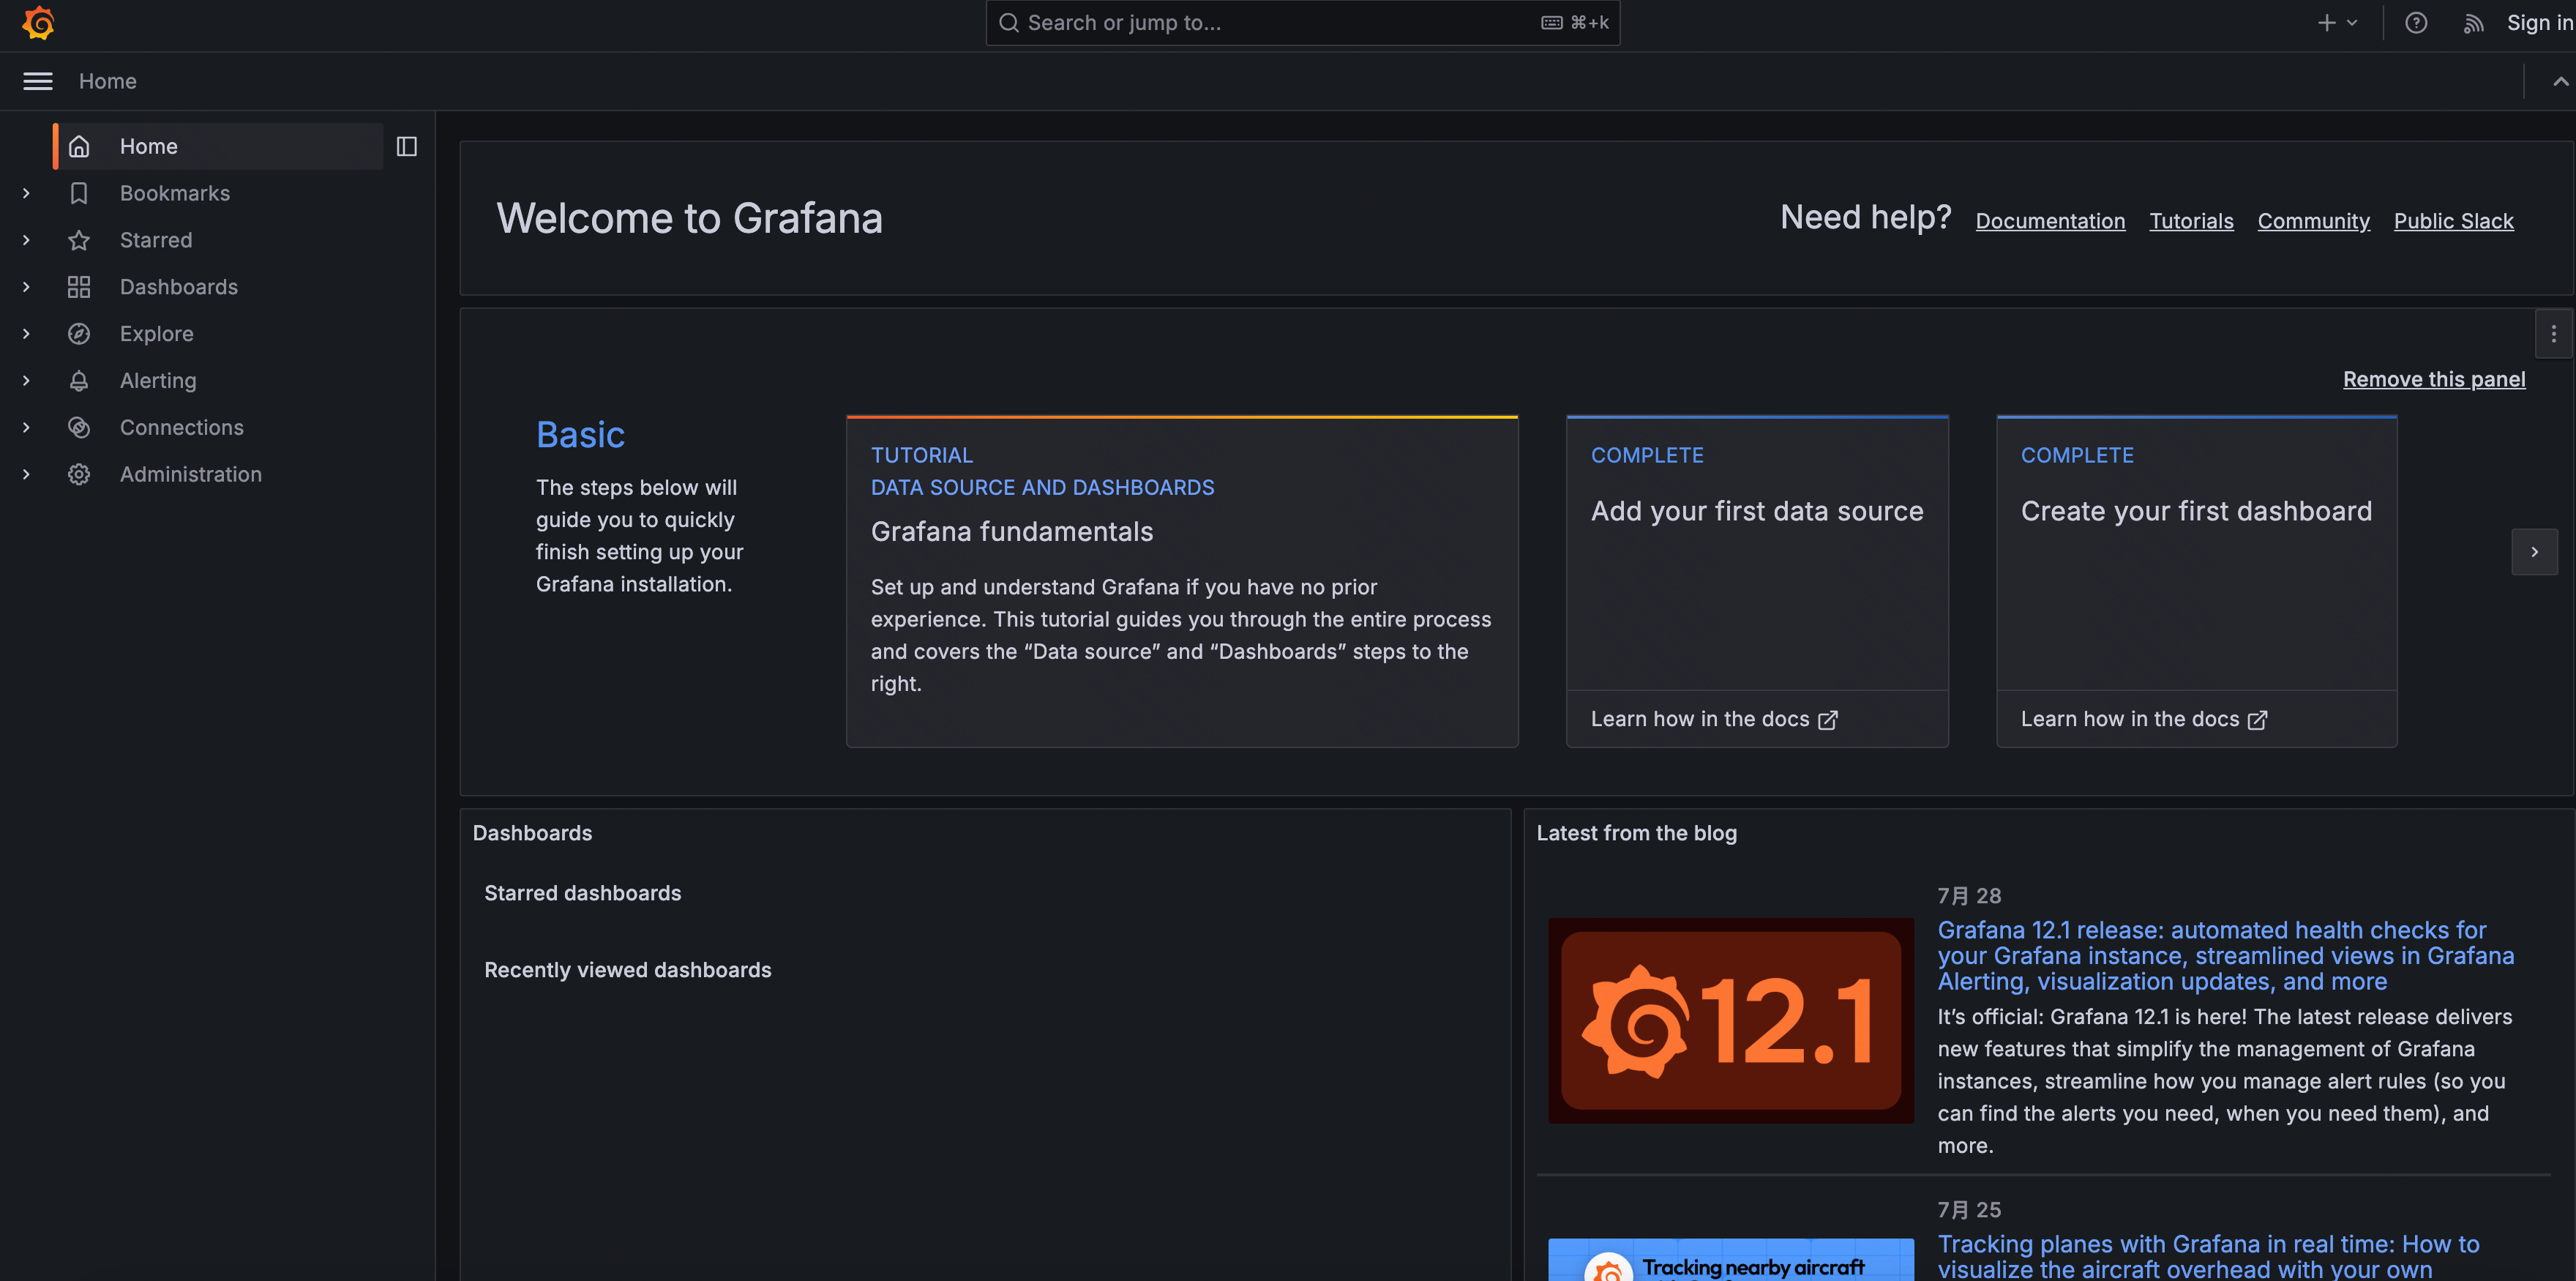
默認監控模版
4、Istio 流量治理實踐
4.1 部署 Istio 測試用例
Bookinfo 項目介紹:https://istio.io/latest/docs/examples/bookinfo/
首先在 Kubernetes 集群中,部署 Bookinfo 項目。
Istio 提供了用于測試功能的應用程序 Bookinfo,可以直接通過下述命令創建 Bookinfo:
# 創建 Namespace 并添加 Label:
[root@k8s-master01 istio-1.26.0]# kubectl create ns bookinfo
[root@k8s-master01 istio-1.26.0]# kubectl label ns bookinfo istio-injection=enabled
# 修改鏡像地址
[root@k8s-master01 istio-1.26.0]# sed -i 's|docker.io/istio|crpi-q1nb2n896zwtcdts.cn-beijing.personal.cr.aliyuncs.com/ywb01|' samples/bookinfo/platform/kube/bookinfo.yaml

[root@k8s-master01 istio-1.26.0]# grep "image:" samples/bookinfo/platform/kube/bookinfo.yaml
        image: crpi-q1nb2n896zwtcdts.cn-beijing.personal.cr.aliyuncs.com/ywb01/examples-bookinfo-details-v1:1.20.3
        image: crpi-q1nb2n896zwtcdts.cn-beijing.personal.cr.aliyuncs.com/ywb01/examples-bookinfo-ratings-v1:1.20.3
        image: crpi-q1nb2n896zwtcdts.cn-beijing.personal.cr.aliyuncs.com/ywb01/examples-bookinfo-reviews-v1:1.20.3
        image: crpi-q1nb2n896zwtcdts.cn-beijing.personal.cr.aliyuncs.com/ywb01/examples-bookinfo-reviews-v2:1.20.3
        image: crpi-q1nb2n896zwtcdts.cn-beijing.personal.cr.aliyuncs.com/ywb01/examples-bookinfo-reviews-v3:1.20.3
        image: crpi-q1nb2n896zwtcdts.cn-beijing.personal.cr.aliyuncs.com/ywb01/examples-bookinfo-productpage-v1:1.20.3


# 創建Bookinfo服務
[root@k8s-master01 istio-1.26.0]# kubectl apply -f samples/bookinfo/platform/kube/bookinfo.yaml -n bookinfo

# 查看部署的 Pod 和 Service:
[root@k8s-master01 istio-1.26.0]# kubectl get po,svc -n bookinfo
NAME                                  READY   STATUS    RESTARTS   AGE
pod/details-v1-859dcddd6d-lxxlm       2/2     Running   0          87s
pod/productpage-v1-5f8d8bf969-tdfqn   2/2     Running   0          87s
pod/ratings-v1-68dcbc5d5b-dk47p       2/2     Running   0          87s
pod/reviews-v1-874fd588-kkwz9         2/2     Running   0          87s
pod/reviews-v2-cb8778f48-5gglc        2/2     Running   0          87s
pod/reviews-v3-5998b9d9dd-g49vt       2/2     Running   0          87s

NAME                  TYPE        CLUSTER-IP       EXTERNAL-IP   PORT(S)    AGE
service/details       ClusterIP   10.96.115.151    <none>        9080/TCP   87s
service/productpage   ClusterIP   10.98.96.114     <none>        9080/TCP   87s
service/ratings       ClusterIP   10.106.215.139   <none>        9080/TCP   87s
service/reviews       ClusterIP   10.100.32.85     <none>        9080/TCP   87s
# 之后可以通過 productpage Service 的 ClusterIP 訪問 Bookinfo 項目:
[root@k8s-master01 istio-1.26.0]# curl 10.98.96.114:9080

<meta charset="utf-8">
<meta http-equiv="X-UA-Compatible" content="IE=edge">
<meta name="viewport" content="width=device-width, initial-scale=1">
....
4.2 使用 Istio 發布項目
接下來創建 Istio 的 Gateway 和 VirtualService 實現域名訪問 Bookinfo 項目。
首先創建 Gateway,假設發布的域名是 bookinfo.kubeasy.com
[root@k8s-master01 istio-1.26.0]# vim samples/bookinfo/networking/bookinfo-gateway.yaml
[root@k8s-master01 istio-1.26.0]# cat samples/bookinfo/networking/bookinfo-gateway.yaml
apiVersion: networking.istio.io/v1      # Gateway 配置如下所示
kind: Gateway
metadata:
  name: bookinfo-gateway
spec:
  selector:
    istio: ingressgateway # use istio default controller
  servers:
  - port:
      number: 80
      name: http
      protocol: HTTP
    hosts:
    - "bookinfo.kubeasy.com"        # 發布域名
---
apiVersion: networking.istio.io/v1      # 接下來配置 VirtualService,實現對不同微服務的路由
kind: VirtualService
metadata:
  name: bookinfo
spec:
  hosts:
  - "bookinfo.kubeasy.com"          # 發布域名
  gateways:
  - bookinfo-gateway
  http:
  - match:
    - uri:
        exact: /productpage
    - uri:
        prefix: /static
    - uri:
        exact: /login
    - uri:
        exact: /logout
    - uri:
        prefix: /api/v1/products
    route:
    - destination:
        host: productpage
        port:
          number: 9080
# 創建資源
[root@k8s-master01 istio-1.26.0]# kubectl create -f samples/bookinfo/networking/bookinfo-gateway.yaml -n bookinfo

# 查看資源:
[root@k8s-master01 istio-1.26.0]# kubectl get gw,vs -n bookinfo
NAME                                           AGE
gateway.networking.istio.io/bookinfo-gateway   58s

NAME                                          GATEWAYS               HOSTS                      AGE
virtualservice.networking.istio.io/bookinfo   ["bookinfo-gateway"]   ["bookinfo.kubeasy.com"]   58s
接下來將域名 bookinfo.kubeasy.com 解析至集群任意一個安裝了 kube-proxy 的節點 IP 上,然后通過 ingressgateway 的 Service 的 NodePort 即可訪問到 Bookinfo:
[root@k8s-master01 istio-1.26.0]# kubectl get svc -n istio-system istio-ingressgateway
NAME                   TYPE       CLUSTER-IP      EXTERNAL-IP   PORT(S)                                      AGE
istio-ingressgateway   NodePort   10.103.74.144   <none>        15020:30520/TCP,80:30080/TCP,443:30443/TCP   5h1m
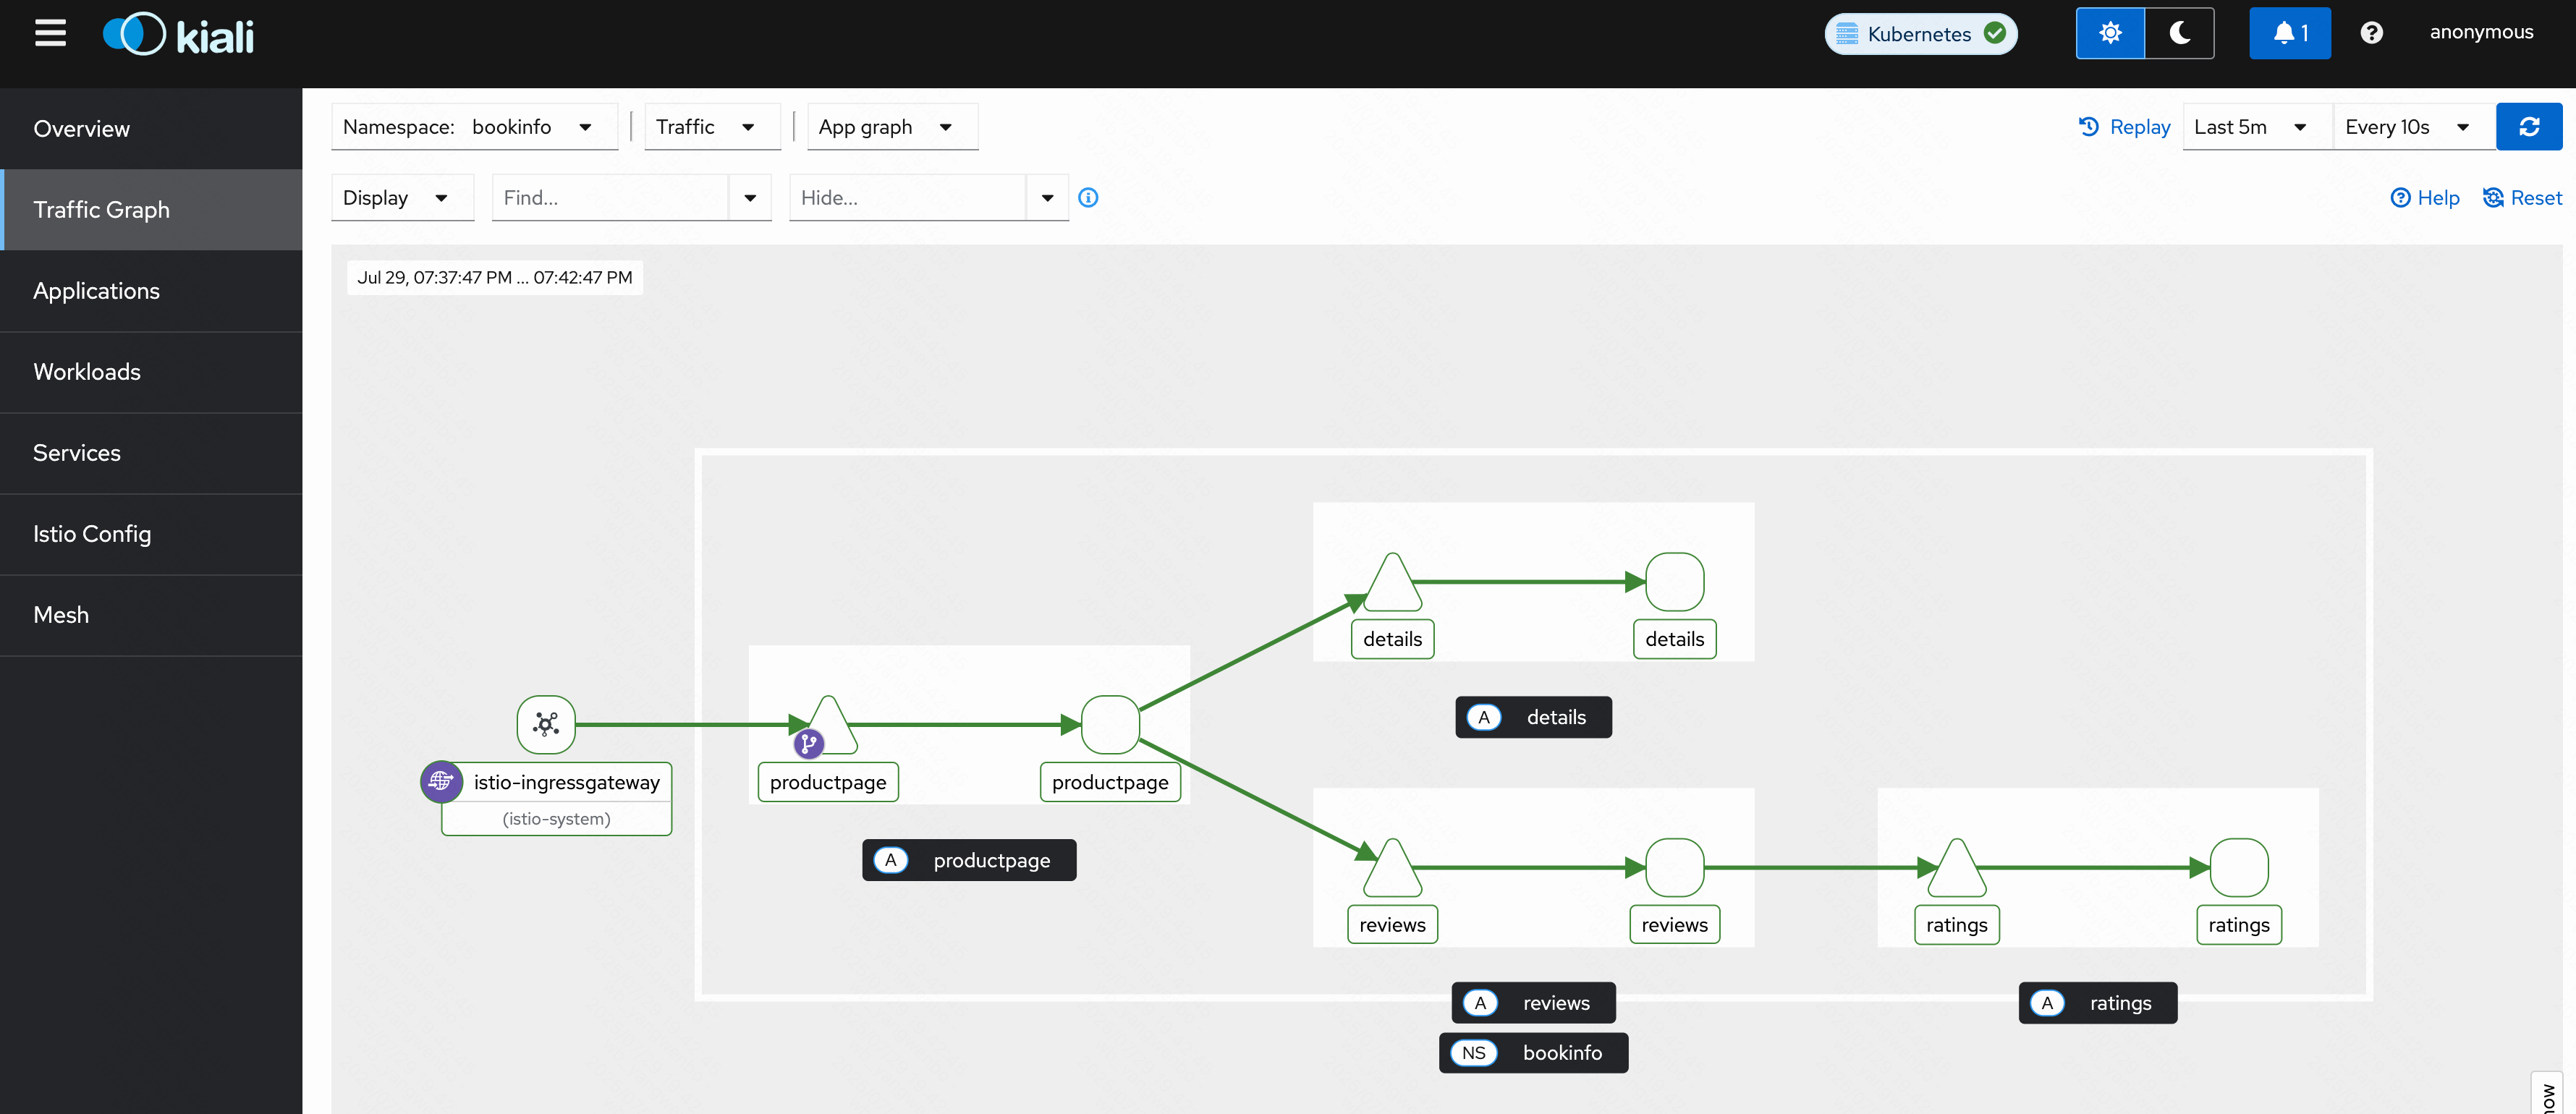
綁定 hosts 后,通過 bookinfo.kubeasy.com+ingressgateway 80 端口的 NodePort 即可訪問該服務,比如本次示例的 http://bookinfo.kubeasy.com:30080/productpage:


多次刷新可以看到 Reviewer 處的星星會在黑色、紅色和消失之間來回替換,是因為之前部署了三個不同版本的 reviews,每個版本具有不同的顯示效果.
此時通過 Kiali 頁面可以看到 Bookinfo 的調用鏈路:
4.3 Istio 地址重寫和重定向
Istio 同樣支持訪問地址的重寫和重定向,詳細配置->:
比如將 bookinfo.kubeasy.com/yunwei,跳轉到 blog.csdn.net/weixin_43279138?type=blog:
[root@k8s-master01 istio-1.26.0]# kubectl edit vs bookinfo -n bookinfo
....
spec:
  gateways:
  - bookinfo-gateway
  hosts:
  - bookinfo.kubeasy.com
  http:
  - match:
    - uri:
        prefix: /yunwei                     # 匹配/yunwei
    redirect:
      authority: blog.csdn.net              # 跳轉的域名
      uri: /weixin_43279138?type=blog       # 跳轉的路徑
  - match:
    - uri:
        exact: /productpage
....
通過瀏覽器訪問 http://bookinfo.kubeasy.com:30080/yunwei(如果是學習環境需要加上端口號)即可跳轉
到 https://blog.csdn.net/weixin_43279138?type=blog。當然也可以用 curl 進行測試:
[root@k8s-master01 istio-1.26.0]# curl -H "Host:bookinfo.kubeasy.com" 192.168.200.50:30080/yunwei -I
HTTP/1.1 301 Moved Permanently
location: http://blog.csdn.net/weixin_43279138?type=blog
date: Tue, 29 Jul 2025 12:08:22 GMT
server: istio-envoy
transfer-encoding: chunked
Istio 地址重寫可用于多個后端的路由,比如將/paymentapi/重寫為/,此時就可以通過 VirtualService 實現。
Istio 地址重寫配置方式和重定向類似,假如將/重寫為/productpage,配置如下:
[root@k8s-master01 istio-1.26.0]# kubectl edit vs bookinfo -n bookinfo
....
spec:
  gateways:
  - bookinfo-gateway
  hosts:
  - bookinfo.kubeasy.com
  http:
  - match:
    - uri:
        exact: /                # 匹配根路徑
    rewrite:
      uri: /productpage         # 重寫為/productpage
    route:
    - destination:
        host: productpage
        port:
          number: 9080
....
保存退出后,訪問 bookinfo.kubeasy.com 即可打開 bookinfo 的頁面(未配置地址重寫前,訪問根路徑會限制 404 錯誤)。

4.4 Istio 實現灰度部署
使用 Istio 進行細粒度的流量管理,需要使用 DestinationRule 資源對不同標簽的 Pod 劃分版本。
首先通過 DestinationRule 將 reviews 分成三個版本:
[root@k8s-master01 istio-1.26.0]# mkdir bookinfo
[root@k8s-master01 istio-1.26.0]# cd bookinfo/
[root@k8s-master01 bookinfo]# vim reviews-dr.yaml
[root@k8s-master01 bookinfo]# cat reviews-dr.yaml
apiVersion: networking.istio.io/v1
kind: DestinationRule
metadata:
  name: reviews
spec:
  host: reviews
  subsets:
  - name: v1
    labels:
      version: v1       # subset v1 指向具有 version=v1 的 Pod
  - name: v2
    labels:
      version: v2       # subset v2 指向具有 version=v2 的 Pod
  - name: v3
    labels:
      version: v3       # subset v3 指向具有 version=v3 的 Pod

# 創建并查看該 DestinationRule:
[root@k8s-master01 bookinfo]# kubectl create -f reviews-dr.yaml -n bookinfo

# 查看資源:
[root@k8s-master01 bookinfo]# kubectl get dr -n bookinfo
NAME      HOST      AGE
reviews   reviews   20s
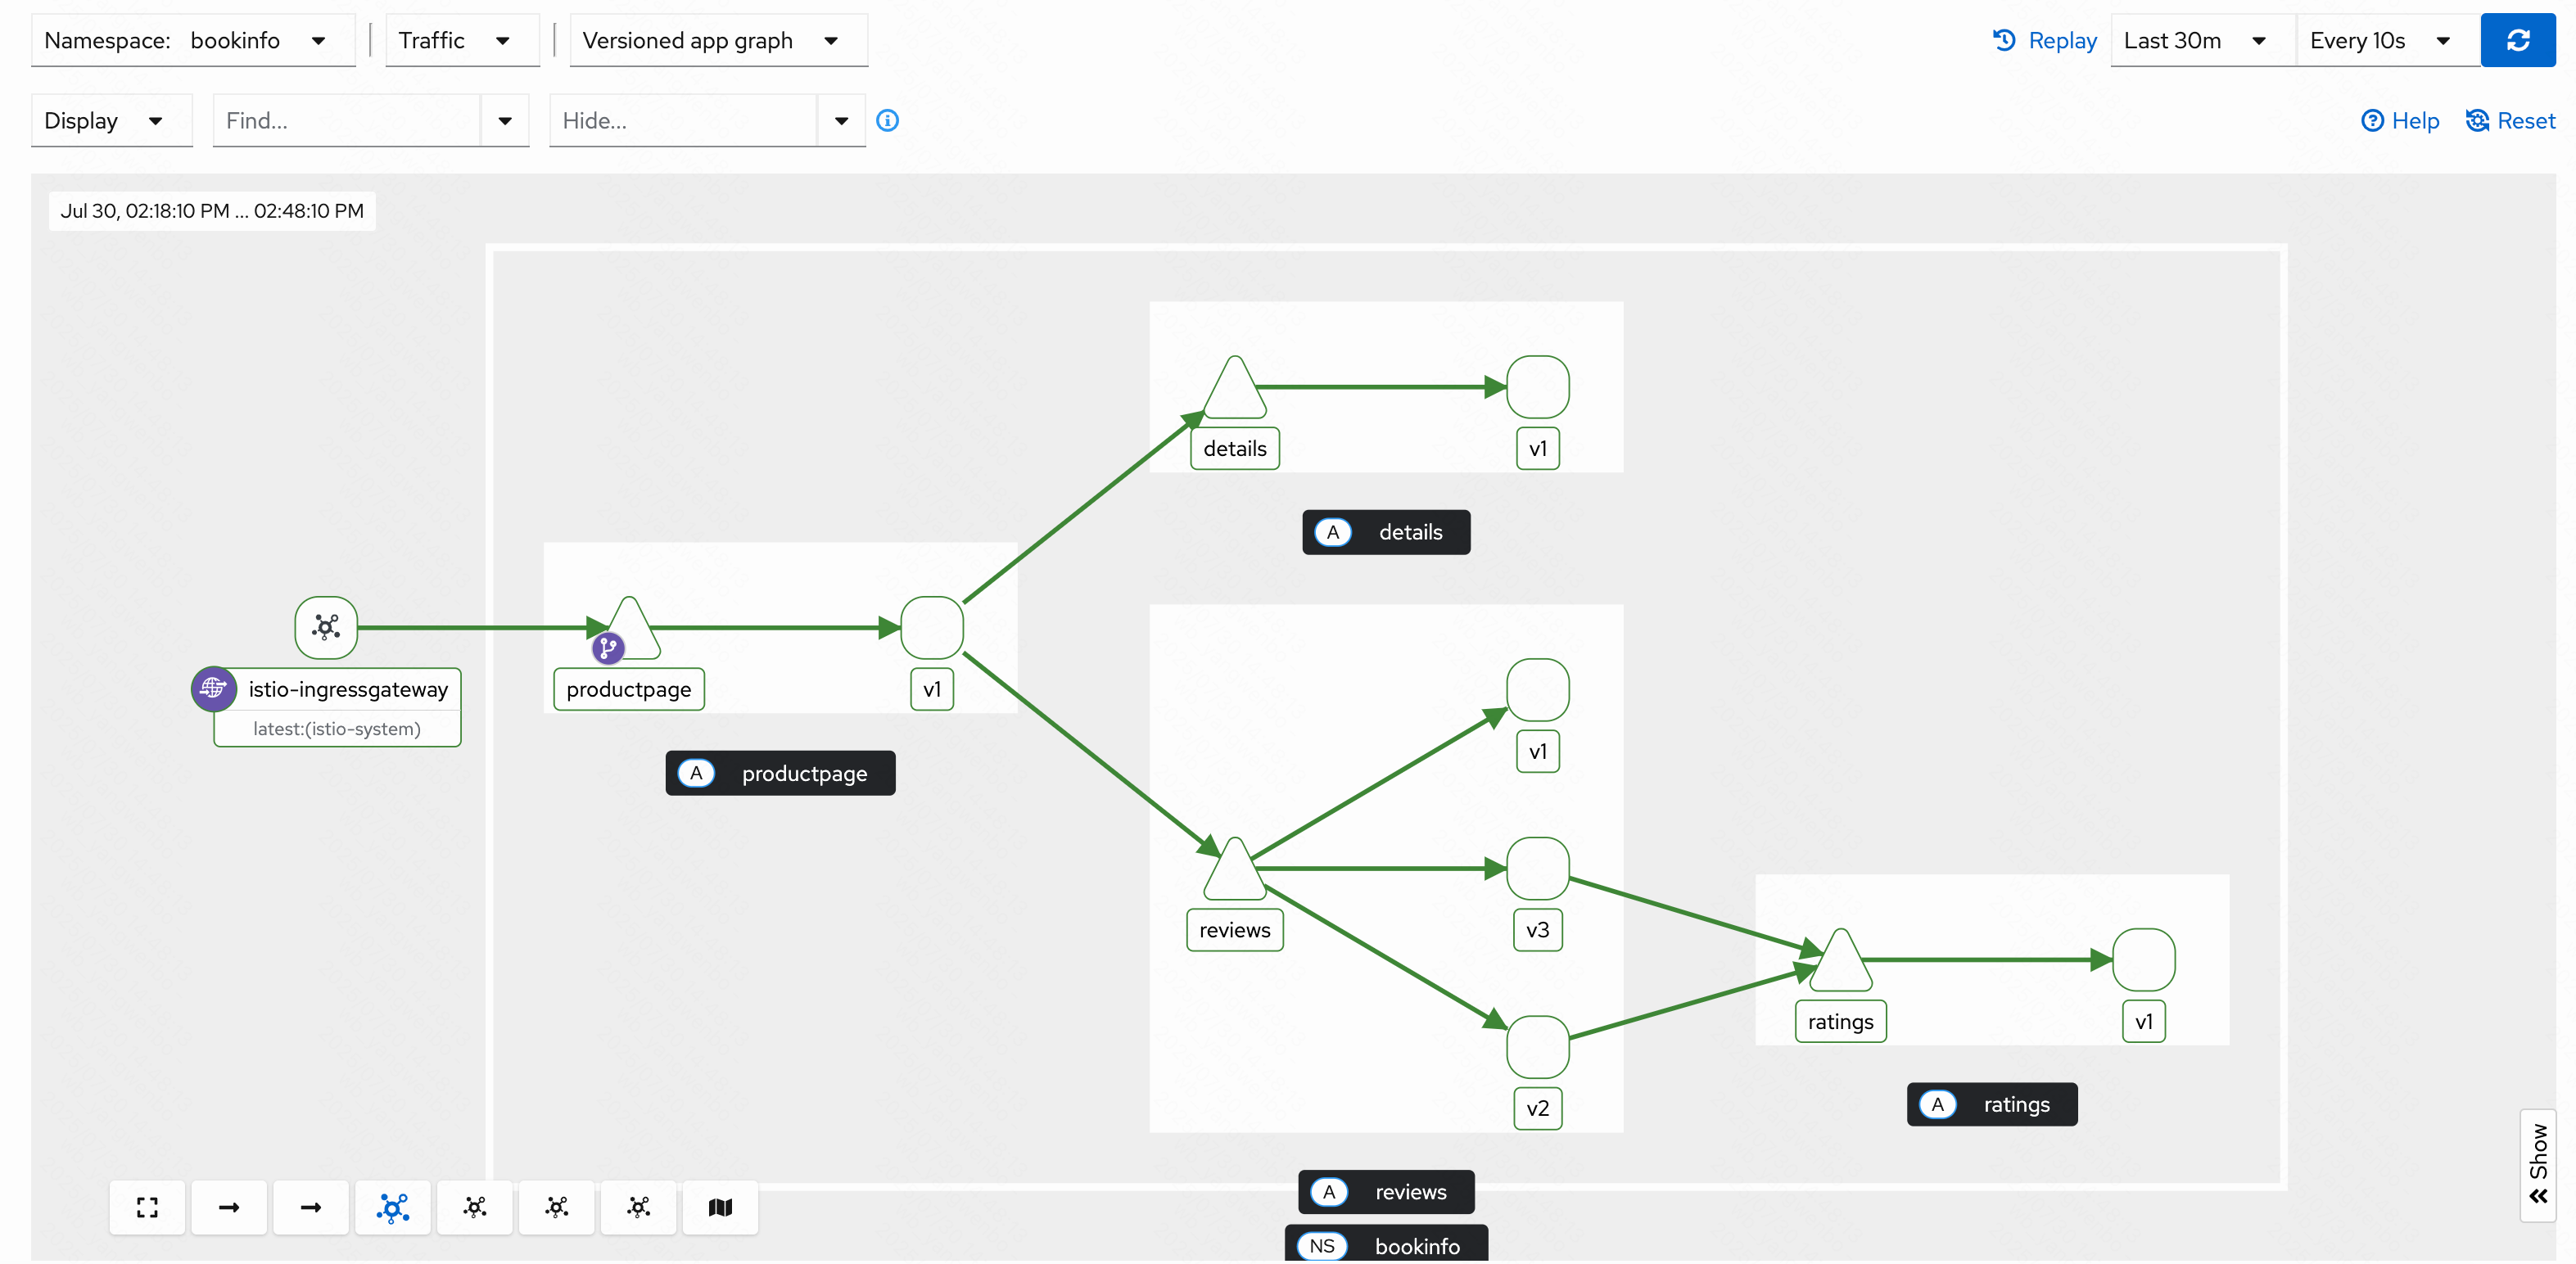
此時只是創建了 DestinationRule,并沒有做任何限制,所以通過瀏覽器訪問該服務時,并沒有什么變化。但是 Kiali 中可以看到 reviews 變成了三個版本:
接下來使用 VirtualService 將所有訪問 reviews 服務的流量指向 reviews 的 v1 版本:
[root@k8s-master01 bookinfo]# vim reviews-v1-all.yaml
[root@k8s-master01 bookinfo]# cat reviews-v1-all.yaml
apiVersion: networking.istio.io/v1
kind: VirtualService
metadata:
  name: reviews
spec:
  hosts:
  - reviews
  http:
  - route:
    - destination:
        host: reviews
        subset: v1          # 將流量指向 v1


# 創建該 VirtualService
[root@k8s-master01 bookinfo]# kubectl create -f reviews-v1-all.yaml -n bookinfo
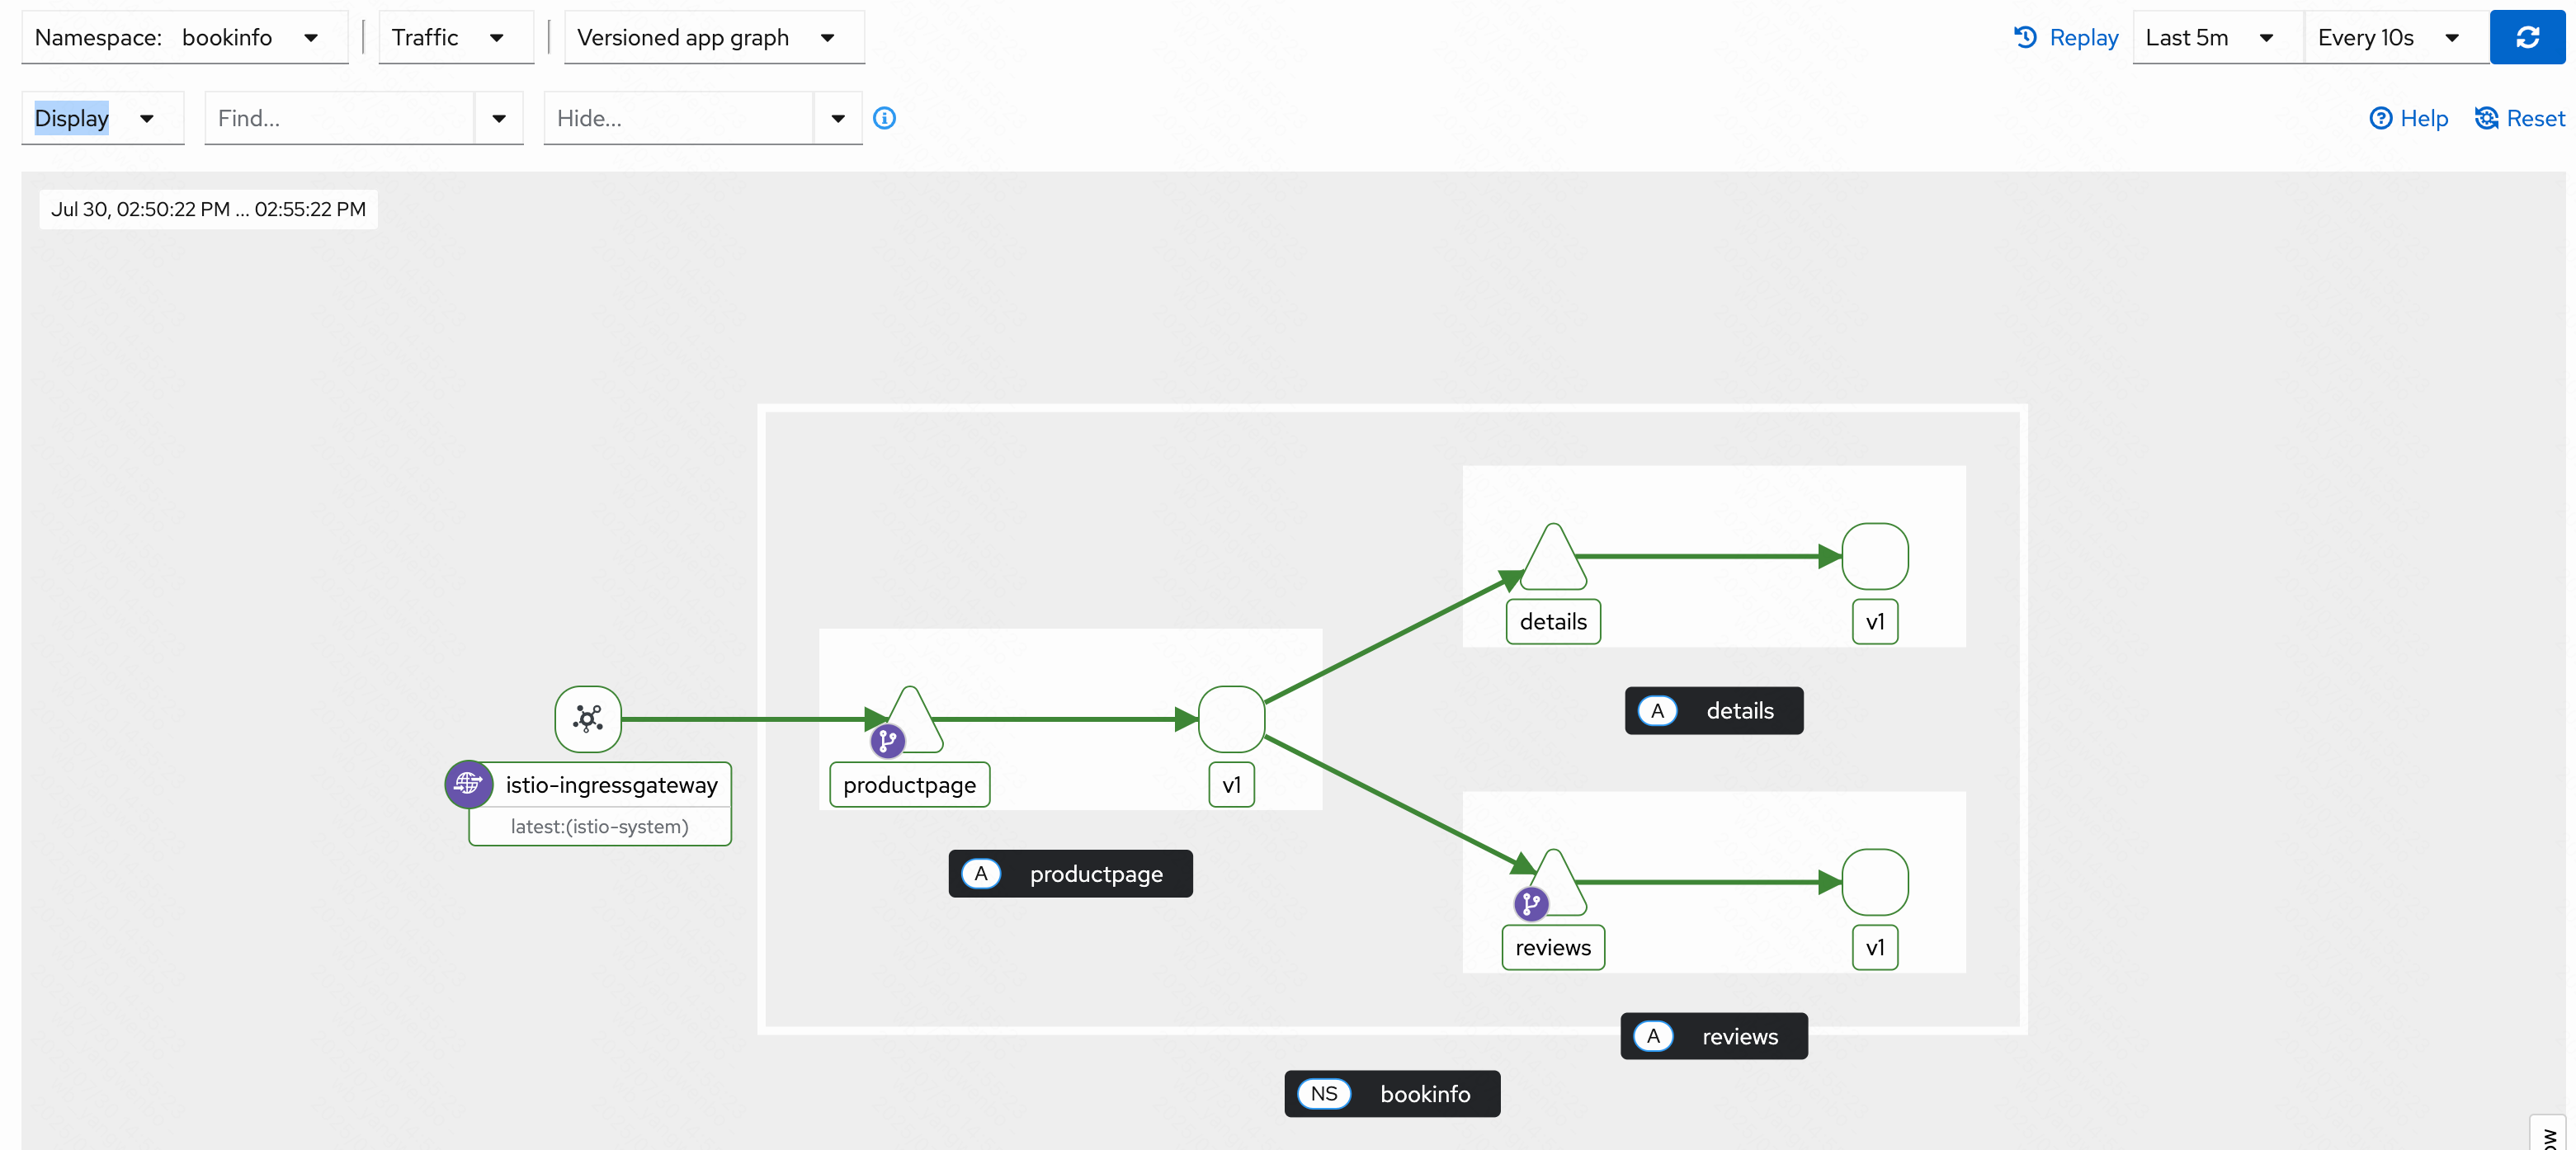
此時再次刷新瀏覽器,Reviews 處不再顯示評分:

同時 Kiali 也不再顯示 reviews 服務調用 ratings 服務:
假如有新版本上線,不想直接接入所有流量,可以使用 VirtualService 控制流量分配比例,比如將 20%的流量路由到 v2 版本,其余的流量依舊路由到 v1 版本:
[root@k8s-master01 bookinfo]# vim reviews-80v1-20v2.yaml
[root@k8s-master01 bookinfo]# cat reviews-80v1-20v2.yaml
apiVersion: networking.istio.io/v1
kind: VirtualService
metadata:
  name: reviews
spec:
  hosts:
  - reviews
  http:
  - route:
    - destination:
        host: reviews
        subset: v1
      weight: 80            # 將 80%流量指向 v1
    - destination:
        host: reviews
        subset: v2
      weight: 20            # 將 20%流量指向 v2

# 更新該 VirtualService
[root@k8s-master01 bookinfo]# kubectl replace -f reviews-80v1-20v2.yaml -n bookinfo
再次使用瀏覽器訪問時,會有 20%的訪問會出現評分(僅有黑色):

此時從 Kiali 頁面即可看到 v2 版本的 review 調用 ratings:

假設新版本已經沒有任何問題,可以將流量全部指向新版本
4.5 Istio 實現 AB 測試
stio 也支持基于請求頭、uri、schema 等方式的細粒度流量管理,這種路由方式比較適用于新版本上線時的 AB 測試。
假如又開發了一個新版,此時只想要公司內部先進行測試,可以配置 VirtualService 指定部分用戶訪問新版本。
再次修改 reviews 的 VirtualService,將 jason 用戶指向 v3,其他用戶依舊使用 v2 版本:
[root@k8s-master01 bookinfo]# vim reviews-jasonv3.yaml
[root@k8s-master01 bookinfo]# cat reviews-jasonv3.yaml
apiVersion: networking.istio.io/v1
kind: VirtualService
metadata:
  name: reviews
spec:
  hosts:
  - reviews
  http:
  - match:
    - headers:
        end-user:
          exact: jason
    route:
    - destination:
        host: reviews
        subset: v3
  - route:
    - destination:
        host: reviews
        subset: v2

# 更新該 VirtualService
[root@k8s-master01 bookinfo]# kubectl replace -f reviews-jasonv3.yaml -n bookinfo
接下來首先登錄 非 jason 用戶, 可以看到頁面只顯示黑色五角星:

接下來登錄 jason 用戶,登錄后頁面評分只顯示紅色:

4.6 Istio 負載均衡算法
Istio 原生支持多種負載均衡算法,比如 ROUND_ROBIN、LEAST_REQUEST、LEAST_CONN、RANDOM 等。假如一個應用存在多個副本(Pod),可以使用上述算法對多個 Pod 進行定制化的負載均衡配置
常見的負載均衡策略如下:
- ROUND_ROBIN:輪詢算法,將請求依次分配給每一個實例,不推薦使用;
- LEAST_REQUEST:最小鏈接算法,從池中隨機選擇兩個實例,并將請求路由給當前活躍請求數較少的那個主機;
- RANDOM:隨機算法,將請求隨機分配給其中一個實例;
- PASSTHROUGH:將連接轉發到調用者請求的原始 IP 地址,而不進行任何形式的負載均衡,目前不推薦使用;
- UNSPECIFIED:未指定負載均衡算法,Istio 將選擇一個合適的默認算法,不推薦使用。
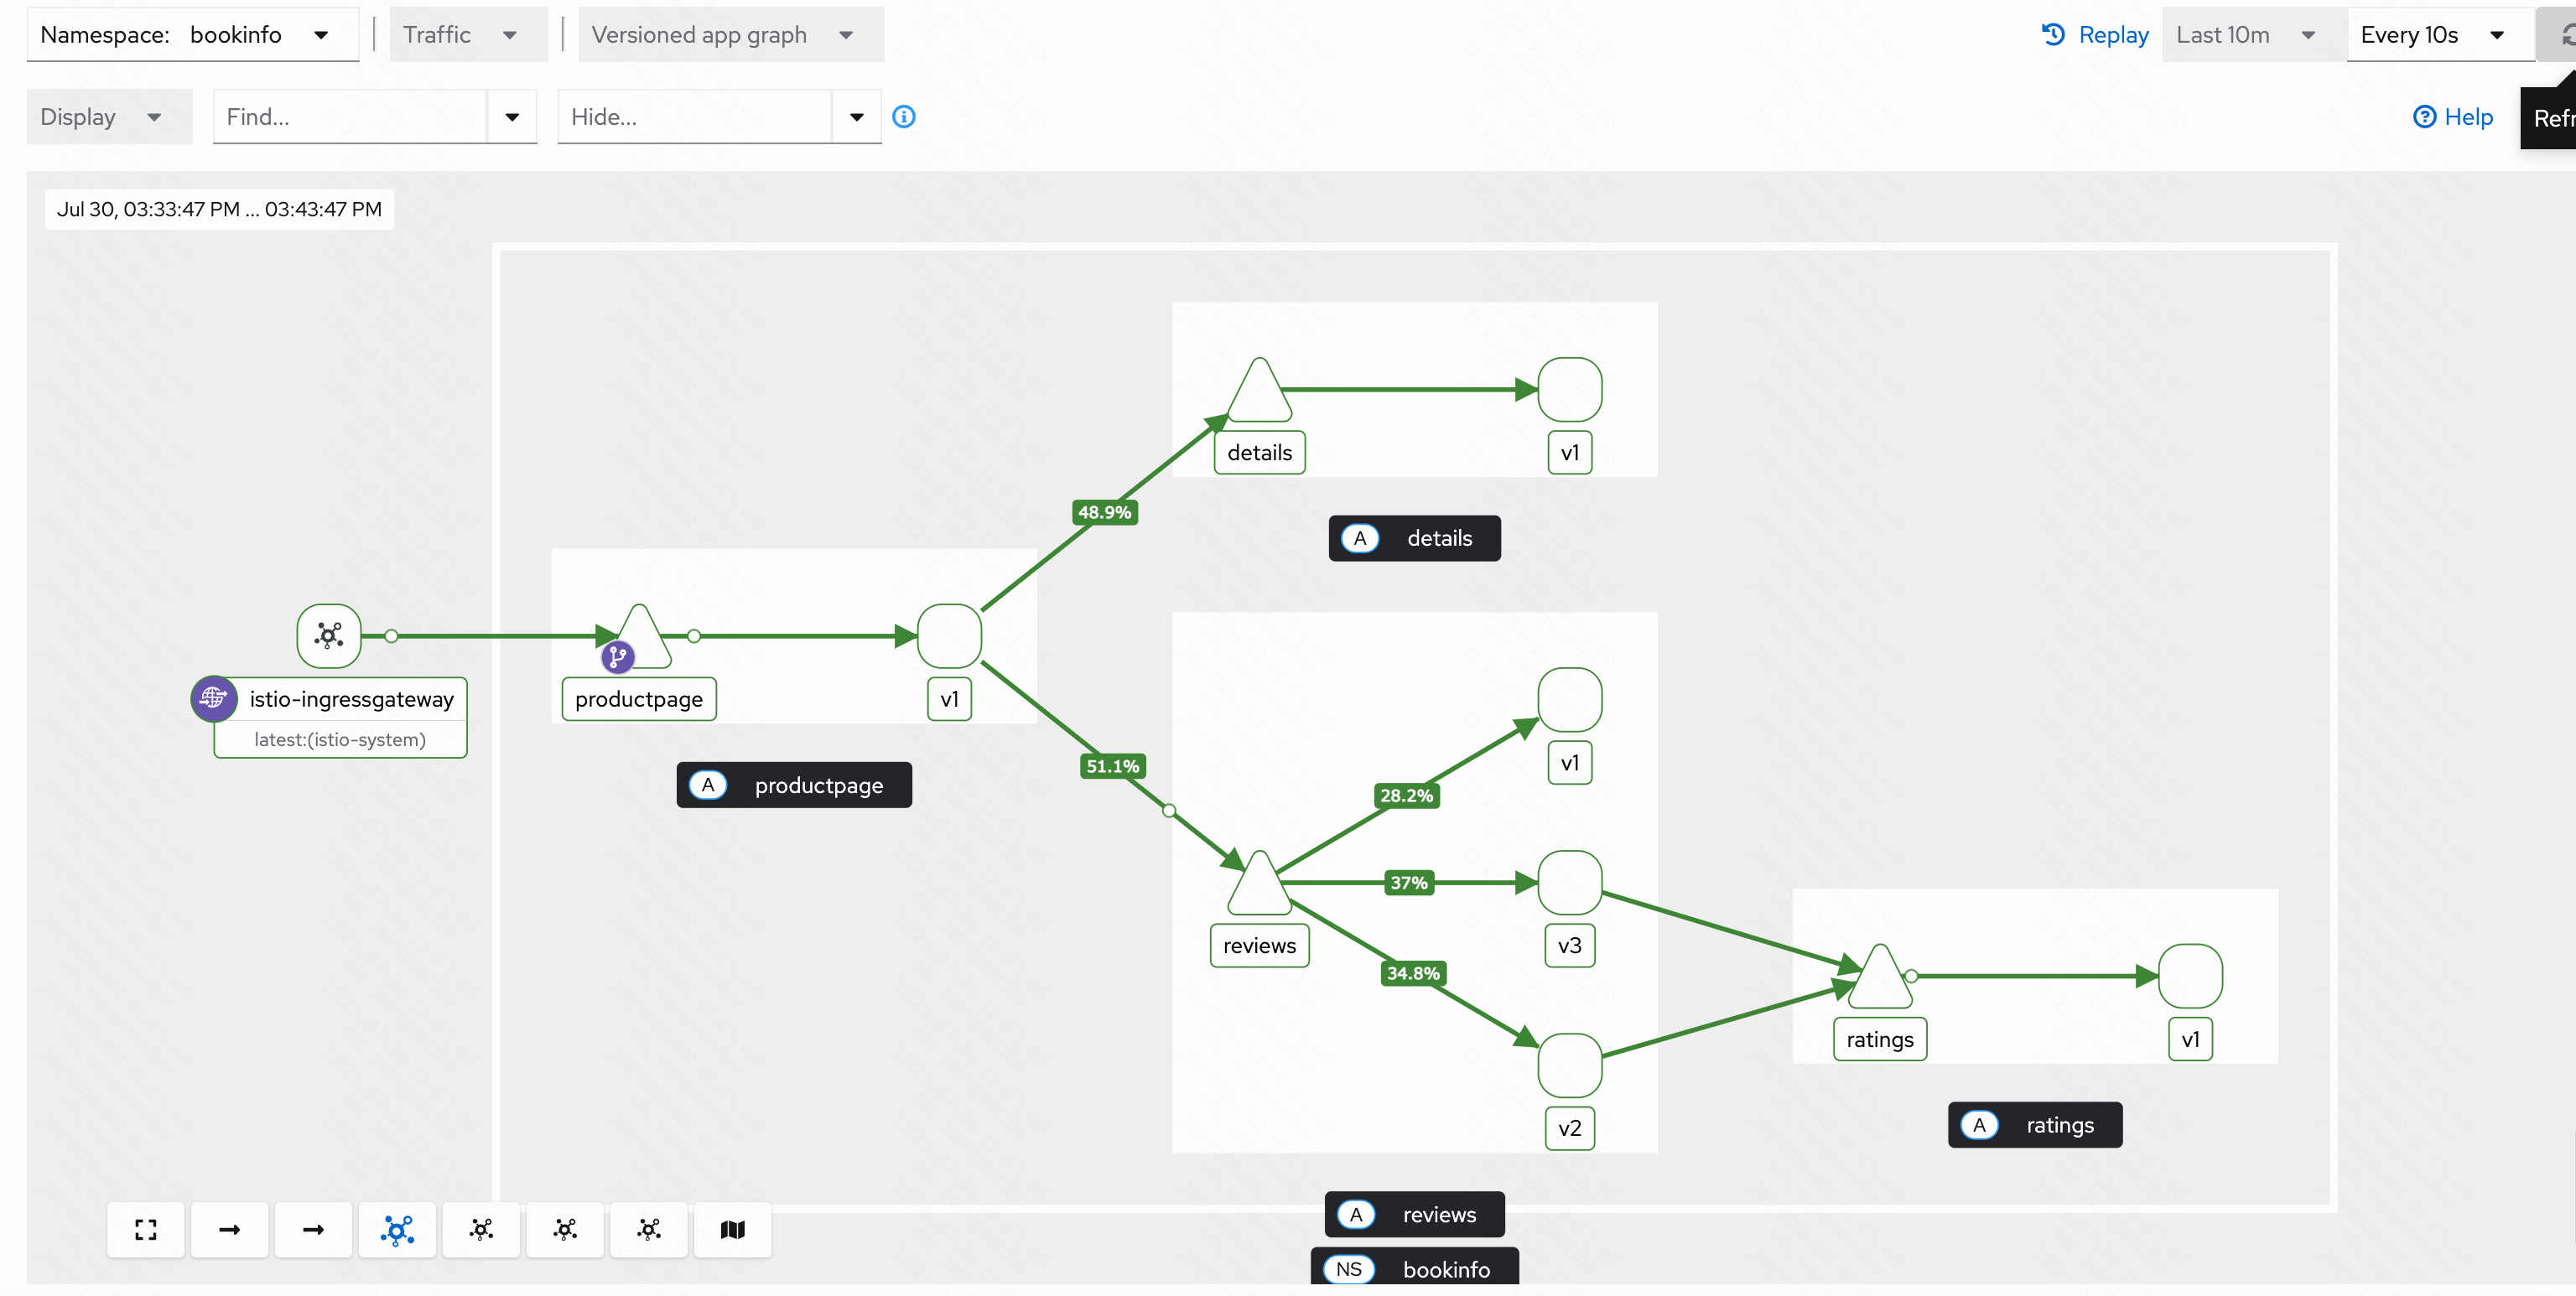
首先去除之前配置的一些路由策略,之后觀看 Kiali 中 reviews 的流量分配:
[root@k8s-master01 bookinfo]# kubectl delete vs -n bookinfo reviews
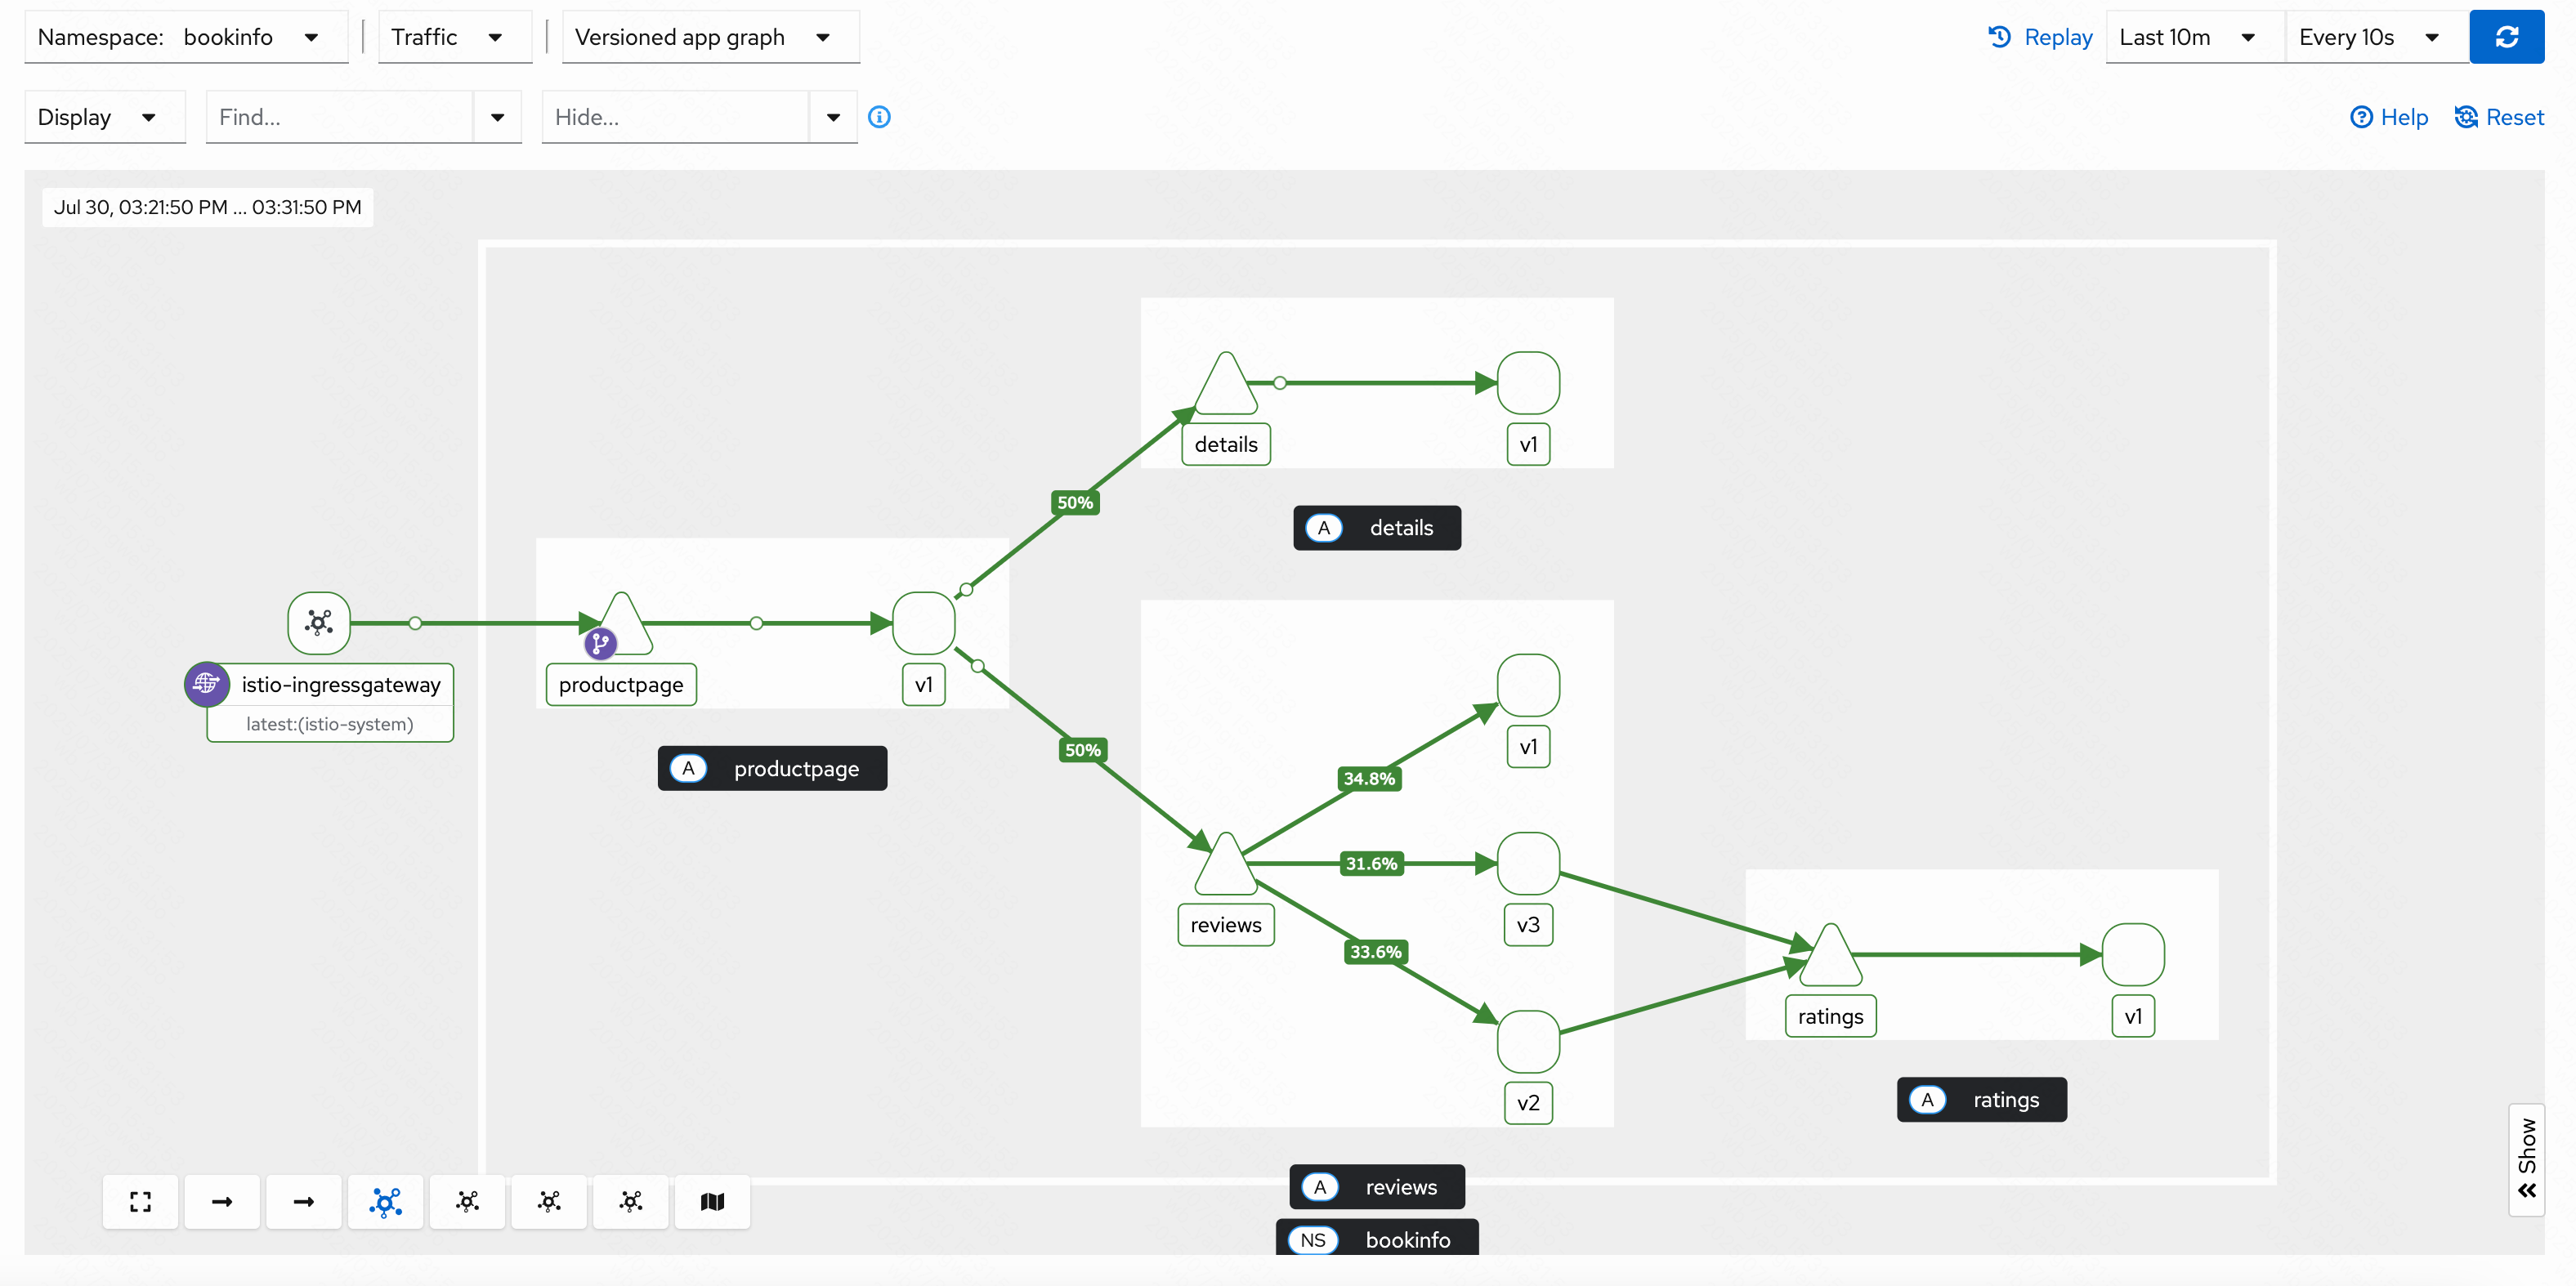
此時可以看到流量分配比較低的實例多次訪問會慢慢提高,符合最小連接數的算法。接下來將算法改成 RANDOM(生產環境建議使用 LEAST_REQUEST):
[root@k8s-master01 bookinfo]# vim reviews-dr.yaml
[root@k8s-master01 bookinfo]# cat reviews-dr.yaml
apiVersion: networking.istio.io/v1
kind: DestinationRule
metadata:
  name: reviews
spec:
  trafficPolicy:        # 添加路由策略,在 spec 下對所有的 subset 生效,也可以在 subset 中配置
    loadBalancer:       # 配置負載均衡
      simple: RANDOM    # 策略為 RANDOM
  host: reviews
  subsets:
  - name: v1
    labels:
      version: v1
  - name: v2
    labels:
      version: v2
  - name: v3
    labels:
      version: v3


[root@k8s-master01 bookinfo]# kubectl replace -f reviews-dr.yaml -n bookinfo
4.7 Istio 熔斷
Istio 支持熔斷機制,可以實現在高并發時對服務進行過載保護。
假設對 ratings 進行熔斷,希望在并發請求數超過 3,并且存在 1 個以上的待處理請求,就觸發熔斷,此時可以配置 ratings 的 DestinationRule 如下所示:
[root@k8s-master01 bookinfo]# vim ratings-dr.yaml
[root@k8s-master01 bookinfo]# cat ratings-dr.yaml
apiVersion: networking.istio.io/v1
kind: DestinationRule
metadata:
  name: ratings
  namespace: bookinfo
spec:
  host: ratings
  trafficPolicy:               # trafficPolicy 配置,可以配置在 subsets 級別
    connectionPool:            # 連接池配置,可以單獨使用限制程序的并發數
      tcp:
        maxConnections: 3      # 最大并發數為 3
      http:
        http1MaxPendingRequests: 1      # 最大的待處理請求
    outlierDetection:               # 熔斷探測配置
      consecutive5xxErrors: 1       # 如果連續出現的錯誤超過 1 次,就會被熔斷
      interval: 10s                 # 每 10 秒探測一次后端實例
      baseEjectionTime: 3m          # 熔斷的時間
      maxEjectionPercent: 100       # 被熔斷實例最大的百分比
  subsets:
  - labels:
      version: v1
    name: v1

[root@k8s-master01 bookinfo]# kubectl create -f ratings-dr.yaml -n bookinfo
保存退出后,部署測試工具 fortio,用于對容器業務進行壓力測試:
[root@k8s-master01 bookinfo]# kubectl apply -f ../samples/httpbin/sample-client/fortio-deploy.yaml -n bookinfo
等待 fortio 容器啟動后,獲取 fortio 容器 id:
[root@k8s-master01 bookinfo]# kubectl get po -n bookinfo | grep fortio
fortio-deploy-74ffb9b4d6-j28bh    2/2     Running   0              55s
發送一個請求,可以看到當前狀態碼為 200,即連接成功:
[root@k8s-master01 bookinfo]# kubectl exec -ti fortio-deploy-74ffb9b4d6-j28bh -n bookinfo -- fortio load -curl http://ratings:9080/ratings/0
....
HTTP/1.1 200 OK
....
接下來更改為兩個并發連接(-c 2),發送 20 請求(-n 20):
[root@k8s-master01 bookinfo]# kubectl exec -ti fortio-deploy-74ffb9b4d6-j28bh -n bookinfo -- fortio load -c 2 -qps 0 -n 20 -loglevel Warning http://ratings:9080/ratings/0 | grep Code
Code 200 : 20 (100.0 %)
可以看到 503 的結果為 12,說明觸發了熔斷。如果提高并發量,會觸發更高的熔斷:
[root@k8s-master01 bookinfo]# kubectl exec -ti fortio-deploy-74ffb9b4d6-j28bh -n bookinfo -- fortio load -c 20 -qps 0 -n 20 -loglevel Warning http://ratings:9080/ratings/0 | grep Code
Code 200 : 8 (40.0 %)
Code 503 : 12 (60.0 %)
4.8 Istio 注入延遲故障
Istio 支持為服務添加延遲和中斷,可以用于測試鏈路的可靠性,添加延遲只需要在 VirtualService 添加 fault 字段即可。
首先不添加任何延遲,看一下訪問速度如何
# 創建一個用于測試的工具
[root@k8s-master01 bookinfo]# kubectl create deploy -n bookinfo debug-tools --image=crpi-q1nb2n896zwtcdts.cn-beijing.personal.cr.aliyuncs.com/ywb01/debug-tools -- sleep 36000

# 查看pod
[root@k8s-master01 bookinfo]# kubectl get po -n bookinfo | grep debug-tools
debug-tools-6447995767-bq2hd      2/2     Running   0              99s

[root@k8s-master01 bookinfo]# kubectl exec -it debug-tools-6447995767-bq2hd -n bookinfo -- bash
(08:23 debug-tools-6447995767-bq2hd:/) time curl -I -s details:9080
....

real	0m0.095s
user	0m0.003s
sys	0m0.009s
不添加任何故障延遲時,095 秒左右就會返回結果。接下來注入一個 5s 的延遲:
[root@k8s-master01 bookinfo]# vim details-delay.yaml
[root@k8s-master01 bookinfo]# cat details-delay.yaml
apiVersion: networking.istio.io/v1
kind: VirtualService
metadata:
  name: details
spec:
  hosts:
  - details
  http:
  - fault:                  # 添加一個錯誤
      delay:                # 添加類型為 delay 的故障
        percentage:         # 故障注入的百分比
          value: 100        # 對所有請求注入故障
        fixedDelay: 5s      # 注入的延遲時間
    route:
    - destination:
        host: details


[root@k8s-master01 bookinfo]# kubectl create -f details-delay.yaml -n bookinfo
再次進行測試,返回時間已經達到了五秒:
(08:31 debug-tools-6447995767-bq2hd:/) time curl -I -s details:9080
....

real	0m5.022s
user	0m0.003s
sys	0m0.007s
4.9 Istio 注入中斷故障
中斷故障注入只需要將 fault 的 delay 更改為 abort 即可:
[root@k8s-master01 bookinfo]# vim details-abort.yaml
[root@k8s-master01 bookinfo]# cat details-abort.yaml
apiVersion: networking.istio.io/v1
kind: VirtualService
metadata:
  name: details
spec:
  hosts:
  - details
  http:
  - fault:
      abort:                # 更改為 abort 類型的故障
        percentage:
          value: 100
        httpStatus: 400     # 故障狀態碼
    route:
    - destination:
        host: details

# 替換該 VirtualService,再次訪問測試:
[root@k8s-master01 bookinfo]# kubectl replace -f details-abort.yaml -n bookinfo

 # 直接返回 400 錯誤
(08:40 debug-tools-6447995767-bq2hd:/) curl -I -s details:9080
HTTP/1.1 400 Bad Request
content-length: 18
content-type: text/plain
date: Wed, 30 Jul 2025 08:40:13 GMT
server: envoy
connection: close
5、企業內項目接入 Istio 流程
企業內項目接入 Istio 常見的有兩種情況:
- 需要注入 Istio Sidecar 進行流量管理的
- 不需要 Sidecar,只需要使用 ingressgateway
針對第一種情況,在建立服務時,最好配置 version 標簽,第二種情況一般無需特殊處理。
同時也需要考慮項目是否已經部署在 Kubernetes 集群內:
- 新項目還未部署:按照 Istio 的規范創建 Deployment 及 Service,及 Istio 的核心資源
- 已部署在集群中的:需要修改 Deployment、Service,以及按需轉為 Istio IngressGateway 對外提供服務
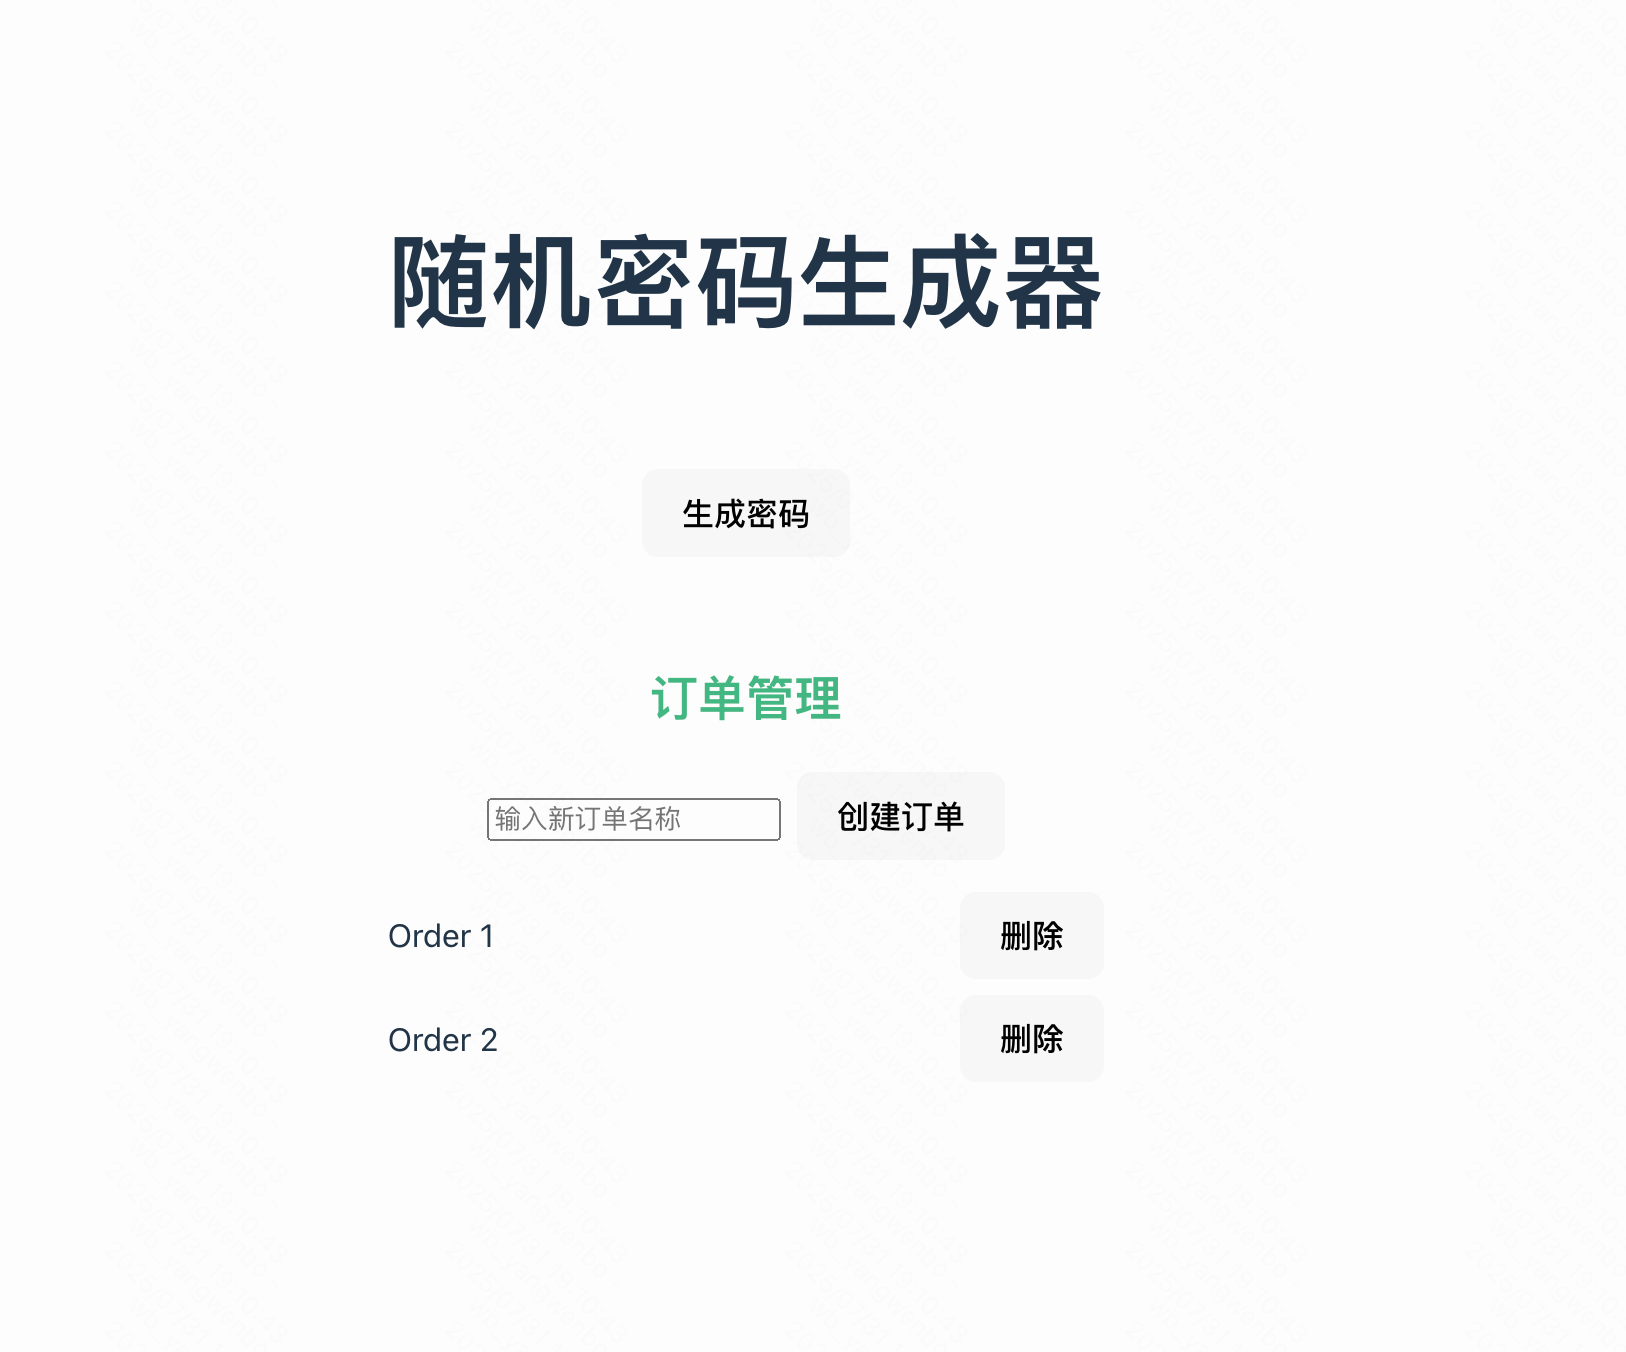
接下來以一個 Demo 項目為例,用于接入 Istio 并測試。
項目架構:
5.1 部署企業測試項目
5.1.1 部署 mysql 服務
[root@k8s-master01 demo]# kubectl create ns demo

# 部署數據庫
[root@k8s-master01 demo]# kubectl create -f mysql.yaml -f mysql-svc.yaml -f mysql-pvc.yaml -n demo

# 查看部署pod
[root@k8s-master01 demo]# kubectl get po -n demo
NAME                     READY   STATUS    RESTARTS   AGE
mysql-6d698b4676-75g2x   1/1     Running   0          66s

# 創建數據庫、用戶/密碼
[root@k8s-master01 demo]# kubectl exec -it mysql-6d698b4676-75g2x -n demo -- bash
root@mysql-6d698b4676-75g2x:/# mysql -uroot -p
....
Type 'help;' or '\h' for help. Type '\c' to clear the current input statement.

mysql> create database orders;
Query OK, 1 row affected (0.03 sec)

mysql> CREATE USER 'order'@'%' IDENTIFIED BY 'password';
Query OK, 0 rows affected (0.04 sec)

mysql> GRANT ALL ON orders.* TO 'order'@'%';
Query OK, 0 rows affected (0.02 sec)
5.1.2 部署 order 服務
# 創建Ingress
[root@k8s-master01 demo]# kubectl label node k8s-node02 ingress=true
[root@k8s-master01 demo]# kubectl create -f ingress-nginx-daemonset.yaml
# 添加 Version 字段
[root@k8s-master01 demo]# vim demo-order-deploy.yaml
[root@k8s-master01 demo]# cat demo-order-deploy.yaml
....
template:
metadata:
creationTimestamp: null
labels:
app: demo-order
version: v1
spec:
containers:
....
# 啟動 order 服務
[root@k8s-master01 demo]# kubectl create -f demo-order-deploy.yaml -f demo-order-svc.yaml -f demo-order-ingress.yaml -n demo
# 查看資源信息
[root@k8s-master01 demo]# kubectl get po,svc,ingress -n demo
NAME READY STATUS RESTARTS AGE
pod/demo-order-7c6ccb7865-b8btq 1/1 Running 0 83s
pod/mysql-6d698b4676-75g2x 1/1 Running 0 10m
NAME TYPE CLUSTER-IP EXTERNAL-IP PORT(S) AGE
service/mysql NodePort 10.102.167.87 <none> 3306:32541/TCP 10m
service/order ClusterIP 10.98.35.104 <none> 80/TCP 83s
NAME CLASS HOSTS ADDRESS PORTS AGE
ingress.networking.k8s.io/demo-order nginx demo.test.com 192.168.200.52 80 82s
# 測試訪問:
[root@k8s-master01 demo]# echo "192.168.200.52 demo.test.com" >> /etc/hosts
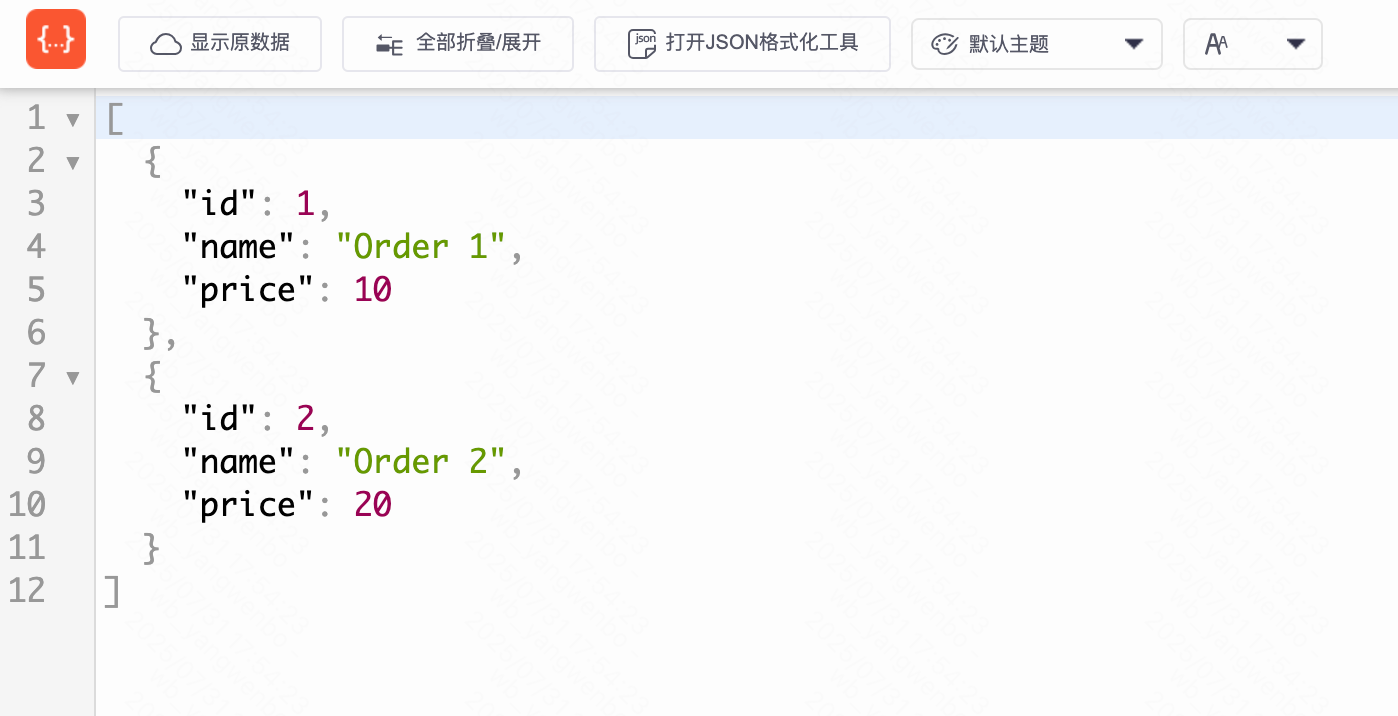
[root@k8s-master01 demo]# curl demo.test.com/orders
[{"id":1,"name":"Order 1","price":10},{"id":2,"name":"Order 2","price":20}]
5.1.3 部署 handler 服務
# 添加 Version 字段
[root@k8s-master01 demo]# vim demo-handler-deploy.yaml
[root@k8s-master01 demo]# cat demo-handler-deploy.yaml
....
  template:
    metadata:
      creationTimestamp: null
      labels:
        app: demo-handler
        version: v1
    spec:
      containers:
....

# 啟動 handler 服務
[root@k8s-master01 demo]# kubectl create -f demo-handler-deploy.yaml -f demo-handler-svc.yaml -n demo
5.1.4 部署 receive 服務
# 添加 Version 字段
[root@k8s-master01 demo]# vim demo-receive-deploy.yaml
[root@k8s-master01 demo]# cat demo-receive-deploy.yaml
....
  template:
    metadata:
      creationTimestamp: null
      labels:
        app: demo-receive
        version: v1
    spec:
      volumes:
....

# 啟動 receive 服務
[root@k8s-master01 demo]# kubectl create -f demo-receive-deploy.yaml -f demo-receive-svc.yaml -f demo-receive-ingress.yaml -n demo
5.1.5 部署 前端ui 服務
# 添加 Version 字段
[root@k8s-master01 demo]# vim demo-ui-deploy.yaml
[root@k8s-master01 demo]# cat demo-ui-deploy.yaml
....
  template:
    metadata:
      creationTimestamp: null
      labels:
        app: demo-ui
        version: v1
    spec:
      containers:
....

# 啟動 前端ui 服務
[root@k8s-master01 demo]# kubectl create -f demo-ui-deploy.yaml -f demo-ui-svc.yaml -f demo-ui-ingress.yaml -n demo
# 部署完畢后,最終的服務如下:
[root@k8s-master01 demo]# kubectl get po,svc -n demo
NAME                                READY   STATUS    RESTARTS   AGE
pod/demo-handler-775df45c67-gc55g   1/1     Running   0          32m
pod/demo-order-7c6ccb7865-b8btq     1/1     Running   0          75m
pod/demo-receive-6cf94f6d9f-6b6lh   1/1     Running   0          5m33s
pod/demo-ui-88c9b5f76-jmjb4         1/1     Running   0          43s
pod/mysql-6d698b4676-75g2x          1/1     Running   0          84m

NAME                   TYPE        CLUSTER-IP      EXTERNAL-IP   PORT(S)          AGE
service/demo-receive   ClusterIP   10.96.97.54     <none>        8080/TCP         5m32s
service/demo-ui        ClusterIP   10.98.249.2     <none>        80/TCP           43s
service/handler        ClusterIP   10.99.3.59      <none>        80/TCP           32m
service/mysql          NodePort    10.102.167.87   <none>        3306:32541/TCP   84m
service/order          ClusterIP   10.98.35.104    <none>        80/TCP           75m
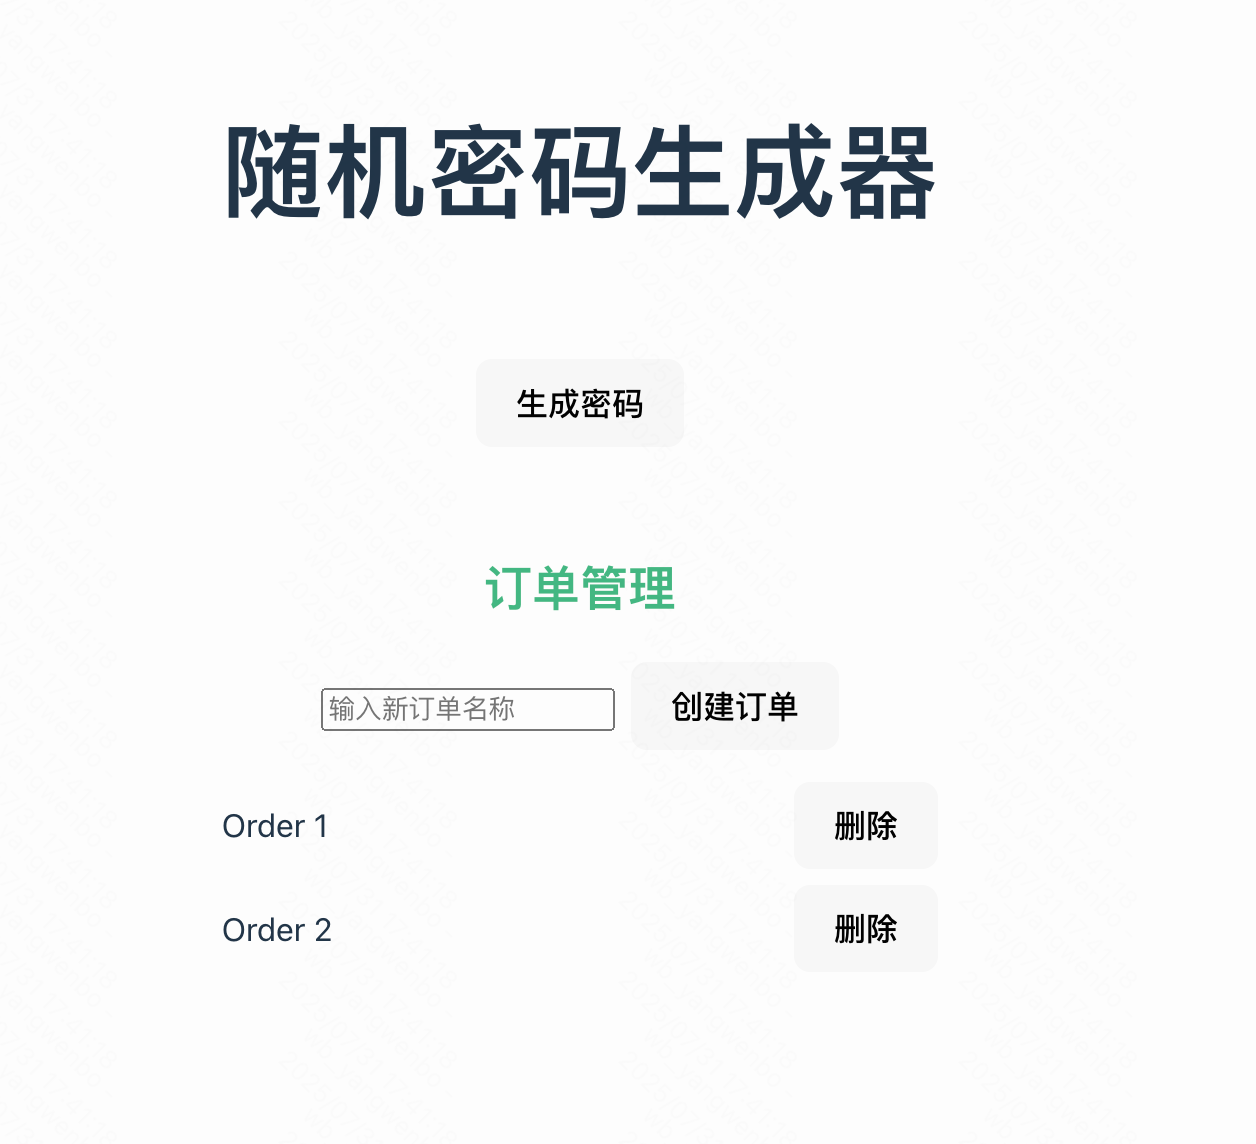
接下來通過瀏覽器訪問:
5.2 Istio 南北流量網關改造
如果想要使用 Istio 管理流量,建議服務的入口使用 IngressGateway 進行管理,也就是需要把之前由其他控制器管理的 Ingress 改造為由 Istio Gateway 管理(新項目直接創建即可,無需改造)。
5.2.1 創建Gateway
首先確認當前項目的 Ingress 配置有哪些:
[root@k8s-master01 demo]# kubectl get ingress -n demo
NAME           CLASS   HOSTS           ADDRESS        PORTS   AGE
demo-order     nginx   demo.test.com   192.168.200.52   80      108m
demo-receive   nginx   demo.test.com   192.168.200.52   80      38m
demo-ui        nginx   demo.test.com   192.168.200.52   80      33m
接下來為該項目創建一個 Gateway:
[root@k8s-master01 demo]# vim demo-gateway.yaml
[root@k8s-master01 demo]# cat demo-gateway.yaml
apiVersion: networking.istio.io/v1
kind: Gateway
metadata:
  name: demo-gateway
spec:
  selector:
    istio: ingressgateway       # 使用默認的 istio ingress gateway
  servers:
  - port:
      number: 80
      name: http
      protocol: HTTP
    hosts:
    - "demo.test.com"           # 發布域名

# 創建資源
[root@k8s-master01 demo]# kubectl create -f demo-gateway.yaml -n demo
[root@k8s-master01 demo]# kubectl get gw -n demo
NAME           AGE
demo-gateway   14s
5.2.2 改造 order 服務的 Ingress 為 VirtualService
查看 order 服務的配置詳情:
[root@k8s-master01 demo]# cat demo-order-ingress.yaml
apiVersion: networking.k8s.io/v1
kind: Ingress
metadata:
  name: demo-order
  namespace: demo
spec:
  ingressClassName: nginx
  rules:
  - host: demo.test.com
    http:
      paths:
      - backend:
          service:
            name: order
            port:
              number: 80
        path: /orders
        pathType: ImplementationSpecific
改造后的 VirtualService:
[root@k8s-master01 demo]# vim demo-order-vs.yaml
[root@k8s-master01 demo]# cat demo-order-vs.yaml
apiVersion: networking.istio.io/v1
kind: VirtualService
metadata:
  name: demo-order
spec:
  hosts:
  - "demo.test.com"
  gateways:
  - demo-gateway
  http:
  - match:
    - uri:
        prefix: /orders
    route:
    - destination:
        host: order
        port:
          number: 80

# 創建資源
[root@k8s-master01 demo]# kubectl create -f demo-order-vs.yaml -n demo
[root@k8s-master01 demo]# kubectl get vs -n demo
NAME         GATEWAYS           HOSTS               AGE
demo-order   ["demo-gateway"]   ["demo.test.com"]   7s
接下來通過瀏覽器訪問:
5.2.3 改造 receive 服務的 Ingress 為 VirtualService
查看 receive 服務的配置詳情:
[root@k8s-master01 demo]# cat demo-receive-ingress.yaml
apiVersion: networking.k8s.io/v1
kind: Ingress
metadata:
  annotations:
    nginx.ingress.kubernetes.io/rewrite-target: /$2
  name: demo-receive
  namespace: demo
spec:
  ingressClassName: nginx
  rules:
  - host: demo.test.com
    http:
      paths:
      - backend:
          service:
            name: demo-receive
            port:
              number: 8080
        path: /receiveapi(/|$)(.*)
        pathType: ImplementationSpecific
改造后的 VirtualService:
[root@k8s-master01 demo]# vim demo-receive-vs.yaml
[root@k8s-master01 demo]# cat demo-receive-vs.yaml
apiVersion: networking.istio.io/v1
kind: VirtualService
metadata:
  name: demo-receive
spec:
  hosts:
  - "demo.test.com"
  gateways:
  - demo-gateway
  http:
  - match:
    - uri:
        prefix: /receiveapi/
    rewrite:
        uri: /
    route:
    - destination:
        host: demo-receive
        port:
          number: 8080

# 創建資源
[root@k8s-master01 demo]# kubectl create -f demo-receive-vs.yaml -n demo
[root@k8s-master01 demo]# kubectl get vs -n demo
NAME           GATEWAYS           HOSTS               AGE
demo-order     ["demo-gateway"]   ["demo.test.com"]   78m
demo-receive   ["demo-gateway"]   ["demo.test.com"]   7s
5.2.4 改造 前端ui 服務的 Ingress 為 VirtualService
查看 前端ui 服務的配置詳情:
[root@k8s-master01 demo]# cat demo-ui-ingress.yaml
apiVersion: networking.k8s.io/v1
kind: Ingress
metadata:
  name: demo-ui
  namespace: demo
spec:
  ingressClassName: nginx
  rules:
  - host: demo.test.com
    http:
      paths:
      - backend:
          service:
            name: demo-ui
            port:
              number: 80
        path: /
        pathType: ImplementationSpecific
改造后的 VirtualService:
[root@k8s-master01 demo]# vim demo-ui-vs.yaml
[root@k8s-master01 demo]# cat demo-ui-vs.yaml
apiVersion: networking.istio.io/v1
kind: VirtualService
metadata:
  name: demo-ui
spec:
  hosts:
  - "demo.test.com"
  gateways:
  - demo-gateway
  http:
  - match:
    - uri:
        prefix: /
    route:
    - destination:
        host: demo-ui
        port:
          number: 80

# 創建資源
[root@k8s-master01 demo]# kubectl create -f demo-ui-vs.yaml -n demo
[root@k8s-master01 demo]# kubectl get vs -n demo
NAME           GATEWAYS           HOSTS               AGE
demo-order     ["demo-gateway"]   ["demo.test.com"]   83m
demo-receive   ["demo-gateway"]   ["demo.test.com"]   5m13s
demo-ui        ["demo-gateway"]   ["demo.test.com"]   7s
接下來即可通過 http://demo.test.com:30080 訪問該服務:
5.3 Istio 東西流量改造
如果需要 Istio 管理東西流量,需要注入 Istio 的 Sidecar。首先向 demo 的空間添加 Istio 注入的標簽:
[root@k8s-master01 demo]# kubectl label ns demo istio-injection=enabled
接下來重建所有 Pod,注入 Sidecar:
# 刪除所有pod
[root@k8s-master01 demo]# kubectl delete po -n demo --all

# 查看重新建立的pod
[root@k8s-master01 demo]# kubectl get po -n demo
NAME                            READY   STATUS    RESTARTS      AGE
demo-handler-775df45c67-f42pv   2/2     Running   2 (52s ago)   2m47s
demo-order-7c6ccb7865-5gnw7     2/2     Running   3 (91s ago)   2m47s
demo-receive-6cf94f6d9f-d7794   2/2     Running   0             2m47s
demo-ui-88c9b5f76-l4qsx         2/2     Running   0             2m47s
mysql-6d698b4676-ns6qw          2/2     Running   0             2m48s
之后給需要管理東西流量的 Service 創建 VirtualService 和 DestinationRule,比如給 handler服務創建 VirtualService 和 DestinationRule:
[root@k8s-master01 demo]# vim demo-handler-dr.yaml
[root@k8s-master01 demo]# cat demo-handler-dr.yaml
apiVersion: networking.istio.io/v1
kind: DestinationRule
metadata:
  name: handler
spec:
  host: handler
  subsets:
  - name: v1
    labels:
      version: v1
---
apiVersion: networking.istio.io/v1
kind: VirtualService
metadata:
  name: handler
  namespace: demo
spec:
  hosts:
  - handler
  http:
  - route:
    - destination:
        host: handler
        port:
          number: 80
        subset: v1

# 創建資源
[root@k8s-master01 demo]# kubectl create -f demo-handler-dr.yaml
[root@k8s-master01 demo]# kubectl get -f demo-handler-dr.yaml
NAME                                          HOST      AGE
destinationrule.networking.istio.io/handler   handler   8s

NAME                                         GATEWAYS   HOSTS         AGE
virtualservice.networking.istio.io/handler              ["handler"]   8s
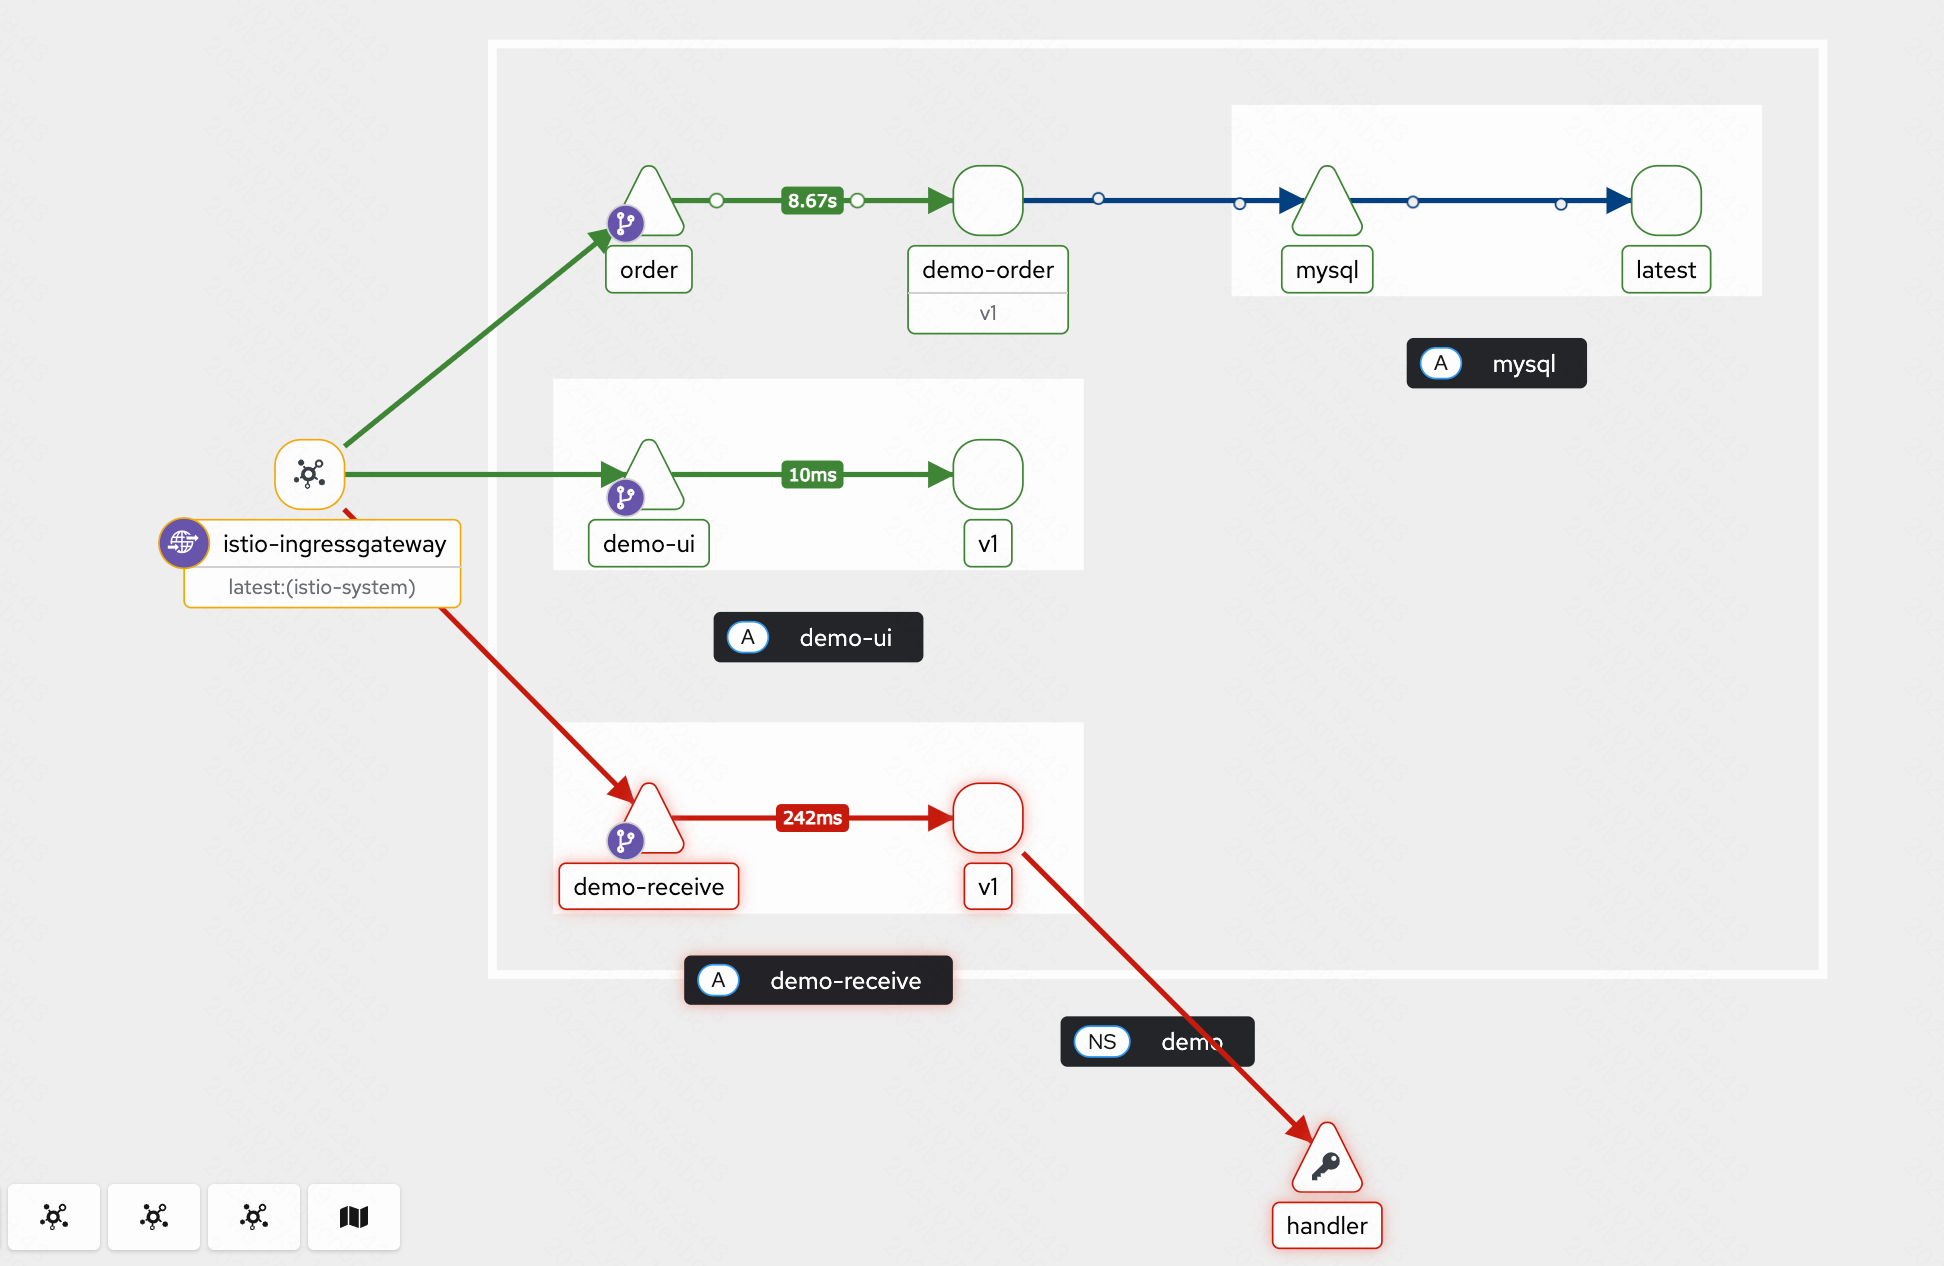
訪問測試后,查看 kiali 流量:

 浙公網安備 33010602011771號