

K8S(一)-搭建k8s集群
集群組成:
master 主節(jié)點,不需要太多,高可用
node 真正提供工作的節(jié)點,也叫worker節(jié)點,為了運行容器的節(jié)點
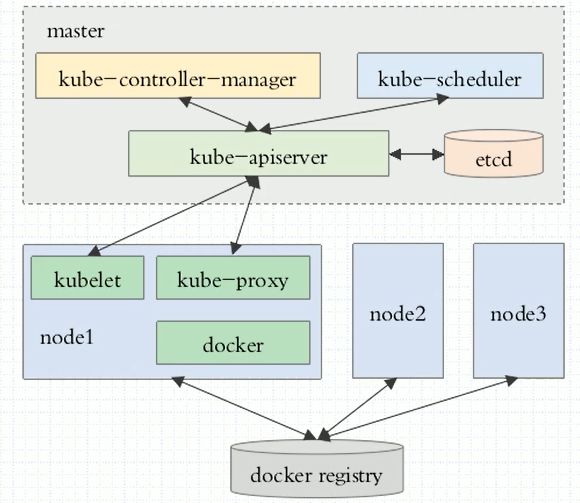
master節(jié)點主要由四個模塊組成:
- APIServer 提供了資源操作的唯一入口,任何對資源進行增刪改查的操作都要交給APIServer處理后再提交給etcd。kubectl就是對api server的調(diào)用。
- scheduler 負責資源的調(diào)度,按照預定的調(diào)度策略將Pod調(diào)度到相應的機器上;
- controller manager 負責維護集群的狀態(tài),比如故障檢測、自動擴展、滾動更新等;
- etcd k8s的DB。是一個kv類型的共享存儲,Kubernetes使用它來存儲各個資源的狀態(tài),支持Restful的API。
node節(jié)點主要由三個模塊組成:
- Container runtime 容器運行環(huán)境,常用docker容器
- kubelet 負責維護容器的生命周期,管理pods和pods上面的容器
- kube-proxy 負責為Service提供cluster內(nèi)部的服務發(fā)現(xiàn)和負載均衡,每一個service的變動都要靠kube-proxy來轉(zhuǎn)換成對應的規(guī)則
網(wǎng)絡:
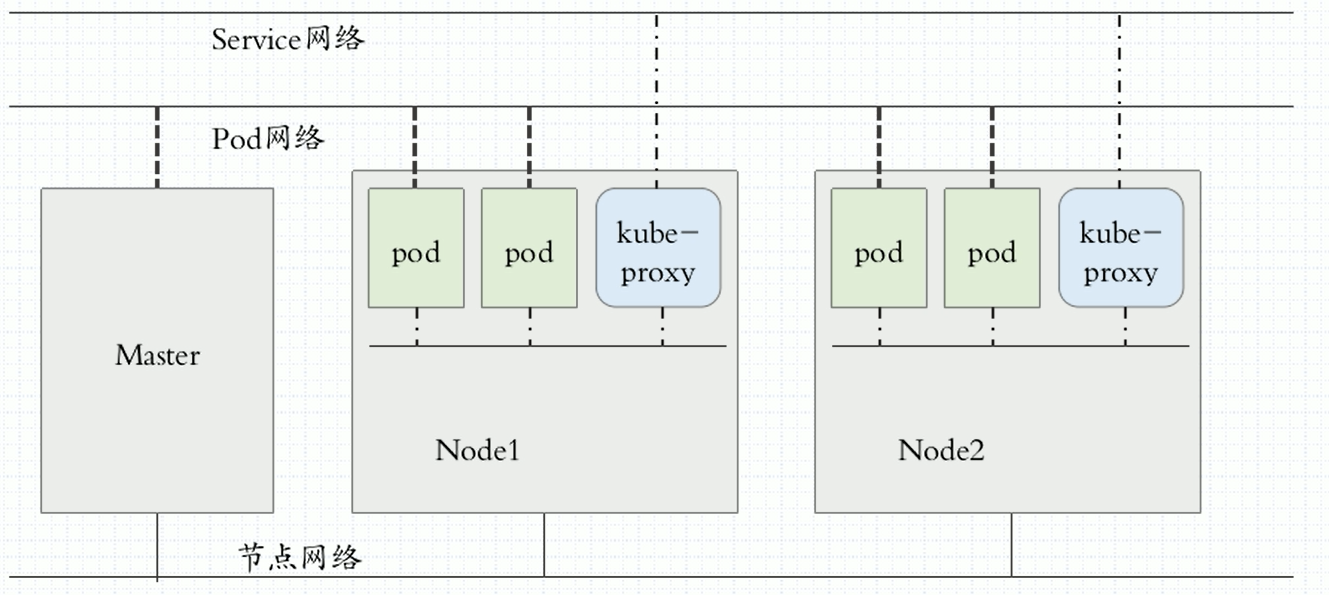
網(wǎng)絡解決方案:
k8s本身內(nèi)部不提供網(wǎng)絡解決方案,通過插件CNI(容器網(wǎng)絡接口)來提供, 這些網(wǎng)絡解決方案可以作為附件運行,也可以作為節(jié)點上的守護進程來運行。常見的有:
flannel:只支持網(wǎng)絡配置,不支持網(wǎng)絡策略, 疊加網(wǎng)絡實現(xiàn)(簡單)
calico:既支持網(wǎng)絡配置,又支持網(wǎng)絡策略,于bgp協(xié)議來實現(xiàn)直接路由的通信,(復雜)
canel:用flannel來提供網(wǎng)絡配置,用calico來支持網(wǎng)絡策略
安裝部署
方法1:將k8s所有組件都運行為系統(tǒng)級的守護進程,包括master節(jié)點上的4個組件和node節(jié)點上的3個組件。全部需要手動安裝,包括證書等,安裝過程較復雜。
方法2:使用kubeadm工具來部署,把k8s的組件運行為pod:master的4個組件全部運行為pod,node節(jié)點上的kube-proxy也運行為pod,需要注意這里的pod都是static pod。
這里采用方法2來安裝, kubeadm https://github.com/kubernetes/kubeadm
master&slave: 安裝kubeadm,docker, kubectl, flannel(支持pod間互相通信)
master : kubeadm init
slave: kubeadm join
1.時間同步,關閉防火墻。
2.安裝docker。wget https://mirrors.aliyun.com/docker-ce/linux/centos/docker-ce.repo
2.配置kubernetes yum源
[kubernetes]
name=kubernetes Repo
baseurl=https://mirrors.aliyun.com/kubernetes/yum/repos/kubernetes-el7-x86_64/
enabled=1
gpgcheck=1
gpgkey=https://mirrors.aliyun.com/kubernetes/yum/doc/rpm-package-key.gpg
wget https://mirrors.aliyun.com/kubernetes/yum/doc/rpm-package-key.gpg
rpm --import rpm-package-key.gpg
4.安裝所需組件
yum install kubelet-1.14.3 kubeadm-1.14.3 kubectl-1.14.3 docker-ce-18.09*
vim /etc/docker/daemon.json

{
"registry-mirrors": ["https://3s01e0d2.mirror.aliyuncs.com"],
"exec-opts": ["native.cgroupdriver=systemd"],
"log-driver": "json-file",
"log-opts": {
"max-size": "100m"
},
"storage-driver": "overlay2",
"storage-opts": [
"overlay2.override_kernel_check=true"
]
}
systemctl start docker
systemctl enable docker
echo 1 > /proc/sys/net/bridge/bridge-nf-call-ip6tables
echo 1 > /proc/sys/net/bridge/bridge-nf-call-iptables
忽略swap
vim /etc/sysconfig/kubelet
[root@heaven00 ~]# cat /etc/sysconfig/kubelet
KUBELET_EXTRA_ARGS="--fail-swap-on=false"
master節(jié)點
初始化master節(jié)點
# kubeadm init  --kubernetes-version=v1.14.3 --pod-network-cidr=10.244.0.0/16 --service-cidr=10.96.0.0/12 --ignore-preflight-errors=swap
[init] using Kubernetes version: v1.14.3
[preflight] running pre-flight checks
    [WARNING KubernetesVersion]: kubernetes version is greater than kubeadm version. Please consider to upgrade kubeadm. kubernetes version: beadm version: 1.11.x

[addons] Applied essential addon: CoreDNS
[addons] Applied essential addon: kube-proxy

Your Kubernetes master has initialized successfully!

To start using your cluster, you need to run the following as a regular user:

  mkdir -p $HOME/.kube
  sudo cp -i /etc/kubernetes/admin.conf $HOME/.kube/config
  sudo chown $(id -u):$(id -g) $HOME/.kube/config

You should now deploy a pod network to the cluster.
Run "kubectl apply -f [podnetwork].yaml" with one of the options listed at:
  https://kubernetes.io/docs/concepts/cluster-administration/addons/

You can now join any number of machines by running the following on each node
as root:

  kubeadm join 172.17.8.128:6443 --token 825yrh.qe2kpku40dwcwusb --discovery-token-ca-cert-hash sha256:02b158edd568a75523cb12a1561b65937bcf146319484fd86f88e9
執(zhí)行:
mkdir -p $HOME/.kube
sudo cp -i /etc/kubernetes/admin.conf $HOME/.kube/config
sudo chown $(id -u):$(id -g) $HOME/.kube/config
# kubectl get cs
# kubectl get nodes
NAME STATUS ROLES AGE VERSION
master01 NotReady master 164m v1.11.2 #nodes處于NotReady狀態(tài),因為缺少網(wǎng)絡組件
部署網(wǎng)絡組件 flannel
# kubectl apply -f https://raw.githubusercontent.com/coreos/flannel/master/Documentation/kube-flannel.yml
podsecuritypolicy.policy/psp.flannel.unprivileged created
clusterrole.rbac.authorization.k8s.io/flannel created
clusterrolebinding.rbac.authorization.k8s.io/flannel created
serviceaccount/flannel created
configmap/kube-flannel-cfg created
daemonset.apps/kube-flannel-ds-amd64 created
daemonset.apps/kube-flannel-ds-arm64 created
daemonset.apps/kube-flannel-ds-arm created
daemonset.apps/kube-flannel-ds-ppc64le created
daemonset.apps/kube-flannel-ds-s390x created
等待一會兒
docker image ls 看到flannel鏡像下載下來
kubectl get pods -n kube-system 查看pods運行在,
才說明flannel安裝成功
# kubectl get pods -n kube-system
NAME                               READY   STATUS    RESTARTS   AGE
coredns-8686dcc4fd-qg5jz           1/1     Running   0          4m33s
coredns-8686dcc4fd-vx64c           1/1     Running   0          4m33s
etcd-master01                      1/1     Running   0          3m46s
kube-apiserver-master01            1/1     Running   0          3m42s
kube-controller-manager-master01   1/1     Running   0          3m33s
kube-flannel-ds-amd64-5sbrx        1/1     Running   1          2m49s
kube-flannel-ds-amd64-wlr5x        1/1     Running   0          3m34s
kube-proxy-d2pzd                   1/1     Running   0          2m49s
kube-proxy-gpwkg                   1/1     Running   0          4m33s
kube-scheduler-master01            1/1     Running   0          3m49s
再查看 kubectl get nodes 會看到已經(jīng)ready
# kubectl get nodes
NAME            STATUS   ROLES    AGE     VERSION
master01        Ready    master   5m52s   v1.14.3
# kubelet get ns
node節(jié)點
安裝組件
# yum install kubelet-1.14.3 kubeadm-1.14.3 kubectl-1.14.3
加入集群
# kubeadm join 172.17.8.128:6443 --token j1u40p.5is2liahibv1gwgk  --discovery-token-ca-cert-hash sha256:51579863a2ff093f730c0552c13c44ea87e270064a7fc9ba5bac069ca47cf2cb
[preflight] Running pre-flight checks
[preflight] Reading configuration from the cluster...
[preflight] FYI: You can look at this config file with 'kubectl -n kube-system get cm kubeadm-config -oyaml'
[kubelet-start] Downloading configuration for the kubelet from the "kubelet-config-1.14" ConfigMap in the kube-system namespace
[kubelet-start] Writing kubelet configuration to file "/var/lib/kubelet/config.yaml"
[kubelet-start] Writing kubelet environment file with flags to file "/var/lib/kubelet/kubeadm-flags.env"
[kubelet-start] Activating the kubelet service
[kubelet-start] Waiting for the kubelet to perform the TLS Bootstrap...

This node has joined the cluster:
* Certificate signing request was sent to apiserver and a response was received.
* The Kubelet was informed of the new secure connection details.

Run 'kubectl get nodes' on the control-plane to see this node join the cluster.
node加入集群后 在master上面查看
]# kubectl get nodes
NAME STATUS ROLES AGE VERSION
node01 Ready <none> 3d21h v1.14.3
master01 Ready master 3d21h v1.14.3
kubectl get pods -n kube-system -o wide 可以查看集群內(nèi)所有的pods,包括node節(jié)點的
報錯1:
啟動docker時報錯:Error starting daemon: Error initializing network controller: list bridge addresses failed: no available network


解決:需要手動添加下docker0網(wǎng)橋:,注意不要跟虛擬機在同一網(wǎng)段
brctl addbr docker0
ip addr add 172.17.0.1/16 dev docker0
ip link set dev docker0 up
systemctl restart docker
報錯2:初始化kubeadm時
[preflight] Some fatal errors occurred:
[ERROR ImagePull]: failed to pull image [k8s.gcr.io/kube-apiserver-amd64:v1.14.3]: exit status 1
[ERROR ImagePull]: failed to pull image [k8s.gcr.io/kube-controller-manager-amd64:v1.14.3]: exit status 1
[ERROR ImagePull]: failed to pull image [k8s.gcr.io/kube-scheduler-amd64:v1.14.3]: exit status 1
[ERROR ImagePull]: failed to pull image [k8s.gcr.io/kube-proxy-amd64:v1.14.3]: exit status 1
[ERROR ImagePull]: failed to pull image [k8s.gcr.io/pause:3.1]: exit status 1
[ERROR ImagePull]: failed to pull image [k8s.gcr.io/etcd-amd64:3.2.18]: exit status 1
[ERROR ImagePull]: failed to pull image [k8s.gcr.io/coredns:1.1.3]: exit status 1
[preflight] If you know what you are doing, you can make a check non-fatal with `--ignore-preflight-errors=...`
解決方法:
通過別的鏡像倉庫,先將鏡像下載下來然后再修改成k8s.gcr.io對應的tag
docker pull mirrorgooglecontainers/kube-apiserver-amd64:v1.14.3
docker pull mirrorgooglecontainers/kube-controller-manager-amd64:v1.14.3
docker pull mirrorgooglecontainers/kube-scheduler-amd64:v1.14.3
docker pull mirrorgooglecontainers/kube-proxy-amd64:v1.14.3
docker pull mirrorgooglecontainers/pause:3.1
docker pull mirrorgooglecontainers/etcd-amd64:3.2.18
docker pull coredns/coredns:1.3.1
修改tag:
docker tag mirrorgooglecontainers/kube-apiserver-amd64:v1.14.3 k8s.gcr.io/kube-apiserver:v1.14.3
docker tag mirrorgooglecontainers/kube-controller-manager-amd64:v1.14.3 k8s.gcr.io/kube-controller-manager:v1.14.3
docker tag mirrorgooglecontainers/kube-scheduler-amd64:v1.14.3 k8s.gcr.io/kube-scheduler:v1.14.3
docker tag mirrorgooglecontainers/etcd-amd64:3.2.18 k8s.gcr.io/etcd:3.3.10
docker tag mirrorgooglecontainers/kube-proxy-amd64:v1.14.3 k8s.gcr.io/kube-proxy:v1.14.3
docker tag coredns/coredns:1.3.1 k8s.gcr.io/coredns:1.3.1
docker tag mirrorgooglecontainers/pause:3.1 k8s.gcr.io/pause:3.1
報錯3: node 執(zhí)行 kubeadm join 加入集群時報錯:
報錯1:configmaps "kubelet-config-1.11" is forbidden: User "system:bootstrap:wdchig" cannot get resource "configmaps" in API group "" in the namespacetem"
原因:版本問題,當前版本為1.11.2 。需要升級kubelet和kubeadm。按照上面的安裝步驟來,安裝的時候指定版本即可。
報錯2:couldn't validate the identity of the API Server: expected a 32 byte SHA-256 hash, found 29 bytes
原因:kubeadm init生成的token有效期只有1天
解決方法:
在master節(jié)點檢查token是否有效
master # kubeadm token list 查看
master# kubeadm token create --print-join-command --ttl 0 生成新的token和命令。然后在node重新執(zhí)行
--ttl 0 不過期
報錯4: 重新執(zhí)行初始化的時候報錯: error marking master: timed out waiting for the condition
解決:
# kubeadm reset -f && rm -rf /etc/kubernetes/
清理集群數(shù)據(jù) 然后再 kubeadm init --kubernetes-version=v1.14.3 --pod-network-cidr=10.244.0.0/16 --service-cidr=10.96.0.0/12 --ignore-preflight-errors=Swap
報錯5: master節(jié)點顯示master狀態(tài)為NotRedy。 coredns CrashLoopBackOff
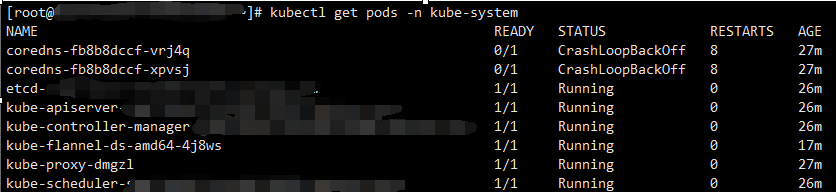
在網(wǎng)上找到方法, 說是CoreDNS啟動后會通過宿主機的resolv.conf文件去獲取上游DNS的信息,如果這個時候獲取的DNS的服務器是本地地址的話,就會出現(xiàn)環(huán)路,從而被環(huán)路識別器識別出來。
解決 :查看機器 /etc/resolv.conf
nameserver 127.0.0.1 修改為 nameserver 114.114.114.114 ,重新初始化后解決
報錯6: node節(jié)點join時正常,但是在master查看時node顯示NotReady狀態(tài)。
# kubectl get nodes
NAME STATUS ROLES AGE VERSION
node01 NotReady <none> 3d20h v1.14.3
master01 Ready master 3d21h v1.14.3

# kubectl describe pod kube-proxy-l6pwk -n kube-system 查看pod詳細信息
# kubectl -n kube-system logs kube-proxy-l6pwk 查看日志
Warning FailedCreatePodSandBox 60m (x1999 over 3d20h) kubelet, node01 Failed create pod sandbox: rpc error: code = Unknown desc = failed pulling image "k8s.gcr.io/pause:3.1": Error response from daemon: Get https://k8s.gcr.io/v1/_ping: dial tcp 74.125.204.82:443: getsockopt: connection timed out
通過手動拉取鏡像并打tag。解決。
報錯7: 加入集群后node狀態(tài)為NotReady
journalctl -f -u kubelet 可在節(jié)點機器查看kubelet的輸出日志信息
E0528 18:56:54.890957 24778 kubelet.go:2170] Container runtime network not ready: NetworkReady=false reason:NetworkPluginNotReady message:docker: network plugin is not ready: cni config uninitialized
docker pull quay.io/coreos/flannel:v0.12.0-amd64

 浙公網(wǎng)安備 33010602011771號