

Zabbix 監控服務介紹
Zabbix 監控服務介紹
一、Zabbix 監控服務介紹
1.1.1 Zabbix 監控服務介紹
- Zabbix 監控介紹
1、Zabbix 由 Alexei Vladishev 創建,目前由其成立的公司—— Zabbix SIA 積極的持續開發更新維護, 并為用戶提供技術支持服務。
2、Zabbix 是一個企業級分布式開源監控解決方案。
3、Zabbix 軟件能夠監控眾多網絡參數和服務器的健康度、完整性。Zabbix 使用靈活的告警機制,允許用戶為幾乎任何事件配置基于郵件的告警。這樣用戶可以快速響應服務器問題。Zabbix基于存儲的數據提供出色的報表和數據可視化功能。這些功能使得 Zabbix 成為容量規劃的理想選擇。
4、Zabbix 支持主動輪詢(polling)和被動捕獲(trapping)。Zabbix所有的報表、統計數據和配置參數都可以通過基于 Web 的前端頁面進行訪問。基于 Web 的前端頁面確保您可以在任何地方訪問您監控的網絡狀態和服務器健康狀況。適當的配置后,Zabbix 可以在監控 IT基礎設施方面發揮重要作用。無論是對于有少量服務器的小型組織,還是擁有大量服務器的大企業而言,同樣適用。
5、Zabbix 是免費的。Zabbix 是根據 GPL 通用公共許可證的第二版編寫和發布的。這意味著產品源代碼是免費發布的,可供公共使用。
- Zabbix 功能介紹
概述
Zabbix 是一個高度成熟完善得網絡監控解決方案,一個的軟件包中包含了多種功能。
數據采集
可用性和性能檢查
支持SNMP(包括主動輪詢和被動捕獲),IPMI,JMX,VMware監控;
自定義檢查
按照自定義的時間間隔采集需要的數據
通過Server、Proxy和Agents來執行數據采集
靈活的閾值定義
您可以參考后端數據庫定義非常靈活的告警閾值,即觸發器
高度可配置的告警
可以更具遞增計劃,接受者,媒介類型自定義發送告警通知
使用宏變量可以使告警通知變得更加高效有用
自動操作包含遠程執行命令
實時圖型
使用內置圖形功能可以將監控項實時繪制成圖形。
Web監控功能
Zabbix 可以追蹤模擬鼠標在Web網站上的點擊操作,來檢查Web網站的功能和響應時間。
豐富的可視化選項
可以組合多個監控項到單個視圖中,創建自定義圖表。
網絡拓撲圖
以儀表盤樣式展現自定義聚合圖形和幻燈片演示;
報表
監控資源的更高層次展示視圖(業務視圖);
歷史數據存儲
存儲在數據庫中的數據
歷史配置
內置數據管理機制(housekeeping)
配置簡單
將被監控設備添加為主機
主機一旦添加到數據庫中,就會采集數據用于監控
將模板用于監控設備
使用模板
模板中分組檢查
模板可以關聯模板,繼承已關聯模板的屬性
網絡發現
自動發現網絡設備
Zabbix Agent 發現設備后自動注冊
自動發現文件系統,網絡接口和Snmp OIDs值。
快捷的Web界面
基于PHP的Web前段;
可以從任何地方訪問
您可以定制自己的操作方式
您可以通過審計日志來查看您的操作
Zabbix API
Zabbix API 為Zabbix 提供可編程接口,用于批量操作,第三方軟件集成和其他用途.
權限管理系統
安全的用戶身份驗證
指定的用戶只能查看指定的權限范圍內的視圖;
功能強大且易于擴展的Zabbix Agent
部署于被監控對象上
支持Linux和Windows;
二進制守護進程
為了更好的性能和更少的內存占用,采用C語言編寫;
便于移植.
適用更復雜的環境
適用Zabbix Proxy代理,可以輕松實現分布式遠程監控.
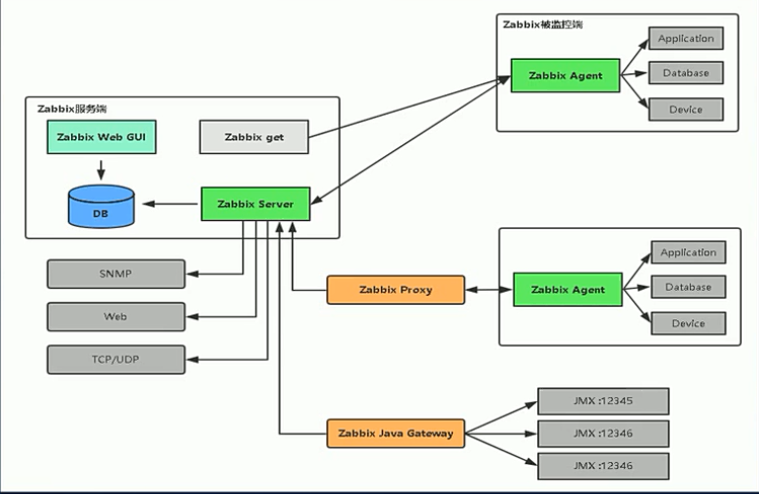
Zabbix 概述
架構
Zabbix 由幾個主要的功能組成,其功能介紹如下所示
Server
Zavvix server 是Zabbix軟件的核心組件,agent向其報告可用性,系統完善性信息和統計信息.server也是存儲所有配置信息,統計信息和操作信息的核心存儲庫.
數據庫
所有配置信息以及Zabbix 采集的數據都被存儲在數據庫中
Web 界面
所有配置信息以及Zabbix 采集到的數據都被存儲在數據庫中;
Proxy
Zabbix agents 部署在被監控目標上,用于主動監控本地資源和應用程序,并將收集數據發送給Zabbix server;
Agent
Zabbix agent 部署在被監控目標上,用于主動監控本地資源和應用程序,并將收集的數據發送給Zabbix server.
數據流
另外,回過頭來整體的了解下Zabbix的內部的數據流對Zabbix 的使用也很重要.首先,為了創建一個采集數據的監控項,您就必須要先創建主機.其次,在任務的另外一端,必須要有監控項才能創建觸發器(trigger),必須要有觸發器來創建動作(action).因此,如果您想要收到 “X個server上CPU負載過高” 這樣的告警,您必須首先為Server X創建一個主機條目,其次創建一個用于監控器CPU的監控項,最后創建一個觸發器,用來觸發CPU負載過高這個動作,并將其發送到您的郵箱中.雖然這些步驟看起來很繁瑣,但是使用模板的話,實際操作非常簡單.也正是由于這種設計,使得Zabbix的配置變得更加靈活易用.
更多內容請看官方文檔:https://www.zabbix.com/documentation/4.0/zh/manual
1.1.2 如何去做監控
- 如何去做監控
初級:
1、識別監控對象
3、理解監控對象
3、細分監控對象指標
4、確定告警的基準線
5、工具化和監控分離
6、監控對象的分類
      ----硬件監控 (機房巡檢、IPMI、SNMP)
      ----系統監控  (對象:CPU、內存、IO【磁盤、網絡】)
      ----軟件服務監控(對象:各類軟件服務(Nginx|Tomcat|RabbitMQ|MySQL等))
      ----日志監控(方法:Elastic stack)
      ----網絡監控(方法:第三方:Smokeping)
      ----流量監控(工具:Piwik等)
      ----其它監控(APP監控、安全監控、業務監控等)
      ----APM應用性能管理監控 (開源的APM應用性能管理工具:pinpoint)
3、掌握一個監控工具:如Zabbix
中級:
0、標準化監控(標準化的腳本、模板、....。)
1、分布式監控(主動、被動、分布式)
2、自動化監控(自動發現、自動注冊(Agent主動注冊、server主動添加API))
3、性能優化(數據采集、數據存儲、數據查詢)
4、二次開發(定制報表、API調用)

進階:
1、動態告警
2、智能告警:1.告警去重 2.依賴
3、故障自愈
4、大規模(集群)(時間驅動、主動控制)
1.13 硬件監控
- 硬件監控(IPMI)
文檔地址:https://www.ibm.com/developerworks/cn/linux/l-ipmi/index.html
          https://blog.csdn.net/ygqygq2/article/details/53264993
yum install OpenIPMI ipmitool -y
- 硬件監控(SNMP)
文檔參考:http://www.ttlsa.com/zabbix/zabbix-snmp-install/
          http://www.rzrgm.cn/zoulongbin/p/7792772.html
[root@zabbix ~]# yum -y install net-snmp net-snmp-libs net-snmp-utils
編輯配置文件
[root@zabbix ~]# cp /etc/snmp/snmpd.conf{,.back}
[root@zabbix ~]# ll /etc/snmp/snmpd.conf{,.back}
-rw------- 1 root root 18861 Jun 23 23:39 /etc/snmp/snmpd.conf
-rw------- 1 root root 18861 Jul  8 00:26 /etc/snmp/snmpd.conf.back

修改如下:(測試操作,不代表生產)
[root@zabbix ~]# grep  "^[a-z]" /etc/snmp/snmpd.conf
com2sec admin  default       admin
group    admin v2c                    admin
view     admin         included   .1 80
access  admin ""      any       noauth    exact  admin admin none

啟動SNMP服務:
[root@zabbix ~]# systemctl start snmpd
[root@zabbix ~]# systemctl enable snmpd
Created symlink from /etc/systemd/system/multi-user.target.wants/snmpd.service to /usr/lib/systemd/system/snmpd.service.

默認監聽udp的161端口
[root@zabbix ~]# ss -luntp|grep snmp
udp    UNCONN     0      0         *:161                   *:*                   users:(("snmpd",pid=1445,fd=6))
tcp    LISTEN     0      128    127.0.0.1:199                   *:*                   users:(("snmpd",pid=1445,fd=7))

5分鐘的負載
[root@zabbix ~]# snmpget -v 2c -c admin 10.4.7.62 .1.3.6.1.4.1.2021.10.1.3.1
UCD-SNMP-MIB::laLoad.1 = STRING: 0.00
10分鐘的負載
[root@zabbix ~]# snmpget -v 2c -c admin 10.4.7.62 .1.3.6.1.4.1.2021.10.1.3.2
UCD-SNMP-MIB::laLoad.2 = STRING: 0.01
15分鐘的負載
[root@zabbix ~]# snmpget -v 2c -c admin 10.4.7.62 .1.3.6.1.4.1.2021.10.1.3.3
UCD-SNMP-MIB::laLoad.3 = STRING: 0.05

如果不知道3后面有哪些節點可以用這個命令查看
[root@zabbix ~]# snmpwalk -v 2c -c admin 10.4.7.62 .1.3.6.1.4.1.2021.10.1.3 #3后面不能加支節點
UCD-SNMP-MIB::laLoad.1 = STRING: 0.00
UCD-SNMP-MIB::laLoad.2 = STRING: 0.01
UCD-SNMP-MIB::laLoad.3 = STRING: 0.05

內存查看:
[root@zabbix ~]# snmpget -v 2c -c admin 10.4.7.62 .1.3.6.1.2.1.25.2.2.0
HOST-RESOURCES-MIB::hrMemorySize.0 = INTEGER: 2027924 KBytes

SNMP OID列表 監控需要用到的OID:http://www.ttlsa.com/monitor/snmp-oid/
1.1.4 系統監控
- CPU監控
[root@zabbix ~]# top
top - 22:28:36 up  2:18,  1 user,  load average: 0.01, 0.02, 0.05
Tasks:  86 total,   2 running,  84 sleeping,   0 stopped,   0 zombie
%Cpu(s):  0.0 us,  0.0 sy,  0.0 ni,100.0 id,  0.0 wa,  0.0 hi,  0.0 si,  0.0 st
KiB Mem :  2027924 total,  1829364 free,    91704 used,   106856 buff/cache
KiB Swap:  1048572 total,  1048572 free,        0 used.  1802536 avail Mem

   PID USER      PR  NI    VIRT    RES    SHR S %CPU %MEM     TIME+ COMMAND
  1378 root      20   0  227984  10872   6500 S  0.0  0.5   0:02.96 snmpd

top - 22:28:36 up  2:18,    1 user,      load average: 0.01, 0.02, 0.05
命令  系統當前時間 啟動時間 當前使用用戶  當前1 5 15分鐘的負載情況

Tasks:  86 total,   2 running,      84 sleeping,   0 stopped,   0 zombie
任務    當前任務     正在運行的任務  睡眠的任務    停止的任務    僵死的任務

%Cpu(s):  0.0 us,  0.0 sy,  0.0 ni,         100.0 id,   0.0 wa,  0.0 hi,  0.0 si,  0.0 st
CPU        用戶態   內核態  優先級為負數     資源閑置率   IO等待    硬中斷    軟中斷

KiB Mem :  2027924 total,  1829364 free,    91704 used,   106856 buff/cache  內存
KiB Swap:  1048572 total,  1048572 free,        0 used.  1802536 avail Mem   交換分區

PID    USER      PR           NI    VIRT              RES               SHR              S     %CPU         %MEM           TIME+ COMMAND
進程ID  用戶     進程優先級         進程占的虛擬內存  進程占的常駐內存  進程占的共享內存      進程占用的CPU 進程占用的內存  進程占用CPU的總時間

按1 顯示所有CPU使用情況
按P 按CPU使用率從大到小排序
按M 按內存使用率從大到小排序
負載:單位時間內運行隊列中就緒等待的進程數平均值

[root@zabbix ~]# cat /proc/loadavg
0.00 0.01 0.05 1/94 14013

常用監控命令的安裝包:sysstat
[root@zabbix ~]# yum install sysstat -y

內存監控
[root@zabbix ~]# vmstat 1 5
procs -----------memory---------- ---swap-- -----io---- -system-- ------cpu-----
 r  b   swpd   free   buff  cache   si   so    bi    bo   in   cs us sy id wa st
 0  0      0 1750660   3140 176912    0    0    12     5   26   42  0  0 99  0  0
 2  0      0 1749620   3140 176912    0    0     0     0   48   79  0  0 100  0  0
 0  0      0 1748792   3140 177008    0    0     0     0  103  335  1  2 97  0  0
 0  0      0 1748792   3140 177008    0    0     0     0   46   76  0  1 99  0  0
 0  0      0 1748792   3140 177008    0    0     0     0   54   88  0  0 100  0  0

CPU監控
[root@zabbix ~]# mpstat 1 5
Linux 3.10.0-1062.18.1.el7.x86_64 (zabbix) 	07/08/2020 	_x86_64_	(1 CPU)

11:10:25 PM  CPU    %usr   %nice    %sys %iowait    %irq   %soft  %steal  %guest  %gnice   %idle
11:10:26 PM  all    0.00    0.00    0.00    0.00    0.00    0.00    0.00    0.00    0.00  100.00
11:10:27 PM  all    0.00    0.00    0.00    0.00    0.00    0.00    0.00    0.00    0.00  100.00
11:10:28 PM  all    0.00    0.00    0.00    0.00    0.00    0.00    0.00    0.00    0.00  100.00
11:10:29 PM  all    0.00    0.00    0.00    0.00    0.00    0.00    0.00    0.00    0.00  100.00
11:10:30 PM  all    0.00    0.00    0.00    0.00    0.00    0.99    0.00    0.00    0.00   99.01
Average:     all    0.00    0.00    0.00    0.00    0.00    0.20    0.00    0.00    0.00   99.80

[root@zabbix ~]# lscpu
Architecture:          x86_64
CPU op-mode(s):        32-bit, 64-bit
Byte Order:            Little Endian
CPU(s):                1
On-line CPU(s) list:   0
Thread(s) per core:    1
Core(s) per socket:    1
Socket(s):             1
NUMA node(s):          1
Vendor ID:             GenuineIntel
CPU family:            6
Model:                 142
Model name:            Intel(R) Core(TM) i7-7500U CPU @ 2.70GHz
Stepping:              9
CPU MHz:               2904.003
BogoMIPS:              5808.00
Hypervisor vendor:     VMware
Virtualization type:   full
L1d cache:             32K
L1i cache:             32K
L2 cache:              256K
L3 cache:              4096K
NUMA node0 CPU(s):     0
Flags:                 fpu vme de pse tsc msr pae mce cx8 apic sep mtrr pge mca cmov pat pse36 clflush mmx fxsr sse sse2 ss syscall nx pdpe1gb rdtscp lm constant_tsc arch_perfmon nopl xtopology tsc_reliable nonstop_tsc eagerfpu pni pclmulqdq ssse3 fma cx16 pcid sse4_1 sse4_2 x2apic movbe popcnt tsc_deadline_timer aes xsave avx f16c rdrand hypervisor lahf_lm abm 3dnowprefetch invpcid_single ssbd ibrs ibpb stibp fsgsbase tsc_adjust bmi1 avx2 smep bmi2 invpcid rdseed adx smap clflushopt xsaveopt xsavec arat spec_ctrl intel_stibp flush_l1d arch_capabilities
- MEM&IO監控
[root@zabbix ~]# cat /proc/meminfo
[root@zabbix ~]# free -h
              total        used        free      shared  buff/cache   available
Mem:           1.9G         94M        1.7G        9.4M        176M        1.7G
Swap:          1.0G          0B        1.0G

[root@zabbix ~]# vmstat 1 5
procs -----------memory---------- ---swap-- -----io---- -system-- ------cpu-----
 r  b   swpd   free   buff  cache   si   so    bi    bo   in   cs us sy id wa st
 0  0      0 1750192   3140 177336    0    0    11     5   25   41  0  0 99  0  0
 0  0      0 1750168   3140 177336    0    0     0     0   25   35  0  0 100  0  0
 0  0      0 1750168   3140 177336    0    0     0     0   23   27  0  0 100  0  0
 0  0      0 1750168   3140 177336    0    0     0     0   24   35  0  0 100  0  0
 0  0      0 1750168   3140 177336    0    0     0     0   16   24  0  0 100  0  0

不使用交換分區
[root@zabbix ~]# cat /proc/sys/vm/swappiness
60
[root@zabbix ~]# cat  0 >/proc/sys/vm/swappiness  #mysql數據庫建議設為0
永久生效
[root@zabbix ~]# vim /etc/sysctl.conf
swappiness=0
[root@zabbix ~]# sysctl -p /etc/sysctl.conf

-w  臨時改變某個指定參數的值
-a  顯示所有的系統參數
-p  從指定的文件加載系統參數,如不指定即從/etc/sysctl.conf中加載

IO監控
[root@zabbix ~]# iotop
Total DISK READ :	0.00 B/s | Total DISK WRITE :       0.00 B/s
Actual DISK READ:	0.00 B/s | Actual DISK WRITE:       0.00 B/s
   PID  PRIO  USER     DISK READ  DISK WRITE  SWAPIN     IO>    COMMAND
     1 be/4 root        0.00 B/s    0.00 B/s  0.00 %  0.00 % systemd --switched-root --system --deserialize 22
     2 be/4 root        0.00 B/s    0.00 B/s  0.00 %  0.00 % [kthreadd]
   515 be/4 root        0.00 B/s    0.00 B/s  0.00 %  0.00 % systemd-journald
     4 be/0 root        0.00 B/s    0.00 B/s  0.00 %  0.00 % [kworker/0:0H]
     5 be/4 root        0.00 B/s    0.00 B/s  0.00 %  0.00 % [kworker/u256:0]
     6 be/4 root        0.00 B/s    0.00 B/s  0.00 %  0.00 % [ksoftirqd/0]
     7 rt/4 root        0.00 B/s    0.00 B/s  0.00 %  0.00 % [migration/0]
     8 be/4 root        0.00 B/s    0.00 B/s  0.00 %  0.00 % [rcu_bh]
     9 be/4 root        0.00 B/s    0.00 B/s  0.00 %  0.00 % [rcu_sched]
    10 be/0 root        0.00 B/s    0.00 B/s  0.00 %  0.00 % [lru-add-drain]

IO 調度算法
[root@zabbix ~]# cat /sys/block/sda/queue/scheduler
noop [deadline] cfq

sas盤c7 默認 c6調成[deadline]
ssd盤c7  c6 調成noop

echo noop >/sys/block/sda/queue/scheduler
想永久的更改I/O調度方法:
修改內核引導參數,加入elevator=調度程序名
vi /boot/grub/menu.lst
更改到如下內容:
kernel /boot/vmlinuz-2.6.18-8.el5 roroot=LABEL=/ elevator=deadline rhgb quiet

[root@zabbix ~]# iostat
Linux 3.10.0-1062.18.1.el7.x86_64 (zabbix) 	07/09/2020 	_x86_64_	(1 CPU)

avg-cpu:  %user   %nice %system %iowait  %steal   %idle
           0.04    0.01    0.19    0.20    0.00   99.57

Device:            tps    kB_read/s    kB_wrtn/s    kB_read    kB_wrtn
sda               0.66         7.94         3.52     137736      61043
scd0              0.00         0.06         0.00       1028          0
dm-0              0.64         7.19         3.40     124794      58995
dm-1              0.01         0.19         0.00       3236          0

[root@zabbix ~]# iftop
interface: eth0
IP address is: 10.4.7.62
MAC address is: 00:0c:29:b2:85:39

 性能監視和分析工具 nmon (本地單機監控) 這個工具可以與 nmon 分析程序一同使用,后者將加載 nmon 的輸出文件并自動地創建大量的圖形。這個可以做報表用
 參考文檔:https://www.jianshu.com/p/7858803b0e18
           http://www.rzrgm.cn/wnfindbug/p/5719181.html
- 網絡監控
監控流量
[root@zabbix ~]# iftop
interface: eth0
IP address is: 10.4.7.62
MAC address is: 00:0c:29:b2:85:39

                          12.5Kb                     25.0Kb                    37.5Kb                     50.0Kb               62.5Kb
└─────────────────────────┴──────────────────────────┴─────────────────────────┴──────────────────────────┴──────────────────────────
zabbix                                               => 10.4.7.1                                               944b   1.01Kb  2.40Kb
                                                     <=                                                        184b    184b    294b
zabbix                                               => dns.google                                               0b      0b     80b
                                                     <=                                                          0b      0b     90b


─────────────────────────────────────────────────────────────────────────────────────────────────────────────────────────────────────
TX:             cum:   6.20KB   peak:	12.7Kb                                                       rates:    944b   1.01Kb  2.48Kb
RX:                     961B            1.95Kb                                                                 184b    184b    384b
TOTAL:                 7.14KB           14.6Kb                                                                1.10Kb  1.19Kb  2.86Kb

TX 發送流量
RX 接受流量
TOTAL 總流量

iftop 常用參數
參數含義                                                      示   例

-i指定需要監測的網卡                                           iftop –i em1
-n將輸出的主機信息都通過IP顯示,不進行DNS反向解析                 iftop -n
-B將輸出以bytes為單位顯示網卡流量,默認是bits                    iftop –B
-p以混雜模式運行iftop,此時iftop可以作為網絡嗅探器使用            iftop –p
-N只顯示連接端口號,不顯示端口對應的服務名稱                      iftop –N
-P顯示主機以及端口信息,這個參數非常有用                          iftop –P
-F顯示特定網段的網卡進出流量                                    iftop –F 192.168.12.0/24


顯示每個進程的流量
[root@zabbix ~]# nethogs
Ethernet link detected
                      Ethernet link detected
                                            Waiting for first packet to arrive (see sourceforge.net bug 1019381)
NetHogs version 0.8.5

    PID USER     PROGRAM                                                                         DEV        SENT      RECEIVED
  13759 root     sshd: root@pts/0                                                                eth0        0.166	 0.059 KB/sec
      ? root     unknown TCP                                                                                 0.000	 0.000 KB/sec

  TOTAL                                                                                                      0.166       0.059 KB/sec

網站測速 ping測速
免費網站地址:http://tool.chinaz.com/speedtest.aspx
smokeping開源的網絡監控工具 官網地址:https://oss.oetiker.ch/smokeping/
二、Zabbix 監控環境部署
2.1.1 Zabbix 監控環境部署
- Zabbix環境部署
監控項:
![]()
Zabbix組件:
![]()

官方文檔:https://www.zabbix.com/documentation/4.0/zh/manual
MySQL 安裝
### 1.1.1 安裝Mysql數據庫
1) 創建用戶

[root@web01 ~]# useradd -M -s /sbin/nologin mysql
[root@web01 ~]# id mysql
uid=1001(mysql) gid=1001(mysql) groups=1001(mysql)
2.上傳mysql安裝包
下載地址:https://downloads.mysql.com/archives/community/
[root@web01 /server/tools]# rz -E
rz waiting to receive.
[root@web01 /server/tools]# ll
total 630768
-rw-r--r-- 1 root  root  644869837 Oct 28  2019 mysql-5.7.26-linux-glibc2.12-x86_64.tar.gz
drwxr-xr-x 9 mysql mysql       186 May  9 21:25 nginx-1.16.0
-rw-r--r-- 1 root  root    1032345 Apr 23  2019 nginx-1.16.0.tar.gz
3.解壓安裝
[root@web01 /server/tools]# tar zxf mysql-5.7.26-linux-glibc2.12-x86_64.tar.gz
[root@web01 /server/tools]# ll
total 630768
drwxr-xr-x 9 root  root        129 May 11 22:22 mysql-5.7.26-linux-glibc2.12-x86_64
-rw-r--r-- 1 root  root  644869837 Oct 28  2019 mysql-5.7.26-linux-glibc2.12-x86_64.tar.gz
drwxr-xr-x 9 mysql mysql       186 May  9 21:25 nginx-1.16.0
-rw-r--r-- 1 root  root    1032345 Apr 23  2019 nginx-1.16.0.tar.gz
#因為mysql是二進制安裝,所以解壓就可以用
4.移動到第三方軟件目錄下
[root@web01 /server/tools]# mv mysql-5.7.26-linux-glibc2.12-x86_64 /application/mysql-5.7.26
[root@web01 /server/tools]# ll /application/mysql-5.7.26
total 36
drwxr-xr-x  2 root root   4096 May 11 22:22 bin
-rw-r--r--  1 7161 31415 17987 Apr 13  2019 COPYING
drwxr-xr-x  2 root root     55 May 11 22:22 docs
drwxr-xr-x  3 root root   4096 May 11 22:21 include
drwxr-xr-x  5 root root    230 May 11 22:22 lib
drwxr-xr-x  4 root root     30 May 11 22:21 man
-rw-r--r--  1 7161 31415  2478 Apr 13  2019 README
drwxr-xr-x 28 root root   4096 May 11 22:22 share
drwxr-xr-x  2 root root     90 May 11 22:22 support-files
- 做個軟鏈接
[root@web01 /server/tools]# ln -s /application/mysql-5.7.26 /application/mysql
[root@web01 /server/tools]# ls -ls /application/mysql
0 lrwxrwxrwx 1 root root 25 May 11 22:33 /application/mysql -> /application/mysql-5.7.26
6.創建件配置文件
[root@web01 /server/tools]# vim /etc/my.cnf
[root@web01 /server/tools]# cat /etc/my.cnf
[mysqld]
basedir = /application/mysql/
datadir = /application/mysql/data/
socket = /tmp/mysql.sock
#socket=/var/lib/mysql/mysql.sock
server_id = 1
port = 3306
log_error = /application/mysql/data/mysql.err
pid_ile = /application/mysql/mysql.pid
log_bin=/data/binlog/mysql-bin
sync_binlog=1
binlog_format=row
skip-name-resolve
server-id=52
gtid-mode=on
enforce-gtid-consistency=true
log-slave-updates=1
relay_log_purge=0
max_connections=1024
back_log=128
wait_timeout=60
interactive_timeout=7200
key_buffer_size=16M
query_cache_size=64M
query_cache_type=1
query_cache_limit=50M
max_connect_errors=20
sort_buffer_size=2M
max_allowed_packet=32M
join_buffer_size=2M
thread_cache_size=200
innodb_buffer_pool_size=1024M
innodb_flush_log_at_trx_commit=1
innodb_flush_method=O_DIRECT
innodb_log_buffer_size=32M
innodb_log_file_size=128M
innodb_log_files_in_group=3
binlog_cache_size=2M
max_binlog_cache_size=8M
max_binlog_size=512M
expire_logs_days=7
read_buffer_size=2M
read_rnd_buffer_size=2M
bulk_insert_buffer_size=8M
[client]
socket=/tmp/mysql.sock
7.創建數據存放目錄data
[root@web01 /server/tools]# mkdir /application/mysql/data
[root@web01 /server/tools]# chown mysql.mysql /application/mysql
#注意如果這里實在生產環境中的話是添加磁盤做raid10或者raid5格式化分區的磁盤
8.初始化數據庫
[root@web01 /application/mysql]# /application/mysql/bin/mysqld --initialize-insecure --user=mysql  --basedir=/application/mysql/ --datadir=/application/mysql/data
#注意不要執行第二遍。否則會報錯
- 報錯
[root@web01 /application/mysql]# /application/mysql/bin/mysqld --initialize-insecure --user=mysql --group=mysql  --basedir=/application/mysql/ --datadir=/application/mysql/data/
2020-05-11T15:16:51.309166Z 0 [Warning] TIMESTAMP with implicit DEFAULT value is deprecated. Please use --explicit_defaults_for_timestamp server option (see documentation for more details).
2020-05-11T15:16:51.311402Z 0 [ERROR] --initialize specified but the data directory has files in it. Aborting.
2020-05-11T15:16:51.311793Z 0 [ERROR] Aborting
#解決方法
[root@web01 /application/mysql]# rm -rf data/*
再初始化一遍
10 用system來管理mysql
[root@web01 /application/mysql]# cp /usr/lib/systemd/system/sshd.service /usr/lib/systemd/system/mysqld.service
[root@web01 /application/mysql/data]# cat /usr/lib/systemd/system/mysqld.service
[Unit]
Description=MYSQL server
Documentation=https://dev.mysql.com/doc/refman/
After=network.target
After=syslog.target


[Service]
User=mysql
Group=mysql
EnvironmentFile=/etc/my.cnf
ExecStart=/application/mysql/bin/mysqld --defaults-file=/etc/my.cnf
limitNOFILE=5000

[Install]
WantedBy=multi-user.target
11.啟動成功
[root@web01 /application/mysql]# systemctl start mysqld
[root@web01 /application/mysql]# systemctl status mysqld
● mysqld.service - MYSQL server
   Loaded: loaded (/usr/lib/systemd/system/mysqld.service; disabled; vendor preset: disabled)
   Active: active (running) since Tue 2020-05-12 00:36:14 CST; 12s ago
     Docs: https://dev.mysql.com/doc/refman/
 Main PID: 2103 (mysqld)
   CGroup: /system.slice/mysqld.service
           └─2103 /application/mysql/bin/mysqld --defaults-file=/etc/my.cnf

May 12 00:36:14 web01 systemd[1]: [/usr/lib/systemd/system/mysqld.service:14] Unknown lvalue 'limitNOFILE' in section 'Service'
May 12 00:36:14 web01 systemd[1]: Started MYSQL server.
[root@web01 /application/mysql]# systemctl enable mysqld
Created symlink from /etc/systemd/system/multi-user.target.wants/mysqld.service to /usr/lib/systemd/system/mysqld.service.
- 檢查mysql是否啟動成功
[root@web01 /application/mysql]# netstat -luntp|grep mysqld
tcp6       0      0 :::3306                 :::*                    LISTEN      2608/mysqld
- 配置環境變量
[root@web01 /application/mysql]# echo "export PATH=/application/mysql/bin:$PATH" >>/etc/profile
[root@web01 /application/mysql]# tail -1 /etc/profile
export PATH=/application/mysql/bin:/application/nginx/sbin:/usr/local/sbin:/usr/local/bin:/usr/sbin:/usr/bin:/root/bin:/root/bin
[root@web01 /application/mysql]# . /etc/profile
- 進入mysql并利用mysqladmin設置用戶和密碼
[root@web01 ~]# mysql
Welcome to the MySQL monitor.  Commands end with ; or \g.
Your MySQL connection id is 3
Server version: 5.7.26 MySQL Community Server (GPL)

Copyright (c) 2000, 2019, Oracle and/or its affiliates. All rights reserved.

Oracle is a registered trademark of Oracle Corporation and/or its
affiliates. Other names may be trademarks of their respective
owners.

Type 'help;' or '\h' for help. Type '\c' to clear the current input statement.

mysql>exit
Bye

#退出設置用戶和密碼
[root@web01 ~]# mysqladmin -u root password '密碼'
mysqladmin: [Warning] Using a password on the command line interface can be insecure.
Warning: Since password will be sent to server in plain text, use ssl connection to ensure password safety.
- 再次登錄就需要指定用戶和密碼了
[root@web01 ~]# mysql -uroot -p
Enter password:
Welcome to the MySQL monitor.  Commands end with ; or \g.
Your MySQL connection id is 9
Server version: 5.7.26 MySQL Community Server (GPL)

Copyright (c) 2000, 2019, Oracle and/or its affiliates. All rights reserved.

Oracle is a registered trademark of Oracle Corporation and/or its
affiliates. Other names may be trademarks of their respective
owners.

Type 'help;' or '\h' for help. Type '\c' to clear the current input statement.

mysql>
16.創建zabbix用戶
db01 [(none)]>grant all privileges on zabbix.* to zabbix@'10.4.7.%' identified by 'zabiix';
Query OK, 0 rows affected, 1 warning (0.00 sec)

db01 [mysql]>use mysql;select user,host from user where user='zabbix';
Database changed
+--------+----------+
| user   | host     |
+--------+----------+
| zabbix | 10.4.7.% |
+--------+----------+
1 row in set (0.02 sec)
2.1.2 Zabbix環境部署(Nginx+PHP部署)
1)下載Nginx到到本我服務器
[root@web01 ~]# mkdir -p /server/tools/
[root@web01 ~]# cd /server/tools/
[root@web01 /server/tools]# wget http://nginx.org/download/nginx-1.16.0.tar.gz
--2020-05-09 21:06:13--  http://nginx.org/download/nginx-1.16.0.tar.gz
Resolving nginx.org (nginx.org)... 95.211.80.227, 62.210.92.35, 2001:1af8:4060:a004:21::e3
Connecting to nginx.org (nginx.org)|95.211.80.227|:80... connected.
HTTP request sent, awaiting response... 200 OK
Length: 1032345 (1008K) [application/octet-stream]
Saving to: ‘nginx-1.16.0.tar.gz’

100%[===========================================================================================>] 1,032,345   7.08KB/s   in 1m 54s

2020-05-09 21:08:08 (8.85 KB/s) - ‘nginx-1.16.0.tar.gz’ saved [1032345/1032345]

[root@web01 /server/tools]# ls
nginx-1.16.0.tar.gz
2)yum下載依賴環境
[root@web01 /server/tools]# yum install pcre pcre-devel openssl openssl-devel make gcc gcc-c++ -y
3)創建www用戶
[root@web01 /server/tools]# useradd -M -s /sbin/nologin www
[root@web01 /server/tools]# id www
uid=888(www) gid=888(www) groups=888(www)
4)解壓Nginx并編譯安裝
[root@web01 /server/tools]# tar zxf nginx-1.16.0.tar.gz
[root@web01 /server/tools]# cd nginx-1.16.0/
[root@web01 /server/tools/nginx-1.16.0]# ./configure --help #編譯幫助命令
[root@web01 /server/tools/nginx-1.16.0]# ./configure --prefix=/application/nginx-1.16.0 --user=www --group=www --with-http_ssl_module --with-http_stub_status_module --with-pcre
[root@web01 /server/tools/nginx-1.16.0]# make && make install
5)做個軟連接去掉版本號
[root@web01 /server/tools/nginx-1.16.0]# ln -s /application/nginx-1.16.0/ /application/nginx
[root@web01 /server/tools/nginx-1.16.0]# ls /application/nginx
conf  html  logs  sbin
[root@web01 /server/tools/nginx-1.16.0]# ls -l /application/nginx
lrwxrwxrwx 1 root root 26 May  9 21:29 /application/nginx -> /application/nginx-1.16.0/
- 查看你版本和編譯的參數
[root@web01 /server/tools/nginx-1.16.0]# cd /application/nginx
[root@web01 /application/nginx]# sbin/nginx -V
nginx version: nginx/1.16.0
built by gcc 4.8.5 20150623 (Red Hat 4.8.5-39) (GCC)
built with OpenSSL 1.0.2k-fips  26 Jan 2017
TLS SNI support enabled
configure arguments: --prefix=/application/nginx-1.16.0 --user=www --group=www --with-http_ssl_module --with-http_stub_status_module --with-pcre
- 啟動Nginx服務
[root@web01 /application/nginx]# sbin/nginx
[root@web01 /application/nginx]# ps -ef|grep nginx
root      27669      1  0 21:33 ?        00:00:00 nginx: master process sbin/nginx
www       27670  27669  0 21:33 ?        00:00:00 nginx: worker process
root      27672  24853  0 21:33 pts/0    00:00:00 grep --color=auto nginx
[root@web01 /application/nginx]# ss -luntp|grep 80
tcp    LISTEN     0      511       *:80                    *:*                   users:(("nginx",pid=27670,fd=6),("nginx",pid=27669,fd=6))
[root@web01 /application/nginx]# lsof -i :80
COMMAND   PID USER   FD   TYPE DEVICE SIZE/OFF NODE NAME
nginx   27669 root    6u  IPv4 210139      0t0  TCP *:http (LISTEN)
nginx   27670  www    6u  IPv4 210139      0t0  TCP *:http (LISTEN)

創建zabbix配置問價和代碼目錄
[root@web01 /application/nginx/conf]# mkdir extra
[root@web01 ~]# cd /application/nginx/conf/
[root@web01 /application/nginx/conf]# cd extra/
[root@web01 /application/nginx/conf/extra]# cat zabbix.conf
server {
        listen       80;
        server_name  10.4.7.7;

        #charset koi8-r;

        access_log  logs/access_www.log  main;

        location / {
            root   html/zabbix;
            index  index.php index.html index.htm;
       }

        location ~ \.php$ {
            root           html/zabbix;
            fastcgi_pass   127.0.0.1:9000;
            fastcgi_index  index.php;
            fastcgi_param  SCRIPT_FILENAME  $document_root$fastcgi_script_name;
                include        fastcgi_params;
        }

#error_page  404              /404.html;

# redirect server error pages to the static page /50x.html
#
        error_page   500 502 503 504  /50x.html;
        location = /50x.html {
            root   html;
        }

}
[root@web01 /application/nginx/html]# /application/nginx/sbin/nginx -t
nginx: the configuration file /application/nginx-1.16.0/conf/nginx.conf syntax is ok
nginx: configuration file /application/nginx-1.16.0/conf/nginx.conf test is successful

將zabbix配置文件加入主配置文件
[root@web01 /application/nginx/conf/extra]# vim ../nginx.conf
include extra/*.conf; #添加在http模塊中

創建zabbix代碼文件目錄
[root@web01 /application/nginx/html]# mkdir zabbix
[root@web01 /application/nginx/html]# chown -R www.www zabbix/
PHP安裝
1.環境依賴安裝
[root@web01 ~]# yum install zlib-devel libxml2-devel libjpeg-devel libjpeg-turbo-devel libiconv-devel   freetype-devel libpng-devel gd-devel libcurl-devel libxslt-devel libxslt-devel mcrypt mhash re2c bison  libmcrypt-devel -y
Loaded plugins: fastestmirror
Loading mirror speeds from cached hostfile
 * epel: mirror2.totbb.net
Package zlib-devel-1.2.7-18.el7.x86_64 already installed and latest version
No package libiconv-devel available.

2.下載字符編碼的庫文件
下載地址:http://www.gnu.org/software/libiconv/
舊版本:https://ftp.gnu.org/gnu/libiconv/

3.PHP的下載
官網地址:https://www.php.net
4.編譯安裝字符編碼庫文件
[root@web01 ~]# cd /server/tools/
[root@web01 /server/tools]# ls
libiconv-1.16.tar.gz  mysql-5.7.26-linux-glibc2.12-x86_64.tar.gz  nginx-1.16.0  nginx-1.16.0.tar.gz  php-7.3.5.tar.gz
[root@web01 /server/tools]# tar zxf libiconv-1.16.tar.gz
[root@web01 /server/tools]# cd libiconv-1.16/
[root@web01 /server/tools/libiconv-1.16]# ./configure  --prefix=/application/libiconv
[root@web01 /server/tools/libiconv-1.16]# make && make install
5.編譯安裝PHP(因為PHP還做他用所以編譯參數較多)
[root@web01 /server/tools]# tar zxf php-7.3.5.tar.gz
[root@web01 /server/tools]# cd php-7.3.5/
[root@web01 /server/tools/php-7.3.5]# ./configure \
--prefix=/application/php-7.3.5 \
--enable-mysqlnd  \
--with-mysqli=mysqlnd \
--with-pdo-mysql=mysqlnd \
--with-iconv-dir=/application/libiconv \
--enable-xml \
--disable-rpath \
--enable-bcmath \
--enable-shmop \
--enable-sysvsem \
--enable-inline-optimization \
--with-curl \
--enable-mbregex \
--enable-fpm \
--enable-mbstring \
--with-gd \
--with-openssl \
--with-mhash \
--enable-pcntl \
--enable-sockets \
--with-xmlrpc \
--enable-soap \
--enable-short-tags \
--enable-static \
--with-xsl \
--with-fpm-user=www \
--with-fpm-group=www \
--enable-ftp \
--enable-opcache=no \
--with-freetype-dir \
--with-jpeg-dir \
--with-png-dir \
--with-zlib \
--with-libxml-dir=/usr \
--enable-xml \
--disable-rpath \
--enable-bcmath \
--enable-shmop \
--enable-sysvsem \
--enable-inline-optimization \
--with-curl \
--enable-mbregex \
--enable-fpm \
--enable-mbstring \
--with-gd \
--with-openssl \
--with-mhash \
--enable-pcntl \
--enable-sockets \
--with-xmlrpc \
--enable-soap \
--enable-short-tags \
--enable-static \
--with-xsl \
--with-fpm-user=www \
--with-fpm-group=www \
--enable-ftp \
--with-gettext \
--enable-opcache=no
[root@web01 /server/tools/php-7.3.5]# make && make install
6.創建軟連接
[root@web01 /server/tools/php-7.3.5]# ln -s /application/php-7.3.5/  /application/php
[root@web01 /server/tools/php-7.3.5]# ls -ld /application/php
lrwxrwxrwx 1 root root 23 May 14 00:03 /application/php -> /application/php-7.3.5/
7.配置php.ini(PHP解析器配置文件)
#這個配置文件在PHP的解壓源碼包里面
[root@web01 /application/php/etc]# ll /server/tools/php-7.3.5/php.ini*
-rw-r--r-- 1 root root 71648 Apr 30  2019 /server/tools/php-7.3.5/php.ini-development   #開發環境
-rw-r--r-- 1 root root 71920 Apr 30  2019 /server/tools/php-7.3.5/php.ini-production    #生產環境
[root@web01 /application/php/etc]# cp  /server/tools/php-7.3.5/php.ini-production /application/php/lib/php.ini
[root@web01 /application/php/etc]# ll /application/php/lib/php.ini
-rw-r--r-- 1 root root 71920 May 14 00:43 /application/php/lib/php.ini

post_max_size = 16M  (8改成16)
max_execution_time = 300  (30改300)
max_input_time = 300     (60改300)
date.timezone = Asia/Shanghai (去掉注釋 改為亞洲上海)
always_populate_raw_post_data -1 (改為-1)
- 配置PHP FPM
[root@web01 /application/php/etc]# ll
total 12
-rw-r--r-- 1 root root 1321 May 13 23:58 pear.conf
-rw-r--r-- 1 root root 5417 May 13 23:58 php-fpm.conf.default
drwxr-xr-x 2 root root   30 May 13 23:58 php-fpm.d
[root@web01 /application/php/etc]# cp php-fpm.conf.default php-fpm.conf
[root@web01 /application/php/etc]# ll
total 20
-rw-r--r-- 1 root root 1321 May 13 23:58 pear.conf
-rw-r--r-- 1 root root 5417 May 14 00:49 php-fpm.conf
-rw-r--r-- 1 root root 5417 May 13 23:58 php-fpm.conf.default
drwxr-xr-x 2 root root   30 May 13 23:58 php-fpm.d
[root@web01 /application/php/etc]# cd php-fpm.d/
[root@web01 /application/php/etc/php-fpm.d]# ll
total 20
-rw-r--r-- 1 root root 19240 May 13 23:58 www.conf.default
[root@web01 /application/php/etc/php-fpm.d]# cp www.conf.default www.conf
[root@web01 /application/php/etc/php-fpm.d]# ll
total 40
-rw-r--r-- 1 root root 19240 May 14 00:50 www.conf
-rw-r--r-- 1 root root 19240 May 13 23:58 www.conf.default
9.啟動PHP
[root@web01 /application/php/etc/php-fpm.d]# /application/php/sbin/php-fpm
[root@web01 /application/php/etc/php-fpm.d]# netstat -luntp|grep php
tcp        0      0 127.0.0.1:9000          0.0.0.0:*               LISTEN      8943/php-fpm: maste   #9000端口啟動成功
10.配置開機自啟動
[root@web01 /application/php/etc/php-fpm.d]# echo "/application/php/sbin/php-fpm" >>/etc/rc.local
[root@web01 /application/php/etc/php-fpm.d]# chmod +x /etc/rc.d/rc.local
11.編寫測試文件檢查是否成功
[root@web01 /application/php/etc/php-fpm.d]# vim /application/nginx/html/blog/index.php
[root@web01 /application/php/etc/php-fpm.d]# cat /application/nginx/html/blog/index.php
<?php
phpinfo();
?>
2.1.3 Zabbix環境部署(zabbix—server)
- Zabbix環境部署
官方下載地址:https://www.zabbix.com/
環境依賴安裝:yum install libevent-devel  gcc gcc-c++  net-snmp-devel libxml2-devel libcurl-devel mysql-devel java-devel -y
[root@zabbix /server/tools]# ll
total 16752
-rw-r--r-- 1 root root 17153389 Jan 27 23:14 zabbix-4.0.16.tar.gz
[root@zabbix /server/tools]# mkdir /application
[root@zabbix /server/tools]# tar zxf zabbix-4.0.16.tar.gz -C /application/
[root@zabbix /server/tools]# ll /application/
total 4
drwxr-xr-x 13 1001 1001 4096 Dec 20  2019 zabbix-4.0.16

創建件zabbix用戶
[root@zabbix /application/zabbix-4.0.16]# useradd -M -s /sbin/nologin zabbix
[root@zabbix /application/zabbix-4.0.16]# id zabbix
uid=1001(zabbix) gid=1001(zabbix) groups=1001(zabbix)

[root@zabbix /application/zabbix-4.0.16]# ./configure --prefix=/application/zabbix-4.0.16 --enable-agent --enable-server --enable-java --with-mysql=/usr/bin/mysql_config --with-net-snmp --with-libcurl --with-libxml2l
[root@zabbix /application/zabbix-4.0.16]# make && make install

[root@zabbix /application/zabbix-4.0.16]# ln -s /application/zabbix-4.0.16/ /application/zabbix
- 配置zabbix.conf
[root@zabbix /application/zabbix-4.0.16]# grep "^[A-Z]" /application/zabbix/conf/zabbix_server.conf
LogFile=/application/zabbix/zabbix_server.log  #日志文件
DBHost=10.4.7.51                               #數據庫
DBName=zabbix                                  #數據庫名
DBUser=zabbix                                  #數據庫用戶
DBPassword=zabbix                              #數據庫密碼
DBPort=3306                                    #端口
Timeout=4                                      #超時時間
AlertScriptsPath=/application/zabbix/alertscripts #監控腳本存放路徑
ExternalScripts=/application/zabbix/externalscripts
LogSlowQueries=3000                               #慢查詢

[root@zabbix /application/zabbix-4.0.16]# chown -R zabbix.zabbix /application/zabbix
- 在源碼包中拷貝mysql數據到db01主機
[root@zabbix /application/zabbix-4.0.16]# cd database/mysql/
[root@zabbix /application/zabbix-4.0.16/database/mysql]# ll
total 6092
-rw-r--r-- 1 zabbix zabbix 4079073 Dec 20  2019 data.sql
-rw-r--r-- 1 zabbix zabbix 1978341 Dec 20  2019 images.sql
-rw-r--r-- 1 root   root     15351 Jul 10 02:32 Makefile
-rw-r--r-- 1 zabbix zabbix     392 Dec 20  2019 Makefile.am
-rw-r--r-- 1 zabbix zabbix   15711 Dec 20  2019 Makefile.in
-rw-r--r-- 1 zabbix zabbix  140265 Dec 20  2019 schema.sql
[root@zabbix /application/zabbix-4.0.16/database/mysql]# scp -rp *.sql 10.4.7.51:/root/
The authenticity of host '10.4.7.51 (10.4.7.51)' can't be established.
ECDSA key fingerprint is SHA256:bbt9sjPOENs3zK9cw7YmIo0ABuFkZnTxXbOaIdpSOo0.
ECDSA key fingerprint is MD5:e5:3b:15:2e:6c:82:4b:b1:f8:45:dc:80:72:de:11:47.
Are you sure you want to continue connecting (yes/no)? y
Please type 'yes' or 'no': yes
Warning: Permanently added '10.4.7.51' (ECDSA) to the list of known hosts.
root@10.4.7.51's password:
data.sql                                                                                           100% 3983KB  23.7MB/s   00:00
images.sql                                                                                         100% 1932KB  31.6MB/s   00:00
schema.sql                                                                                         100%  137KB  22.7MB/s   00:00

在db01導入zabbix數據
db01 [mysql]>create database zabbix charset utf8mb4;
db01 [mysql]>show databases like 'zabbix';
+-------------------+
| Database (zabbix) |
+-------------------+
| zabbix            |
+-------------------+
1 row in set (0.00 sec)

db01 [zabbix]>source /root/schema.sql
db01 [zabbix]>source /root/images.sql
db01 [zabbix]>source /root/data.sql

db01 [zabbix]>show tables;
+----------------------------+
| Tables_in_zabbix           |
+----------------------------+
- 在源碼中拷貝代碼到web01 代碼zabbix目錄下
[root@zabbix /application/zabbix-4.0.16]# scp -rp frontends/php/* 10.4.7.7:/application/nginx/html/zabbix/
[root@web01 /application/nginx/html]# chown -R www.www zabbix/
[root@web01 /application/nginx/html]# systemctl restart nginx
- 啟動zabbix
[root@zabbix /application/zabbix-4.0.16]# /application/zabbix/sbin/zabbix_server -c /application/zabbix/conf/zabbix_server.conf
[root@zabbix /application/zabbix-4.0.16]# /application/zabbix/sbin/zabbix_agentd
[root@zabbix /application/zabbix-4.0.16]# ss -luntp|grep 10051
[root@zabbix /application/zabbix-4.0.16]# ps -ef |grep zabbix
-
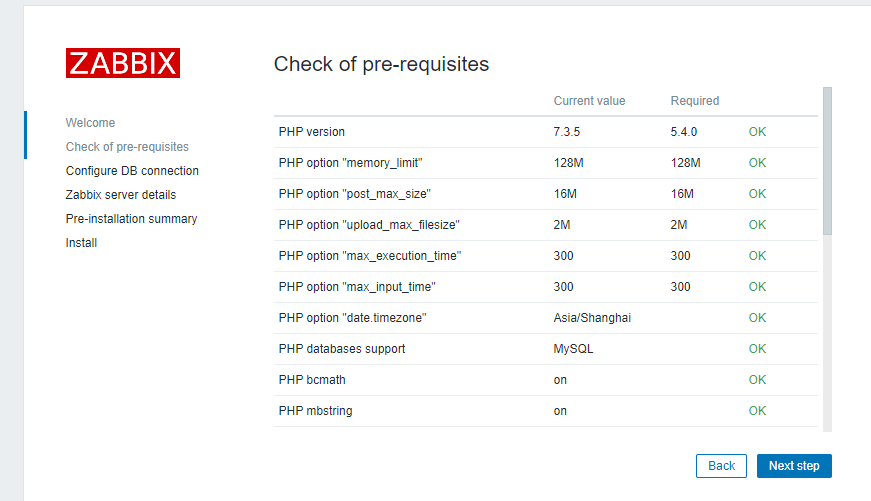
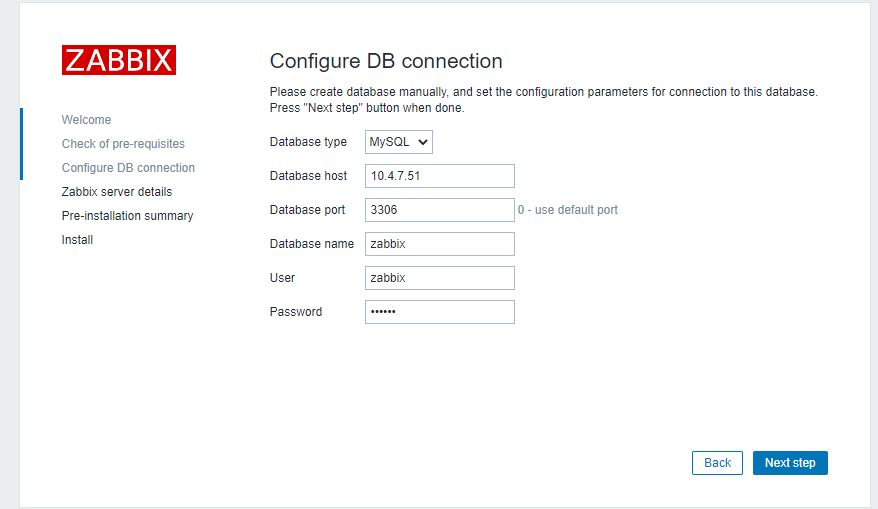
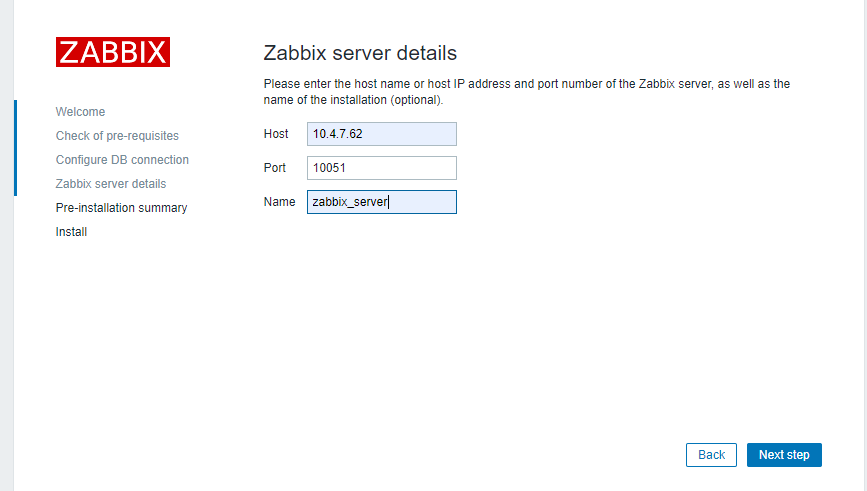
web網頁配置zabbix
![]()
![]()
![]()
![]()
![]()
![]()
-
解決中文字體亂碼問題


在web(nginx)端上傳字體
[root@web01 ~]# cd /application/nginx/html/zabbix/assets/fonts/
[root@web01 /application/nginx/html/zabbix/assets/fonts]# ll
total 10268
-rw-r--r-- 1 mysql mysql  756072 Dec 20  2019 DejaVuSans.ttf.back #將原字體文件備份
-rw-r--r-- 1 root  root  9753388 Mar  2  2019 simhei.ttf

編輯配置字體的PHP文件:
[root@web01 /application/nginx/html/zabbix/assets/fonts]# vim  ../../include/defines.inc.php
:%s/DejaVuSans/simhei.ttf/g  #快捷替換

重啟Nginx服務
[root@web01 /application/nginx/html/zabbix/assets/fonts] systemctl restart nginx
重啟zabbix服務
[root@zabbix ~]# systemctl restart zabbix-server.service
[root@zabbix ~]# systemctl status zabbix-server.service

刷新web頁面即可

 浙公網安備 33010602011771號