使用 C# 入門深度學習:Pytorch 基礎
教程名稱:使用 C# 入門深度學習
作者:癡者工良
地址:
1.2 Pytorch 基礎
本文內容介紹 Pytorcn 的基礎 API,主要是數組的創建方式和運算方式,由于相關內容跟 Numpy 比較相似,并且 Numpy 類型可以轉 torch.Tensor,因此對 Numpy 感興趣的讀者可以參考筆者的其它文章:
- Python 之 Numpy 框架入門
提示:學習本文時,如果對線性代數有足夠的了解,則學習效果更佳,沒有線性代數基礎也沒關系,后面會學習到。本文會同時使用 Python 和 C# 編寫示例,方便各位讀者對照差異,在后續的章節學習中,基本只會使用 C# 編寫示例。
基礎使用
由于神經網絡中的數值很多以向量或數組等形式存在,不像日常編程中的數值類型那么簡單,因此打印數值信息是我們學習了解或調試程序的一種手段,下面我們來觀察程序是怎么打印 Pytorch 中復雜數據類型的。
打印
下面使用 Pytorch 創建一個從 0..9 的數組,接著打印數組。
Python:
import torch
x = torch.arange(10)
print(x)
tensor([0, 1, 2, 3, 4, 5, 6, 7, 8, 9])
C# 版本不使用 Console.WriteLine(),而是使用官方提供的庫。
using TorchSharp;

var x = torch.arange(10);
x.print(style:TensorStringStyle.Default);
x.print(style:TensorStringStyle.Numpy);
x.print(style:TensorStringStyle.Metadata);
x.print(style:TensorStringStyle.Julia);
x.print(style:TensorStringStyle.CSharp);
[10], type = Int64, device = cpu 0 1 2 3 4 5 6 7 8 9
[0, 1, 2, ... 7, 8, 9]
[10], type = Int64, device = cpu
[10], type = Int64, device = cpu 0 1 2 3 4 5 6 7 8 9
[10], type = Int64, device = cpu, value = long [] {0L, 1L, 2L, ... 7L, 8L, 9L}
Python 打印的結果比較容易理解,C# 默認打印的方式比較難看,所以一般來說,可視化都使用 TensorStringStyle.Numpy 枚舉。
C# 打印數值時,參數有個 string? fltFormat = "g5",表示精確度的意思,即打印的小數位數。
在 Maomi.Torch 包中提供了一些擴展方法,讀者可以使用 x.print_numpy() 擴展直接打印對應風格的信息。
對于后面的章節來說,默認都引入 Python 的 torch 包名稱、C# 的 TorchSharp 命名空間,后續代碼示例可能會省略引入代碼,讀者自行引入。
基本數據類型
Pytorch 的數據類型跟我們編程語言中的基本類型不太一樣,讀者要注意區別。
具體詳細的官方文檔參考鏈接:
https://pytorch.org/docs/stable/tensor_attributes.html
https://pytorch.ac.cn/docs/stable/tensor_attributes.html
Pytorch 創建的數據類型以 torch.Tensor 表示,torch.Tensor 是用來處理機器學習模型中的各種數據的基礎結構,包括標量、向量、矩陣以及更高維度的張量。如果筆者沒理解錯的話,在 Pytorch 中創建的 Tensor 對象就叫張量。開發者可以通過各種形式的數據在 Pytorch 創建 Tensor。
Pytorch 創建的數據類型,都使用 Tensor 對象表示。
對于這句話的理解,建議看完本文再回頭看看。
PyTorch 有十二種不同的數據類型,列表如下:
| 數據類型 | dtype |
|---|---|
| 32 位浮點數 | torch.float32 或 torch.float |
| 64 位浮點數 | torch.float64 或 torch.double |
| 64 位復數 | torch.complex64 或 torch.cfloat |
| 128 位復數 | torch.complex128 或 torch.cdouble |
| 16 位浮點數 | torch.float16 或 torch.half |
| 16 位浮點數 | torch.bfloat16 |
| 8 位整數(無符號) | torch.uint8 |
| 8 位整數(有符號) | torch.int8 |
| 16 位整數(有符號) | torch.int16 或 torch.short |
| 32 位整數(有符號) | torch.int32 或 torch.int |
| 64 位整數(有符號) | torch.int64 或 torch.long |
| 布爾值 | torch.bool |
下面示范在創建一個數值全為 1 的數組時,設置數組的類型。
Python:
float_tensor = torch.ones(1, dtype=torch.float)
double_tensor = torch.ones(1, dtype=torch.double)
complex_float_tensor = torch.ones(1, dtype=torch.complex64)
complex_double_tensor = torch.ones(1, dtype=torch.complex128)
int_tensor = torch.ones(1, dtype=torch.int)
long_tensor = torch.ones(1, dtype=torch.long)
uint_tensor = torch.ones(1, dtype=torch.uint8)
C#:
var float_tensor = torch.ones(1, dtype: torch.float32);
var double_tensor = torch.ones(1, dtype: torch.float64);
var complex_float_tensor = torch.ones(1, dtype: torch.complex64);
var complex_double_tensor = torch.ones(1, dtype: torch.complex128);
var int_tensor = torch.ones(1, dtype: torch.int32); ;
var long_tensor = torch.ones(1, dtype: torch.int64);
var uint_tensor = torch.ones(1, dtype: torch.uint8);
在 C# 中, torch.ScalarType 枚舉表示 Pytorch 的數據類型,所以可以有以下兩種方式指定數據類型。
例如:
var arr = torch.zeros(3,3,3, torch.ScalarType.Float32);
arr.print_numpy();
或:
var arr = torch.zeros(3,3,3, torch.float32);
arr.print_numpy();
CPU 或 GPU 運算
我們知道,AI 模型可以在 CPU 下運行,也可以在 GPU 下運行,Pytorch 的數據也可以這樣做,在創建數據類型時就設置綁定的設備,在運算使用會使用對應的設備進行運算。
一般使用
cpu表示 CPU,使用cuda或cuda:{顯卡序號}表示 GPU。
下面編寫代碼判斷 Pytorch 正在使用 GPU 還是 CPU 運行。
Python:
print(torch.get_default_device())
C#:
Console.WriteLine(torch.get_default_device())
如果當前設備支持 GPU,則使用 GPU 啟動 Pytorch,否則使用 CPU 啟動 Pytorch。可以通過 torch.device('cuda')、torch.device('cuda:0') 指定使用 GPU 、指定使用哪個 GPU。
Python:
if torch.cuda.is_available():
    print("當前設備支持 GPU")
    device = torch.device('cuda')
    # 使用 GPU 啟動
    torch.set_default_device(device)
    current_device = torch.cuda.current_device()
    print(f"綁定的 GPU 為:{current_device}")
else:
    # 不支持 GPU,使用 CPU 啟動
    device = torch.device('cpu')
    torch.set_default_device(device)

default_device = torch.get_default_device()
print(f"當前正在使用 {default_device}")
C#:
if (torch.cuda.is_available())
{
    Console.WriteLine("當前設備支持 GPU");
    var device = torch.device("cuda",index:0);
    // 使用 GPU 啟動
    torch.set_default_device(device);
}
else
{
    var device = torch.device("cpu");
    // 使用 CPU 啟動
    torch.set_default_device(device);
    Console.WriteLine("當前正在使用 CPU");
}

var default_device = torch.get_default_device();
Console.WriteLine($"當前正在使用 {default_device}");
C# 沒有
torch.cuda.current_device()這個方法,建議默認設置使用哪塊 GPU,即設置 index 參數。
另外可以通過使用 torch.cuda.device_count() 獲取設備有多少個顯卡,這里不再贅述。
Pytorch 還支持針對單獨的數據類型設置使用 CPU 還是 GPU,還可以讓兩者混合運算,這里不再贅述。
Tensor 類型
在 Pytorch 中,可以將標量、數組等類型轉換為 Tensor 類型,Tensor 表示的數據結構就叫張量。
x = torch.tensor(3.0);
基本數組
Pytorch 使用 asarray() 函數將 obj 值轉換為數組,其定義如下:
torch.asarray(obj, *, dtype=None, device=None, copy=None, requires_grad=False) → Tensor
官方 API 文檔:https://pytorch.org/docs/stable/generated/torch.asarray.html#torch-asarray
obj 可以是以下之一:
- a tensor(張量)
- a NumPy array or a NumPy scalar(NumPy 數組或 NumPy 標量)
- a DLPack capsule
- an object that implements Python’s buffer protocol
- a scalar(標量)
- a sequence of scalars(標量序列)
筆者不會的或者本文用不到的,就不翻譯了。
比如說,傳入一個平常的數組類型,轉換成 Pytorch 中的數組類型。
Python:
arr = torch.asarray([1,2,3,4,5,6], dtype=torch.float)
print(arr)
C#:
var arr = torch.from_array(new float[] { 1, 2, 3, 4, 5 });
arr.print(style: TensorStringStyle.Numpy);
請注意,兩種語言的版本差異有些大。
前面提到過,可以給單獨的數據類型設置使用 CPU 還是 GPU。
device = torch.device("cuda",index=0)
arr = torch.asarray(obj=[1,2,3,4,5,6], dtype=torch.float, device=device)
print(arr)
將數據類型轉換為使用 CPU 設備:
device = torch.device("cuda",index=0)
arr = torch.asarray(obj=[1,2,3,4,5,6], dtype=torch.float, device=device)
arr = arr.cpu()
print(arr)
但是將數據在 GPU、CPU 之間轉換,會消耗一定的性能。
生成數組
torch.zeros
用于創建一個元素全為 0 的數組,可以指定數組大小,其定義如下:
torch.zeros(*size, *, out=None, dtype=None, layout=torch.strided, device=None, requires_grad=False) → Tensor
Python:
arr = torch.zeros(10, dtype=torch.float)
print(arr)
C#:
var arr = torch.zeros(10);
arr.print(style: TensorStringStyle.Numpy);
另外,可以指定生成的數組維度,例如下面指定生成 2*3 的多維數組。
var arr = torch.zeros(2,3, torch.float32);
arr.print(style: TensorStringStyle.Numpy);
代碼為 C# 語言。
打印:
[[0, 0, 0] [0, 0, 0]]
我們還可以生成多種維度的數組,例如下面生成一個 3*3*3 的數組:
var arr = torch.zeros(3,3,3, torch.float32);
arr.print(style: TensorStringStyle.Numpy);
為了方便理解,下面將打印結果做了格式化處理。
[
[[0, 0, 0]  [0, 0, 0]  [0, 0, 0]]
[[0, 0, 0]  [0, 0, 0]  [0, 0, 0]]
[[0, 0, 0]  [0, 0, 0]  [0, 0, 0]]
]
torch.ones
創建一個全由 1 填充的數組,使用方法跟 torch.zeros 完全一致,因此這里不再贅述。
torch.empty
創建一個未初始化的數組,使用方法跟 torch.zeros 完全一致,因此這里不再贅述。
由于其沒有初始化內存,因此內存區域會殘留數據,元素的值不確定。
復制函數
此外,上面三個函數還有對應的原型復制函數:
torch.ones_like(input, *, dtype=None, layout=None, device=None, requires_grad=False, memory_format=torch.preserve_format) → Tensor
torch.zeros_like(input, *, dtype=None, layout=None, device=None, requires_grad=False, memory_format=torch.preserve_format) → Tensor
torch.empty_like(input, *, dtype=None, layout=None, device=None, requires_grad=False, memory_format=torch.preserve_format) → Tensor
它們的作用是根據數組類型,拷貝一個相同的結構,然后填充對應值。
如下示例,復制數組相同的結構,但是填充的值為 1。
var arr = torch.ones_like(torch.zeros(3, 3, 3));
arr.print(style: TensorStringStyle.Numpy);
該代碼語言為 C#。
[
[[1, 1, 1]  [1, 1, 1]  [1, 1, 1]]
[[1, 1, 1]  [1, 1, 1]  [1, 1, 1]]
[[1, 1, 1]  [1, 1, 1]  [1, 1, 1]]
]
torch.rand
torch.rand 會生成一個張量,數組會填充來自 [0,1) 區間上的均勻分布的隨機數。
函數定義如下:
torch.rand(*size, *, generator=None, out=None, dtype=None, layout=torch.strided, device=None, requires_grad=False, pin_memory=False) → Tensor
例如生成 2*3 大小的,范圍在 [0,1) 區間的隨機數,使用 C# 編寫代碼:
var arr = torch.rand(2,3);
arr.print(style: TensorStringStyle.Numpy);
[[0.60446, 0.058962, 0.65601] [0.58197, 0.76914, 0.16542]]
由于 C# 繪制圖形的庫不像 Python matplotlib 簡單易用,因此讀者可以引用 Maomi.Torch.ScottPlot、Maomi.ScottPlot.Winforms 兩個包,可以快速轉換 Pytorch 類型和生成繪制窗口 。下面示范使用編寫代碼繪制均勻分布的隨機數,方便使用 Python matplotlib 和 Maomi.ScottPlot.Winforms 框架顯示圖形。
Python:
import torch
import matplotlib.pyplot as plt

arr = torch.rand(100, dtype=torch.float)

print(arr)

x = arr.numpy()
y = x
plt.scatter(x,y)
plt.show()
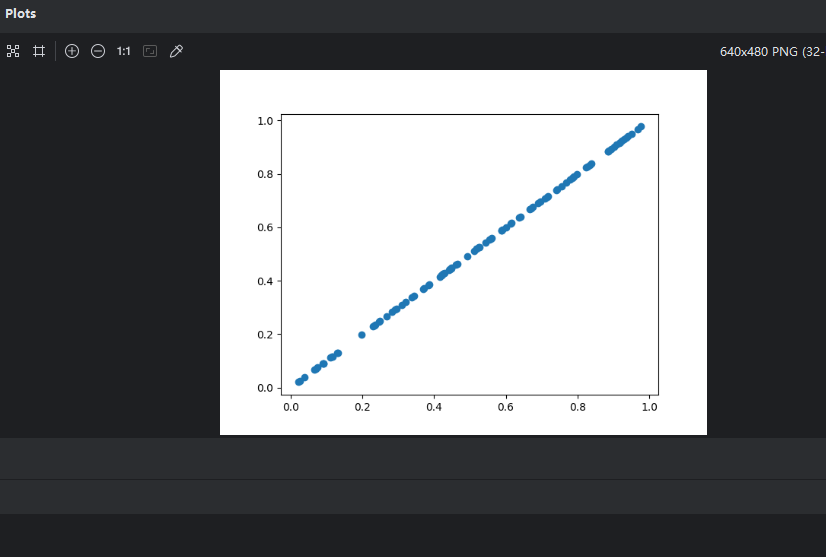
C#:
using Maomi.Torch;
using Maomi.Plot;
using TorchSharp;

var x = torch.rand(100);

x.print(style: TensorStringStyle.Numpy);

ScottPlot.Plot myPlot = new();
myPlot.Add.Scatter(x, x);
var form = myPlot.Show(400, 300);
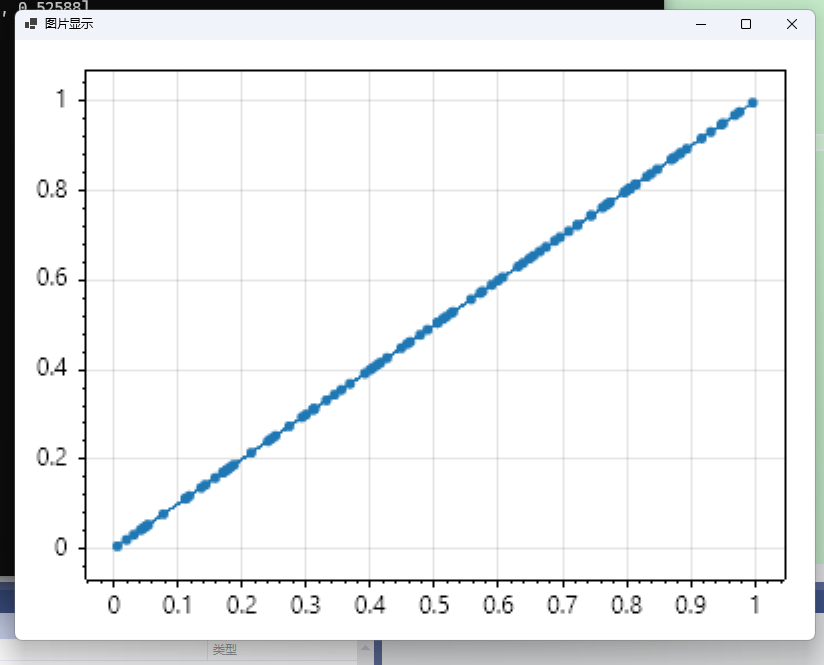
由圖可知,生成的隨機數是均勻散布在 [0,1) 區間內。
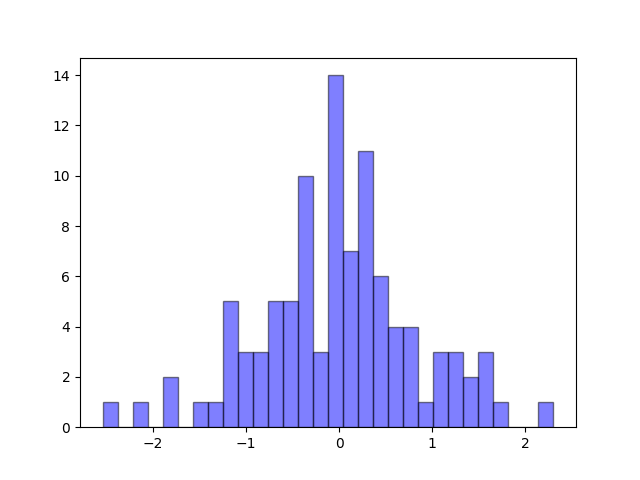
torch.randn
生成具有給定形狀的標準正態分布(平均值為0,方差為1)的隨機樣本。隨機樣本取值范圍是[0,1)。
定義如下:
torch.randn(*size, *, generator=None, out=None, dtype=None, layout=torch.strided, device=None, requires_grad=False, pin_memory=False) → Tensor
官方文檔:https://pytorch.ac.cn/docs/stable/generated/torch.randn.html#torch.rand
由于 C# 不好繪圖,這里使用 Python 編寫示例:
import torch
import matplotlib.pyplot as plt

arr = torch.randn(100, dtype=torch.float)

print(arr)

x = arr.numpy()
y = x
plt.hist(x, bins=30, alpha=0.5, color='b', edgecolor='black')

plt.show()
x 坐標軸是數值,y 坐標軸是出現次數。
torch.randint
在某個區間內生成隨機數。
定義如下:
torch.randint(low=0, high, size, \*, generator=None, out=None, dtype=None, layout=torch.strided, device=None, requires_grad=False) → Tensor
比如在 0-100 范圍內生成 10 個元素,安裝 5*2 結構組成,使用 C# 代碼編寫。
var arr = torch.randint(low: 0, high: 100, size: new int[] { 5, 2 });
arr.print(style: TensorStringStyle.Numpy);
[[17, 46] [89, 52] [10, 89] [80, 91] [52, 91]]
如果要生成某個區間的浮點數,則可以使用 torch.rand ,但是因為 torch.rand 生成范圍是 [0,1),因此需要自行乘以倍數。例如要生成 [0,100) 的隨機數。
var arr = torch.rand(size: 100, dtype: torch.ScalarType.Float32) * 100;
arr.print(style: TensorStringStyle.Numpy);
torch.arange
指定區間以及步長,均勻提取元素生成數組。
定義如下:
torch.arange(start=0, end, step=1, *, out=None, dtype=None, layout=torch.strided, device=None, requires_grad=False) → Tensor
比如說,需要生成 [0,1,2,3,4,5,6,7,8,9] 這樣的數組,可以使用:
var arr = torch.arange(start: 0, stop: 10, step: 1);
arr.print(style: TensorStringStyle.Numpy);
如果將步長改成 0.5。
var arr = torch.arange(start: 0, stop: 10, step: 0.5);
[0.0000, 0.5000, 1.0000, 1.5000, 2.0000, 2.5000, 3.0000, 3.5000, 4.0000,
        4.5000, 5.0000, 5.5000, 6.0000, 6.5000, 7.0000, 7.5000, 8.0000, 8.5000,
        9.0000, 9.5000]
數組操作和計算
軸
在 Pytorch 中,往往使用 dim(dimension) 參數表示軸,軸就是張量的層數。
有以下數組:
[[ 1, 2, 3 ], { 4, 5, 6 ]]
如果把 a = [1,2,3],b = [4,5,6],則:
[a,b]
那么當我們要獲取 a 時,dim(a) = 0,dim(b) = 1。
var arr = torch.from_array(new[,] { { 1, 2, 3 }, { 4, 5, 6 } });

arr.print(style: TensorStringStyle.Numpy);

// 打印維度
arr.shape.print();

var a = arr[0];
a.print();
var b = arr[1];
b.print();
[[1, 2, 3] [4, 5, 6]]
[2, 3]
[3], type = Int32, device = cpu 1 2 3
[3], type = Int32, device = cpu 4 5 6
這里我們分兩步理解,由于該數組是 2*3 數組,可以使用 .shape.print() 打印出來。
由于第一層有兩個元素,因此可以使用 Tensor[i] 獲取第一層的第 i 個元素,其中 i<2。
同理,由于 a、b 的下一層都有 3 個元素,因此第二層 n<3。
例如要將數組的 3、6 兩個元素取出來。
用 C# 可以這樣寫,但是打印的時候不能選 TensorStringStyle.Numpy ,否則打印不出來。
var arr = torch.from_array(new[,] { { 1, 2, 3 }, { 4, 5, 6 } });

var a = arr[0, 2];
a.print(style: TensorStringStyle.CSharp);
var b = arr[1, 2];
b.print(style: TensorStringStyle.CSharp);
同理,如果數組有三層,可以這樣獲取 3、6 兩個元素
var arr = torch.from_array(new[, ,] { { { 1, 2, 3 } }, { { 4, 5, 6 } } });

var a = arr[0, 0, 2];
a.print(style: TensorStringStyle.CSharp);
var b = arr[1, 0, 2];
b.print(style: TensorStringStyle.CSharp);
如果要取出一部分元素,TorchCsharp 可以使用 a[i..j] 的語法截取,示例如下。
var arr = torch.from_array(new int[] { 1, 2, 3 });
arr = arr[0..2];
arr.print(style: TensorStringStyle.Numpy);
[1, 2]
數組排序
Pytorch 中有一些排序函數:
sort :沿給定維度按值升序對 input 張量的元素進行排序。
argsort:它是沿指定軸的間接排序,本文不講解。
msort:按值對 input 張量沿其第一維以升序排序。torch.msort(t) 等效于 torch.sort(t, dim=0)。
sort 可以降序或升序,參數說明如下:
torch.sort(input, dim=-1, descending=False, stable=False, *, out=None)
- input (張量) – 輸入張量。
- dim (int,可選) – 要排序的維度
- descending (bool,可選) – 控制排序順序(升序或降序)
- stable (boo,可選) – 使排序例程穩定,從而保證等效元素的順序得以保留。
示例:
var arr = torch.arange(start: 0, stop: 10, step: 1);

// 或者使用 torch.sort(arr, descending: true)
(torch.Tensor Values, torch.Tensor Indices) a1 = arr.sort(descending: true);

a1.Values.print(style: TensorStringStyle.Numpy);
[9, 8, 7, ... 2, 1, 0]
Values 是排序后的結果,Indices 是排序的規則。
如果數組結構比較復雜,默認不設置參數時,只有最內層數組進行排序。如下代碼所示,有兩層數組。
var arr = torch.from_array(new[,] { { 4, 6, 5 }, { 8, 9, 7 }, { 3, 2, 1 } });

(torch.Tensor Values, torch.Tensor Indices) a1 = arr.sort();

a1.Values.print(style: TensorStringStyle.Numpy);
a1.Indices.print(style: TensorStringStyle.Numpy);
[[4, 5, 6] [7, 8, 9] [1, 2, 3]]
[[0, 2, 1] [2, 0, 1] [2, 1, 0]]
Indices 會記錄當前元素在以前的排序位置。
當設置 arr.sort(dim: 0); 時,按照第一層排序。
[[3, 2, 1] [4, 6, 5] [8, 9, 7]]
[[2, 2, 2] [0, 0, 0] [1, 1, 1]]
當設置 arr.sort(dim: 1); 時,只有里面一層排序。
[[4, 5, 6] [7, 8, 9] [1, 2, 3]]
[[0, 2, 1] [2, 0, 1] [2, 1, 0]]
當一個張量的維度比較大時,我們可以這樣逐層排序。
var arr = torch.from_array(new[, ,] { { { 4, 6, 5 }, { 8, 9, 7 }, { 3, 2, 1 } } });

var dimCount = arr.shape.Length;
for (int i = dimCount - 1; i >= 0; i--)
{
    (torch.Tensor Values, torch.Tensor Indices) a1 = arr.sort(dim: i);
    arr = a1.Values;
    arr.print(style: TensorStringStyle.Numpy);
}
[[[1, 2, 3] [4, 5, 6] [7, 8, 9]]]
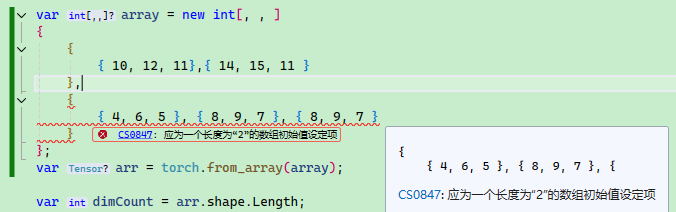
C# 多維數組沒有 Python 那么方便,會要求每一層的元素個數必須一致。
例如下面的數組聲明是對的:
var array = new int[, , ]
{
    {
        { 10, 12, 11},{ 14, 15, 11 }
    },
    {
        { 4, 6, 5 }, { 8, 9, 7 }
    }
};
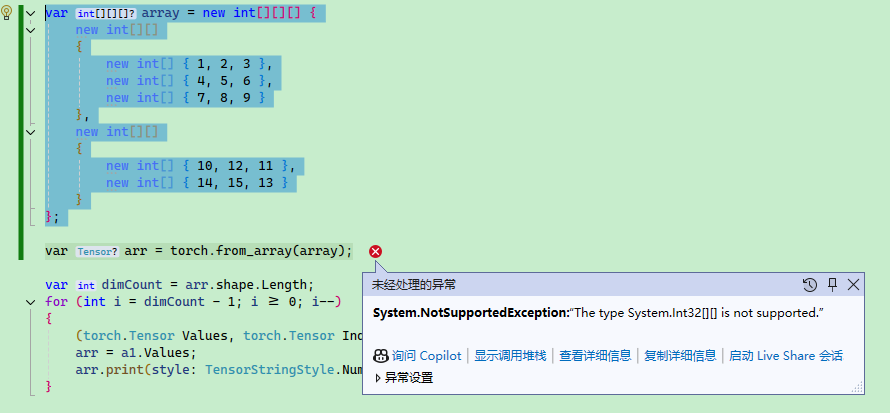
如果層數元素個數不一致會報錯:
另外要注意,C# 有多維數組和交錯數組,下面是交錯數組的聲明方式,TorchSharp 并不支持。多維數組是數組,交錯數組是數組的數組,或數組的數組的數組,要注意區分。
var array = new int[][][]
{
    new int[][]
    {
        new int[] { 1, 2, 3 },
        new int[] { 4, 5, 6 },
        new int[] { 7, 8, 9 }
    },
    new int[][]
    {
        new int[] { 10, 12, 11 },
        new int[] { 14, 15, 13 }
    }
};
數組運算符
在 PyTorch 中,張量支持許多運算符,下面列舉部分加以說明:
算術運算符
+:加法,如a + b-:減法,如a - b*:元素級乘法,如a * b/:元素級除法,如a / b//:元素級整除,如a // b,TorchCsharp 不支持。%:取模運算,如a % b**:冪運算,如a ** b,TorchCsharp 不支持,使用.pow(x)代替。
邏輯運算符
==:元素級相等比較,如a == b!=:元素級不等于比較,如a != b>:元素級大于比較,如a > b<:元素級小于比較,如a < b>=:元素級大于等于比較,如a >= b<=:元素級小于等于比較,如a <= b
位運算符
&:按位與運算,如a & b|:按位或運算,如a | b^:按位異或運算,如a ^ b~:按位取反運算,如~a<<:按位左移,如a << b>>:按位右移,如a >> b
索引和切片
[i]:索引運算符,如a[i][i:j]:切片運算符,如a[i:j],TorchCsharp 使用a[i..j]語法。[i, j]:多維索引運算符,如a[i, j]
例如張量每個元素的值 *10。
var arr = torch.from_array(new int[] { 1, 2, 3 });
arr = arr * 10;
arr.print(style: TensorStringStyle.Numpy);
[10, 20, 30]
此外,還有 Pytorch 還很多函數,后面的章節中會逐漸學習。

 浙公網安備 33010602011771號