node.js+react全棧實(shí)踐-開(kāi)篇
利用業(yè)余時(shí)間寫(xiě)了個(gè)簡(jiǎn)單的項(xiàng)目,使用react+node.js做的一個(gè)全棧實(shí)踐項(xiàng)目,前端參考了[React-Admin-Starter](https://github.com/veryStarters/react-admin-starter)這個(gè)項(xiàng)目,這個(gè)項(xiàng)目的自動(dòng)配置路由,自動(dòng)頁(yè)面骨架的思路很新穎。后端是node.js+express提供接口訪問(wèn),最主要的內(nèi)容是mysql.js的使用和使用nginx反向代理來(lái)跨域。
1.前端parttime
前端基于框架React-Admin-Starter基本沒(méi)有改動(dòng)。這是一個(gè)后臺(tái)管理系統(tǒng),最常用的功能也就是增刪改查,這里做了一些自己的調(diào)整。
1.1.統(tǒng)一的字段名
開(kāi)發(fā)PC端這種后臺(tái)項(xiàng)目,產(chǎn)品經(jīng)理經(jīng)常會(huì)提一些臨時(shí)需求。比如原型上一個(gè)表格字段“編輯時(shí)間”,做到一般快結(jié)尾了或者已經(jīng)快上線了,說(shuō)要改成“更新時(shí)間”。這個(gè)時(shí)候就比較蛋疼了,當(dāng)然最直接的辦法就是Ctrl+H全局查找,一個(gè)一個(gè)替換,但是遇到新手連編輯器都不是很熟的小伙伴就要捉急了(我見(jiàn)過(guò)一些剛?cè)腴T的小伙子,用的是vscode,還真不知道全局查找,快速跳轉(zhuǎn)這些快捷鍵)。
前端項(xiàng)目中使用的是ant.design for react,table有兩個(gè)地方需要注意,數(shù)據(jù)源和顯示列名:
// 數(shù)據(jù)源
const dataSource = [
  { key: '1', name: '胡彥斌', age: 32, address: '西湖區(qū)湖底公園1號(hào)' },
  { key: '2', name: '胡彥祖', age: 42, address: '西湖區(qū)湖底公園1號(hào)' }
];

// 顯示列
const columns = [
  { title: '姓名', dataIndex: 'name', key: 'name' },
  { title: '年齡', dataIndex: 'age', key: 'age' },
  { title: '住址', dataIndex: 'address', key: 'address' }
]
這里可以把所有字段單獨(dú)寫(xiě)在一個(gè)文件里面,從同一個(gè)地方引用這個(gè)字段,這樣只修改這一個(gè)字段所有的名字都改過(guò)來(lái)了。如下,columns.js 定義字段:
const id = { title: 'ID', dataIndex: 'id', key: 'id', type: 'input' }
const name = { title: '姓名', dataIndex: 'name', key: 'name', type: 'input' }
const mobile = { title: '手機(jī)號(hào)', dataIndex: 'mobile', key: 'mobile', type: 'input' }
const email = { title: '郵箱', dataIndex: 'email', key: 'email', type: 'input' }
const thumb = { title: '頭像', dataIndex: 'thumb', key: 'thumb', render: src => <img alt='' src={ src }/> }
const user = [id, name, email, mobile, thumb, createTime, updateTime]
export {
  user
}
user/list/index.js使用字段:
import { user } from './../../../columns'

<Table
    dataSource={userList}
    pagination={paginationProps}
    columns={user})}
    rowKey='id'
    size="middle"
    bordered/>
問(wèn)題來(lái)了,如果有編輯,刪除字段怎么辦呢?這個(gè)時(shí)候就需要和引用它的地方交互了。這里可以使用給子組件傳遞函數(shù)的方法來(lái)實(shí)現(xiàn):
const action = props => {
  let { handleDelete, handleEdit } = props
  return {
    title: '操作',
    key: 'action',
    render: (text, record) => <span>
      <Popconfirm title='確定刪除?' onConfirm={() => handleDelete(record)} okText="確定" cancelText="取消">
        <Icon type="delete" className={style.deleteLink}/>
      </Popconfirm>
      <Divider type="vertical"/>
      <Icon type="edit" onClick={() => handleEdit(record)}/>
    </span>
  }
}
const user = { column: props => [id, name, email, mobile, thumb, createTime, updateTime, action(props)] }
在使用這個(gè)字段的時(shí)候就可以調(diào)用一個(gè)函數(shù):
handleDelete(record) {
    api.user.deleteUser({ id: record.id }).then(res => {
        if (res.success) {
            this.search()
        }
    })
}

<Table
    dataSource={userList}
    pagination={paginationProps}
    columns={user.column({ handleDelete: this.handleDelete.bind(this), handleEdit: this.handleEdit.bind(this) })}
    rowKey='id'
    size="middle"
    bordered/>
這里給Table的columns屬性賦的是一個(gè)函數(shù),函數(shù)參數(shù)是一個(gè)也是一個(gè)函數(shù),這樣子組件就可以調(diào)用到這個(gè)函數(shù),有點(diǎn)拗口,你懂就好。columns.js中的action字段只是一個(gè)橋梁作用,根據(jù)具體邏輯傳遞進(jìn)去的函數(shù)執(zhí)行不同的操作,不同場(chǎng)合執(zhí)行的操作不同,但是操作是類似的,基本都是刪除,和編輯兩個(gè)邏輯。
分頁(yè)也有類似的問(wèn)題,比如那天產(chǎn)品經(jīng)理說(shuō):“分頁(yè)樣式統(tǒng)一起來(lái),每個(gè)地方可選的每頁(yè)個(gè)數(shù)都是20, 30, 50, 100”。我們也可以把這個(gè)定義在同一個(gè)地方,方便修改。這里仍然定義在columns.js中
const pageSet = { current: 1, pageSize: 2, total: 0, showQuickJumper: true, showSizeChanger: true, pageSizeOptions: ['20', '30', '50', '100'] }
使用的,如果我們要需要某些場(chǎng)合需要覆蓋掉部分信息,可以在state中使用...擴(kuò)展運(yùn)算符,然后后面跟上同名屬性來(lái)覆蓋,例如:
import { user, pageSet } from './../../../columns'
  constructor(props) {
    super(props)
    this.state = {
      showAdd: false,
      pageSet: { ...pageSet, pageSizeOptions: ['2', '10'] }
    }
  }
這樣就不需要在每個(gè)業(yè)務(wù)邏輯里都去定義列名,只需要在columns.js中去定義,組合,導(dǎo)出字段就好了。這樣可能也會(huì)有不妥的地方,理論上這里應(yīng)該包含這個(gè)系統(tǒng)中所有要顯示的列名,大一點(diǎn)的系統(tǒng)如果有成千上萬(wàn)個(gè)字段,這里就多起來(lái)了。不過(guò)話說(shuō)回來(lái)這總比在每個(gè)界面自己定義字段寫(xiě)的代碼要少。
1.2 使用同一個(gè)新增彈框
新增數(shù)據(jù),無(wú)非是一個(gè)彈出框,一個(gè)Form加上兩個(gè)按鈕,沒(méi)有必要為每一個(gè)界面寫(xiě)一個(gè),如果能給這個(gè)彈框傳入屬性,包含要新增的字段,點(diǎn)擊確定的時(shí)候調(diào)用父組件中的新增方法。這樣這個(gè)彈出框被公用起來(lái),只起到收集數(shù)據(jù),驗(yàn)證數(shù)據(jù)的作用。
傳入要新增的字段,一樣在columns.js這個(gè)文件里做文章,一般要新增的字段和顯示在表里的字段是類似的,二般不一樣就難辦了,這樣最好還是區(qū)分開(kāi)來(lái),頂多是組合字段而已。再者,如果新增的字段時(shí)間類型,下拉框選擇,上傳的文件,圖片怎么辦呢? 可以在這個(gè)字段里加上一個(gè)type字段,表示控件類型,如下:
const email = { title: '郵箱', dataIndex: 'email', key: 'email', type: 'input' }
const createTime = { title: '創(chuàng)建時(shí)間', dataIndex: 'createTime', key: 'createTime', type: 'time' }
const user = { column: props => [id, name, email, mobile, thumb, createTime, updateTime, action(props)], field: [name, email, mobile, thumb]}
引入field,傳遞給新增組件
import { user, pageSet } from './../../../columns'
<AddComp
    field={user.field}
    showAdd={showAdd}
    onAddData={this.addUser.bind(this)}
    title={route.title}/>
在AddComp組件中使用傳入的字段:
import React, { Component } from 'react'
import { Form, Modal, Input, message } from 'antd'

class AddDataComp extends Component {
  constructor(props) {
    super(props)
    this.state = {
    }
  }
  componentWillReceiveProps(nextProps, nextContext) {
    this.setState({ showAdd: nextProps.showAdd })
  }
  // 取消,關(guān)閉,調(diào)用父組件關(guān)閉彈框
  hideModel() {
    this.props.onClose()
  }
  // 確認(rèn),調(diào)用父組件,添加數(shù)據(jù)
  confirmForm() {
    this.props.form.validateFields((err, values) => {
      if (err) {
        message.error(err)
      }
      this.props.onAddData(values)
    })
  }
  render() {
    let { showAdd } = this.state
    let { field, title } = this.props
    let { getFieldDecorator } = this.props.form
    const formItemLayout = { labelCol: { span: 6 }, wrapperCol: { span: 18 }}
    return <Modal
      visible={showAdd}
      title={'添加' + title}
      centered
      onCancel={this.hideModel.bind(this)}
      onOk={this.confirmForm.bind(this)}>
      <Form {...formItemLayout}>
        {field.map((f, index) => <Form.Item key={f.key} label={f.title}>
          {getFieldDecorator(f.key, {
            validateTrigger: ['onChange', 'onBlur'],
            rules: [
              { required: true, whitespace: true, message: `${f.title}不能為空` },
            ],
          })(<Input placeholder={'請(qǐng)輸入' + f.title}/>)}
        </Form.Item>)}
      </Form>
    </Modal>
  }
}
const AddComp = Form.create({ name: 'add_comp' })(AddDataComp)
export default AddComp
未解決問(wèn)題:
- 驗(yàn)證,不同的字段驗(yàn)證不同,可以在字段中傳入一個(gè)RegExp來(lái)驗(yàn)證,復(fù)雜的驗(yàn)證比如密碼比較,字段之間有關(guān)聯(lián)的驗(yàn)證如何通過(guò)字段來(lái)驗(yàn)證,目前本人沒(méi)有想到好辦法
- 復(fù)雜字段,比如文件上傳,傳入file或者img字段可以明確表示需要上傳的字段類型,這種一般是上傳文件后得到一個(gè)鏈接,返回這個(gè)鏈接并寫(xiě)入到數(shù)據(jù)庫(kù)中,暫時(shí)沒(méi)有實(shí)現(xiàn)。
1.3 使用同一個(gè)搜索組件
同樣,搜索也是根據(jù)幾個(gè)字段來(lái)查詢信息,這里我們可以把搜索分成兩種類型:
- 簡(jiǎn)單搜索,按照更新時(shí)間來(lái)搜索,比如昨天,今天,當(dāng)月,上月,名稱搜索,其中昨天,今天,當(dāng)月,上月做成tab的形式,名稱直接輸入框,并且回車搜索。這個(gè)能滿足最普遍的搜索功能。
- 復(fù)雜搜索,簡(jiǎn)單搜索的基礎(chǔ)上加上要搜索的字段。

簡(jiǎn)單搜索
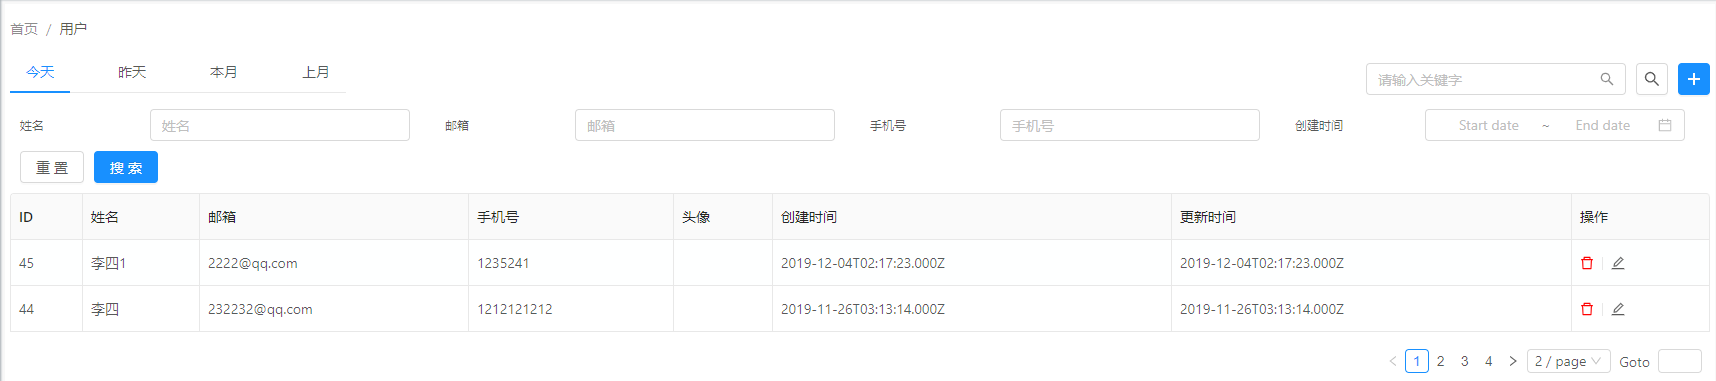
復(fù)雜搜索
復(fù)雜搜索中要搜索的字段照樣放在common.js中,如下:
const user = { column: props => [id, name, email, mobile, thumb, createTime, updateTime, action(props)], field: [name, email, mobile, thumb], searchField: [name, email, mobile, createTime] }
引用并使用:
import { user, pageSet } from './../../../columns'
<AddComp
  field={user.field}
  showAdd={showAdd}
  onAddData={this.addUser.bind(this)}
  title={route.title}/>
SearchComp組件:
import React, { Component } from 'react'
import { Tabs, Input, Button, DatePicker } from 'antd'
const { TabPane } = Tabs
const { Search } = Input
const { RangePicker } = DatePicker
import style from './../static/css/index.pcss'
import { Type } from 'utils'

class SearchComp extends Component {
  constructor(props) {
    super(props)
    this.state = {
      moreSearch: true, // 顯示更多搜索
      timeSpan: [{ name: 'today', title: '今天' },
        { name: 'yesterday', title: '昨天' },
        { name: 'currentMonth', title: '本月' },
        { name: 'lastMonth', title: '上月' }],
      searchObj: {}
    }
  }
  componentDidMount() {
  }
  // 搜索條件
  setSearchState(event, column) {
    let { searchObj } = this.state
    if (event.type === 'time') {
      if (column[0]) {
        searchObj[`${event.dataIndex}Start`] = column[0].format('YYYY-MM-DD hh:mm')
      } else {
        delete searchObj[`${event.dataIndex}Start`]
      }
      if (column[1]) {
        searchObj[`${event.dataIndex}End`] = column[1].format('YYYY-MM-DD hh:mm')
      } else {
        delete searchObj[`${event.dataIndex}End`]
      }
    } else {
      if (event.target.value) {
        searchObj[event.target.name] = event.target.value
      } else {
        delete searchObj[event.target.name]
      }
    }
    this.setState(searchObj)
  }
  // 簡(jiǎn)單搜索,默認(rèn)搜索第一個(gè)字段
  searchKeyword(value) {
    let searchObj = {}
    let { searchField } = this.props
    if (searchField.length > 0) {
      searchObj[searchField[0].key] = value
      this.onSearch(searchObj)
    }
  }
  // 回車搜索
  searchEnterKeyword(e) {
    if (e.target.value) {
      let searchObj = {}
      let { searchField } = this.props
      if (searchField.length > 0) {
        searchObj[searchField[0].key] = e.target.value
        this.onSearch(searchObj)
      }
    }
  }
  // 條件搜索
  searchClick() {
    let { searchObj } = this.state
    this.onSearch(searchObj)
  }
  // 觸發(fā)父組件搜索
  onSearch(searchObj) {
    this.props.onSearch(searchObj)
  }
  // 添加,觸發(fā)父組件,彈出添加框
  popUpAdd() {
    this.props.onAdd()
  }
  getSearchItem = () => {
    let { searchField } = this.props
    return (<div className={style.searchItem}>
      {searchField.map((s, index) => {
        if (s.type === 'input') { // 文本框
          return <div key={s.key}>
            <label htmlFor={s.key}>{s.title}</label>
            <Input name={s.key} id={s.key} allowClear placeholder={s.title} onChange={this.setSearchState.bind(this)} className={style.itemInput}/>
          </div>
        } else if (s.type === 'time') { // 時(shí)間搜索
          return <div key={s.key}>
            <label htmlFor={s.key}>{s.title}</label>
            <RangePicker name={s.key} id={s.key} allowClear onChange={ this.setSearchState.bind(this, s) } className={style.itemInput}/>
          </div>
        } else {
          return null
        }
      })}
      <div key='submit-button'>
        <Button>重置</Button>
        <Button type="primary" className={style.commonMarginLeft} onClick={this.searchClick.bind(this)}>搜索</Button>
      </div>
    </div>)
  }
  render() {
    let { timeSpan, moreSearch } = this.state
    let { onAdd } = this.props
    return (<div>
      <div className={style.search}>
        <Tabs>{ timeSpan.map((t, i) => <TabPane tab={t.title} key={i}/>) }</Tabs>
        <div className={style.searchBox}>
          <Search
            allowClear
            className={style.itemInput}
            placeholder="請(qǐng)輸入關(guān)鍵字"
            onPressEnter={this.searchEnterKeyword.bind(this)}
            onSearch={this.searchKeyword.bind(this)}/>
          <Button
            onClick={() => this.setState({ moreSearch: !moreSearch })}
            icon="search"
            className={style.commonMarginLeft}/>
          {Type.isFunction(onAdd) ? <Button
            onClick={this.popUpAdd.bind(this)}
            className={style.commonMarginLeft}
            type="primary"
            icon="plus"/> : null}
        </div>
      </div>
      {moreSearch ? this.getSearchItem() : null}
    </div>)
  }
}
export default SearchComp
這里使用onChange方法來(lái)收集搜索數(shù)據(jù),原理是給Input組件設(shè)置name,值是key,也就是字段名,onChange方法中,使用event.target.name獲取字段名字,使用event.target.value獲取Input的輸入值,這樣組成搜索數(shù)據(jù)searchObj,最后把searchObj返回給父組件。
未解決問(wèn)題:
- 時(shí)間搜索一般是一個(gè)時(shí)間段,這個(gè)暫時(shí)沒(méi)有實(shí)現(xiàn)。
- 如果搜索條件是一個(gè)下拉框選擇出來(lái)的,這個(gè)要給條件渲染成下拉框,這個(gè)暫時(shí)沒(méi)有實(shí)現(xiàn)。
1.4 mock數(shù)據(jù)和代理跨域
原框架提供自動(dòng)生成mock文件的功能,項(xiàng)目啟動(dòng)后使用express啟用了http應(yīng)用(parttime\scripts\addone\mock-server.js),端口是10086,專門監(jiān)聽(tīng)mock請(qǐng)求,在fetch(parttime\src\common\utils\fetch.js),proxyTable(parttime\src\rasConfig.js)中代理。如果不想走mock,就修改代理的target。不過(guò)上項(xiàng)目之后很少使用mock,增加了工作量不是?再說(shuō)已經(jīng)全棧開(kāi)發(fā)了還要mock個(gè)啥呢?
2.后端parttimeApp
后端開(kāi)發(fā)采用的express,mysql.js,pug實(shí)現(xiàn)的,注意這里主要寫(xiě)接口,pug模板基本上沒(méi)有用到。這個(gè)子項(xiàng)目基本上是按照官方文檔來(lái)寫(xiě)的。
使用express-generator來(lái)生成項(xiàng)目骨架,express的模板引擎好多,也不知道那個(gè)好,就按照官方文檔中的例子給個(gè)pug來(lái)生成項(xiàng)目。項(xiàng)目中有個(gè)www文件,是啟動(dòng)文件,可以直接運(yùn)行這個(gè)文件啟動(dòng)。
2.1 數(shù)據(jù)庫(kù)訪問(wèn)
要訪問(wèn)接口要添加中間件body-parser,因?yàn)閜ost,put,patch三種請(qǐng)求中包含請(qǐng)求提,node.js原生的http模塊中,請(qǐng)求提是基于流的方式來(lái)接受,body-parser可以解析JSON,Raw,文本,URL-encoded格式的請(qǐng)求體。
var bodyParser = require('body-parser');
//解析 application/json
app.use(bodyParser.json());
//解析 application/x-www-form-urlencoded
app.use(bodyParser.urlencoded({ extended: false }));
//轉(zhuǎn)發(fā)api/base請(qǐng)求
app.use('/api/base', indexRouter);
//轉(zhuǎn)發(fā)api/user請(qǐng)求
app.use('/api/user', usersRouter);
在usersRouter就是具體的接口請(qǐng)求了,如下:
var express = require('express');
var router = express.Router();
var config = require('./../conf/index')

/* GET users listing. */
router.get('/', function (req, res, next) {
    res.send('respond with a resource');
});
這里簡(jiǎn)單的分了個(gè)層,和java,.net代碼一樣有router層(相當(dāng)于業(yè)務(wù)邏輯層),dao層(數(shù)據(jù)訪問(wèn)層)。dao層里使用mysql.js訪問(wèn)mysql數(shù)據(jù)庫(kù)。
這個(gè)地方說(shuō)一下分頁(yè)的邏輯,分頁(yè)查詢使用的是limit offset,pageSize方式,但是有個(gè)重要的信息要返回,就是數(shù)據(jù)行數(shù),所以需要執(zhí)行兩次請(qǐng)求,這就意味這要使用回調(diào)嵌套了,這就不是很爽了,代碼會(huì)成一坨。所幸mysql.js生成連接池的時(shí)候有個(gè)選項(xiàng)multipleStatements,把它設(shè)置成true,就可以一次執(zhí)行兩個(gè)sql語(yǔ)句,有點(diǎn)類似存儲(chǔ)過(guò)程。
查詢接口一般是select column1,column2 ... from table where column1=value1 and column2=value2 ... order by updateTime desc limit offset, pageSize,這樣的,為了避免每次都拼接sql語(yǔ)句,這里寫(xiě)了一個(gè)統(tǒng)一處理函數(shù),另外還使用current,pageSize生成offSet。
接口請(qǐng)求中出列current,pageSize,current字段之外的字段默認(rèn)都是需要查詢的字段,使用for...of方法輪詢查詢對(duì)象,生成where后綴。方法如下:
    paging: (sql, param) => {
        // 如果請(qǐng)求中有pageSize,使用current,pageSize生成offSet
        if (param.hasOwnProperty('pageSize')) {
            param.pageSize = parseInt(param.pageSize)
            param.offSet = param.current <= 1 ? 0 : (param.current - 1) * param.pageSize
        }
        for(let key in param) {
            if(!['pageSize', 'current', 'offSet'].includes(key)) {
                sql[0]+= ` AND ${key}=:${key}`
                sql[1]+= ` AND ${key}=:${key}`
            }
        }
        sql[0] += ' ORDER BY updateTime DESC LIMIT :offSet, :pageSize;'
        sql[1] += ' ORDER BY updateTime DESC;'
        return {sql: sql.join(''), param: param}
    }
2.2 轉(zhuǎn)義
默認(rèn)情況下使用?轉(zhuǎn)義,但是我覺(jué)得這種情況有點(diǎn)怪,例如select * from t_user where name=? and age=? and sex=?;這樣要傳入的參數(shù)是一個(gè)數(shù)組,并且要時(shí)刻注意數(shù)組的順序和sql語(yǔ)句中?的順序保持一致,這是不是反人類?所幸mysql.js有提供一個(gè)配置queryFormat,自定義轉(zhuǎn)義,代碼如下:
queryFormat: function (sqlString, values) {
    if (!values) return sqlString;
    return sqlString.replace(/\:(\w+)/g, function (txt, key) {
    if (values.hasOwnProperty(key)) {
        return this.escape(values[key]);
    }
    return txt;
    }.bind(this))
}
這個(gè)函數(shù)的原理是使用字符串的replace方法將sql語(yǔ)句中的:columnname替換成轉(zhuǎn)義后的請(qǐng)求值,這樣寫(xiě)sql語(yǔ)句就方便多了,select * from t_user where name=:name and age=:age and sex=:sex; 還有傳入?yún)?shù)的時(shí)候就可以直接傳入一個(gè)對(duì)象就好,例如{name: '張三', age: 18, sex: 'man'},見(jiàn)名知義,豈不是很爽?
未解決問(wèn)題:
- 暫時(shí)沒(méi)有考慮like,between,>,<等情況。
- 這里默認(rèn)接口請(qǐng)求傳入的字段名字和數(shù)據(jù)庫(kù)中表的字段名字一致,這是不安全的。
- 使用multipleStatements設(shè)置一次執(zhí)行多條語(yǔ)句,也不是很安全,會(huì)有sql注入危險(xiǎn)。
3. 部署上線
部署上線首先要有域名和空間,這沒(méi)啥好說(shuō)的,就是買買買,不過(guò)域名不是必須的。
服務(wù)器我用的是阿里云的Ubuntu,要在里面安裝nginx,node.js,npm,mysql,pm2或者forever。
mysql裝好之后命令可以連接,查看,但是這不是影響工作效率,所有要用客戶端連接,我用的是navicat for mysql。首先要在阿里云服務(wù)器里當(dāng)前實(shí)例的安全組里配置端口訪問(wèn)規(guī)則,mysql使用的是3306,截圖如下: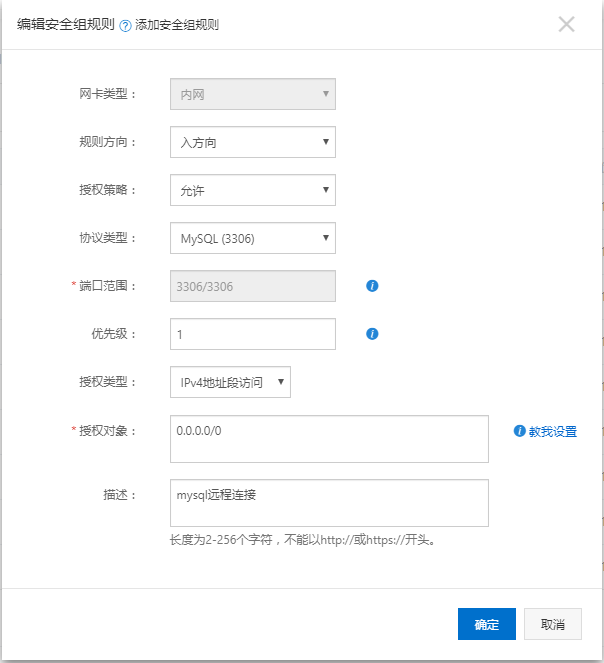
還要允許root用戶從外網(wǎng)登陸,要修改mysql里的user表,這里不再贅述。
使用pm2啟動(dòng)node.js項(xiàng)目,防止因出錯(cuò)造成自動(dòng)退出。pm2工具的使用就不再贅述。
最后前端使用proxyTable代理解決跨域問(wèn)題的那一套,部署在服務(wù)器上就不管用了,這里沒(méi)有在后端修改服務(wù)器響應(yīng)頭Access-Control-Allow-Origin,而是使用nginx代理,具體做法是使用vhost,將來(lái)自localhost:3332/api/路徑的請(qǐng)求代理到本地127.0.0.1:3333。具體做法是在nginx的vhost目錄下新建一個(gè)parttime.conf,內(nèi)容如下:
server {
        listen 3332;                                    # 端口
        server_name www.hzyayun.net hzyayun.net;        # 域名
        root /usr/local/app/parttime;                   # 站點(diǎn)根目錄
        index index.html;                               # 默認(rèn)首頁(yè)
        location /api/ {
                proxy_pass http://127.0.0.1:3333;       # 請(qǐng)求轉(zhuǎn)發(fā)的地址
                proxy_connect_timeout 6000;             # 連接超時(shí)設(shè)置
                proxy_read_timeout 6000;
                proxy_redirect off;                     # 不修改請(qǐng)求url
        }
}
在nginx的配置文件ngxin.conf內(nèi)修改http對(duì)象,在http配置的最后一行跟上include /etc/nginx/vhost/*.conf; 然后重啟nginx。最后還要開(kāi)放3332,3333兩個(gè)端口。如下:
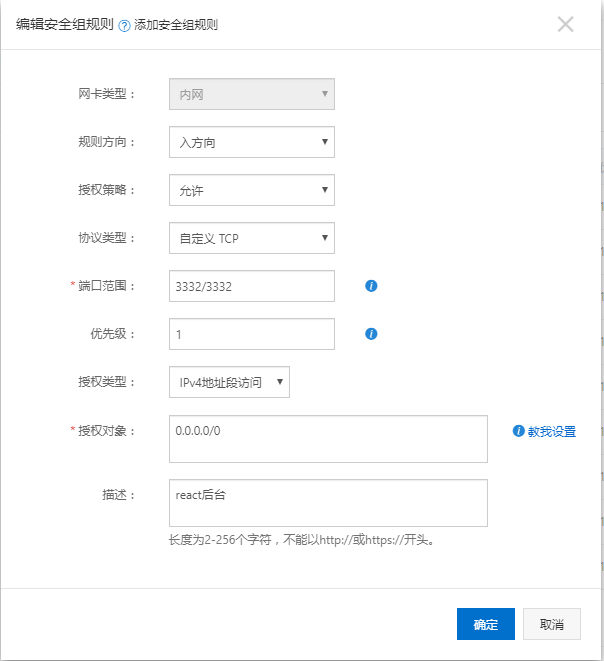

最后如果想用域名訪問(wèn),需要在阿里云上解析域名,需要備案,太麻煩我就沒(méi)有弄,直接使用域名訪問(wèn):http://120.27.214.189:3332/
作者:Tyler Ning
出處:http://www.rzrgm.cn/tylerdonet/
本文版權(quán)歸作者和博客園共有,歡迎轉(zhuǎn)載,但未經(jīng)作者同意必須保留此段聲明,且在文章頁(yè)面明顯位置給出原文連接,如有問(wèn)題,請(qǐng)微信聯(lián)系冬天里的一把火


 浙公網(wǎng)安備 33010602011771號(hào)