

golang單元測試和mock框架的介紹和推薦
背景介紹:探索golang 的單元測試框架,看一下哪種框架是結合業務體驗更好的。
推薦 和 不推薦 使用的框架,我都會在標題中 標注出來,沒有標注的表示體驗一般,但也沒有特別的缺點,觀望態度
單元測試框架介紹
原生testing
示例
func TestModifyArr(t *testing.T) {
	arr := [3]int{0, 1, 2}
	modifyArr(arr)
	if 112233 == arr[0] {
		t.Logf("[TestModifyArr] 測試修改數組元素成功!")
	} else if 0 == arr[0] {
		t.Errorf("[TestModifyArr] 測試修改數組元素失敗!元素未修改")
	} else {
		t.Errorf("[TestModifyArr] 測試修改數組元素失敗!未知元素: %d", arr[0])
	}
}
注意:使用 t.Errorf 的同時,單測也會被置為失敗(但是測試不會馬上停止,用 FailedNow 或者 Fatalf 才會)
擴展:Table-Driven 設計思想
其實就是將多個測試用例封裝到數組中,依次執行相同的測試邏輯
即使是用其他測試框架,這個設計思想也是挺有用的,用例多的時候可以簡化代碼量
示例:
var (
	powTests = []struct {
		base     float64
		power    float64
		expected float64
	}{
		{1, 5, 1},
		{2, 4, 16},
		{3, 3, 27},
		{5, 0, 1},
	}
)

// 測試一些math 包的計算方法
func TestMathPkgMethodByTesting(t *testing.T) {
	for index, currentTest := range powTests {
		if currentTest.expected != math.Pow(currentTest.base, currentTest.power) {
			t.Errorf("[TestMathPkgMethod] %d th test: %.2f the power of %.2f is not expected: %.2f",
				index, currentTest.base, currentTest.power, currentTest.expected)
		}
	}
	t.Logf("[TestMathPkgMethod] All test passed!")
}
并行測試
使用方式:在測試代碼中執行:t.Parallel(),該測試方法就可以和其他測試用例一起并行執行。
場景:一般在 多個用例需要同時執行,比如測試生產和消費的時候才需要用到。
但是個人不建議這么做,因為這有點違背“單測”的概念:一個單測就測試一個功能。類似的場景也可以通過 單測中設置 channel 多協程來實現。
goconvey
示例
引入方式:
go get github.com/smartystreets/goconvey/convey

import 方式:
import (
	. "github.com/smartystreets/goconvey/convey"
)

// 提醒:諸如 goconvey、gomonkey 這些工具類 最好都用這種import方式,減少使用其內部方法的代碼長度,讓代碼更加簡潔
func TestMathPkgMethodByConvey(t *testing.T) {
	Convey("Convey test pow", t, func() {
		for _, currentTest := range powTests {
			So(math.Pow(currentTest.base, currentTest.power), ShouldEqual, currentTest.expected)
		}
	})
}
So 這個方法結構對一開始接觸 GoConvey 的同學可能有點不太好理解,這里結合源碼簡單說明一下:
// source code: github.com\smartystreets\goconvey@v1.6.4\convey\context.go
type assertion func(actual interface{}, expected ...interface{}) string
......
func (ctx *context) So(actual interface{}, assert assertion, expected ...interface{}) {
	if result := assert(actual, expected...); result == assertionSuccess {
		ctx.assertionReport(reporting.NewSuccessReport())
	} else {
		ctx.assertionReport(reporting.NewFailureReport(result))
	}
}
關鍵是對So 參數的理解,總共有三個參數:
actual: 輸入
assert:斷言
expected:期望值
assert 斷言看定義,其實也是一個方法,但其實Convey 包已經幫我們定義了大部分的基礎斷言了:
// source code: github.com\smartystreets\goconvey@v1.6.4\convey\assertions.go
var (
	ShouldEqual          = assertions.ShouldEqual
	ShouldNotEqual       = assertions.ShouldNotEqual
	ShouldAlmostEqual    = assertions.ShouldAlmostEqual
	ShouldNotAlmostEqual = assertions.ShouldNotAlmostEqual
	ShouldResemble       = assertions.ShouldResemble
	ShouldNotResemble    = assertions.ShouldNotResemble
	.....
諸如 判斷相等、大于小于 這些判斷方法都是可以直接拿來用的。
雙層嵌套
func TestMathPkgMethodByConvey(t *testing.T) {
	// 雙層嵌套
	Convey("Convey test multiple test", t, FailureHalts, func() {
		Convey("Failed test", func() {
			So(math.Pow(5, 2), ShouldEqual, 26)
			log.Printf("[test] 5^3 = 125? to execute!")
			So(math.Pow(5, 3), ShouldEqual, 125)
		})

		Convey("Success test", func() {
			log.Printf("[test] 5^2 = 25? to execute!")
			So(math.Pow(5, 2), ShouldEqual, 25)
		})
	})
}
注意:內層的Convey 不再需要加上 testing 對象
注意:子Convey 的執行策略是并行的,因此前面的子Convey 執行失敗,不會影響后面的Convey 執行。但是一個Convey 下的子 So,執行是串行的。
跳過測試
如果有的測試在本次提交 還沒有測試完全,可以先用 TODO + 跳過測試的方式,先備注好,下次commit 的時候再完善
SkipConvey:跳過當前Convey 下的所有測試
SkipSo:跳過當前斷言
設置失敗后的執行策略
默認 一個Convey 下的多個 So 斷言,是失敗后就終止的策略。如果想要調整,在Convey 參數中加上 失敗策略即可,比如設置 失敗后繼續,就用 FailureContinues
// source code: github.com\smartystreets\goconvey@v1.6.4\convey\doc.go
const (
    ......
	FailureContinues FailureMode = "continue"

	......
	FailureHalts FailureMode = "halt"

	......
	FailureInherits FailureMode = "inherits"
)
但是要注意:這里的失敗后策略是針對 一個Convey 下的多個So 斷言來說的,而不是一個Convey 下的多個子Convey。所以接下來會講到Convey 的執行機制:是并行的。
子 Convey 并發執行的原理簡述
GoConvey 底層是借助了 jtolds/gls 這個庫實現了 goroutine 的管理,也實現了 多個子Convey 的并發執行。
// source code: github.com\smartystreets\goconvey@v1.6.4\convey\context.go
func (ctx *context) Convey(items ...interface{}) {
	......

	if inner_ctx.shouldVisit() {
		ctxMgr.SetValues(gls.Values{nodeKey: inner_ctx}, func() {
			// entry.Func 就是實際的測試方法
			inner_ctx.conveyInner(entry.Situation, entry.Func)
		})
	}
}

// source code: github.com\jtolds\gls@v4.20.0+incompatible\context.go
func (m *ContextManager) SetValues(new_values Values, context_call func()) {
	......

	// 該方法會判斷 是否滿足并發執行的條件
	EnsureGoroutineId(func(gid uint) {
		...... // 解析傳入的 context 參數

		context_call()
	})
}
了解有限,這里不會展開講 gls 庫的原理,借助一些文檔,了解到gls 實際就是通過 go 底層的api 對 GPM 模型進行管理,在滿足一定條件的時候,會將子Convey 提交到子協程中執行(默認)
對gls 庫感興趣,想了解其 底層 是怎么管理協程的話,可以參考:
gls 官方github 地址
testify(推薦)
其實Testify的用法 和 原生的testing 的用法差不多,都是比較清晰的斷言定義。
它提供 assert 和 require 兩種用法,分別對應失敗后的執行策略,前者失敗后繼續執行,后者失敗后立刻停止。 但是它們都是單次斷言失敗,當前Test 就失敗。
func TestGetStudentById(t *testing.T) {
	currentMock := gomonkey.ApplyFunc(dbresource.NewDBController, dbresource.NewDBMockController)
	defer currentMock.Reset()
	schoolService := schoolservice.NewSchoolService()
	student := schoolService.GetStudentById("1")

	assert.NotEqual(t, "", student.Name)
	require.Equal(t, studentsql.TEST_STUDENT_NAME, student.Name)
}
測試框架總結
這里簡單總結一下幾個測試框架:個人覺得 GoConvey 的語法 對業務代碼侵入有點嚴重,而且理解它本身也需要一些時間成本,比如 testify 邏輯清晰。單元測試邏輯本身就要求比較簡單,綜上,還是更推薦用testify。
mock框架介紹
gostub(不推薦)
基本使用
go get github.com/prashantv/gostub
func TestGetLocalIp(t *testing.T) {
	// 給變量打樁
	varStub := Stub(&testGlobalInt, 100)
	defer varStub.Reset()
	log.Printf("[test mock] mock var: %d", testGlobalInt)

	// 給方法打樁
	var getIpFunc = system.GetOutboundIP
	funcStub := StubFunc(&getIpFunc, "1.2.3.4")
	defer funcStub.Reset()
}
和 GoConvey 結合示例

不推薦使用的原因
主要是局限性太多:
gostub 由于方法的mock 還必須聲明出 variable 才能進行mock,即使是 interface method 也需要這么來定義,不是很方便
另外,如果需要mock 的方法,入參和返回的 數量都是長度不固定的數組類型,可能就沒法定義mock 了
最后,同一個方法,如果需要mock 多種入參出參場景,gostub 也無法實現。這就非常麻煩,mock 不同的參數場景應該算是mock 的基本功能了
gomock
官方維護的 mock 框架,只要是對象 + 接口的數據結構,基本都能通過gomock 來直接編寫 不同場景的mock。
之前寫過一篇關于 gomock 如何使用的基本介紹,總體來說,是比較適用于框架場景的,比如 通過 protobuf 定義并生成的對外對象和接口,如果能自動生成 gomock 代碼,對開發就比較方便了。但是對業務代碼 并不是特別適合,因為業務內部往往還要定義非常多的對象,每個對象都要生成mock 還是有點麻煩的。
gomonkey(推薦)
import "github.com/agiledragon/gomonkey/v2"
給方法打樁
func TestGetAbsolutePath(t *testing.T) {
	// 打樁方法
	funcStub := ApplyFunc(config.GetAbsolutePath, testGetAbsolutePath)
	defer funcStub.Reset()
	log.Printf("config path: %s", config.GetAbsolutePath())
}
總體來說,和 gostub 的使用方法非常類似,也是要通過變量單獨指定方法,并設置mock。執行 ApplyFunc 方法
不同的地方在于 StubFunc 直接定義方法的出參(行為結果),但是 ApplyFunc 還需要定義 方法具體的動作(行為本身)
給方法打序列樁
func TestGetAbsolutePath(t *testing.T) {
	// 方法序列打樁
	retArr := []OutputCell{
		{Values: Params{"./testpath1"}},
		{Values: Params{"./testpath2"}},
		{Values: Params{"./testpath3"}, Times: 2},
	}
	ApplyFuncSeq(config.GetAbsolutePath, retArr)

	log.Printf("config path: %s", config.GetAbsolutePath())
	log.Printf("config path: %s", config.GetAbsolutePath())
	log.Printf("config path: %s", config.GetAbsolutePath())
	log.Printf("config path: %s", config.GetAbsolutePath())
}
給全局變量打樁
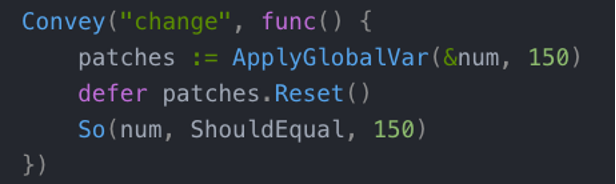
用法和gostub 的Stub 方法類似,不多贅述了。
另外還有什么 ApplyMethod (為對象的指定方法打樁)、ApplyMethodSeq 等,用法依然是和ApplyFunc 很類似了。詳細可以看參考博客,或者直接看源碼中的測試例子。
總結和展望
這里介紹了單測、mock 的幾個通用框架的使用,并總結出 testify + gomonkey 是比較直觀好用的框架。
我會在下一篇博客中 介紹這兩個測試框架 如何更好地結合實際項目,編寫完整的、含mock 的單元測試。

 浙公網安備 33010602011771號