

# 第七章 自媒體文章審核
目標
- 能夠掌握自媒體文章審核的流程
- 能夠使用阿里云安全服務檢測文章內容
- 能夠完成自媒體文章審核的功能
- 能夠完成自媒體發布文章與審核對接
1 自媒體文章自動審核需求說明
1.1 自媒體文章自動審核流程
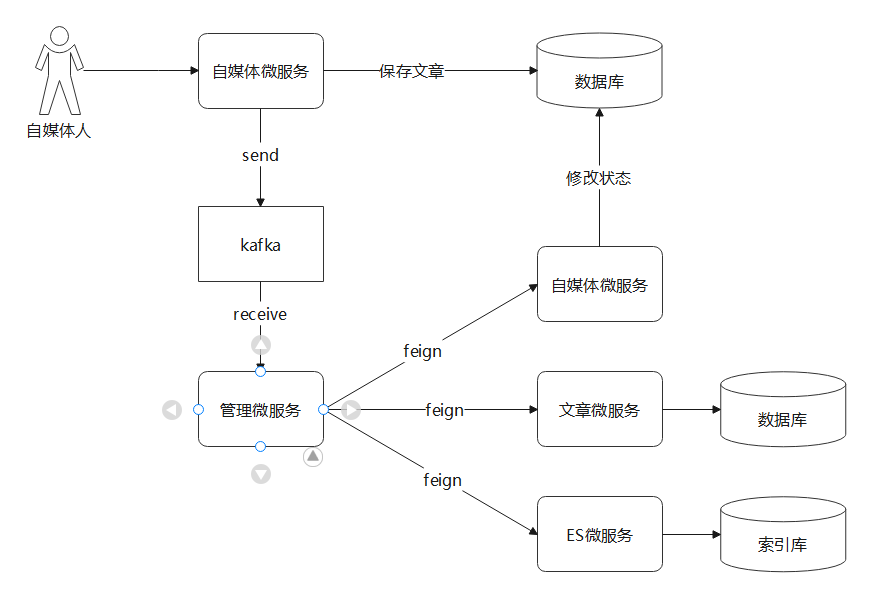
做為內容類產品,內容安全非常重要,所以需要進行對自媒體用戶發布的文章進行審核以后才能到app端展示給用戶。
審核的流程如下:也可以查看當前講義文件夾下:day07-文章審核時序圖.pdf
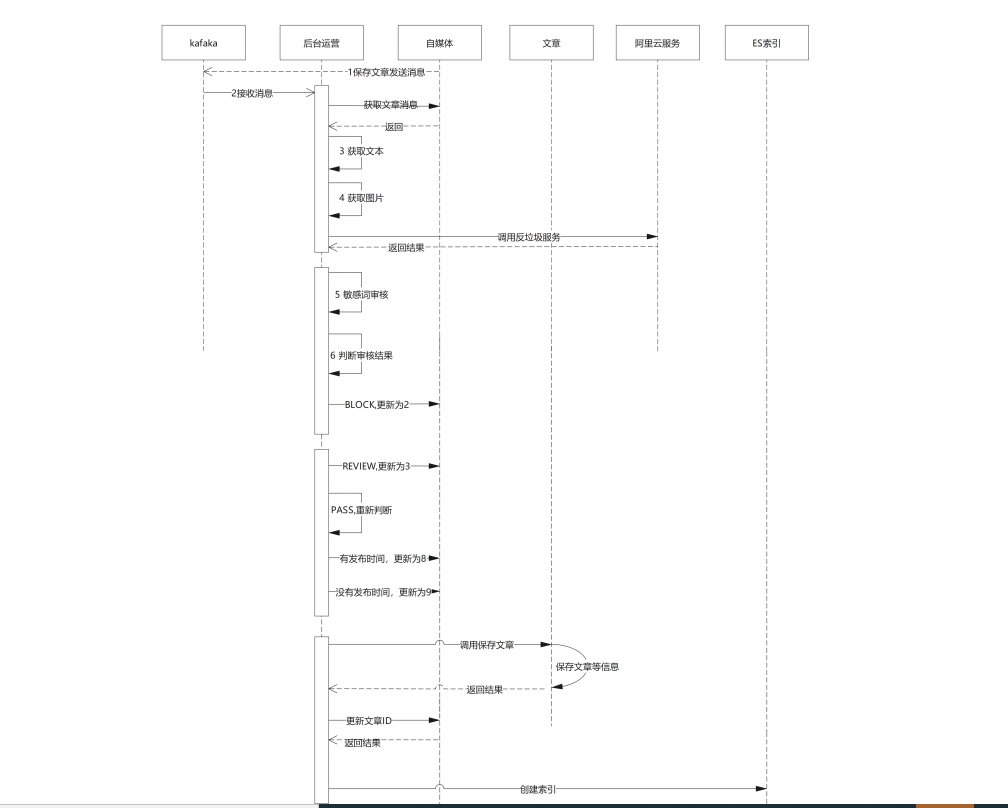
解釋:
1.當發生自媒體文章保存之后 發送消息給kafka
2.運營管理平臺接收到消息之后 進行查詢自媒體文章信息
3.查詢到圖片和文本內容
4.調用反垃圾阿里云服務 并獲取結果
5.再調用自定義的敏感詞進行審核
6.獲取審核結果 分為3個情況
	6.1 如果是block 則為拒絕 更新自媒體文章狀態2
	6.2 如果是review 則為人工審核 更新自媒體文章狀態為3
	6.3 如果是PASS 則更新狀態為 8 或者9
		6.3.1 有發布時間 則 更新為8
		6.3.2 沒有發布時間 則 更新為9
7.生成索引
1.2 表結構
涉及到的表如下
(1)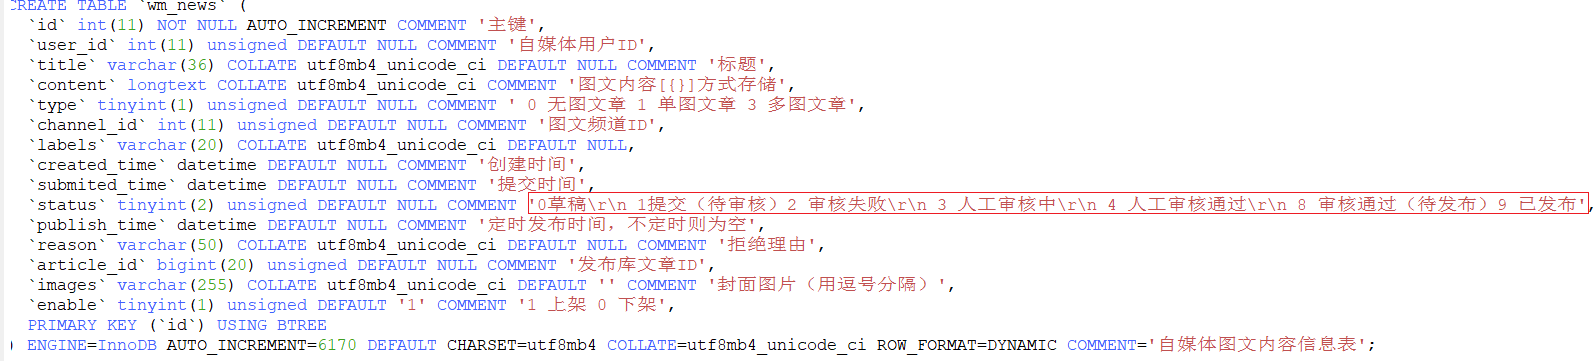
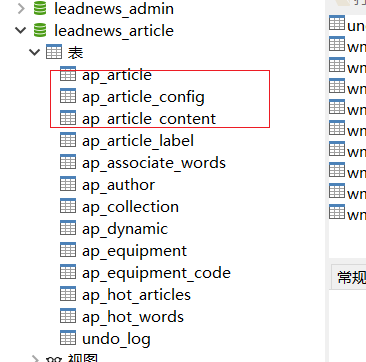
(2)文章表 文章配置表 文章內容表 作者表
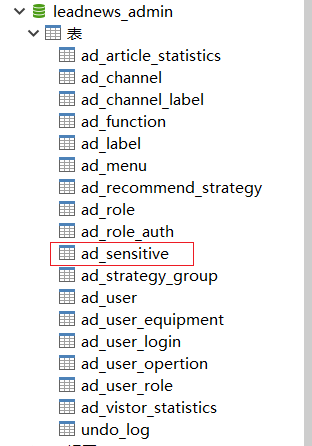
(3)敏感詞表
2 文章審核功能實現
2.1 實現思路分析
1.自媒體保存文章 發送消息給kafka
2.管理微服務進行接收消息獲取相關的信息 進行 審核
3.通過feign調用進行處理即可。具體的流程參考時序圖
具體的步驟如下:
1 自媒體發送消息
2 管理微服務接收消息
	2.1 獲取到消息內容 通過Feign調用獲取自媒體文章信息
	2.2 獲取文章的標題 和 內容中解析出來的文本
	2.3 獲取到文章的封面圖片和內容中解析出來的圖片
	2.4 調用獲取阿里云反垃圾服務進行審核文本 和 審核圖片 以及調用管理微服務本身的敏感詞審核
	2.5 判斷審核的結果
		2.5.1 如果是Block  則 通過feign調用更新自媒體文章的狀態為2
		2.5.2 如果是review 則 通過feign調用更新自媒體文章的狀態為3
		2.5.3 如果是pass
			2.5.3.1 判斷發布時間是否有值 如果有  則通過feign調用更新自媒體文章的狀態為8
			2.5.3.2 判斷發布時間是否有值 如果無  則通過feign調用更新自媒體文章的狀態為9
	2.6 保存文章信息到 article庫中
    2.7 調用feign更新文章的ID 到自媒體文章表中
2.2 功能實現
步驟:
1 先實現消息的發送和接收
2 監聽端-獲取文章的信息
3 獲取需要審核的文本和圖片
4 進行自動審核
5 判斷審核的狀態
? 5.1 如果是Block 則 通過feign調用更新自媒體文章的狀態為2
? 5.2 如果是review 則 通過feign調用更新自媒體文章的狀態為3
? 5.3 如果是pass
? 5.3.1 判斷發布時間是否有值 如果有 則通過feign調用更新自媒體文章的狀態為8
? 5.3.2 判斷發布時間是否有值 如果無 則通過feign調用更新自媒體文章的狀態為9
?
2.2.1 實現消息發送和接收
步驟:
生產者端:
(1)添加kafka依賴
(2)修改yml 配置kafak生成者配置
(3)修改保存文章的方法 添加發送消息
消費者端:
(1)添加kafak依賴
(2)修改yml 配置消費者配置
(3)添加監聽類 進行獲取
2.2.1.1 生產者端
(1)添加依賴:在自媒體微服務中添加
<!-- kafka依賴 begin -->
<dependency>
    <groupId>org.springframework.kafka</groupId>
    <artifactId>spring-kafka</artifactId>
</dependency>
<dependency>
    <groupId>org.springframework.kafka</groupId>
    <artifactId>spring-kafka-test</artifactId>
    <scope>test</scope>
</dependency>
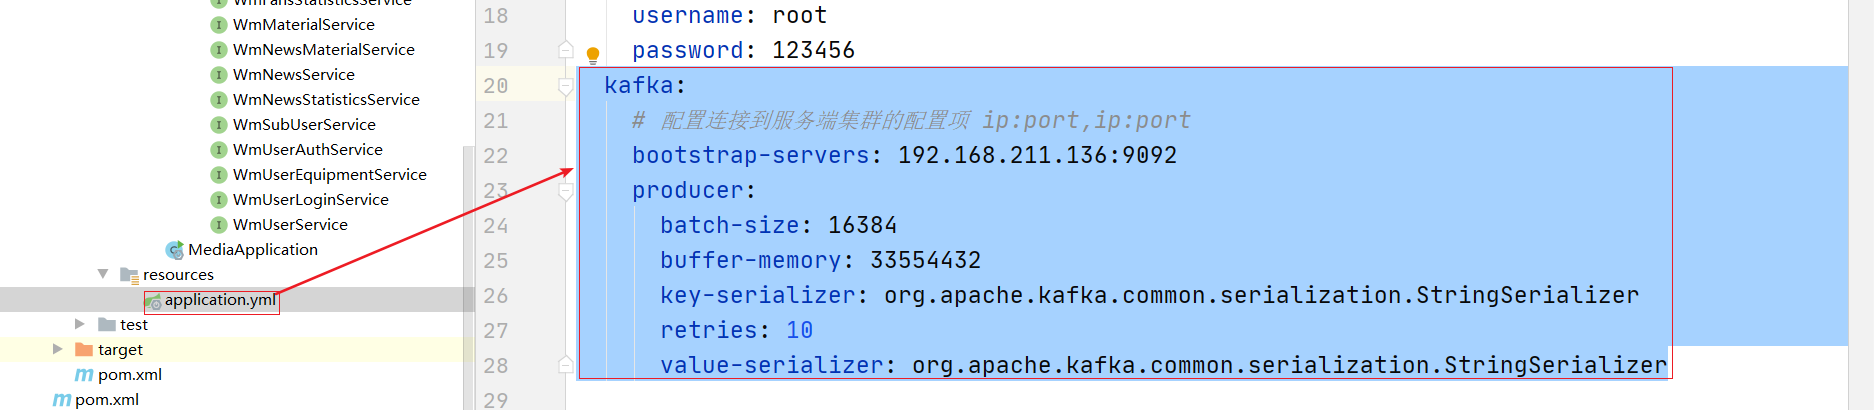
(2)修改配置
  kafka:
    # 配置連接到服務端集群的配置項 ip:port,ip:port
    bootstrap-servers: 192.168.211.136:9092
    producer:
      batch-size: 16384
      buffer-memory: 33554432
      key-serializer: org.apache.kafka.common.serialization.StringSerializer
      retries: 10
      value-serializer: org.apache.kafka.common.serialization.StringSerializer
(3)修改方法 添加發送消息
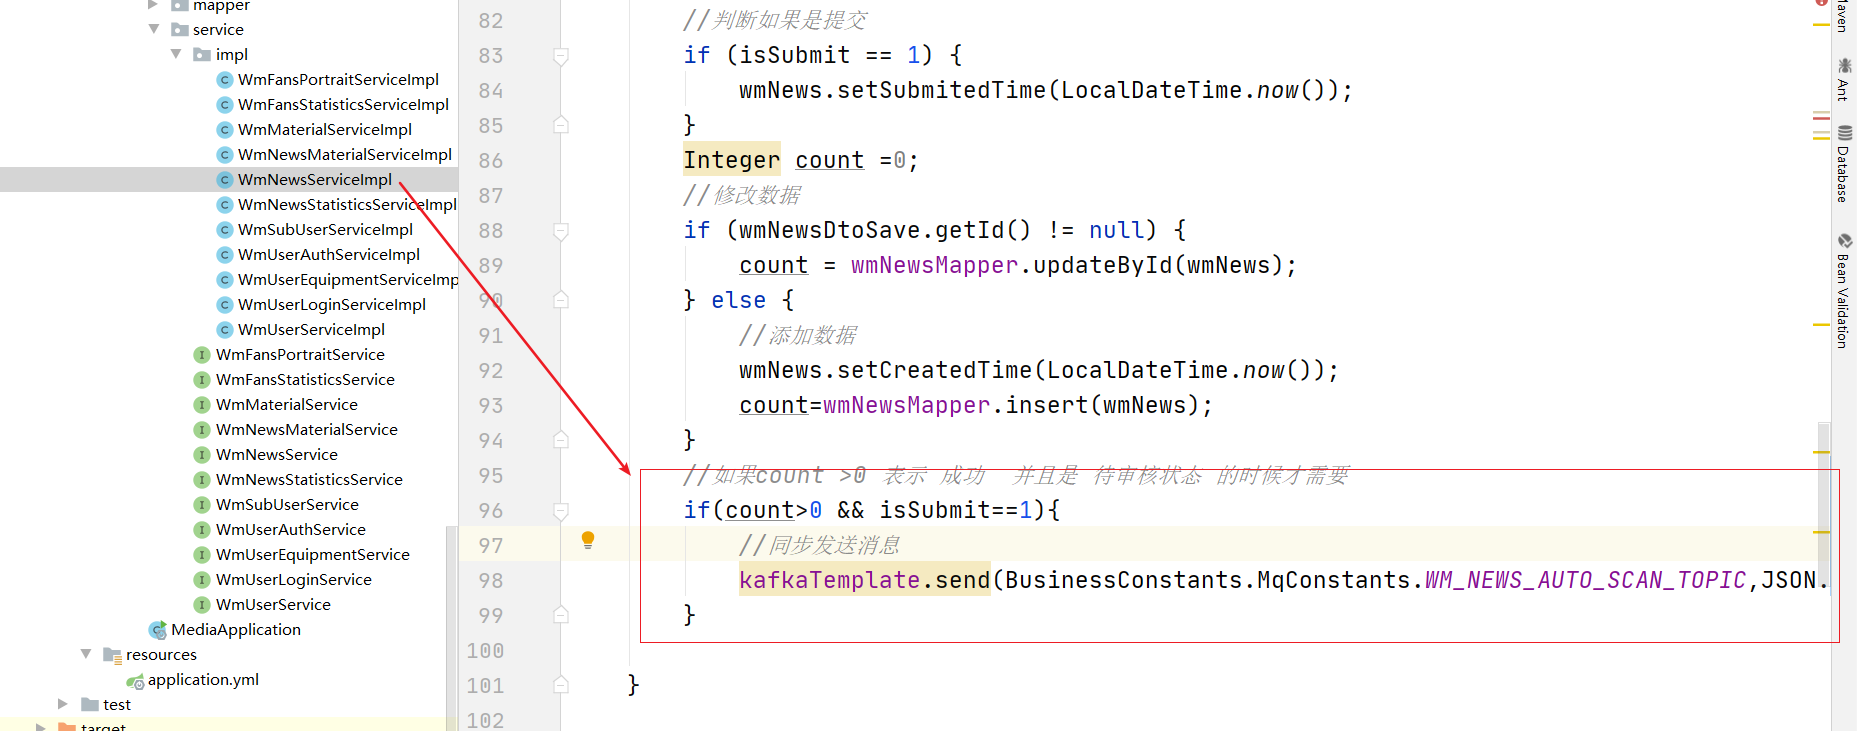
//如果count >0 表示 成功  并且是 待審核狀態 的時候才需要
if(count>0 && isSubmit==1){
    //同步發送消息
    kafkaTemplate.send(BusinessConstants.MqConstants.WM_NEWS_AUTO_SCAN_TOPIC,JSON.toJSONString(wmNews.getId()));
}
添加常量類值:
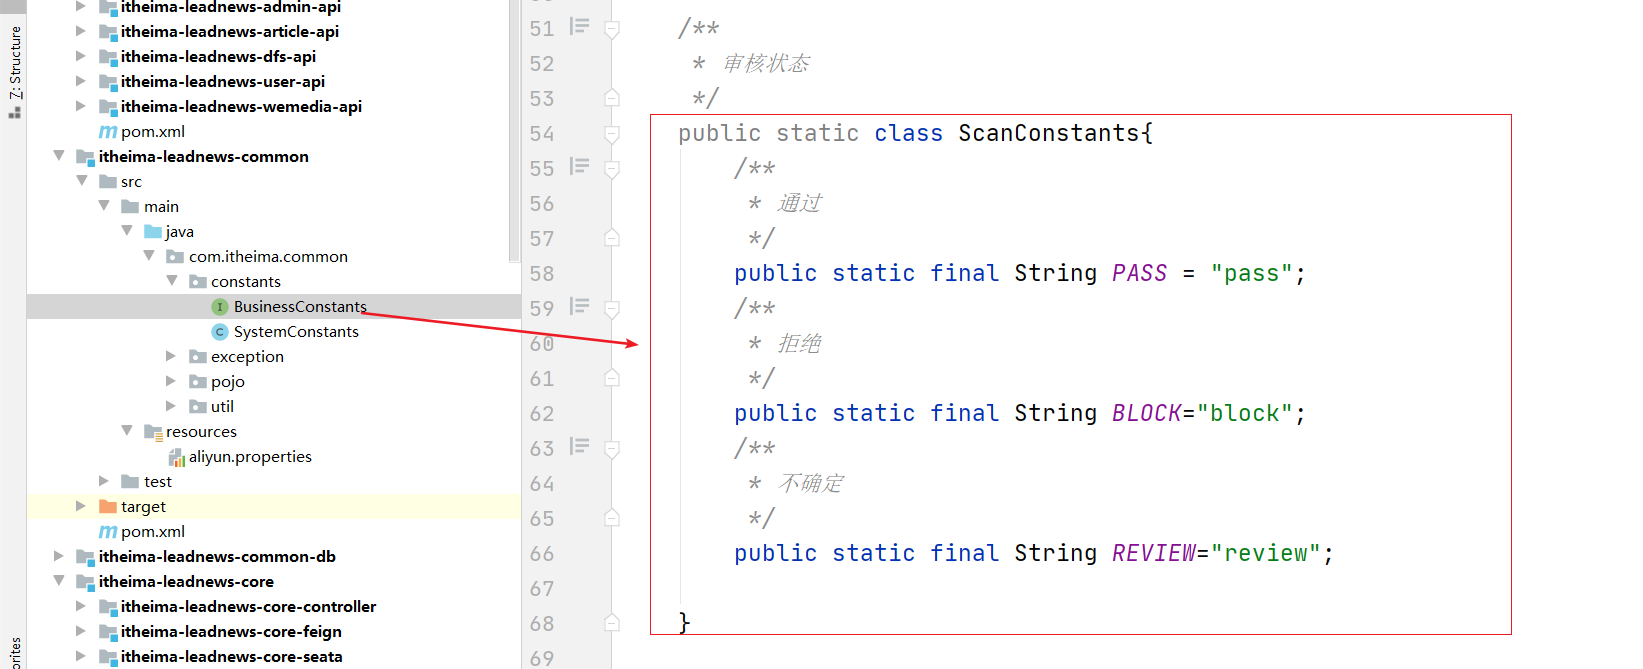
 public static class ScanConstants{
        /**
         * 通過
         */
        public static final String PASS = "pass";
        /**
         * 拒絕
         */
        public static final String BLOCK="block";
        /**
         * 不確定
         */
        public static final String REVIEW="review";

    }
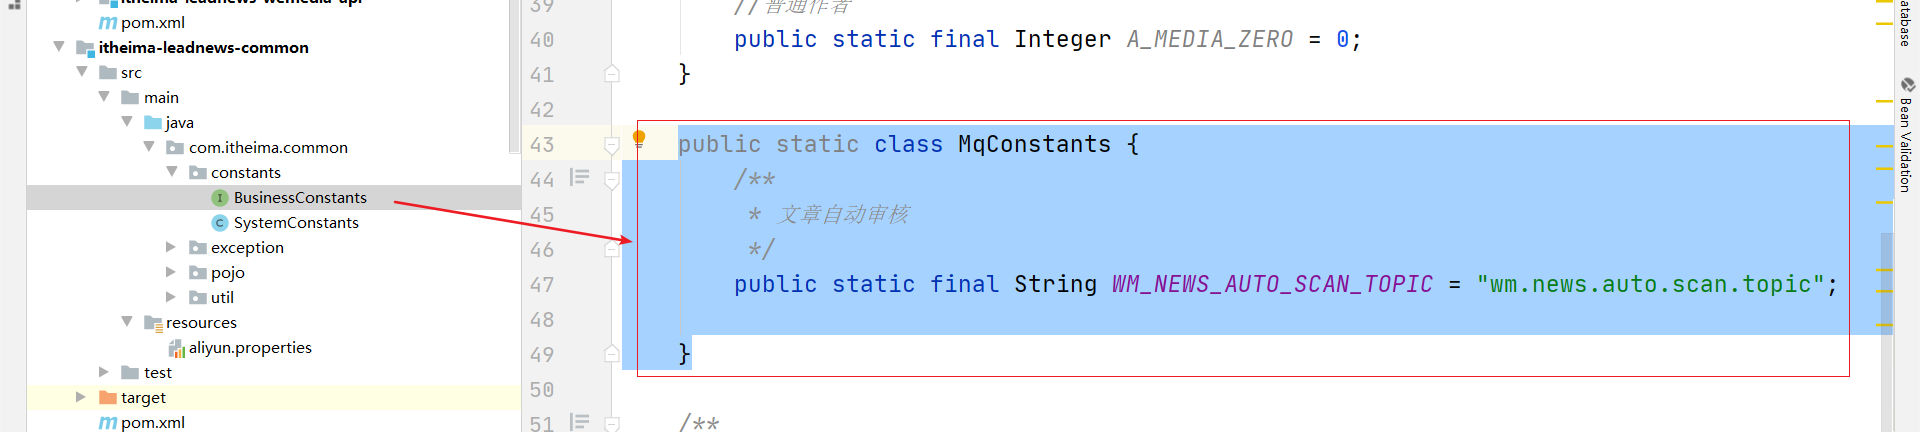
public static class MqConstants {
    /**
         * 文章自動審核
         */
    public static final String WM_NEWS_AUTO_SCAN_TOPIC = "wm.news.auto.scan.topic";

}
2.2.1.2 消費者端
(1)添加依賴 :在admin微服務中添加
<!-- kafka依賴 begin -->
<dependency>
    <groupId>org.springframework.kafka</groupId>
    <artifactId>spring-kafka</artifactId>
</dependency>
<dependency>
    <groupId>org.springframework.kafka</groupId>
    <artifactId>spring-kafka-test</artifactId>
    <scope>test</scope>
</dependency>
(2)修改kafka配置
  kafka:
    # 配置連接到服務端集群的配置項 ip:port,ip:port
    bootstrap-servers: 192.168.211.136:9092
    consumer:
      auto-offset-reset: earliest
      group-id: test-consumer-group
      # 默認值即為字符串
      key-deserializer: org.apache.kafka.common.serialization.StringDeserializer
      # 默認值即為字符串
      value-deserializer: org.apache.kafka.common.serialization.StringDeserializer
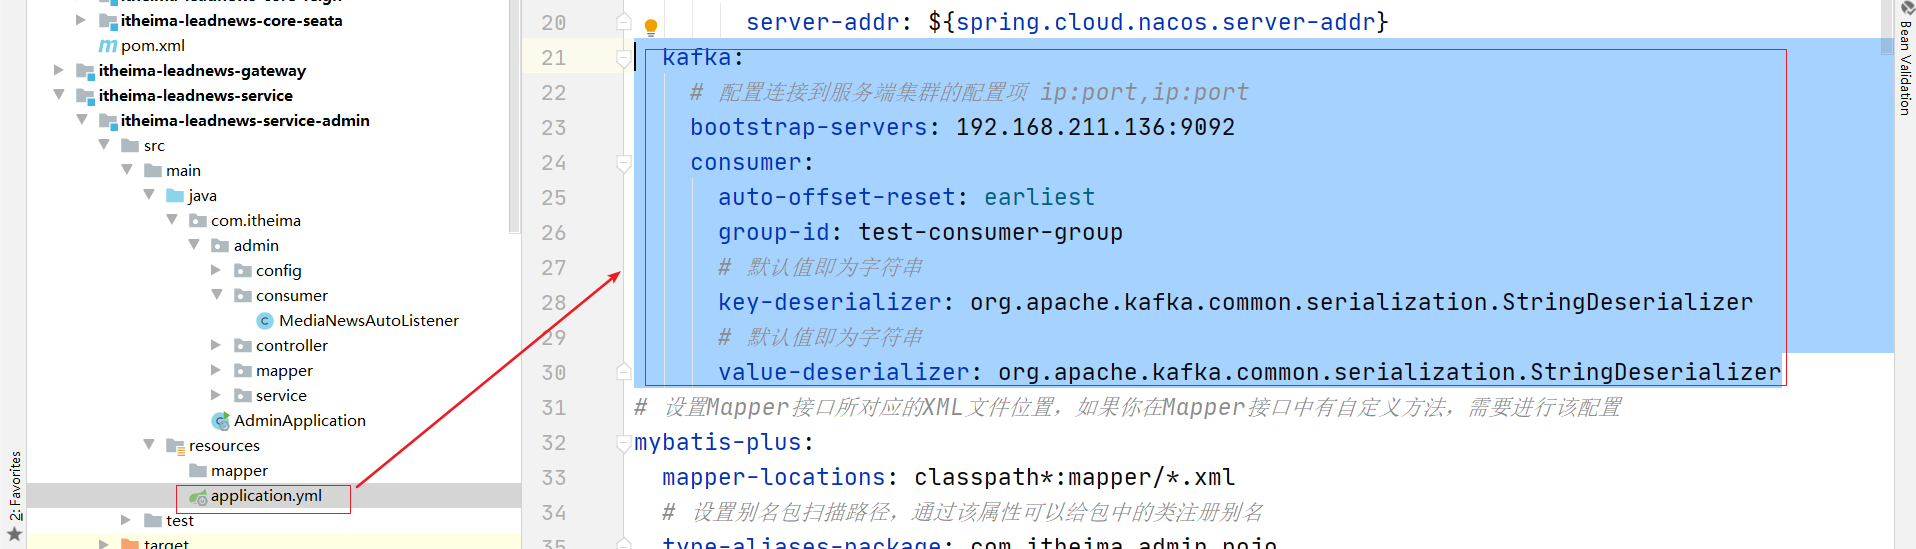
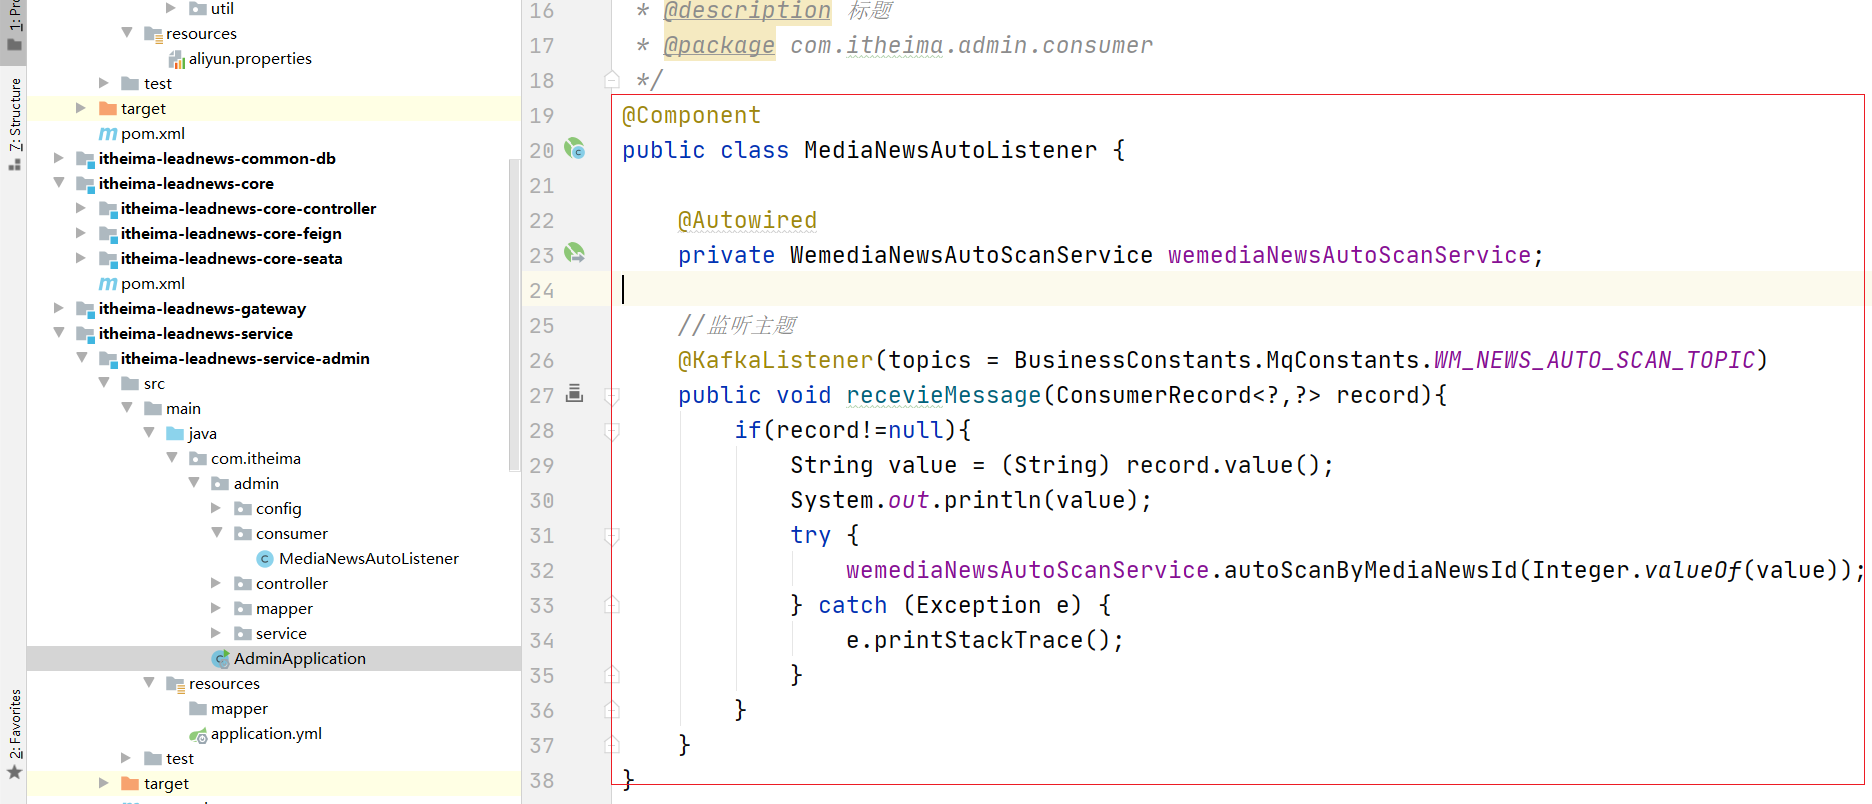
(3) 創建監聽類
@Component
public class MediaNewsAutoListener {

    @Autowired
    private WemediaNewsAutoScanService wemediaNewsAutoScanService;

    //監聽主題
    @KafkaListener(topics = BusinessConstants.MqConstants.WM_NEWS_AUTO_SCAN_TOPIC)
    public void recevieMessage(ConsumerRecord<?,?> record){
        if(record!=null){
            String value = (String) record.value();
            System.out.println(value);
            try {
                wemediaNewsAutoScanService.autoScanByMediaNewsId(Integer.valueOf(value));
            } catch (Exception e) {
                e.printStackTrace();
            }
        }
    }
}
(4)創建WemediaNewsAutoScanService接口和實現類:
@Service
public class WemediaNewsAutoScanServiceImpl implements WemediaNewsAutoScanService {
@Override
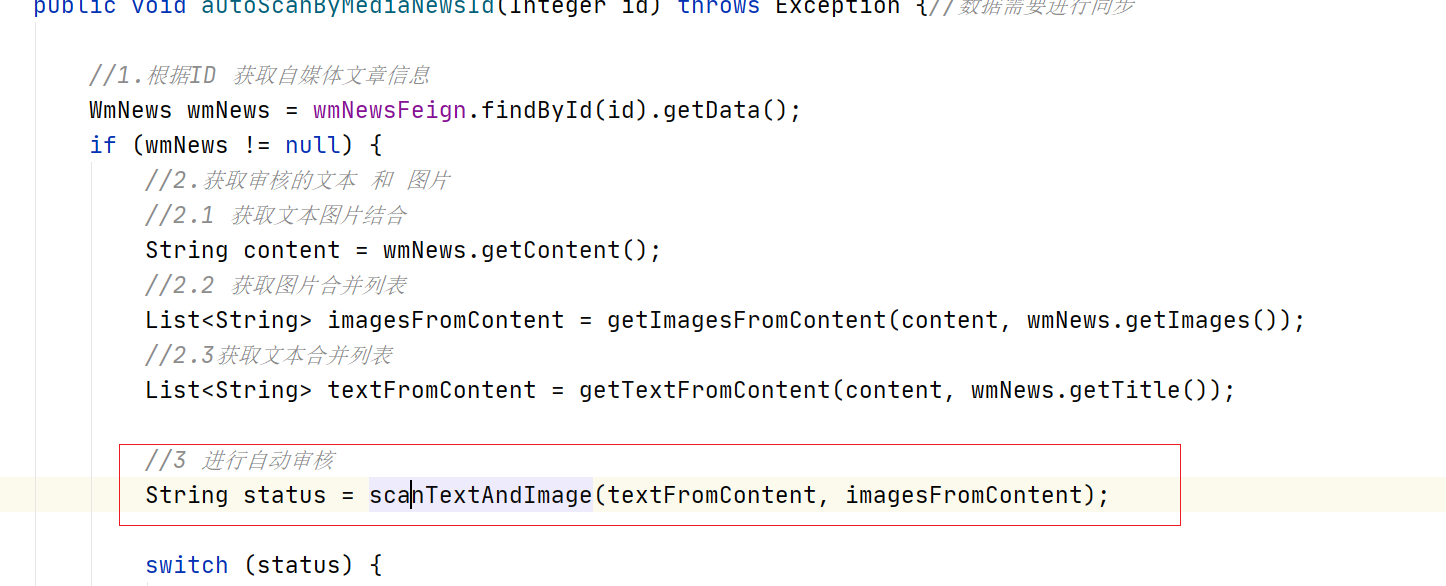
public void autoScanByMediaNewsId(Integer id) throws Exception {//數據需要進行同步
System.out.println(id);
//1 獲取文章信息
//2 獲取審核的 文本 和 圖片
//3 進行自動審核
//4 判斷審核的狀態 進行更新
//5 保存文章數據
//6 更新文章的ID
}
}
//1 獲取文章信息
//2 獲取審核的 文本 和 圖片
//3 進行自動審核
//4 判斷審核的狀態 進行更新
//5 保存文章數據
//6 更新文章的ID
2.2.2 實現監聽業務-獲取自媒體文章信息
步驟:通過feign進行調用即可
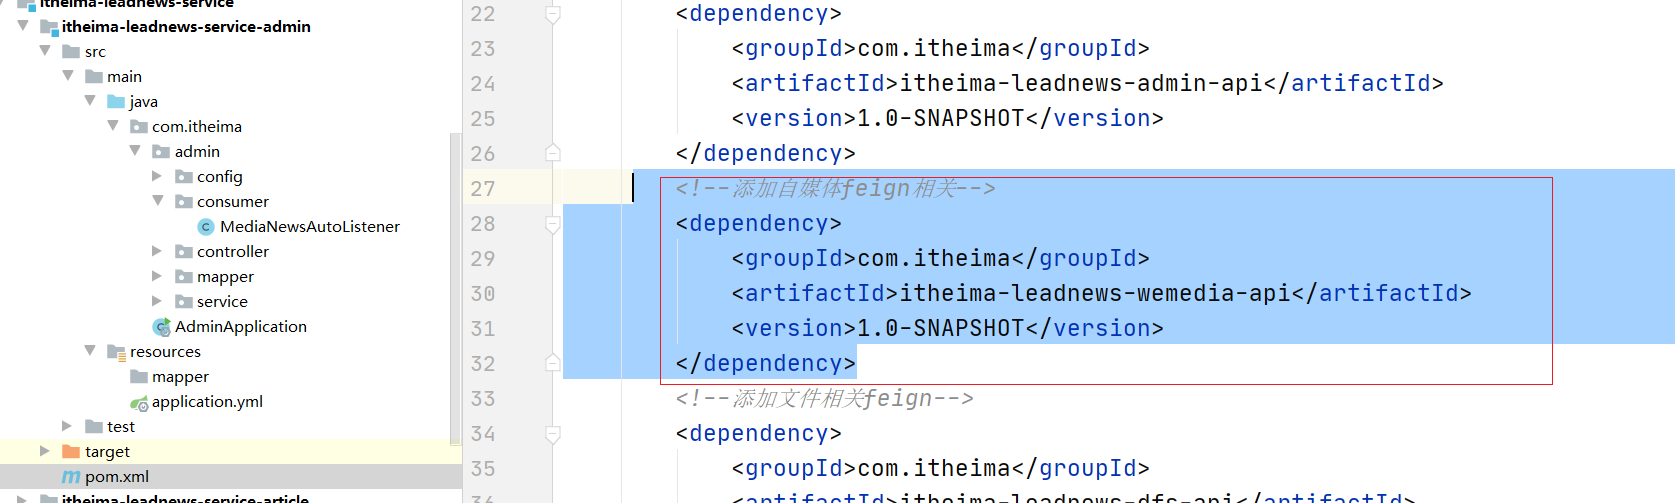
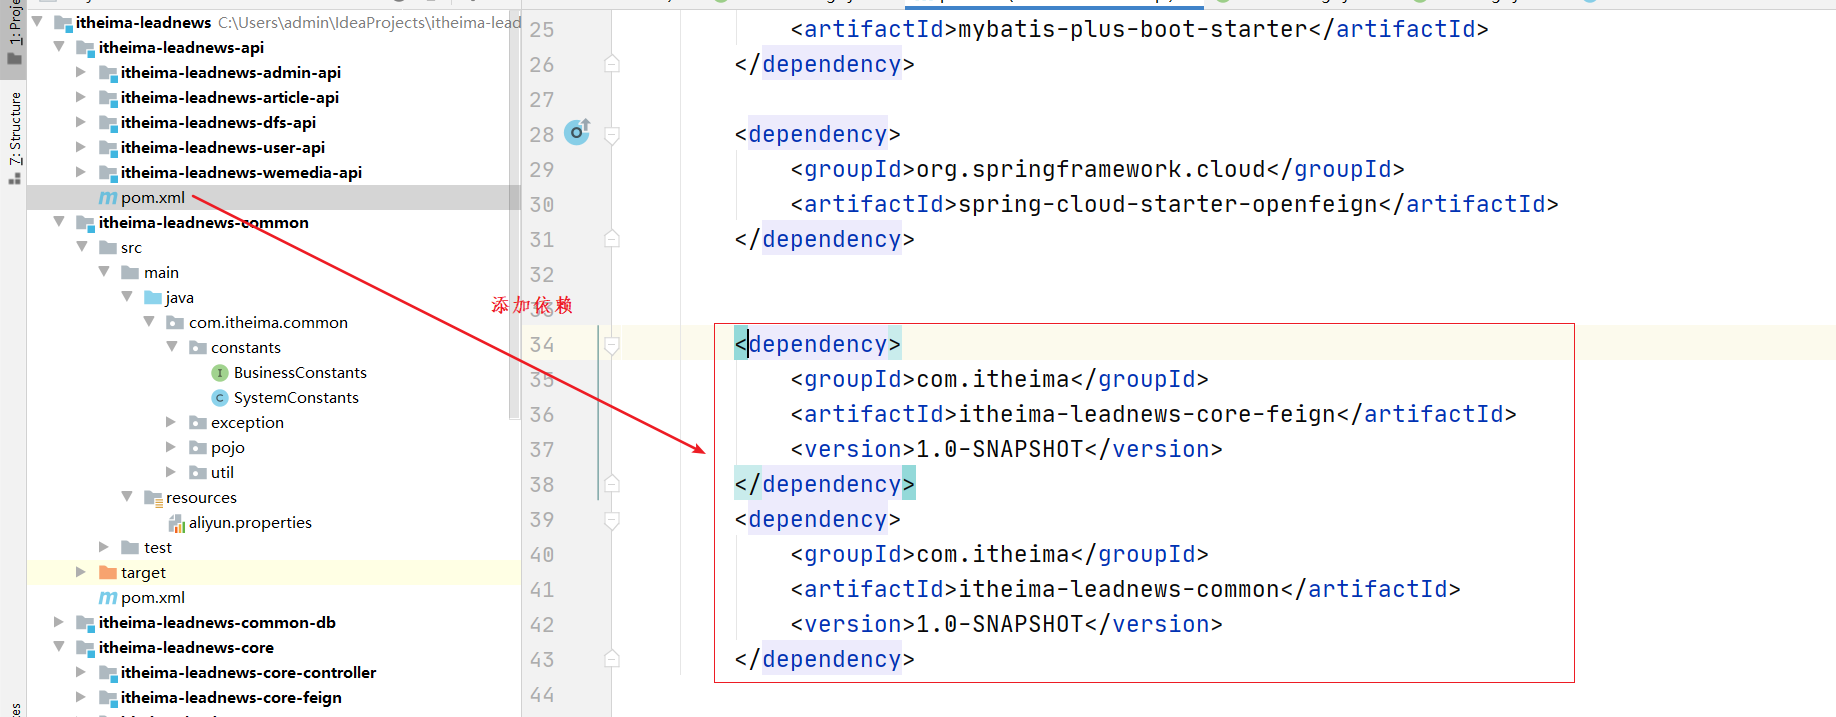
(1)admin端微服務引入依賴
<!--添加自媒體feign相關-->
<dependency>
    <groupId>com.itheima</groupId>
    <artifactId>itheima-leadnews-wemedia-api</artifactId>
    <version>1.0-SNAPSHOT</version>
</dependency>
(2)創建feign
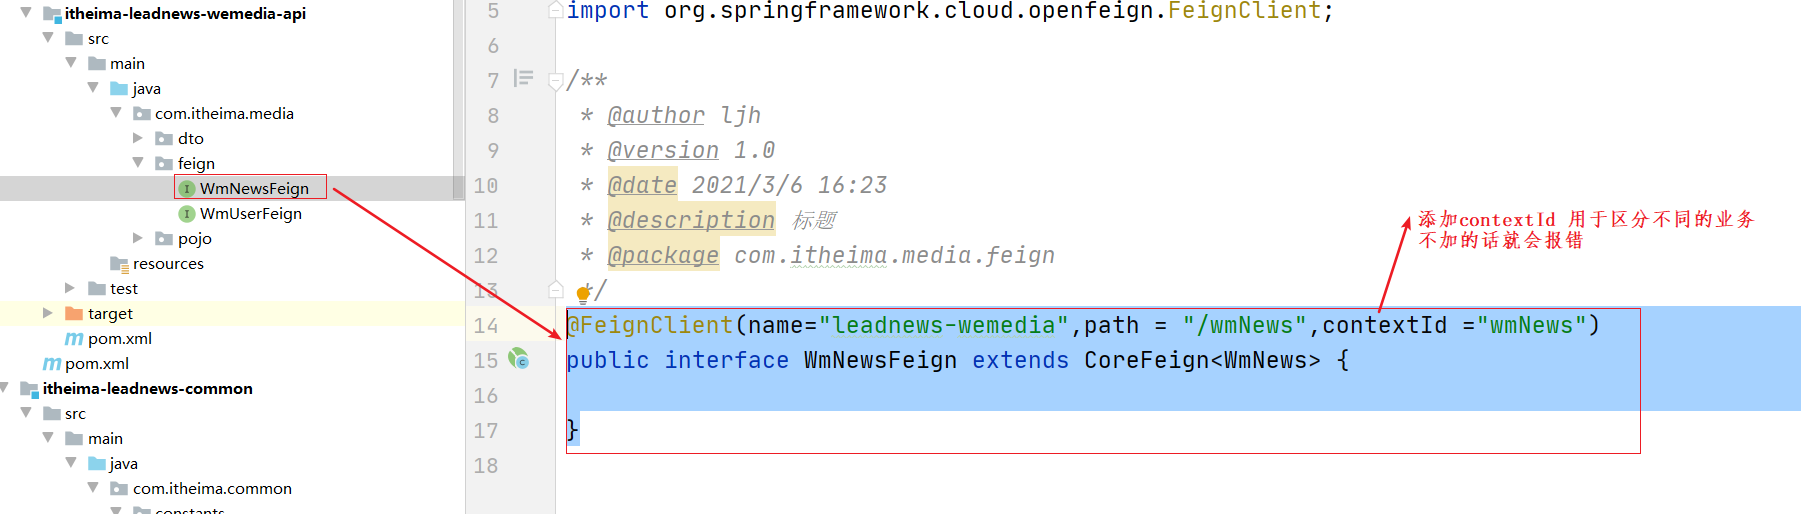
@FeignClient(name="leadnews-wemedia",path = "/wmNews",contextId ="wmNews")
public interface WmNewsFeign extends CoreFeign<WmNews> {

}
(3)添加依賴 如果有添加則不需要再加了
(4)修改feign,如圖添加contextId 用于區分不同的業務
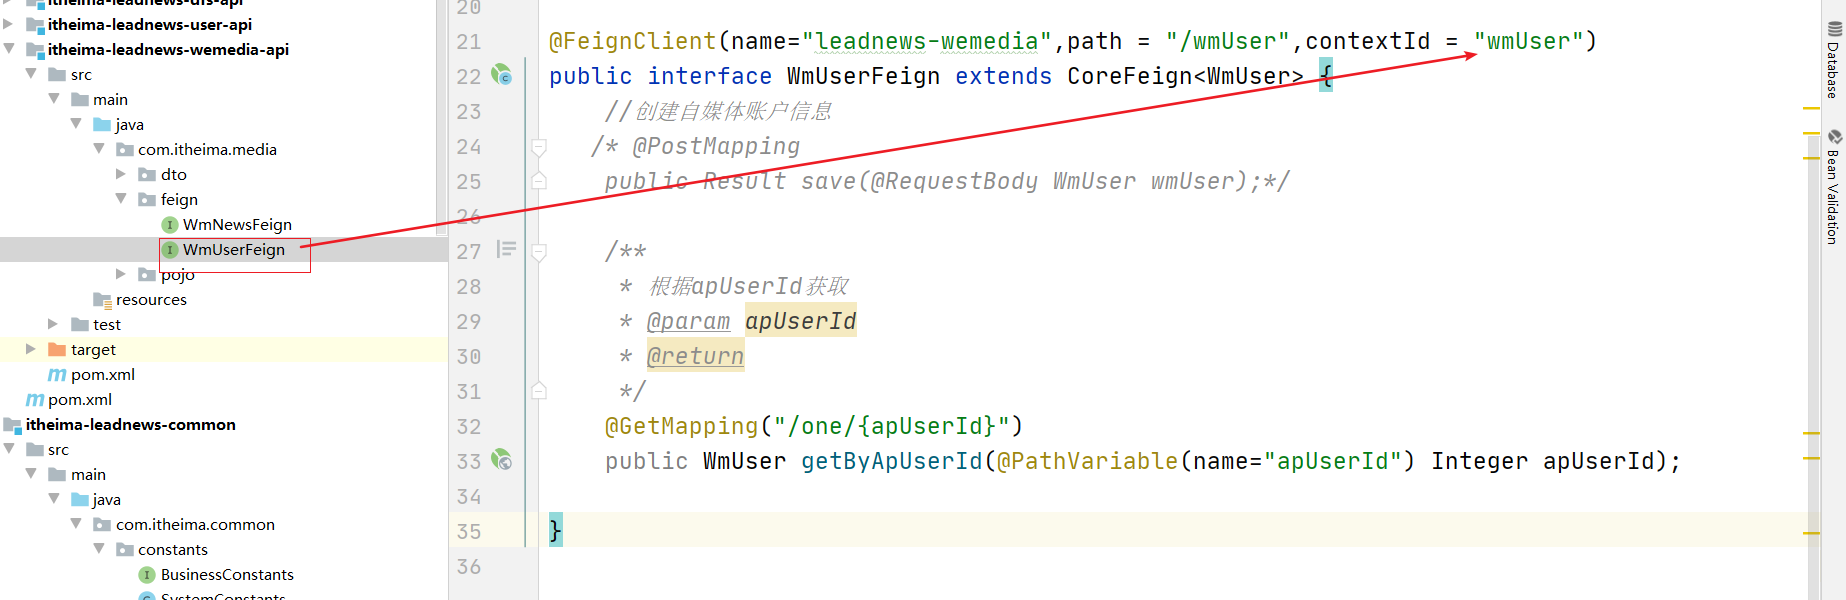
(5)實現類中調用

(6) 啟用feignclients

2.2.3 實現監聽業務-獲取審核的文本和圖片
分析:由于有圖片和文本 而且 文本是在title 和content中有 圖片是封面和content也有,那么就需要解析出content中的圖片和文本 分別進行審核。
編寫代碼如下
//2.1 獲取文本圖片結合
String content = wmNews.getContent();
//2.2 獲取圖片合并列表
List<String> imagesFromContent = getImagesFromContent(content, wmNews.getImages());
//2.3獲取文本合并列表
List<String> textFromContent = getTextFromContent(content, wmNews.getTitle());
獲取圖片
 //獲取圖片
    private List<String> getImagesFromContent(String content, String images) {
        //1.定義一個List 用來封裝所有的圖片路徑
        List<String> imagesAllList  = new ArrayList<String>();
        if(!StringUtils.isEmpty(content)) {
            //2.將content 轉成 List<ContentNode>
            List<ContentNode> contentNodes = JSON.parseArray(content, ContentNode.class);

            //3.循環遍歷獲取到type類型為image的value的值 添加到list中
            for (ContentNode contentNode : contentNodes) {
                if(contentNode.getType().equals("image")){
                    imagesAllList.add(contentNode.getValue());
                }
            }
        }
        //images的數據格式:12345.jpg
        if(!StringUtils.isEmpty(images)) {
            //4.將 images 添加list
            String[] split = images.split(",");
            List<String> imagesList = Arrays.asList(split);
            imagesAllList.addAll(imagesList);
        }
        //5.返回list
        return imagesAllList;
    }
獲取文本:
  //獲取文本
    private List<String> getTextFromContent(String content, String title) {
        //1.定義一個List 用來封裝所有的文本
        List<String> texts  = new ArrayList<String>();

        if(!StringUtils.isEmpty(content)) {
            //2.將content 轉成 List<ContentNode>
            List<ContentNode> contentNodes = JSON.parseArray(content, ContentNode.class);
            //3.循環遍歷獲取到type類型為text的value的值 添加到list中
            for (ContentNode contentNode : contentNodes) {
                if (contentNode.getType().equals("text")) {
                    texts.add(contentNode.getValue());
                }
            }
        }
        //4.將title 添加list
        texts.add(title);
        //5.返回list
        return texts;
    }
2.2.4 實現監聽業務-自動審核
分析:
根據文本列表 和 圖片地址列表 調用阿里云內容發垃圾服務進行審核,再調用本地敏感詞進行過濾 并返回結果即可
(1)封裝審核的方法
@Autowired
private DfsFeign dfsFeign;
@Autowired
private GreenTextScan greenTextScan;
@Autowired
private GreenImageScan greenImageScan;
@Autowired
private AdSensitiveMapper adSensitiveMapper;
//阿里云文本和圖片審核 以及 敏感詞審核
private String scanTextAndImage(List<String> texts, List<String> images) throws Exception {
//1審核文本
if (texts != null) {
Map map = greenTextScan.greeTextScan(texts);
String result1 = getScanResult(map);
//如果不成功 則直接返回 不需要執行了
if (!result1.equals(BusinessConstants.ScanConstants.PASS)) {
return result1;
}
}
//2 審核 圖片
if (images != null) {
List<byte[]> bytes = dfsFeign.downLoadFile(images);
Map map = greenImageScan.imageScan(bytes);
String result2 = getScanResult(map);
//如果不成功 則直接返回 不需要執行了
if (!result2.equals(BusinessConstants.ScanConstants.PASS)) {
return result2;
}
}
if(texts!=null) {
//3 審核敏感詞
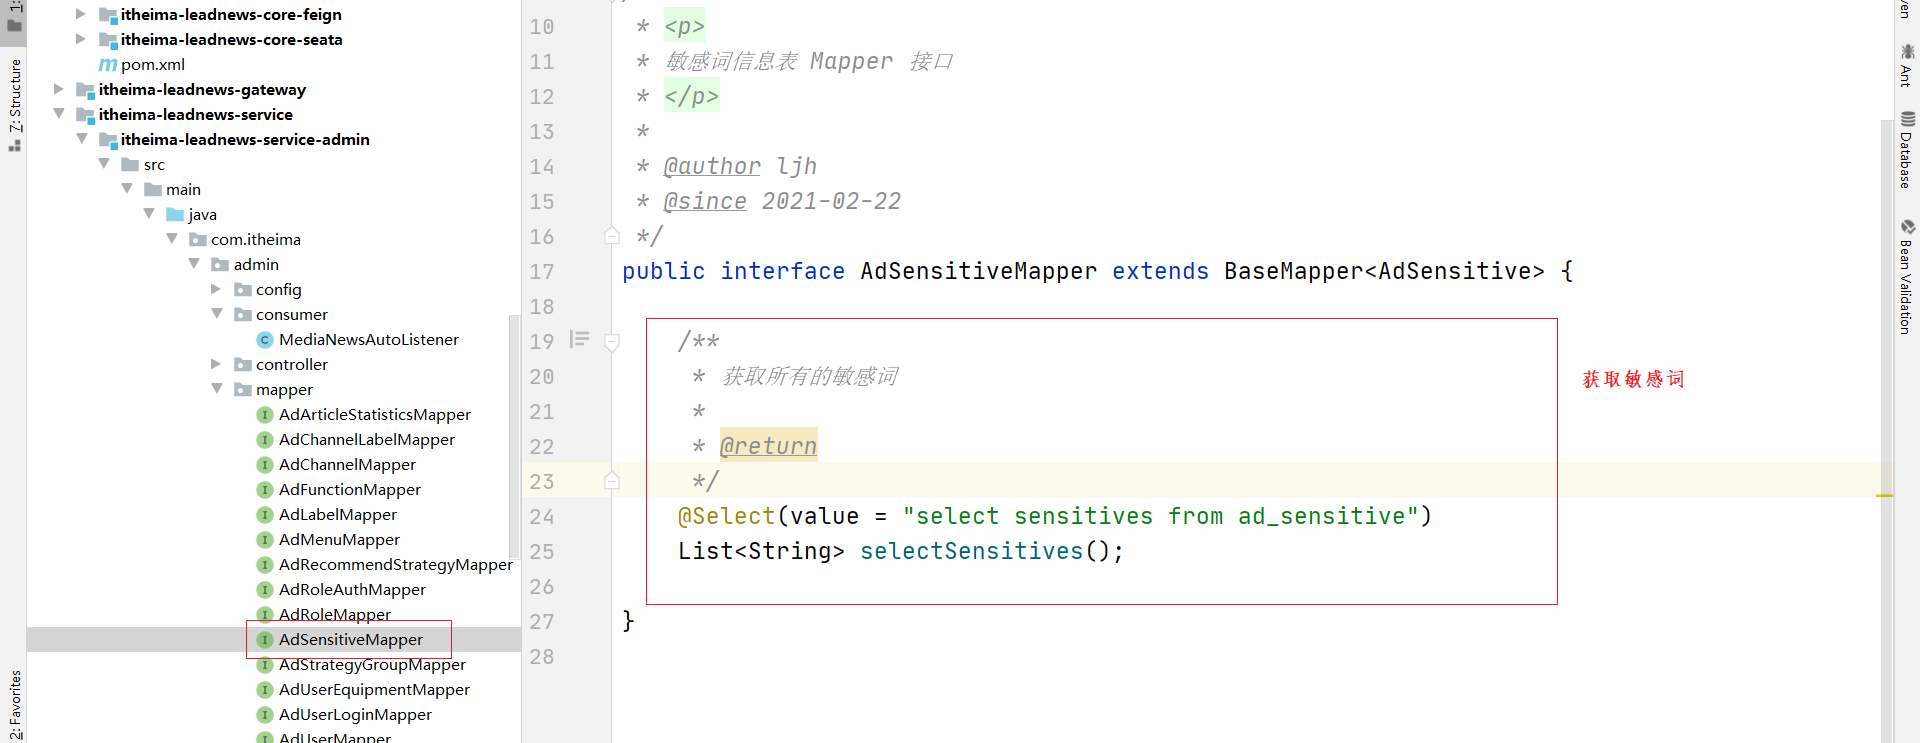
List<String> adSensitives = adSensitiveMapper.selectSensitives();
//這個可以優化放到緩存中
SensitiveWordUtil.initMap(adSensitives);
//掃描并判斷是否正確DynamicServerListLoadBalancer
for (String text : texts) {
Map<String, Integer> stringIntegerMap = SensitiveWordUtil.matchWords(text);
if (stringIntegerMap.size() > 0) {
return BusinessConstants.ScanConstants.BLOCK;
}
}
}
//通過
return BusinessConstants.ScanConstants.PASS;
}
//封裝
private String getScanResult(Map map) {
Object suggestion = map.get("suggestion");
if (!suggestion.equals("pass")) {
//有敏感詞
if (suggestion.equals("block")) {
return BusinessConstants.ScanConstants.BLOCK;
}
//人工審核
if (suggestion.equals("review")) {
return BusinessConstants.ScanConstants.REVIEW;
}
}
//如果沒錯誤 返回成功
return BusinessConstants.ScanConstants.PASS;
}
(2)創建dfsfeign 獲取圖片地址對應的的字節數組列表
創建dfs-api工程,并創建feign
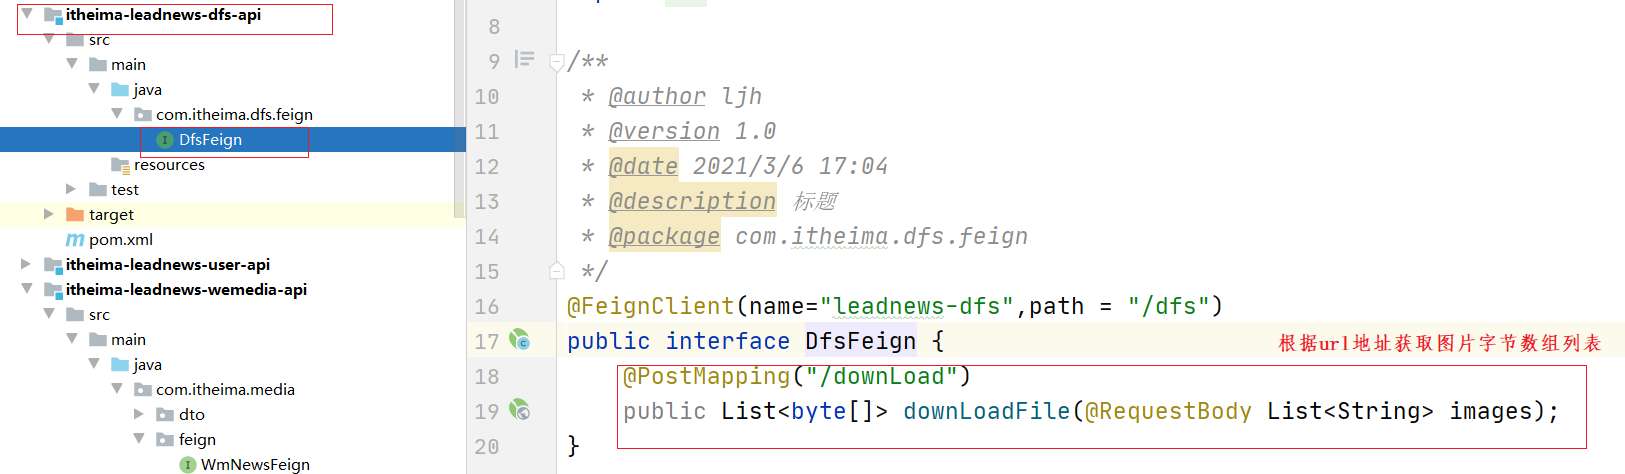
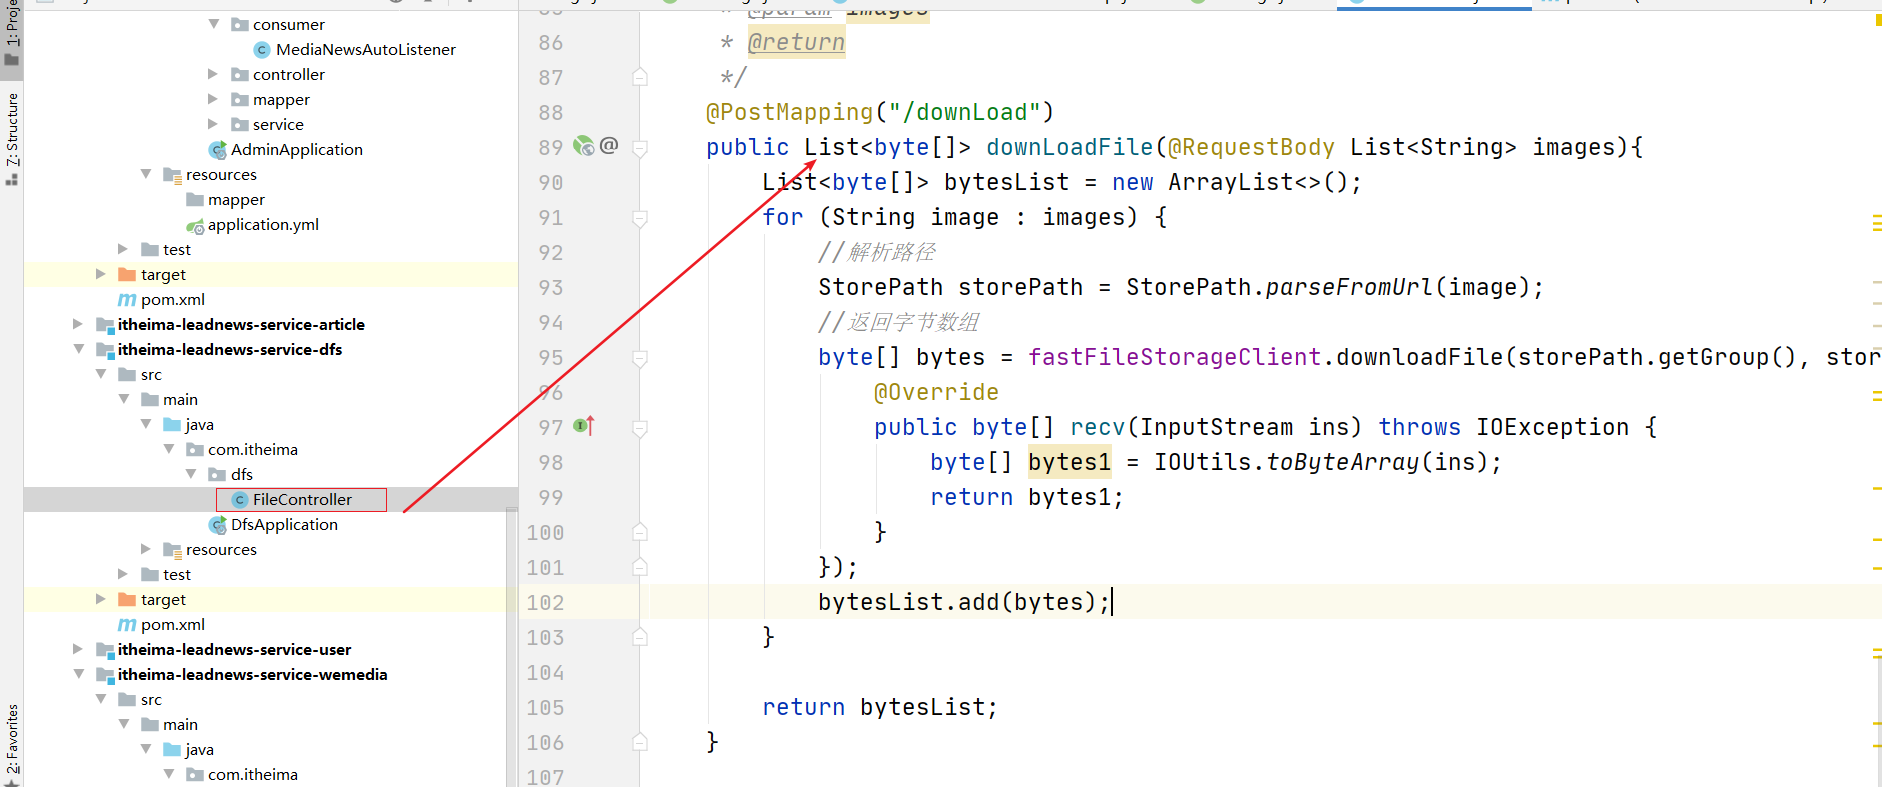
(3)dsf微服務中實現獲取字節數組返回
@PostMapping("/downLoad")
public List<byte[]> downLoadFile(@RequestBody List<String> images){
    List<byte[]> bytesList = new ArrayList<>();
    for (String image : images) {
        //解析路徑
        StorePath storePath = StorePath.parseFromUrl(image);
        //返回字節數組
        byte[] bytes = fastFileStorageClient.downloadFile(storePath.getGroup(), storePath.getPath(), new DownloadCallback<byte[]>() {
            @Override
            public byte[] recv(InputStream ins) throws IOException {
                byte[] bytes1 = IOUtils.toByteArray(ins);
                return bytes1;
            }
        });
        bytesList.add(bytes);
    }

    return bytesList;
}
(4)添加依賴到admin微服務中
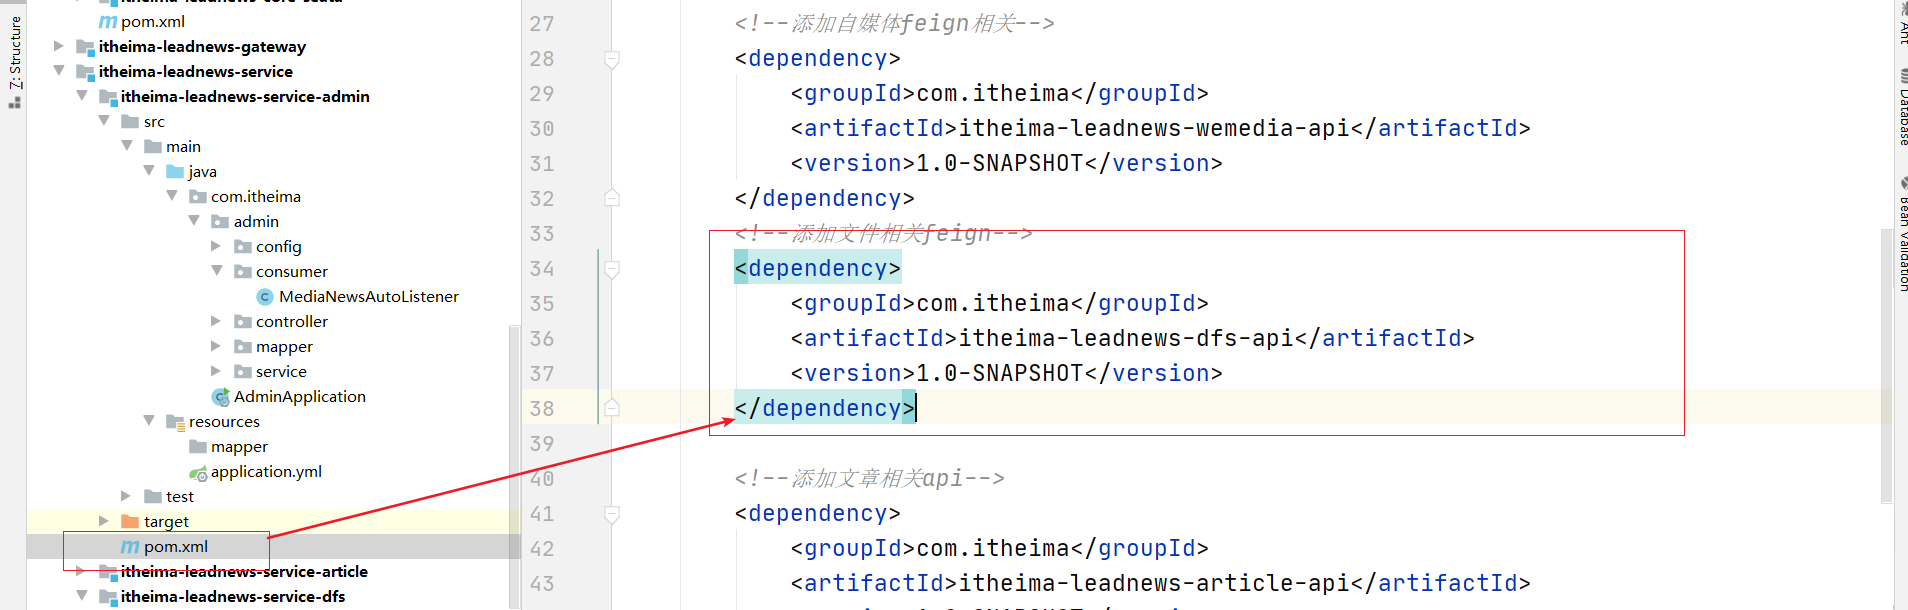
(5)添加方法用于mapper查詢敏感詞
(6)調用方法 添加
2.2.5 實現監聽業務-狀態判斷
根據上邊的分析思路如下:
	2.5 判斷審核的結果
		2.5.1 如果是Block  則 通過feign調用更新自媒體文章的狀態為2
		2.5.2 如果是review 則 通過feign調用更新自媒體文章的狀態為3
		2.5.3 如果是pass
			2.5.3.1 判斷發布時間是否有值 如果有  則通過feign調用更新自媒體文章的狀態為8
			2.5.3.2 判斷發布時間是否有值 如果無  則通過feign調用更新自媒體文章的狀態為9
添加代碼如下:
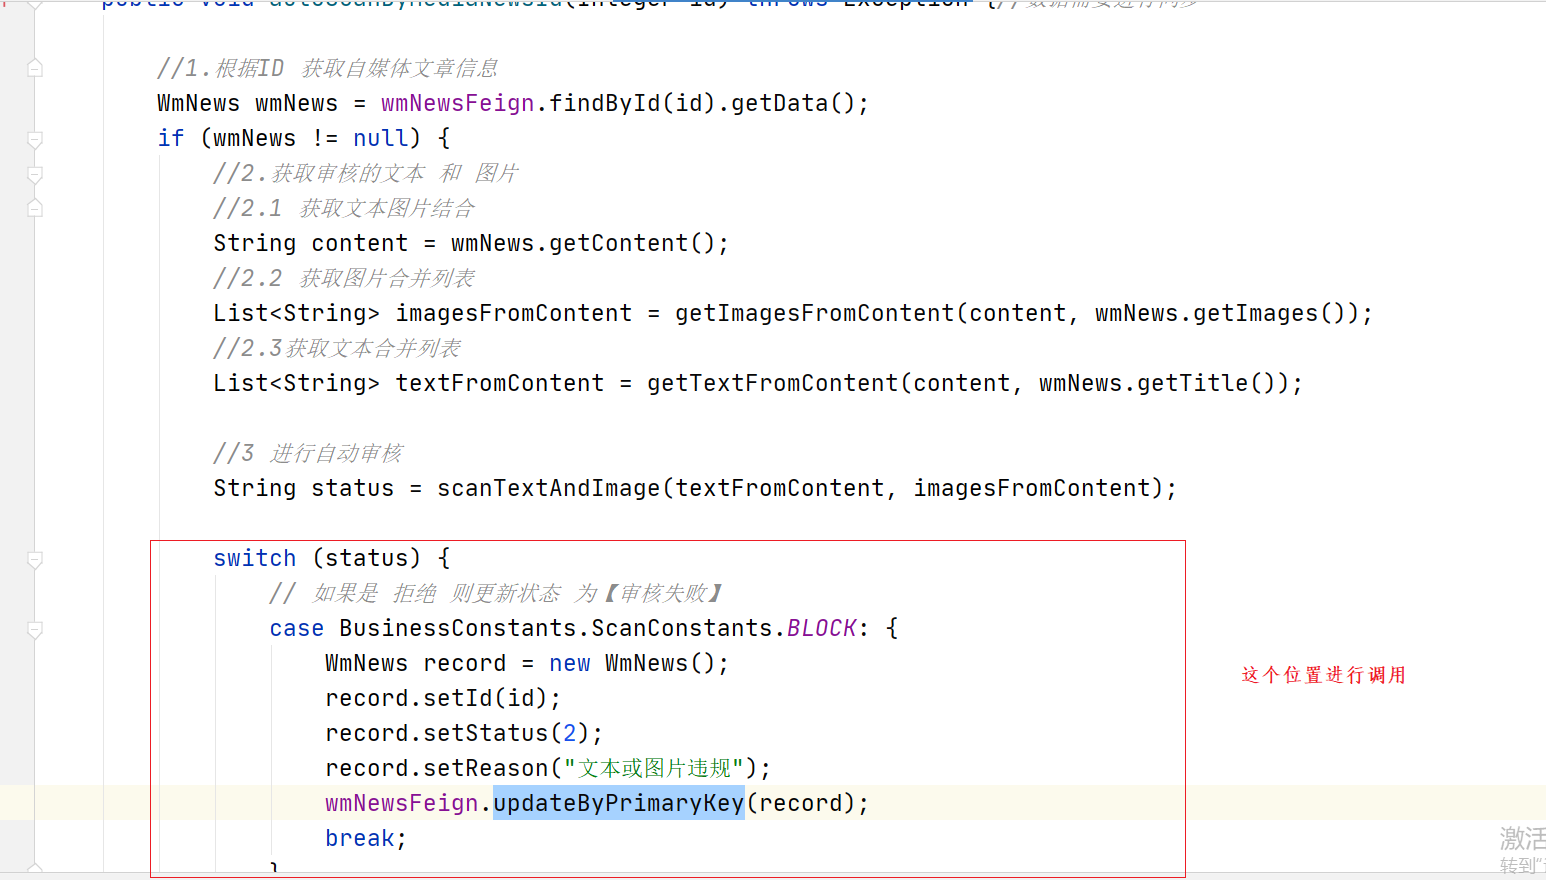
switch (status) {
    // 如果是 拒絕 則更新狀態 為【審核失敗】
    case BusinessConstants.ScanConstants.BLOCK: {
        WmNews record = new WmNews();
        record.setId(id);
        record.setStatus(2);
        record.setReason("文本或圖片違規");
        wmNewsFeign.updateByPrimaryKey(record);
        break;
    }
    // 如果是 審核成功 則更新狀態根據情況來進行處理   1如果是發布時間為null 則 更新為9 ; 2: 如果是發布時間不為null 則更新為8
    case BusinessConstants.ScanConstants.PASS: {
        if (wmNews.getPublishTime() != null) {
            WmNews record = new WmNews();
            record.setId(id);
            record.setStatus(8);
            wmNewsFeign.updateByPrimaryKey(record);
        } else {
            WmNews record = new WmNews();
            record.setId(id);
            record.setStatus(9);
            wmNewsFeign.updateByPrimaryKey(record);
        }
        break;
    }
    // 如果是 不確定 則人工審核
    case BusinessConstants.ScanConstants.REVIEW: {
        WmNews record = new WmNews();
        record.setId(id);
        record.setStatus(3);
        wmNewsFeign.updateByPrimaryKey(record);
        break;
    }
    default:
        System.out.println("錯誤信息");
        break;
}
2.2.6 實現監聽業務-文章信息進行保存
步驟分析:
(1)文章信息設計到的表為3張,并且還需要作者信息 所以我們可以定義一個dto對象包含相關屬性
(2)定義feign
(3)實現feign
(4)admin端進行feign調用
	添加依賴
	啟用feignclients
	注入并進行調用
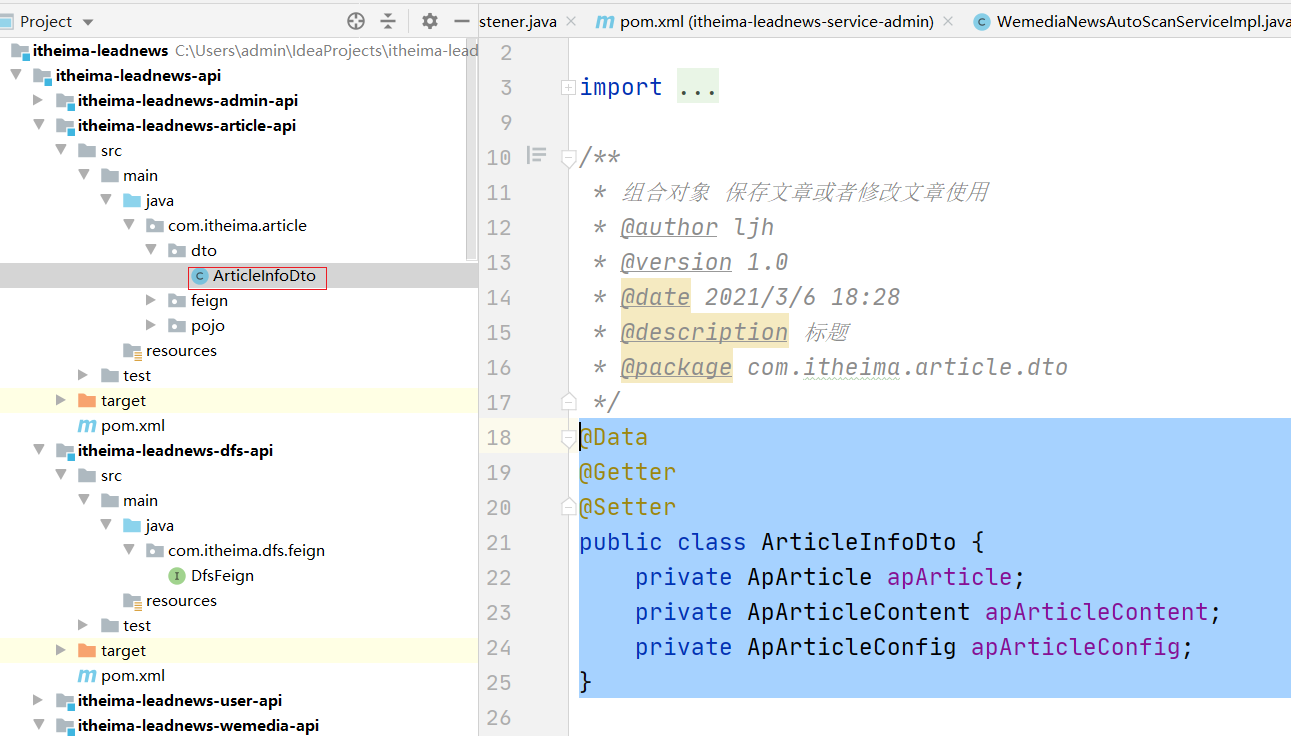
(1)定義dto對象
@Data
@Getter
@Setter
public class ArticleInfoDto {
    private ApArticle apArticle;
    private ApArticleContent apArticleContent;
    private ApArticleConfig apArticleConfig;
}
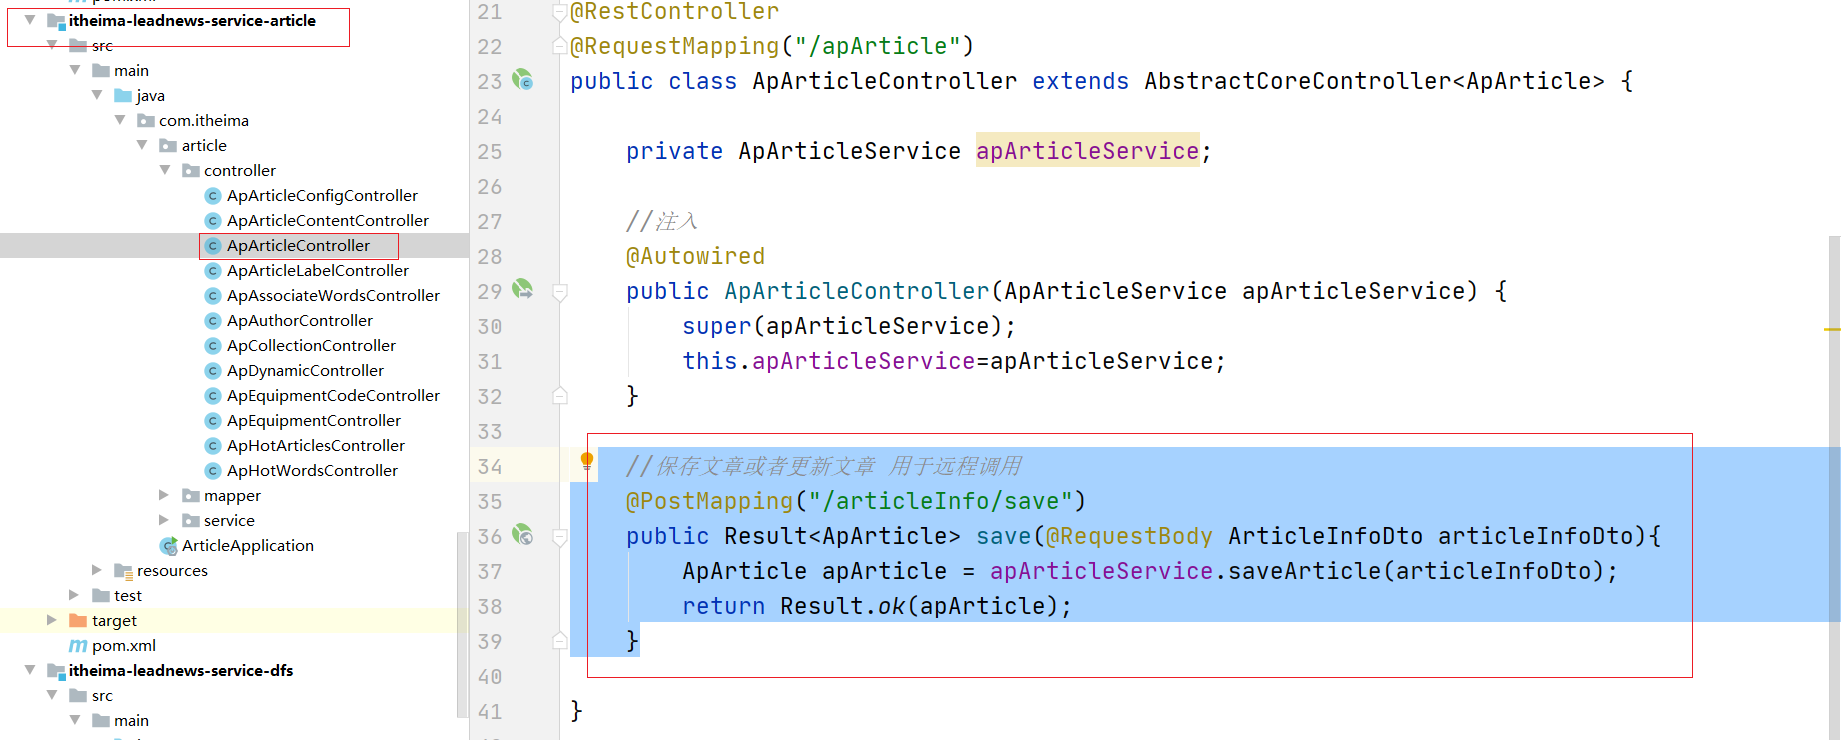
(2)創建feign接口實現更新保存
@FeignClient(name="leadnews-article",path = "/apArticle",contextId = "apArticle")
public interface ApArticleFeign {
    //保存文章或者更新文章信息
    @PostMapping("/articleInfo/save")
    public Result<ApArticle> save(@RequestBody ArticleInfoDto articleInfoDto);
}

另外也需要修改apAuthorFeign的配置如下:

(3)實現feign接口對應的業務邏輯:
controller:
  //保存文章或者更新文章 用于遠程調用
    @PostMapping("/articleInfo/save")
    public Result<ApArticle> save(@RequestBody ArticleInfoDto articleInfoDto){
        ApArticle apArticle = apArticleService.saveArticle(articleInfoDto);
        return Result.ok(apArticle);
    }
service實現類:
 @Autowired
    private ApArticleMapper apArticleMapper;
    @Autowired
    private ApArticleConfigMapper apArticleConfigMapper;
    @Autowired
    private ApArticleContentMapper apArticleContentMapper;

	//更新的情況不會存在,但是為了避免出現錯誤,我們可以進行更新
    @Override
    public ApArticle saveArticle(ArticleInfoDto articleInfoDto) {
        //1.獲取文章信息 判斷 是否有值
        ApArticle apArticle = articleInfoDto.getApArticle();
        //更新的
        if (apArticle.getId() != null) {
            //更新文章
            //apArticleMapper.updateById(apArticle);

            //更新配置  不需要更新配置(是在文章審核通過之后進行的)
           /* QueryWrapper<ApArticleConfig> wrapper1 = new QueryWrapper<ApArticleConfig>();
            wrapper1.eq("article_id",apArticle.getId());
            apArticleConfigMapper.update(articleInfoDto.getApArticleConfig(),wrapper1);*/
            //更新內容
           // QueryWrapper<ApArticleContent> wrapper2 = new QueryWrapper<ApArticleContent>();
           // wrapper2.eq("article_id",apArticle.getId());
            //apArticleContentMapper.update(articleInfoDto.getApArticleContent(),wrapper2);
        } else {
            //添加
            apArticle.setCreatedTime(LocalDateTime.now());
            apArticleMapper.insert(apArticle);

            ApArticleConfig apArticleConfig = articleInfoDto.getApArticleConfig();
            apArticleConfig.setArticleId(apArticle.getId());
            apArticleConfigMapper.insert(apArticleConfig);

            ApArticleContent apArticleContent = articleInfoDto.getApArticleContent();
            apArticleContent.setArticleId(apArticle.getId());
            apArticleContentMapper.insert(apArticleContent);
        }
        return apArticle;
    }
(4)admin微服務中添加依賴
<!--添加文章相關api-->
<dependency>
    <groupId>com.itheima</groupId>
    <artifactId>itheima-leadnews-article-api</artifactId>
    <version>1.0-SNAPSHOT</version>
</dependency>
(5)實現feign調用
設置flag 表示當狀態為9的時候才能進行創建文章。
@Autowired
private ApArticleFeign apArticleFeign;
@Override
public void autoScanByMediaNewsId(Integer id) throws Exception {

    //略

    if(flag) {
        //4.保存文章相關信息 并進行狀態同步 涉及到三個表 article article_content article_config
        ArticleInfoDto articleInfoDto = new ArticleInfoDto();

        ApArticle article = new ApArticle();

        //該值有可能為null
        if (wmNews.getArticleId() != null) {
            article.setId(wmNews.getArticleId());
        }
        article.setTitle(wmNews.getTitle());
        //根據自媒體賬號獲取作者信息
        //自媒體賬號ID
        ApAuthor apAuthor = apAuthorFeign.getByWmUserId(wmNews.getUserId());
        if (apAuthor != null) {
            article.setAuthorId(apAuthor.getId());
            article.setAuthorName(apAuthor.getName());
        }
        //獲取頻道
        AdChannel adChannel = adChannelService.getById(wmNews.getChannelId());
        if (adChannel != null) {
            article.setChannelId(adChannel.getId());
            article.setChannelName(adChannel.getName());
        }
        //文章布局
        article.setLayout(wmNews.getType());
        //普通文章
        article.setFlag(0);

        article.setImages(wmNews.getImages());

        article.setLabels(wmNews.getLabels());

        if (wmNews.getPublishTime() != null) {
            article.setPublishTime(wmNews.getPublishTime());
        }
        //同步狀態
        article.setSyncStatus(wmNews.getStatus());
        articleInfoDto.setApArticle(article);


        ApArticleConfig articleConfig = new ApArticleConfig();
        //設置默認值
        articleConfig.setIsDown(0);
        //設置默認值
        articleConfig.setIsDelete(0);

        articleInfoDto.setApArticleConfig(articleConfig);


        ApArticleContent articleContent = new ApArticleContent();
        //內容
        articleContent.setContent(wmNews.getContent());

        articleInfoDto.setApArticleContent(articleContent);

        //獲取到文章的ID
        Result<ApArticle> resultApArticle = apArticleFeign.save(articleInfoDto);
    }
    //略
}
代碼所在位置

還需要定義apAuthor的方法用于根據自媒體用戶的ID 獲取作者信息:
/*@PostMapping
    public Result<ApAuthor> save(@RequestBody ApAuthor record);*/
@GetMapping("/author/{wmUserId}")
public ApAuthor getByWmUserId(@PathVariable(name="wmUserId") Integer wmUserId);
在文章微服務中進行“實現”接口:
/**
     * 根據mw_user_id 獲取作者()
     * @param wmUserId  自媒體用戶的ID主鍵值
     * @return
     */
@GetMapping("/author/{wmUserId}")
public ApAuthor getByWmUserId(@PathVariable(name="wmUserId") Integer wmUserId){
    QueryWrapper<ApAuthor> queryWrapper = new QueryWrapper<ApAuthor>();
    queryWrapper.eq("wm_user_id",wmUserId);
    return apAuthorService.getOne(queryWrapper);
}
2.2.7 實現監聽任務-實現文章ID更新到自媒體文章中
ApArticle data = resultApArticle.getData();
//獲取ID 更新到自媒體表當中
Long articleId = data.getId();
WmNews record = new WmNews();
record.setId(id);
record.setArticleId(articleId);

wmNewsFeign.updateByPrimaryKey(record);
2.3 整體代碼如下
package com.itheima.admin.service.impl;
import com.alibaba.fastjson.JSON;
import com.itheima.admin.mapper.AdSensitiveMapper;
import com.itheima.admin.pojo.AdChannel;
import com.itheima.admin.service.AdChannelService;
import com.itheima.admin.service.WemediaNewsAutoScanService;
import com.itheima.article.dto.ArticleInfoDto;
import com.itheima.article.feign.ApArticleFeign;
import com.itheima.article.feign.ApAuthorFeign;
import com.itheima.article.pojo.ApArticle;
import com.itheima.article.pojo.ApArticleConfig;
import com.itheima.article.pojo.ApArticleContent;
import com.itheima.article.pojo.ApAuthor;
import com.itheima.common.constants.BusinessConstants;
import com.itheima.common.pojo.Result;
import com.itheima.common.util.GreenImageScan;
import com.itheima.common.util.GreenTextScan;
import com.itheima.common.util.SensitiveWordUtil;
import com.itheima.dfs.feign.DfsFeign;
import com.itheima.media.dto.ContentNode;
import com.itheima.media.feign.WmNewsFeign;
import com.itheima.media.feign.WmUserFeign;
import com.itheima.media.pojo.WmNews;
import org.springframework.beans.factory.annotation.Autowired;
import org.springframework.stereotype.Service;
import org.springframework.util.StringUtils;
import java.util.ArrayList;
import java.util.Arrays;
import java.util.List;
import java.util.Map;
/**
* 自動審核
*
* @author ljh
* @version 1.0
* @date 2021/3/5 16:25
* @description 標題
* @package com.itheima.admin.service.impl
*/
@Service
public class WemediaNewsAutoScanServiceImpl implements WemediaNewsAutoScanService {
@Autowired
private WmNewsFeign wmNewsFeign;
@Autowired
private DfsFeign dfsFeign;
@Autowired
private GreenTextScan greenTextScan;
@Autowired
private GreenImageScan greenImageScan;
@Autowired
private AdSensitiveMapper adSensitiveMapper;
@Autowired
private ApArticleFeign apArticleFeign;
@Autowired
private ApAuthorFeign apAuthorFeign;
@Autowired
private AdChannelService adChannelService;
@Override
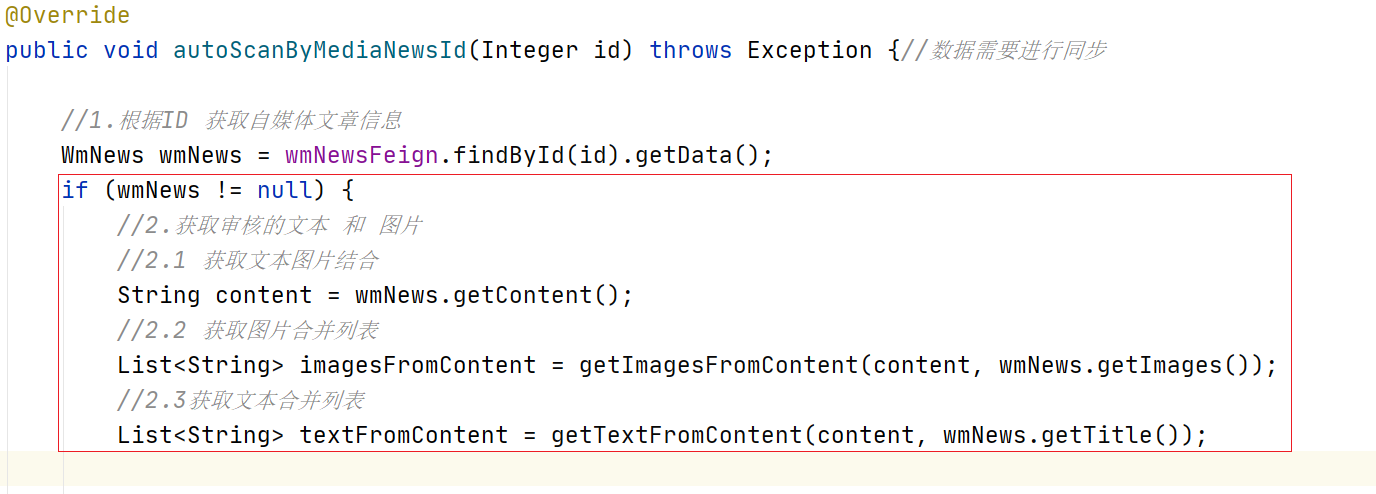
public void autoScanByMediaNewsId(Integer id) throws Exception {//數據需要進行同步
//1.根據ID 獲取自媒體文章信息
WmNews wmNews = wmNewsFeign.findById(id).getData();
if (wmNews != null) {
//2.獲取審核的文本 和 圖片
//2.1 獲取文本圖片結合
String content = wmNews.getContent();
//2.2 獲取圖片合并列表
List<String> imagesFromContent = getImagesFromContent(content, wmNews.getImages());
//2.3獲取文本合并列表
List<String> textFromContent = getTextFromContent(content, wmNews.getTitle());
//3 進行自動審核
String status = scanTextAndImage(textFromContent, imagesFromContent);
//判斷是否狀態為9 如果是9 才需要進行創建文章 (在8的時候也不行,當后面我們實現功能XXL-JOB進行更新的時候 再進行調用)
boolean flag=false;
switch (status) {
// 如果是 拒絕 則更新狀態 為【審核失敗】
case BusinessConstants.ScanConstants.BLOCK: {
WmNews record = new WmNews();
record.setId(id);
record.setStatus(2);
record.setReason("文本或圖片違規");
wmNewsFeign.updateByPrimaryKey(record);
break;
}
// 如果是 審核成功 則更新狀態根據情況來進行處理 1如果是發布時間為null 則 更新為9 ; 2: 如果是發布時間不為null 則更新為8
case BusinessConstants.ScanConstants.PASS: {
if (wmNews.getPublishTime() != null) {
WmNews record = new WmNews();
record.setId(id);
record.setStatus(8);
wmNewsFeign.updateByPrimaryKey(record);
} else {
WmNews record = new WmNews();
record.setId(id);
record.setStatus(9);
flag=true;
wmNewsFeign.updateByPrimaryKey(record);
}
break;
}
// 如果是 不確定 則人工審核
case BusinessConstants.ScanConstants.REVIEW: {
WmNews record = new WmNews();
record.setId(id);
record.setStatus(3);
wmNewsFeign.updateByPrimaryKey(record);
break;
}
default:
System.out.println("錯誤信息");
break;
}
//4.保存文章相關信息 并進行狀態同步 涉及到三個表 article article_content article_config
if(flag) {
ArticleInfoDto articleInfoDto = new ArticleInfoDto();
ApArticle article = new ApArticle();
//該值有可能為null
if (wmNews.getArticleId() != null) {
article.setId(wmNews.getArticleId());
}
article.setTitle(wmNews.getTitle());
//根據自媒體賬號獲取作者信息
//自媒體賬號ID
ApAuthor apAuthor = apAuthorFeign.getByWmUserId(wmNews.getUserId());
if (apAuthor != null) {
article.setAuthorId(apAuthor.getId());
article.setAuthorName(apAuthor.getName());
}
//獲取頻道
AdChannel adChannel = adChannelService.getById(wmNews.getChannelId());
if (adChannel != null) {
article.setChannelId(adChannel.getId());
article.setChannelName(adChannel.getName());
}
//文章布局
article.setLayout(wmNews.getType());
//普通文章
article.setFlag(0);
article.setImages(wmNews.getImages());
article.setLabels(wmNews.getLabels());
if (wmNews.getPublishTime() != null) {
article.setPublishTime(wmNews.getPublishTime());
}
//同步狀態
article.setSyncStatus(wmNews.getStatus());
articleInfoDto.setApArticle(article);
ApArticleConfig articleConfig = new ApArticleConfig();
//設置默認值
articleConfig.setIsDown(0);
//設置默認值
articleConfig.setIsDelete(0);
articleInfoDto.setApArticleConfig(articleConfig);
ApArticleContent articleContent = new ApArticleContent();
//內容
articleContent.setContent(wmNews.getContent());
articleInfoDto.setApArticleContent(articleContent);
//獲取到文章的ID
Result<ApArticle> resultApArticle = apArticleFeign.save(articleInfoDto);
ApArticle data = resultApArticle.getData();
//獲取ID 更新到自媒體表當中
Long articleId = data.getId();
WmNews record = new WmNews();
record.setId(id);
record.setArticleId(articleId);
wmNewsFeign.updateByPrimaryKey(record);
}
}
}
//獲取圖片
private List<String> getImagesFromContent(String content, String images) {
//1.定義一個List 用來封裝所有的圖片路徑
List<String> imagesAllList = new ArrayList<String>();
if(!StringUtils.isEmpty(content)) {
//2.將content 轉成 List<ContentNode>
List<ContentNode> contentNodes = JSON.parseArray(content, ContentNode.class);
//3.循環遍歷獲取到type類型為image的value的值 添加到list中
for (ContentNode contentNode : contentNodes) {
if(contentNode.getType().equals("image")){
imagesAllList.add(contentNode.getValue());
}
}
}
//images的數據格式:12345.jpg
if(!StringUtils.isEmpty(images)) {
//4.將 images 添加list
String[] split = images.split(",");
List<String> imagesList = Arrays.asList(split);
imagesAllList.addAll(imagesList);
}
//5.返回list
return imagesAllList;
}
//獲取文本并合并
private List<String> getTextFromContent(String content, String title) {
//1.定義一個List 用來封裝所有的文本
List<String> texts = new ArrayList<String>();
if(!StringUtils.isEmpty(content)) {
//2.將content 轉成 List<ContentNode>
List<ContentNode> contentNodes = JSON.parseArray(content, ContentNode.class);
//3.循環遍歷獲取到type類型為text的value的值 添加到list中
for (ContentNode contentNode : contentNodes) {
if (contentNode.getType().equals("text")) {
texts.add(contentNode.getValue());
}
}
}
//4.將title 添加list
texts.add(title);
//5.返回list
return texts;
}
//阿里云文本和圖片審核 以及 敏感詞審核
private String scanTextAndImage(List<String> texts, List<String> images) throws Exception {
//1審核文本
if (texts != null) {
Map map = greenTextScan.greeTextScan(texts);
String result1 = getScanResult(map);
//如果不成功 則直接返回 不需要執行了
if (!result1.equals(BusinessConstants.ScanConstants.PASS)) {
return result1;
}
}
//2 審核 圖片
if (images != null) {
List<byte[]> bytes = dfsFeign.downLoadFile(images);
Map map = greenImageScan.imageScan(bytes);
String result2 = getScanResult(map);
//如果不成功 則直接返回 不需要執行了
if (!result2.equals(BusinessConstants.ScanConstants.PASS)) {
return result2;
}
}
if(texts!=null) {
//3 審核敏感詞
List<String> adSensitives = adSensitiveMapper.selectSensitives();
//這個可以優化放到緩存中
SensitiveWordUtil.initMap(adSensitives);
//掃描并判斷是否正確DynamicServerListLoadBalancer
for (String text : texts) {
Map<String, Integer> stringIntegerMap = SensitiveWordUtil.matchWords(text);
if (stringIntegerMap.size() > 0) {
return BusinessConstants.ScanConstants.BLOCK;
}
}
}
//通過
return BusinessConstants.ScanConstants.PASS;
}
//封裝
private String getScanResult(Map map) {
Object suggestion = map.get("suggestion");
if (!suggestion.equals("pass")) {
//有敏感詞
if (suggestion.equals("block")) {
return BusinessConstants.ScanConstants.BLOCK;
}
//人工審核
if (suggestion.equals("review")) {
return BusinessConstants.ScanConstants.REVIEW;
}
}
//如果沒錯誤 返回成功
return BusinessConstants.ScanConstants.PASS;
}
}
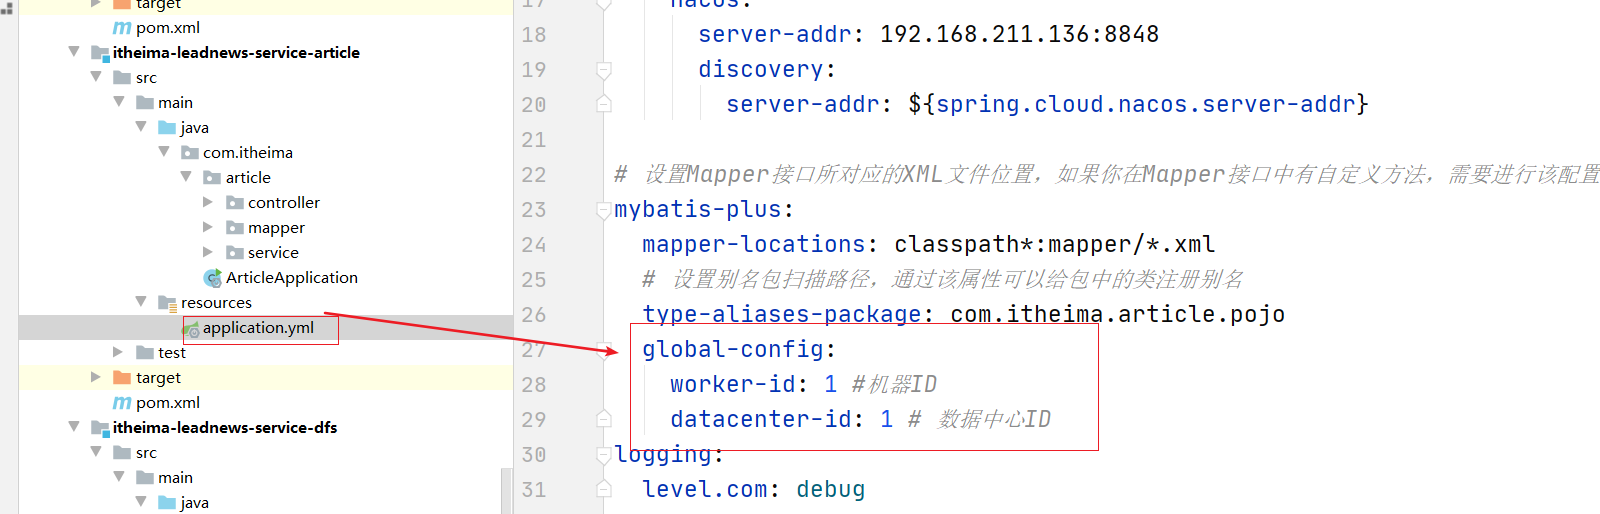
3 雪花算法
? 在我們機器越來越多的情況下,主鍵的生成策略 如果還是自增的話,那么就會在邏輯上出現主鍵不一致的情況。
為了避免這種情況出現,我們可以采用雪花算法來生成主鍵,并且產生不重復的主鍵值。如下圖可以查看
mybatisplus已經為我們提供了該主鍵的生成策略,可以直接使用,對于文章來講,可能文章的數據是特別的多,所以文章信息我們可以采用此種解決方案。
使用步驟很簡單 如下兩個步驟即可:
1. 定義生成的策略

2. 在微服務中進行配置
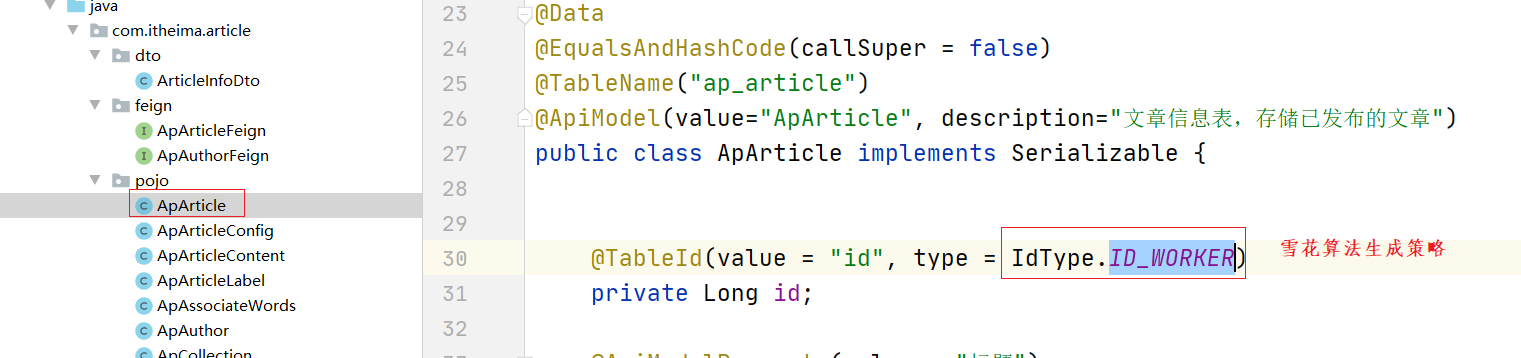
在article微服務中配置 datacenterid和workid
4 人工審核文章
4.1 需求分析
自媒體文章如果沒有自動審核成功,而是到了人工審核(自媒體文章狀態為3),需要在admin端人工處理文章的審核
如圖所示:
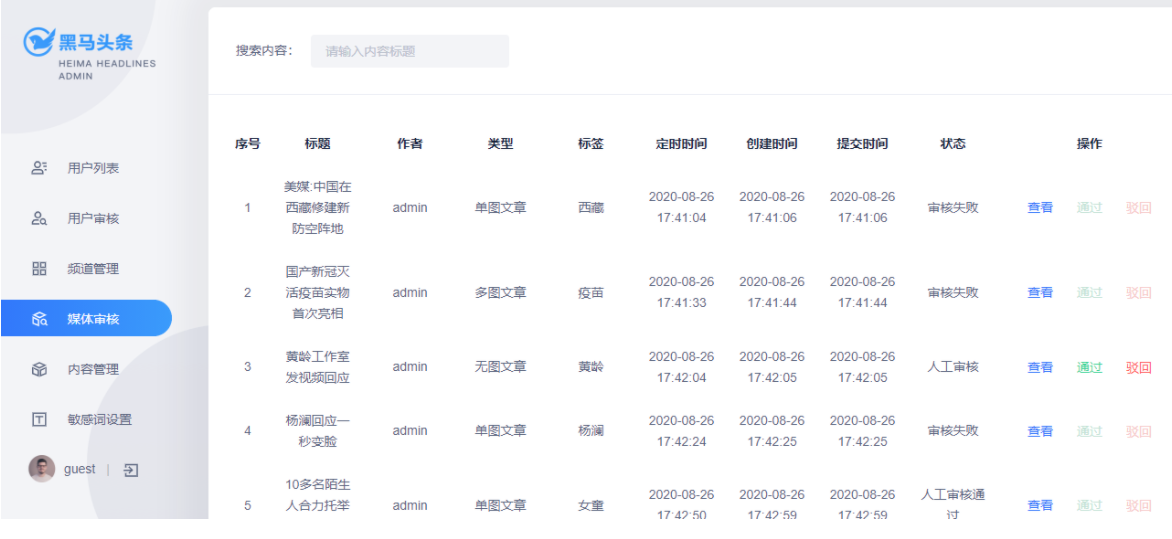
管理員后臺 可以查看 【人工審核中】和【審核失敗】狀態下的文章信息,并且可以通過操作界面對某一個文章進行審核通過,和駁回。也就是審核失敗。
需求如下:
1 根據條件分頁查詢自媒體文章數據 前提條件 是查詢人工審核中 或者 審核失敗狀態下的文章信息
2 查詢文章的詳情信息
3 通過審核
4 駁回審核
4.2 功能實現分析
分析如下:
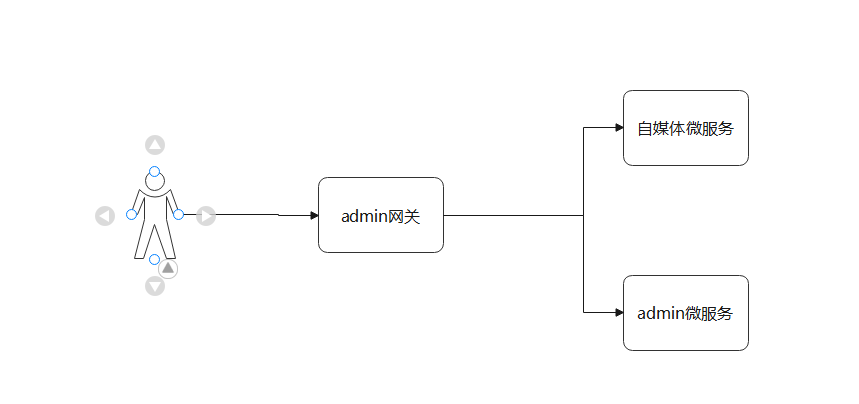
由于有了admin網關 我們可以直接通過admin網關進行路由到自媒體微服務將數據列出返回即可。在這個查詢的過程中由于需求中需要有作者信息 那么就需要聯合查詢到對應的作者名稱。而作者名稱就是自媒體用戶的名稱。

1.根據標題進行分頁查詢 自媒體文章信息 并且包含 人工審核中和審核失敗的文章
2.審核通過
3.審核失敗
4.查看文章的詳情(需要作者的信息,之前的寫好的功能中沒有作者信息)
4.3 功能實現
4.3.1 條件分頁查詢功能實現
步驟:
創建VO
創建controller 實現條件分頁查詢以及查詢
創建service
創建mapper
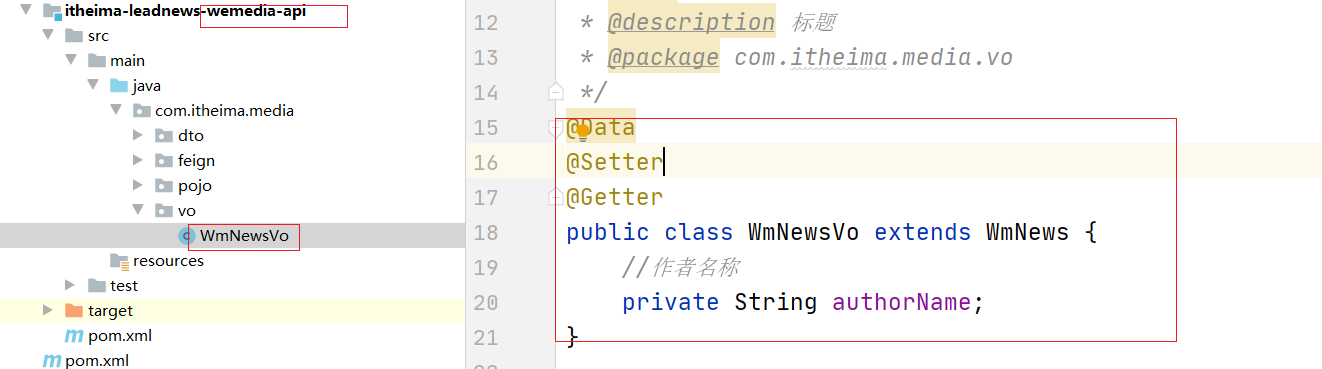
(1) 創建VO 用于給前端進行展示 需要添加一些必要的字段
@Data
@Setter
@Getter
public class WmNewsVo extends WmNews {
    //作者名稱
    private String authorName;
}
(2)創建controller 進行創建方法
//條件分頁列表查詢
@PostMapping("/vo/search")
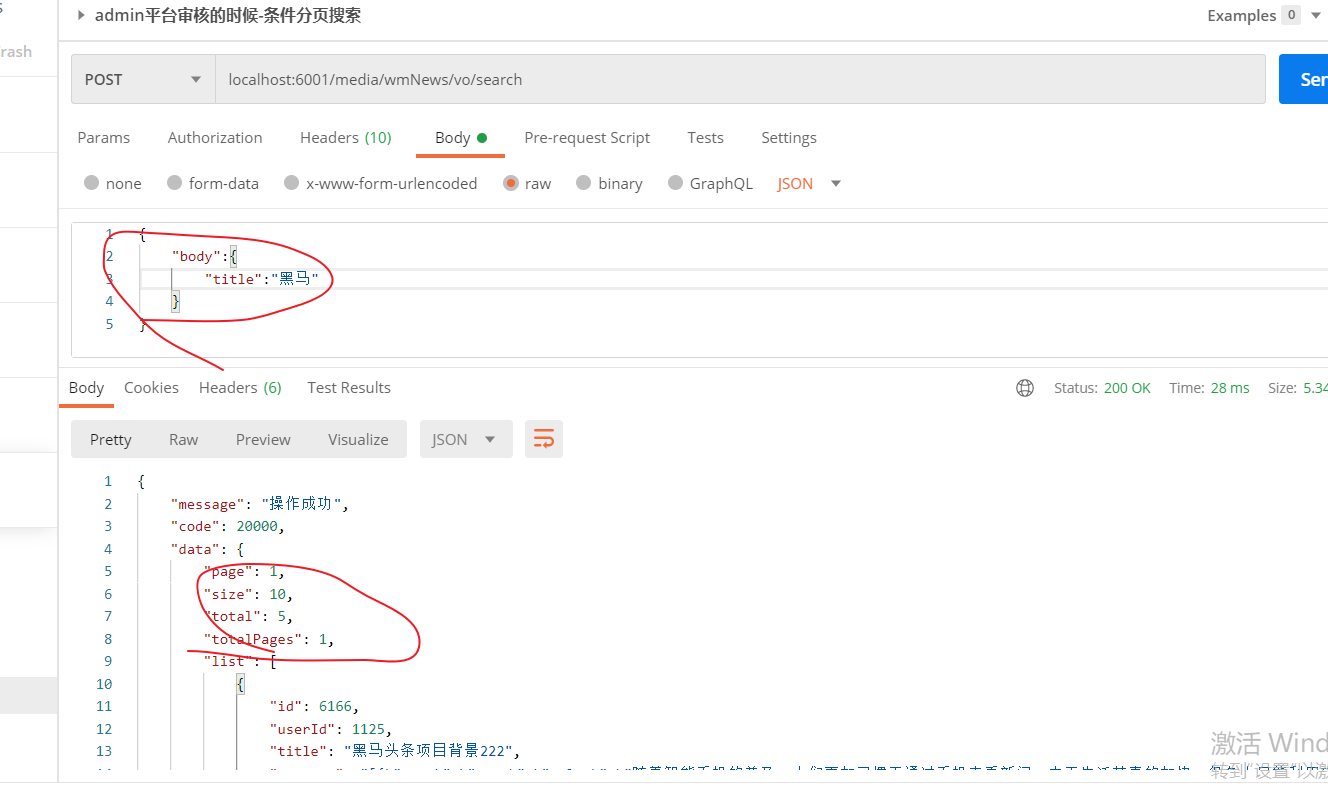
public Result<PageInfo<WmNewsVo>> searchByCondition(@RequestBody PageRequestDto<WmNews> pageRequestDto){
//1.獲取條件
//2.執行
PageInfo<WmNewsVo> pageInfo = wmNewsService.pageForCondition(pageRequestDto);
//4.返回結果
return Result.ok(pageInfo);
}
(3)創建service實現類
@Override
    public PageInfo<WmNewsVo> pageForCondition(PageRequestDto<WmNews> pageRequestDto) {

        String title ="";
        if (pageRequestDto.getBody()!=null && !StringUtils.isEmpty(pageRequestDto.getBody().getTitle())) {
            title = "%"+pageRequestDto.getBody().getTitle()+"%";
        }
        Long page = pageRequestDto.getPage();
        Long size = pageRequestDto.getSize();
        //開始位置
        Long start = (page-1)*size;
        //每頁顯示的行
        List<WmNewsVo> wmNewsVos = wmNewsMapper.selectMyPage(start,size,title);

        Long total = wmNewsMapper.selectMyCount(title);
        //計算總頁數
        Long totalPages = total / size;
        if (total % size != 0) {
            totalPages++;
        }

        PageInfo<WmNewsVo> pageInfo = new PageInfo<WmNewsVo>(page,size,total,totalPages,wmNewsVos);

        return pageInfo;
    }
(4)mapper接口創建
public interface WmNewsMapper extends BaseMapper<WmNews> {

    List<WmNewsVo> selectMyPage(@Param(value="start") Long start, @Param(value="size")Long size, @Param(value="title")String title);

    Long selectMyCount(@Param(value="title") String title);
}
(5)創建XML映射文件
<?xml version="1.0" encoding="UTF-8"?>
<!DOCTYPE mapper PUBLIC "-//mybatis.org//DTD Mapper 3.0//EN" "http://mybatis.org/dtd/mybatis-3-mapper.dtd">
<mapper namespace="com.itheima.media.mapper.WmNewsMapper">
<select id="selectMyPage" resultType="com.itheima.media.vo.WmNewsVo" parameterType="map">
SELECT
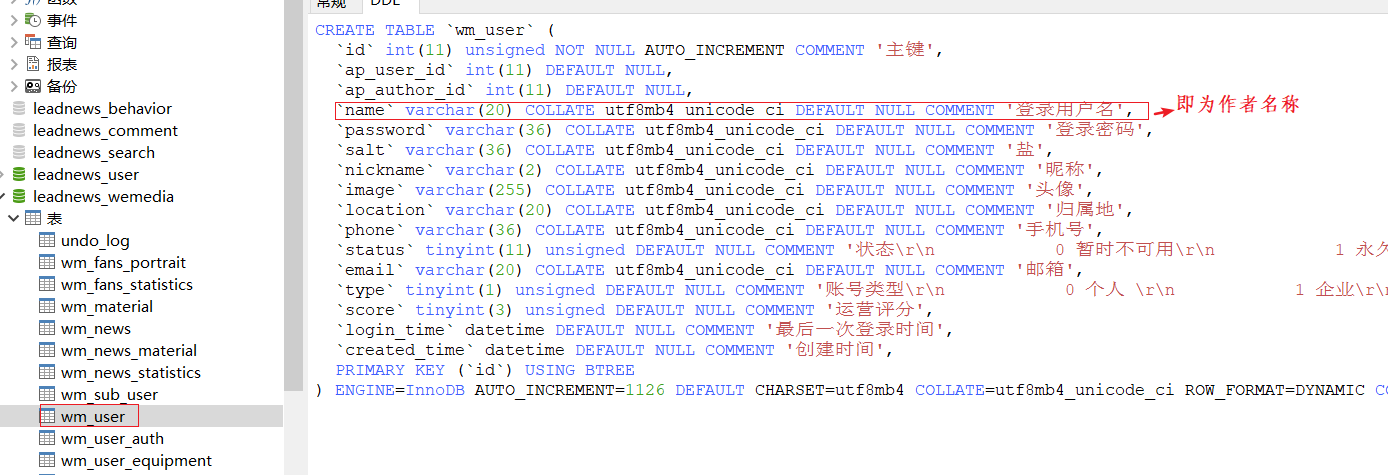
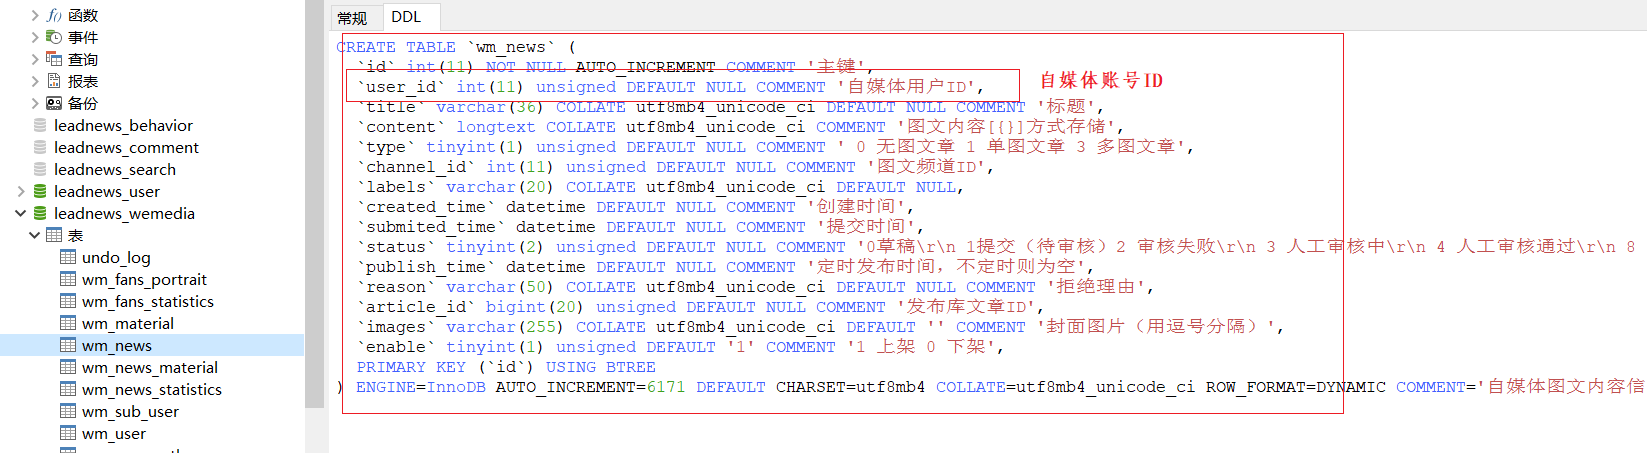
wn.*, wu.`name` as authorName
FROM
wm_news wn
LEFT JOIN wm_user wu ON wn.user_id = wu.id
<where>
<if test="title!=null and title!=''">
and wn.title LIKE #{title}
</if>
and wn.status in (2,3)
</where>
LIMIT #{start}, #{size}
</select>
<select id="selectMyCount" resultType="java.lang.Long" parameterType="string">
SELECT count(*)
FROM
wm_news wn
LEFT JOIN wm_user wu ON wn.user_id = wu.id
<where>
<if test="title!=null and title!=''">
and wn.title LIKE #{title}
</if>
and wn.status in (2,3)
</where>
</select>
</mapper>
(6)配置admin網關路由
整體配置yaml如下:
spring:
  profiles:
    active: dev
---
server:
  port: 6001
spring:
  application:
    name: leadnews-admin-gateway
  profiles: dev
  cloud:
    nacos:
      server-addr: 192.168.211.136:8848
      discovery:
        server-addr: ${spring.cloud.nacos.server-addr}
    gateway:
      globalcors:
        cors-configurations:
          '[/**]': # 匹配所有請求
            allowedOrigins: "*" #跨域處理 允許所有的域
            allowedHeaders: "*"
            allowedMethods: # 支持的方法
              - GET
              - POST
              - PUT
              - DELETE
      routes:
        # 平臺管理
        - id: admin
          uri: lb://leadnews-admin
          predicates:
            - Path=/admin/**
          filters:
            - StripPrefix= 1
        # 自媒體微服務
        - id: wemedia
          uri: lb://leadnews-wemedia
          predicates:
            - Path=/media/**
          filters:
            - StripPrefix= 1
---
server:
  port: 6001
spring:
  application:
    name: leadnews-admin-gateway
  profiles: test
  cloud:
    nacos:
      server-addr: 192.168.211.136:8848
      discovery:
        server-addr: ${spring.cloud.nacos.server-addr}
    gateway:
      globalcors:
        cors-configurations:
          '[/**]': # 匹配所有請求
            allowedOrigins: "*" #跨域處理 允許所有的域
            allowedHeaders: "*"
            allowedMethods: # 支持的方法
              - GET
              - POST
              - PUT
              - DELETE
      routes:
        # 平臺管理
        - id: admin
          uri: lb://leadnews-admin
          predicates:
            - Path=/admin/**
          filters:
            - StripPrefix= 1
        # 自媒體微服務
        - id: wemedia
          uri: lb://leadnews-wemedia
          predicates:
            - Path=/media/**
          filters:
            - StripPrefix= 1
---
server:
  port: 6001
spring:
  application:
    name: leadnews-admin-gateway
  profiles: pro
  cloud:
    nacos:
      server-addr: 192.168.211.136:8848
      discovery:
        server-addr: ${spring.cloud.nacos.server-addr}
    gateway:
      globalcors:
        cors-configurations:
          '[/**]': # 匹配所有請求
            allowedOrigins: "*" #跨域處理 允許所有的域
            allowedHeaders: "*"
            allowedMethods: # 支持的方法
              - GET
              - POST
              - PUT
              - DELETE
      routes:
        # 平臺管理
        - id: admin
          uri: lb://leadnews-admin
          predicates:
            - Path=/admin/**
          filters:
            - StripPrefix= 1
        # 自媒體微服務
        - id: wemedia
          uri: lb://leadnews-wemedia
          predicates:
            - Path=/media/**
          filters:
            - StripPrefix= 1
4.3.2 實現文章審核通過和駁回
@Autowired
private WmUserService wmUserService;
//審核通過 或者 駁回  8 標識通過  2 標識駁回
@PutMapping("/updateStatus/{id}/{status}")
public Result updateStatus(@PathVariable(name="id")Integer id,@PathVariable(name="status") Integer status){
    if(status==8 || status==2){
        WmNews wmNews = new WmNews();
        wmNews.setId(id);
        wmNews.setStatus(status);
        wmNewsService.updateById(wmNews);
        return Result.ok();
    }else{
        return Result.errorMessage("錯誤的狀態值");
    }
}
4.3.3 實現文章詳情查詢
@Autowired
private WmUserService wmUserService;
@GetMapping("/vo/{id}")
public Result<WmNewsVo> getVoById(@PathVariable(name="id")Integer id){
    //獲取文章信息
    WmNews wmNews = wmNewsService.getById(id);
    //獲取作者信息
    if(wmNews!=null) {
        WmUser wmUser = wmUserService.getById(wmNews.getUserId());
        //獲取到作者
        String name = wmUser.getName();
        WmNewsVo vo = new WmNewsVo();
        BeanUtils.copyProperties(wmNews,vo);
        vo.setAuthorName(name);
        return Result.ok(vo);
    }else{
        return Result.errorMessage("找不到對應的信息");
    }
}
4.4 測試
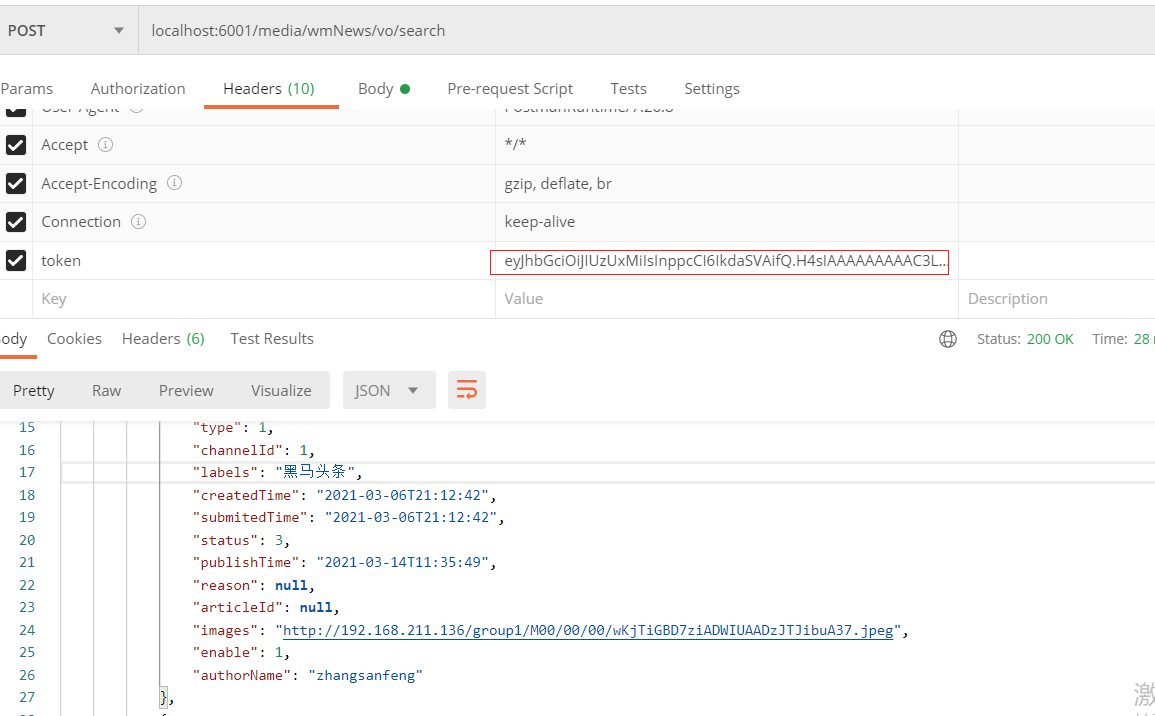
查詢測試:
啟動微服務 和網關
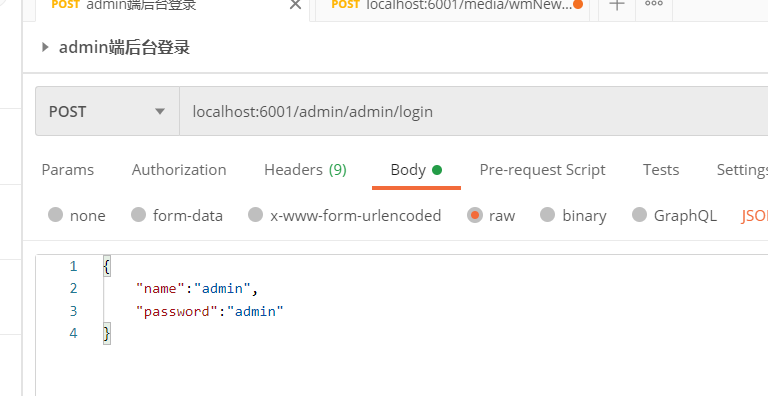
先登錄,
再實現查詢:
駁回或者審核通過測試 以及查看文章詳情測試(略)。

 浙公網安備 33010602011771號