vue 不完美的多標簽頁解決方案

開源地址:https://github.com/Montaro2017/vue-tag-view
背景
多標簽頁多用在中后臺管理系統,能夠讓用戶同時打開多個標簽頁,而且不會丟失之前填寫的內容,操作起來會比較方便。雖然部分開源項目有多標簽頁的功能,但就體驗來看,算不上特別好。
目標
- 可以通過router.push實現打開標簽頁
- 同一路由組件可以多開并且數據能夠緩存下來
- 不需要處理是否緩存導致的生命周期不一致的問題
- 多標簽頁可以關閉,同時KeepAlive中的緩存清除
存在的問題
要實現多標簽頁的緩存,最簡單的方法就是用RouterView配合KeepAlive。
<RouterView v-slot="{ Component }">
  <KeepAlive>
    <component :is="Component" />
  </KeepAlive>
</RouterView>
然而,這個方案存在幾個問題:
- 不能重復打開同一個路由,而是原有的組件被激活
- 組件生命周期發生變化
不能重復打開路由
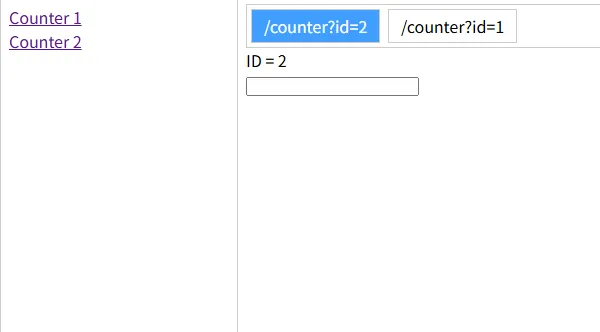
如果給路由添加參數,打開第一次沒有任何問題,但如果換另一個參數打開,還會是之前的頁面,因為組件被緩存下來了。
例如:
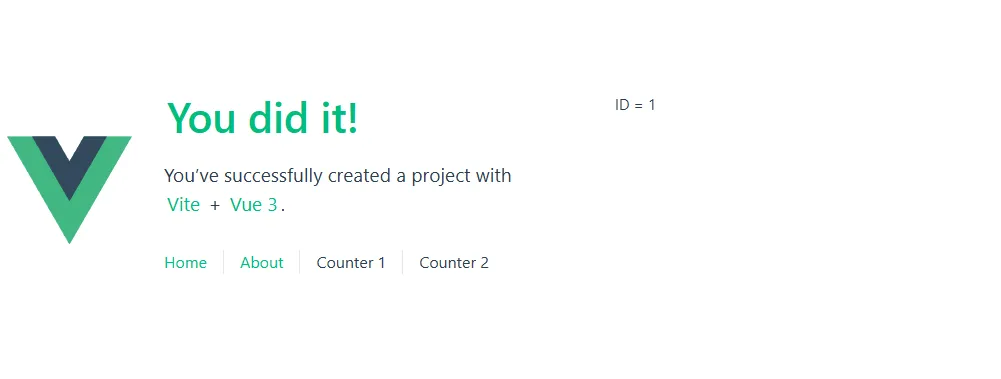
新增一個路由 counter,在頁面上添加RouterLink,并使用不同的參數
<template>
  <header>
    <img alt="Vue logo" class="logo" src="@/assets/logo.svg" width="125" height="125" />
    <div class="wrapper">
      <HelloWorld msg="You did it!" />
      <nav>
        <RouterLink to="/home">Home</RouterLink>
        <RouterLink to="/about">About</RouterLink>
        <RouterLink to="/counter?id=1">Counter 1</RouterLink>
        <RouterLink to="/counter?id=2">Counter 2</RouterLink>
      </nav>
    </div>
  </header>
<RouterView v-slot="{ Component }">
  <KeepAlive>
    <component :is="Component" />
  </KeepAlive>
</RouterView>
</template>
然后再Counter組件中獲取id參數,分別點擊Counter 1和Counter 2,會發現點擊Counter 1時獲取到的id是1,點擊Counter 2時卻沒有任何變化,而且兩個RouterLink同時是激活狀態。
組件生命周期變化
和上一個問題有所關聯,因為組件沒有重新加載,在需要重新獲取數據時,KeepAlive改變了組件的生命周期,添加了onActivated和onDeactivated生命周期。
添加一個組件測試生命周期:
<template>
  <div class="about">
    <h1>This is an about page</h1>
  </div>
</template>

<script setup>

import { onMounted, onUpdated, onUnmounted, onBeforeMount, onBeforeUpdate, onBeforeUnmount, onActivated, onDeactivated } from 'vue'

onMounted(() => { console.log("onMounted") })
onUpdated(() => { console.log("onUpdated") })
onUnmounted(() => { console.log("onUnmounted") })
onBeforeMount(() => { console.log("onBeforeMount") })
onBeforeUpdate(() => { console.log("onBeforeUpdate") })
onBeforeUnmount(() => { console.log("onBeforeUnmount") })
onActivated(() => { console.log("onActivated") })
onDeactivated(() => { console.log("onDeactivated") })
</script>

<style>
@media (min-width: 1024px) {
  .about {
    min-height: 100vh;
    display: flex;
    align-items: center;
  }
}
</style>
再修改App.vue
<template>
  <header>
    <img alt="Vue logo" class="logo" src="@/assets/logo.svg" width="125" height="125" />

    <div class="wrapper">
      <HelloWorld msg="You did it!" />
      <nav>
        <RouterLink to="/home">Home</RouterLink>
        <RouterLink to="/about">About</RouterLink>
        <RouterLink to="/counter?id=1">Counter 1</RouterLink>
        <RouterLink to="/counter?id=2">Counter 2</RouterLink>
      </nav>
    </div>
  </header>

  <RouterView v-slot="{ Component }">
    <!-- <KeepAlive> -->
      <component :is="Component" />
    <!-- </KeepAlive> -->
  </RouterView>
</template>

<script setup>
import { watch } from 'vue'
import { RouterLink, RouterView, useRoute } from 'vue-router'
import HelloWorld from './components/HelloWorld.vue'

const route = useRoute()

watch(route, () => {
  console.log("頁面切換", route.fullPath)
})

</script>
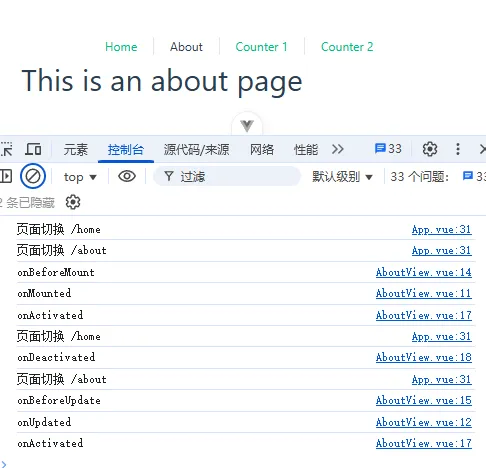
先從Home切換到About再切換回Home再切換回About。
查看在不使用KeepAlive切換頁面時候的輸出,onBeforeMount -> onMounted -> onBeforeUnmount -> onUnMounted 循環
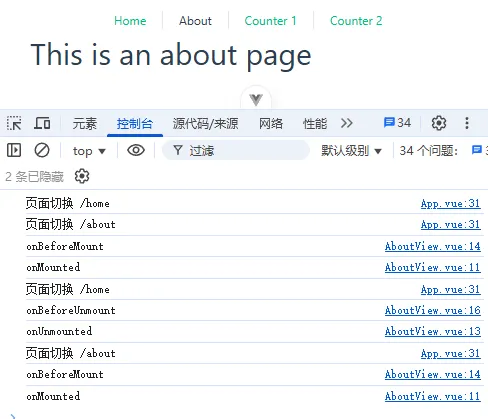
使用KeepAlive的情況,情況就復雜很多,每次切換到頁面時會激活onActivated鉤子,正常情況下可以通過onActivated鉤子獲取路由參數,重新獲取數據。
問題在于:如果組件可以在緩存與不緩存中切換,在獲取數據時,需要考慮是寫在onMounted里還是onActivated里,寫在onMounted中時如果組件會被服用,需要處理路由參數變化重新獲取數據;寫在onActivated里,需要考慮組件不緩存了鉤子函數不會被調用的情況。
解決方案
重復打開組件 & 生命周期變化
這個問題很好解決,只需要給KeepAlive中的component加上不同的key就可以實現,key可以通過router.fullPath來計算,這樣KeepAlive中就可以緩存同一個組件多次。
<RouterView v-slot="{ Component, route }">
  <KeepAlive>
    <component :is="Component" :key="route.fullPath" />
  </KeepAlive>
</RouterView>
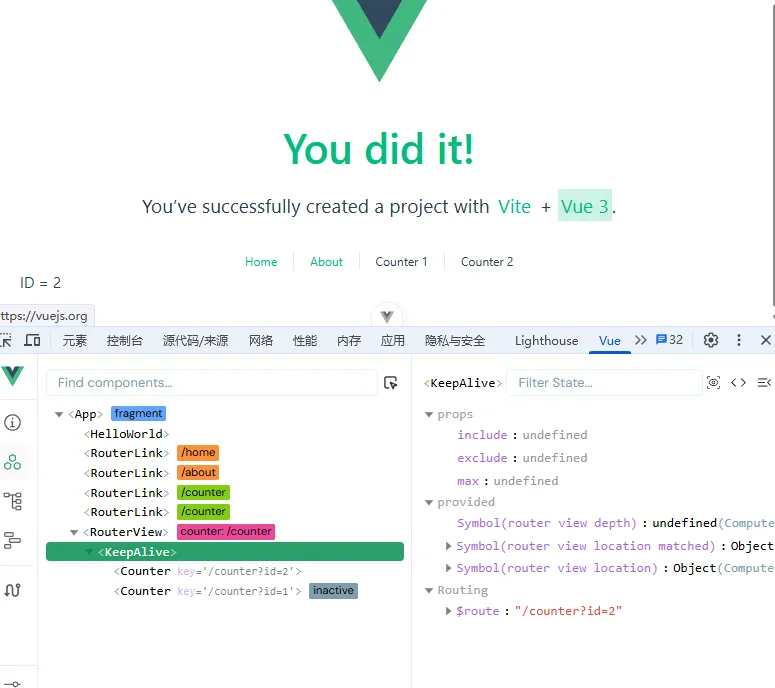
同時,修改下Counter組件,查看生命周期
<template>
    <div> ID = {{ id }}</div>
</template>

<script setup>

import { useRoute } from 'vue-router'
import { onMounted, onUpdated, onUnmounted, onBeforeMount, onBeforeUpdate, onBeforeUnmount, onActivated, onDeactivated } from 'vue'

const route = useRoute()
const id = route.query.id

onMounted(() => { console.log(route.fullPath, "onMounted") })
onUpdated(() => { console.log(route.fullPath, "onUpdated") })
onUnmounted(() => { console.log(route.fullPath, "onUnmounted") })
onBeforeMount(() => { console.log(route.fullPath, "onBeforeMount") })
onBeforeUpdate(() => { console.log(route.fullPath, "onBeforeUpdate") })
onBeforeUnmount(() => { console.log(route.fullPath, "onBeforeUnmount") })
onActivated(() => { console.log(route.fullPath, "onActivated") })
onDeactivated(() => { console.log(route.fullPath, "onDeactivated") })
</script>
會發現,雖然是同一個組件,但生命周期也獨立了,也就不需要考慮路由參數變化時重新獲取數據,只需要在onMounted時獲取一次數據就可以了。

關閉標簽頁
上面的問題好像一下就解決了,但第三個目標沒有實現,這也是最難的一個問題。
KeepAlive可以通過給component添加不同的key達到路由多開的效果,但是卻不能用key刪除,KeepAlive只能通過exclude參數使用組件名稱刪除緩存。
這下問題麻煩了,雖然使用不同的key多開了路由,但路由的組件名稱是相同的,也就是說,就算能多開了,關閉卻只能全部關閉,這種是不行的。
思索后,想到了下面的方案:
不使用KeepAlive,通過監聽route,變化后就向list中添加達到打開標簽頁的功能,渲染list中的所有組件,然后為了讓組件數據緩存下來,不能使用v-if而是使用v-show來隱藏組件。
驗證方案
監聽route,將訪問過的路由都保存下來作為打開過的標簽頁,當前route作為激活的標簽頁
編寫一個TagView組件,替代RouterView+KeepAlive,關閉的時候直接刪除tagView就可以
<template>
  <div class="tags">
    <div class="tag" v-for="tagView in tagViews" :class="{ active: tagView.key === currentTagView?.key }"
     @click="router.push(tagView.route)">
      {{ tagView.title }}</div>
  </div>
  <div class="content">
    <template v-for="tagView in tagViews" :key="tagView.key">
      <Component :is="tagView.component" v-show="tagView.key === currentTagView.key" />
    </template>
  </div>
</template>

<script setup>

import { inject, ref, shallowRef, toValue, watch } from 'vue'
import { useRoute, useRouter, viewDepthKey } from 'vue-router'

const route = useRoute()
const router = useRouter()

const tagViews = ref([])
const currentTagView = ref(null)
// 參考了vue官方的RouterView, 是RouterView嵌套的深度
const routerViewDepth = inject(viewDepthKey, 0)

const routeKey = (route) => {
  return route.fullPath
}

const routeTitle = (route) => {
  // 還沒有設計title,先用fullPath替代
  return route.fullPath
}

const toTagView = (route) => {
  const depth = toValue(routerViewDepth)
  return {
    title: routeTitle(route),
    key: routeKey(route),
    route: { ...route },
    component: shallowRef(route.matched[depth]?.components['default'])
  }
}

watch(route, () => {
  // 判斷是否已存在,存在則不添加
  const key = routeKey(route)
  let tagView = tagViews.value.find(tagView => tagView.key === key)
  if (!tagView) {
    tagView = toTagView(route)
    tagViews.value.push(tagView)
  }
  currentTagView.value = tagView
})

</script>

<style scoped>
.tags {
  gap: 8px;
  padding: 4px;
  display: flex;
  border: 1px solid #ccc;
}

.tag {
  padding: 4px 12px;
  border: 1px solid #ccc;
}

.tag.active {
  color: #fff;
  background-color: #409EFF;
}
</style>
然后在App.vue中使用
<template>
  <div class="left-menu">
    <RouterLink to="/counter?id=1">Counter 1</RouterLink>
    <RouterLink to="/counter?id=2">Counter 2</RouterLink>
  </div>
  <div class="right-content">
    <TagView />
  </div>
</template>

<script setup>
import { watch } from 'vue'
import TagView from './components/TagView.vue'
import { RouterLink, useRoute } from 'vue-router'

const route = useRoute()

watch(route, () => {
  console.log("頁面切換", route.fullPath)
})

</script>


<style scoped>
.left-menu {
  display: flex;
  padding: 8px;
  width: 220px;
  border: 1px solid #ccc;
  flex-direction: column;
}

.right-content {
  flex: 1;
  padding: 8px;
}
</style>
樣式隨便寫的,明白意思就好。
可以自由切換標簽頁,并且填寫的內容依然保留。
優點:編寫起來很簡單
缺點:之前的組件一直保留,打開的頁面多了可能會卡
總結:也算一種可行的方案,但要注意頁面不能太多
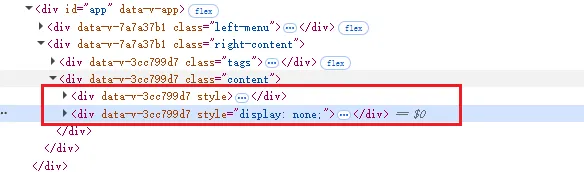
之前的組件只是display: none了
可能是優化
上面其實解決了最大的問題,但是還可以優化一下,可以利用KeepAlive卸載dom并緩存。
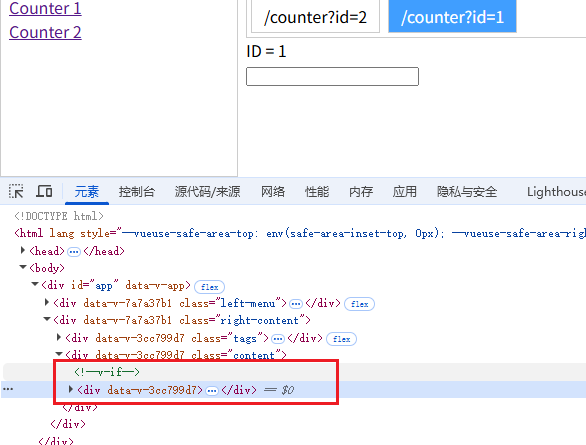
基于上面的方案,在Component外面再套一層KeepAlive,然后將v-show改成v-if。
<template>
  <div class="tags">
    <div class="tag" v-for="tagView in tagViews" :class="{ active: tagView.key === currentTagView?.key }"
      @click="router.push(tagView.route)">
      {{ tagView.title }}</div>
  </div>
  <div class="content">
    <template v-for="tagView in tagViews" :key="tagView.key">
      <KeepAlive>
        <Component :is="tagView.component" v-if="tagView.key === currentTagView.key" />
      </KeepAlive>
    </template>
  </div>
</template>
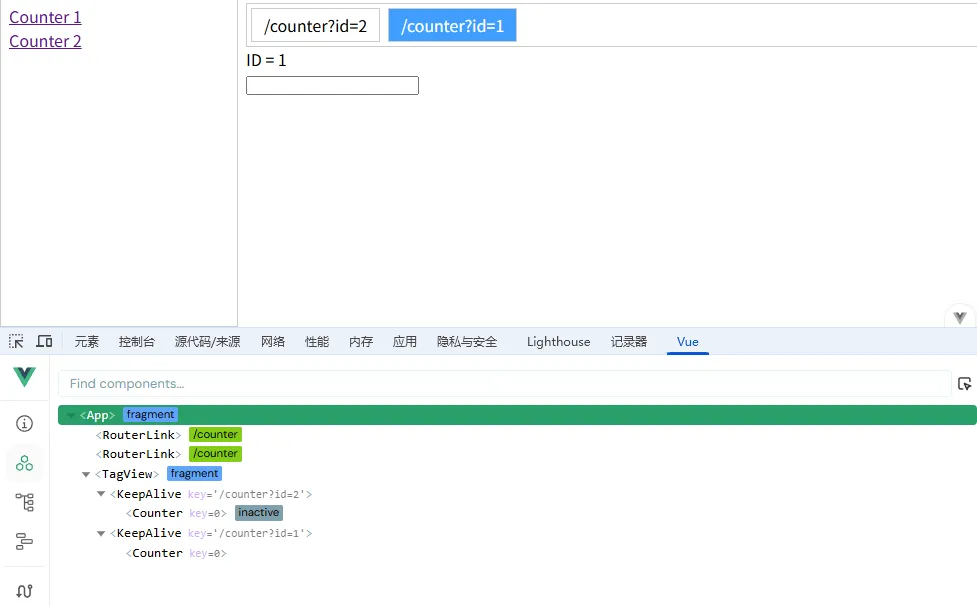
這樣就解決了打開頁面太多可能會導致的性能問題,但是在DevTool中就會看到很多個KeepAlive了,這也是一種取舍吧。
總結
上面的解決方案并不完美,要么容易影響性能,要么可能會影響開發(多個KeepAlive在DevTool里),要完美的話估計只能自己實現一個KeepAlive了。
我正在使用免費的純真社區版IP庫。純真(CZ88.NET)自2005年起一直為廣大社區用戶提供社區版IP地址庫,只要獲得純真的授權就能免費使用,并不斷獲取后續更新的版本。如果有需要免費版IP庫的朋友可以前往純真的官網進行申請。
純真除了免費的社區版IP庫外,還提供數據更加準確、服務更加周全的商業版IP地址查詢數據。純真圍繞IP地址,基于 網絡空間拓撲測繪 + 移動位置大數據 方案,對IP地址定位、IP網絡風險、IP使用場景、IP網絡類型、秒撥偵測、VPN偵測、代理偵測、爬蟲偵測、真人度等均有近20年豐富的數據沉淀。

 浙公網安備 33010602011771號