基于openEuler 22.03 LTS 部署openstack(Train版)
| 節點名稱 | IP地址 | 軟件 |
|---|---|---|
| controller | ens160:172.173.10.110(管理),ens192:10.10.10.10 | mariadb,rabbitmq,keyston,glance,placement,nova,neutron,horizon |
| compute01 | ens160:172.173.10.111(管理),ens192:10.10.10.11 | nova,neutron, |
安裝參考:OpenStack Installation Guide — Installation Guide documentation
一、環境準備
1.1 基礎環境
- 配置主機名。
hostnamectl set-hostname <hostname>
- 配置主機名ip解析。
cat <<EOF>> /etc/hosts
172.173.10.110 controller
172.173.10.111 compute
EOF
- 關閉防火墻和SELinux。
systemctl disable firewalld --now && setenforce 0 && sed -i 's/^SELINUX=enforcing/SELINUX=disabled/' /etc/selinux/config
- 配置時間同步。
5.禁用IPv6.
echo 1 > /proc/sys/net/ipv6/conf/all/disable_ipv6
echo 1 > /proc/sys/net/ipv6/conf/default/disable_ipv6
cat <<EOF>> /etc/sysctl.conf
net.ipv6.conf.all.disable_ipv6 = 1
net.ipv6.conf.default.disable_ipv6 = 1
EOF
1.2 軟件倉庫
參考:OpenStack packages for RHEL and CentOS — Installation Guide documentation
yum -y install openstack-release-train
yum clean all && yum makecache
1.3 安裝安裝 SQL DataBase
參考:SQL database for RHEL and CentOS — Installation Guide documentation
1.執行如下命令,安裝軟件包。
yum -y install mariadb mariadb-server python3-PyMySQL
2.執行如下命令,創建并編輯 /etc/my.cnf.d/openstack.cnf 文件。
cat >/etc/my.cnf.d/openstack.cnf<<'EOF'
[mysqld]
bind-address = 0.0.0.0
default-storage-engine = innodb
innodb_file_per_table = on
max_connections = 4096
collation-server = utf8_general_ci
character-set-server = utf8
EOF
3.啟動 DataBase 服務,并為其配置開機自啟動:
systemctl enable mariadb.service --now
4.配置DataBase的默認密碼(可選)
mysql_secure_installation
1.4 安裝 RabbitMQ
參考:Message queue for RHEL and CentOS — Installation Guide documentation
1.執行如下命令,安裝軟件包。
yum -y install rabbitmq-server
2.啟動 RabbitMQ 服務,并為其配置開機自啟動。
systemctl enable rabbitmq-server.service --now
3.添加 OpenStack用戶。
rabbitmqctl add_user openstack guojie.com
4.設置openstack用戶權限,允許進行配置、寫、讀:
rabbitmqctl set_permissions openstack ".*" ".*" ".*"
1.5 安裝 Memcached
參考:Memcached for RHEL and CentOS — Installation Guide documentation
1.執行如下命令,安裝依賴軟件包。
yum -y install memcached python3-memcached
2.編輯 /etc/sysconfig/memcached 文件。
sed -i 's/^OPTIONS=.*/OPTIONS="-l 0.0.0.0"/' /etc/sysconfig/memcached
3.執行如下命令,啟動 Memcached 服務,并為其配置開機啟動。
systemctl enable memcached.service --now
二、安裝OpenStack
2.1 Keystone 安裝
參考:OpenStack Docs: Install and configure
1.創建 keystone 數據庫并授權。
mysql -u root -p

CREATE DATABASE keystone;
GRANT ALL PRIVILEGES ON keystone.* TO 'keystone'@'%' IDENTIFIED BY 'guojie.com';
exit
2.安裝軟件包。
yum -y install openstack-keystone httpd mod_wsgi
3.配置keystone相關配置
cp /etc/keystone/keystone.conf{,.bak}
grep -Ev '^$|#' /etc/keystone/keystone.conf.bak > /etc/keystone/keystone.conf
sed -i '/^\[database\]/a connection = mysql+pymysql://keystone:guojie.com@controller/keystone' /etc/keystone/keystone.conf
sed -i '/^\[token\]/a provider = fernet' /etc/keystone/keystone.conf
4.同步數據庫。
su -s /bin/sh -c "keystone-manage db_sync" keystone
mysql -ukeystone -pguojie.com -Dkeystone -e 'show tables;'
5.初始化Fernet密鑰倉庫。
keystone-manage fernet_setup --keystone-user keystone --keystone-group keystone
keystone-manage credential_setup --keystone-user keystone --keystone-group keystone
6.啟動服務。
keystone-manage bootstrap --bootstrap-password guojie.com \
--bootstrap-admin-url http://controller:5000/v3/ \
--bootstrap-internal-url http://controller:5000/v3/ \
--bootstrap-public-url http://controller:5000/v3/ \
--bootstrap-region-id RegionOne
7.配置Apache HTTP server
sed -i 's/^#ServerName www.example.com:80/ServerName controller:80/' /etc/httpd/conf/httpd.conf
ln -s /usr/share/keystone/wsgi-keystone.conf /etc/httpd/conf.d/
8.啟動Apache HTTP服務。
systemctl enable httpd.service --now
9.創建環境變量配置。
cat << EOF > ~/.admin-openrc
export OS_PROJECT_DOMAIN_NAME=Default
export OS_USER_DOMAIN_NAME=Default
export OS_PROJECT_NAME=admin
export OS_USERNAME=admin
export OS_PASSWORD=guojie.com
export OS_AUTH_URL=http://controller:5000/v3
export OS_IDENTITY_API_VERSION=3
export OS_IMAGE_API_VERSION=2
EOF
10.依次創建domain, projects, users, roles,需要先安裝好python3-openstackclient:
yum -y install python3-openstackclient
導入環境變量
source ~/.admin-openrc
創建project service,其中 domain default 在 keystone-manage bootstrap 時已創建
openstack domain create --description "An Example Domain" example
openstack project create --domain default --description "Service Project" service
注意:官網還有介紹創建我的用戶的,但是我們這里不用了,直接用admin管理。
2.2 Glance 安裝
參考:OpenStack Docs: Install and configure (Red Hat)
1.在控制節點上創建數據庫、服務憑證和 API 端點
創建數據庫:
mysql -u root -p

CREATE DATABASE glance;
GRANT ALL PRIVILEGES ON glance.* TO 'glance'@'%' IDENTIFIED BY 'guojie.com';
exit
創建服務憑證
source ~/.admin-openrc

openstack user create --domain default --password guojie.com glance
openstack role add --project service --user glance admin
openstack service create --name glance --description "OpenStack Image" image
創建鏡像服務API端點:
openstack endpoint create --region RegionOne image public http://controller:9292
openstack endpoint create --region RegionOne image internal http://controller:9292
openstack endpoint create --region RegionOne image admin http://controller:9292
2.安裝軟件包
yum -y install openstack-glance
3.配置glance相關配置:
cp /etc/glance/glance-api.conf{,.bak}
grep -Ev '^#|^$' /etc/glance/glance-api.conf.bak > /etc/glance/glance-api.conf
vi /etc/glance/glance-api.conf

[DEFAULT]
log_file = /var/log/glance/glance-api.log

[database]
connection = mysql+pymysql://glance:guojie.com@controller/glance

[glance_store]
stores = file,http
default_store = file
filesystem_store_datadir = /var/lib/glance/images/

[keystone_authtoken]
www_authenticate_uri  = http://controller:5000
auth_url = http://controller:5000
memcached_servers = controller:11211
auth_type = password
project_domain_name = Default
user_domain_name = Default
project_name = service
username = glance
password = guojie.com

[paste_deploy]
flavor = keystone
完整配置:
[root@controller ~]# cat /etc/glance/glance-api.conf
[DEFAULT]
log_file = /var/log/glance/glance-api.log
[cinder]
[cors]
[database]
connection = mysql+pymysql://glance:guojie.com@controller/glance
[file]
[glance.store.http.store]
[glance.store.rbd.store]
[glance.store.sheepdog.store]
[glance.store.swift.store]
[glance.store.vmware_datastore.store]
[glance_store]
stores = file,http
default_store = file
filesystem_store_datadir = /var/lib/glance/images/
[image_format]
[keystone_authtoken]
www_authenticate_uri  = http://controller:5000
auth_url = http://controller:5000
memcached_servers = controller:11211
auth_type = password
project_domain_name = Default
user_domain_name = Default
project_name = service
username = glance
password = guojie.com
[oslo_concurrency]
[oslo_messaging_amqp]
[oslo_messaging_kafka]
[oslo_messaging_notifications]
[oslo_messaging_rabbit]
[oslo_middleware]
[oslo_policy]
[paste_deploy]
flavor = keystone
[profiler]
[store_type_location_strategy]
[task]
[taskflow_executor]
4.同步數據庫:
su -s /bin/sh -c "glance-manage db_sync" glance
5.啟動服務
systemctl enable openstack-glance-api.service --now
查看9292端口是否監聽
[root@controller ~]# ss -ntl|grep 9292
LISTEN 0      4096         0.0.0.0:9292       0.0.0.0:*
6.驗證
下載鏡像
source ~/.admin-openrc
wget http://download.cirros-cloud.net/0.4.0/cirros-0.4.0-x86_64-disk.img
*注意*
如果您使用的環境是鯤鵬架構,請下載aarch64版本的鏡像;已對鏡像cirros-0.5.2-aarch64-disk.img進行測試。
向Image服務上傳鏡像:
openstack image create --disk-format qcow2 --container-format bare --file cirros-0.4.0-x86_64-disk.img --public cirros
確認鏡像上傳并驗證屬性:
openstack image list
2.3 Placement安裝
參考:OpenStack Docs: Install and configure Placement for Red Hat Enterprise Linux and CentOS
1.控制節點創建數據庫、服務憑證和 API 端點
創建數據庫:
作為 root 用戶訪問數據庫,創建 placement 數據庫并授權。
mysql -u root -p

CREATE DATABASE placement;
GRANT ALL PRIVILEGES ON placement.* TO 'placement'@'%' IDENTIFIED BY 'guojie.com';
exit
source ~/.admin-openrc
執行如下命令,創建 placement 服務憑證、創建 placement 用戶以及添加‘admin’角色到用戶‘placement’。
創建Placement API服務
openstack user create --domain default --password guojie.com placement
openstack role add --project service --user placement admin
openstack service create --name placement --description "Placement API" placement
創建placement服務API端點:
openstack endpoint create --region RegionOne placement public http://controller:8778
openstack endpoint create --region RegionOne placement internal http://controller:8778
openstack endpoint create --region RegionOne placement admin http://controller:8778
2.安裝和配置
安裝軟件包:
yum -y install openstack-placement-api
配置placement:
編輯 /etc/placement/placement.conf 文件:
在[placement_database]部分,配置數據庫入口
在[api] [keystone_authtoken]部分,配置身份認證服務入口
cp /etc/placement/placement.conf{,.bak}
grep -Ev "^#|^$" /etc/placement/placement.conf.bak > /etc/placement/placement.conf
vi /etc/placement/placement.conf


[placement_database]
# ...
connection = mysql+pymysql://placement:guojie.com@controller/placement

[api]
# ...
auth_strategy = keystone

[keystone_authtoken]
# ...
auth_url = http://controller:5000/v3
memcached_servers = controller:11211
auth_type = password
project_domain_name = Default
user_domain_name = Default
project_name = service
username = placement
password = guojie.com
完整配置:
[root@controller ~]# cat /etc/placement/placement.conf
[DEFAULT]
[api]
auth_strategy = keystone
[cors]
[keystone_authtoken]
auth_url = http://controller:5000/v3
memcached_servers = controller:11211
auth_type = password
project_domain_name = Default
user_domain_name = Default
project_name = service
username = placement
password = guojie.com
[oslo_policy]
[placement]
[placement_database]
connection = mysql+pymysql://placement:guojie.com@controller/placement
[profiler]
同步數據庫:
su -s /bin/sh -c "placement-manage db sync" placement
vi /etc/httpd/conf.d/00-placement-api.conf
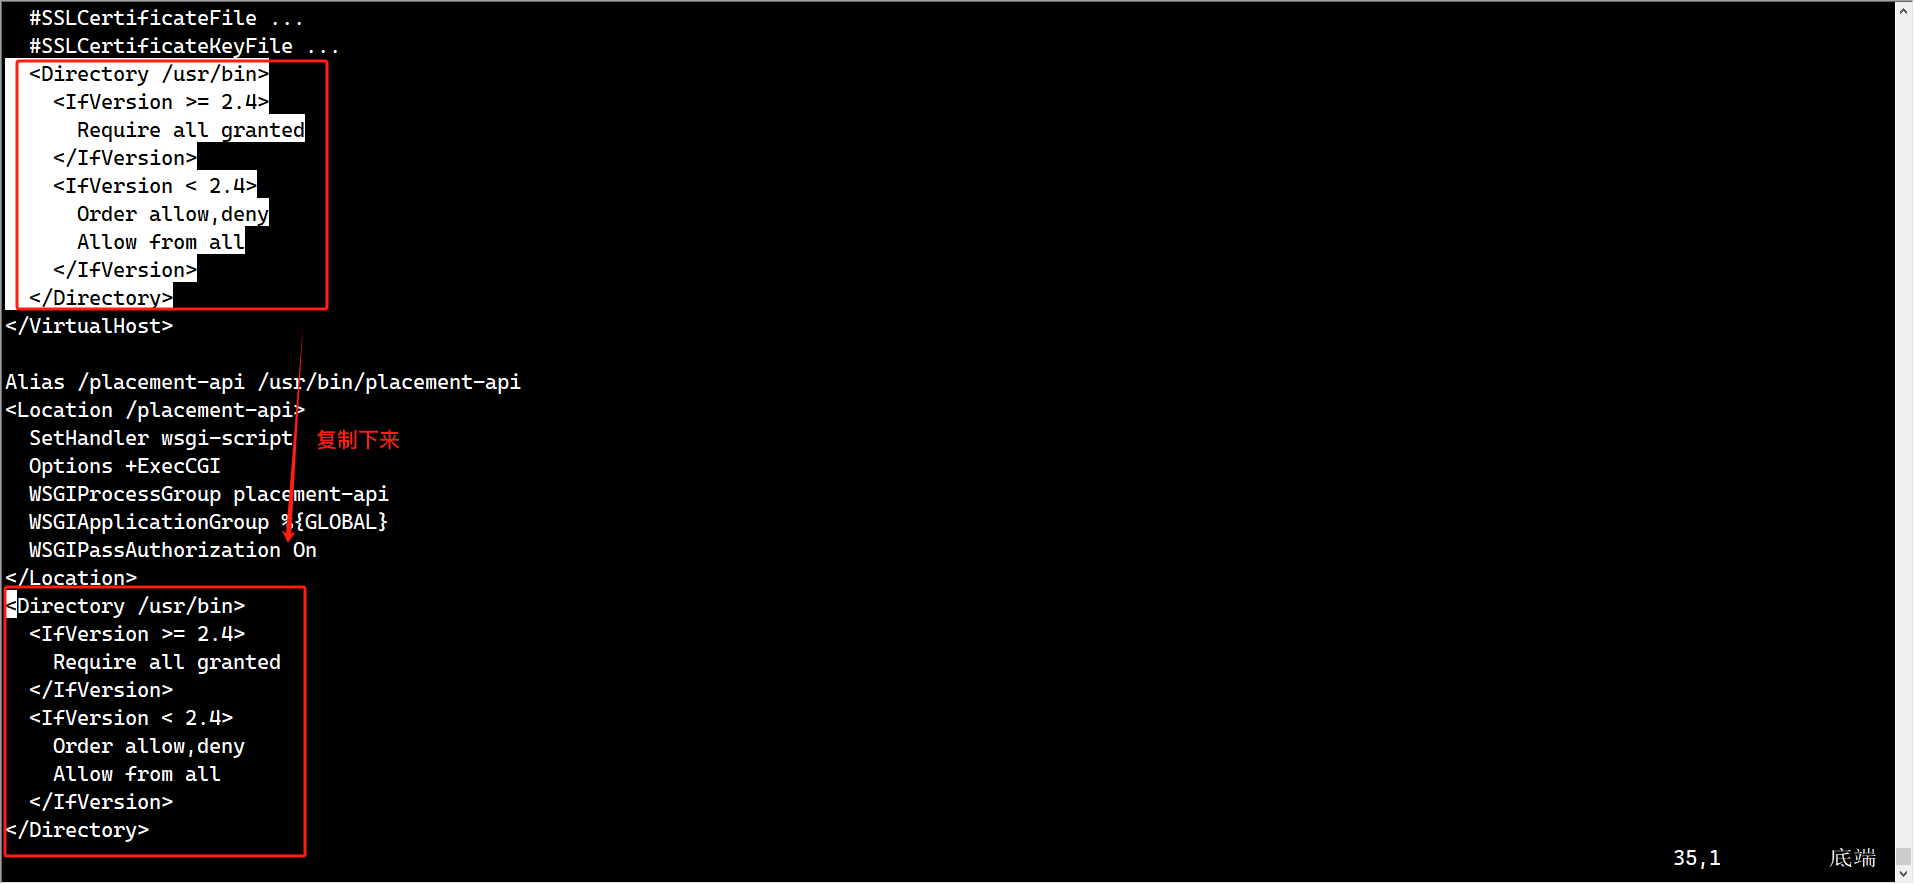
完整配置:
[root@controller ~]# cat /etc/httpd/conf.d/00-placement-api.conf
Listen 8778

<VirtualHost *:8778>
  WSGIProcessGroup placement-api
  WSGIApplicationGroup %{GLOBAL}
  WSGIPassAuthorization On
  WSGIDaemonProcess placement-api processes=3 threads=1 user=placement group=placement
  WSGIScriptAlias / /usr/bin/placement-api
  <IfVersion >= 2.4>
    ErrorLogFormat "%M"
  </IfVersion>
  ErrorLog /var/log/placement/placement-api.log
  #SSLEngine On
  #SSLCertificateFile ...
  #SSLCertificateKeyFile ...
  <Directory /usr/bin>
    <IfVersion >= 2.4>
      Require all granted
    </IfVersion>
    <IfVersion < 2.4>
      Order allow,deny
      Allow from all
    </IfVersion>
  </Directory>
</VirtualHost>

Alias /placement-api /usr/bin/placement-api
<Location /placement-api>
  SetHandler wsgi-script
  Options +ExecCGI
  WSGIProcessGroup placement-api
  WSGIApplicationGroup %{GLOBAL}
  WSGIPassAuthorization On
</Location>
<Directory /usr/bin>
  <IfVersion >= 2.4>
    Require all granted
  </IfVersion>
  <IfVersion < 2.4>
    Order allow,deny
    Allow from all
  </IfVersion>
</Directory>
啟動httpd服務:
systemctl restart httpd
3.驗證
執行如下命令,執行狀態檢查:
source ~/.admin-openrc
placement-status upgrade check

2.4 Nova 安裝
參考:OpenStack Docs: Install and configure controller node for Red Hat Enterprise Linux and CentOS
1.控制節點創建數據庫、服務憑證和 API 端點
創建數據庫:
mysql -u root -p

CREATE DATABASE nova_api;
CREATE DATABASE nova;
CREATE DATABASE nova_cell0;
GRANT ALL PRIVILEGES ON nova_api.* TO 'nova'@'%' IDENTIFIED BY 'guojie.com';
GRANT ALL PRIVILEGES ON nova.* TO 'nova'@'%' IDENTIFIED BY 'guojie.com';
GRANT ALL PRIVILEGES ON nova_cell0.* TO 'nova'@'%' IDENTIFIED BY 'guojie.com';
exit
source ~/.admin-openrc
創建nova服務憑證:
openstack user create --domain default --password guojie.com nova
openstack role add --project service --user nova admin
openstack service create --name nova --description "OpenStack Compute" compute
創建nova API端點:
openstack endpoint create --region RegionOne compute public http://controller:8774/v2.1
openstack endpoint create --region RegionOne compute internal http://controller:8774/v2.1
openstack endpoint create --region RegionOne compute admin http://controller:8774/v2.1
2.安裝軟件包
yum -y install openstack-nova-api openstack-nova-conductor openstack-nova-novncproxy openstack-nova-scheduler
3.配置nova相關配置
cp /etc/nova/nova.conf{,.bak}
grep -Ev '^#|^$' /etc/nova/nova.conf.bak > /etc/nova/nova.conf
vi /etc/nova/nova.conf
配置內容較多,可根據官網配置步驟修改,完整配置如下(注意修改相關組件密碼和my_ip):
[root@controller ~]# cat /etc/nova/nova.conf
[DEFAULT]
enabled_apis = osapi_compute,metadata
transport_url = rabbit://openstack:guojie.com@controller:5672/
my_ip = 172.173.10.110
use_neutron = true
firewall_driver = nova.virt.firewall.NoopFirewallDriver
log_file = /var/log/nova/nova.log
[api]
auth_strategy = keystone
[api_database]
connection = mysql+pymysql://nova:guojie.com@controller/nova_api
[barbican]
[cache]
[cinder]
[compute]
[conductor]
[console]
[consoleauth]
[cors]
[database]
connection = mysql+pymysql://nova:guojie.com@controller/nova
[devices]
[ephemeral_storage_encryption]
[filter_scheduler]
[glance]
api_servers = http://controller:9292
[guestfs]
[healthcheck]
[hyperv]
[ironic]
[key_manager]
[keystone]
[keystone_authtoken]
www_authenticate_uri = http://controller:5000/
auth_url = http://controller:5000/
memcached_servers = controller:11211
auth_type = password
project_domain_name = Default
user_domain_name = Default
project_name = service
username = nova
password = guojie.com
[libvirt]
[metrics]
[mks]
[neutron]
[notifications]
[osapi_v21]
[oslo_concurrency]
lock_path = /var/lib/nova/tmp
[oslo_messaging_amqp]
[oslo_messaging_kafka]
[oslo_messaging_notifications]
[oslo_messaging_rabbit]
[oslo_middleware]
[oslo_policy]
[pci]
[placement]
region_name = RegionOne
project_domain_name = Default
project_name = service
auth_type = password
user_domain_name = Default
auth_url = http://controller:5000/v3
username = placement
password = guojie.com
[powervm]
[privsep]
[profiler]
[quota]
[rdp]
[remote_debug]
[scheduler]
[serial_console]
[service_user]
[spice]
[upgrade_levels]
[vault]
[vendordata_dynamic_auth]
[vmware]
[vnc]
enabled = true
server_listen = $my_ip
server_proxyclient_address = $my_ip
同步數據庫:
su -s /bin/sh -c "nova-manage api_db sync" nova
su -s /bin/sh -c "nova-manage cell_v2 map_cell0" nova
su -s /bin/sh -c "nova-manage cell_v2 create_cell --name=cell1 --verbose" nova
su -s /bin/sh -c "nova-manage db sync" nova
驗證cell0和cell1注冊正確:
su -s /bin/sh -c "nova-manage cell_v2 list_cells" nova

啟動服務:
systemctl enable --now \
openstack-nova-api.service \
openstack-nova-scheduler.service \
openstack-nova-conductor.service \
openstack-nova-novncproxy.service
制作一個腳本方便管理nova啟動
cat <<EOF> nova-restart.sh
#!/bin/bash
systemctl restart openstack-nova-api.service openstack-nova-scheduler.service openstack-nova-conductor.service openstack-nova-novncproxy.service
EOF
測試:
sh nova-restart.sh
查看日志:
tail -100f /var/log/nova/nova.log
2.5 計算節點部署Nova
參考:OpenStack Docs: Install and configure a compute node for Red Hat Enterprise Linux and CentOS
1.軟件安裝:
yum -y install openstack-nova-compute
配置:
cp /etc/nova/nova.conf{,.bak}
grep -Ev '^#|^$' /etc/nova/nova.conf.bak > /etc/nova/nova.conf
vi /etc/nova/nova.conf
配置內容較多,可根據官網配置步驟修改,完整配置如下(注意修改相關組件密碼和my_ip):
[root@compute01 ~]# cat /etc/nova/nova.conf
[DEFAULT]
enabled_apis = osapi_compute,metadata
transport_url = rabbit://openstack:guojie.com@controller:5672/
compute_driver=libvirt.LibvirtDriver
my_ip = 172.173.10.111
use_neutron = true
firewall_driver = nova.virt.firewall.NoopFirewallDriver
log_file = /var/log/nova/nova-compute.log
block_device_allocate_retries = 180
[api]
auth_strategy = keystone
[api_database]
[barbican]
[cache]
[cinder]
[compute]
[conductor]
[console]
[consoleauth]
[cors]
[database]
[devices]
[ephemeral_storage_encryption]
[filter_scheduler]
[glance]
api_servers = http://controller:9292
[guestfs]
[healthcheck]
[hyperv]
[ironic]
[key_manager]
[keystone]
[keystone_authtoken]
www_authenticate_uri = http://controller:5000/
auth_url = http://controller:5000/
memcached_servers = controller:11211
auth_type = password
project_domain_name = Default
user_domain_name = Default
project_name = service
username = nova
password = guojie.com
[libvirt]
[metrics]
[mks]
[neutron]
[notifications]
[osapi_v21]
[oslo_concurrency]
lock_path = /var/lib/nova/tmp
[oslo_messaging_amqp]
[oslo_messaging_kafka]
[oslo_messaging_notifications]
[oslo_messaging_rabbit]
[oslo_middleware]
[oslo_policy]
[pci]
[placement]
region_name = RegionOne
project_domain_name = Default
project_name = service
auth_type = password
user_domain_name = Default
auth_url = http://controller:5000/v3
username = placement
password = guojie.com
[powervm]
[privsep]
[profiler]
[quota]
[rdp]
[remote_debug]
[scheduler]
[serial_console]
[service_user]
[spice]
[upgrade_levels]
[vault]
[vendordata_dynamic_auth]
[vmware]
[vnc]
enabled = true
server_listen = 0.0.0.0
server_proxyclient_address = $my_ip
novncproxy_base_url = http://172.173.10.110:6080/vnc_auto.html
[workarounds]
[wsgi]
[xenserver]
[xvp]
[zvm]
2.確定是否支持虛擬機硬件加速(x86架構):
grep -Ec '(vmx|svm)' /proc/cpuinfo
如果返回值為0則不支持硬件加速,需要配置libvirt使用QEMU而不是KVM
vi /etc/nova/nova.conf                                                                        (CPT)

[libvirt]
virt_type = qemu
如果返回值為1或更大的值,則支持硬件加速,不需要進行額外的配置
啟動服務:
systemctl enable libvirtd.service openstack-nova-compute.service
systemctl start libvirtd.service #這里等一會讓這個服務啟動完成再啟動下一個
systemctl status libvirtd.service


systemctl start openstack-nova-compute.service
查看日志發現報錯:
tail -100f /var/log/nova/nova-compute.log

手動創建該文件并重啟:
mkdir /usr/lib/python3.9/site-packages/instances
chown -R nova.nova /usr/lib/python3.9/site-packages/instances
systemctl restart openstack-nova-compute.service
在控制節點上發現主機:
openstack compute service list --service nova-compute

添加計算節點到集群:
su -s /bin/sh -c "nova-manage cell_v2 discover_hosts --verbose" nova
驗證:
openstack compute service list

2.6 部署Neutron
OpenStack Docs: Install and configure controller node
1.創建數據庫、服務憑證和 API 端點
創建數據庫:
mysql -u root -p

CREATE DATABASE neutron;
GRANT ALL PRIVILEGES ON neutron.* TO 'neutron'@'%' IDENTIFIED BY 'guojie.com';
exit;
創建neutron服務憑證:
openstack user create --domain default --password guojie.com neutron
openstack role add --project service --user neutron admin
openstack service create --name neutron --description "OpenStack Networking" network
創建Neutron服務API端點:
openstack endpoint create --region RegionOne network public http://controller:9696
openstack endpoint create --region RegionOne network internal http://controller:9696
openstack endpoint create --region RegionOne network admin http://controller:9696
2.安裝軟件包:
yum -y install openstack-neutron openstack-neutron-ml2 openstack-neutron-linuxbridge ebtables ipset
3.配置neutron相關配置:
配置主體配置
cp /etc/neutron/neutron.conf{,.bak}
grep -Ev '^$|#' /etc/neutron/neutron.conf.bak > /etc/neutron/neutron.conf
vi /etc/neutron/neutron.conf
完整配置(注意修改組件密碼):
[root@controller ~]# cat /etc/neutron/neutron.conf
[DEFAULT]
core_plugin = ml2
service_plugins = router
allow_overlapping_ips = true
transport_url = rabbit://openstack:guojie.com@controller
auth_strategy = keystone
notify_nova_on_port_status_changes = true
notify_nova_on_port_data_changes = true
[cors]
[database]
connection = mysql+pymysql://neutron:guojie.com@controller/neutron
[keystone_authtoken]
www_authenticate_uri = http://controller:5000
auth_url = http://controller:5000
memcached_servers = controller:11211
auth_type = password
project_domain_name = Default
user_domain_name = Default
project_name = service
username = neutron
password = guojie.com
[oslo_concurrency]
lock_path = /var/lib/neutron/tmp
[oslo_messaging_amqp]
[oslo_messaging_kafka]
[oslo_messaging_notifications]
[oslo_messaging_rabbit]
[oslo_middleware]
[oslo_policy]
[privsep]
[ssl]
[nova]
auth_url = http://controller:5000
auth_type = password
project_domain_name = Default
user_domain_name = Default
region_name = RegionOne
project_name = service
username = nova
password = guojie.com
配置ML2插件:
cp /etc/neutron/plugins/ml2/ml2_conf.ini{,.bak}
grep -Ev '^$|#' /etc/neutron/plugins/ml2/ml2_conf.ini.bak > /etc/neutron/plugins/ml2/ml2_conf.ini
vi /etc/neutron/plugins/ml2/ml2_conf.ini
完整配置(基本上固定配置,照搬):
[root@controller ~]# cat /etc/neutron/plugins/ml2/ml2_conf.ini
[DEFAULT]
[ml2]
type_drivers = flat,vlan,vxlan
tenant_network_types = vxlan
mechanism_drivers = linuxbridge,l2population
extension_drivers = port_security

[ml2_type_flat]
flat_networks = extnal

[ml2_type_vxlan]
vni_ranges = 1:1000

[securitygroup]
enable_ipset = true
創建/etc/neutron/plugin.ini的符號鏈接:
ln -s /etc/neutron/plugins/ml2/ml2_conf.ini /etc/neutron/plugin.ini
配置 Linux bridge 代理:
cp /etc/neutron/plugins/ml2/linuxbridge_agent.ini{,.bak}
grep -Ev '^$|#' /etc/neutron/plugins/ml2/linuxbridge_agent.ini.bak > /etc/neutron/plugins/ml2/linuxbridge_agent.ini
vi /etc/neutron/plugins/ml2/linuxbridge_agent.ini
完整配置如下:
[root@controller ~]# cat /etc/neutron/plugins/ml2/linuxbridge_agent.ini
[DEFAULT]
[linux_bridge]
physical_interface_mappings = extnal:ens192

[vxlan]
enable_vxlan = true
local_ip = 172.173.10.110
l2_population = true

[securitygroup]
enable_security_group = true
firewall_driver = neutron.agent.linux.iptables_firewall.IptablesFirewallDriver
替換ens192為物理網絡上外網的接口;
替換172.173.10.110為控制節點的管理IP地址;
確保Linux操作系統內核支持網絡橋接過濾器,配置以下所有sysctl值設置為1:
cat <<EOF>> /etc/sysctl.conf
net.bridge.bridge-nf-call-iptables=1
net.bridge.bridge-nf-call-ip6tables=1
EOF
modprobe br_netfilter
sysctl -p
配置Layer-3代理:
cp /etc/neutron/l3_agent.ini{,.bak}
grep -Ev '^$|#' /etc/neutron/l3_agent.ini.bak > /etc/neutron/l3_agent.ini
vi /etc/neutron/l3_agent.ini
完整配置(就加了一行配置):
[root@controller ~]# cat /etc/neutron/l3_agent.ini
[DEFAULT]
interface_driver = linuxbridge
配置DHCP代理:
cp /etc/neutron/dhcp_agent.ini{,.bak}
grep -Ev '^$|#' /etc/neutron/dhcp_agent.ini.bak > /etc/neutron/dhcp_agent.ini
vi /etc/neutron/dhcp_agent.ini
完整配置(加了三行):
[root@controller ~]# cat /etc/neutron/dhcp_agent.ini
[DEFAULT]
interface_driver = linuxbridge
dhcp_driver = neutron.agent.linux.dhcp.Dnsmasq
enable_isolated_metadata = true
配置metadata代理:
cp /etc/neutron/metadata_agent.ini{,.bak}
grep -Ev '^$|#' /etc/neutron/metadata_agent.ini.bak > /etc/neutron/metadata_agent.ini
vi /etc/neutron/metadata_agent.ini
完整配置如下:
[root@controller ~]# cat /etc/neutron/metadata_agent.ini
[DEFAULT]
nova_metadata_host = controller
metadata_proxy_shared_secret = guojie
[cache]
替換guojie為合適的元數據代理secret。要和下面一步對應nova配置中metadata_proxy_shared_secret配置項一致。
4.配置nova相關配置/etc/nova/nova.conf,在[neutron]項中添加如下配置:
[neutron]
auth_url = http://controller:5000
auth_type = password
project_domain_name = Default
user_domain_name = Default
region_name = RegionOne
project_name = service
username = neutron
password = guojie.com
service_metadata_proxy = true
metadata_proxy_shared_secret = guojie
5.同步數據庫:
su -s /bin/sh -c "neutron-db-manage --config-file /etc/neutron/neutron.conf --config-file /etc/neutron/plugins/ml2/ml2_conf.ini upgrade head" neutron
6.重啟計算API服務:
systemctl restart openstack-nova-api.service
7.啟動服務
systemctl enable neutron-server.service neutron-linuxbridge-agent.service neutron-dhcp-agent.service neutron-metadata-agent.service neutron-l3-agent.service
寫成腳本,方便管理
cat <<EOF> neutron-restart.sh
#!/bin/bash
systemctl restart neutron-server.service neutron-linuxbridge-agent.service neutron-dhcp-agent.service neutron-metadata-agent.service neutron-l3-agent.service
EOF
sh neutron-restart.sh
2.7 計算節點部署Neutron
參考:OpenStack Docs: Install and configure compute node
1.安裝軟件
yum -y install openstack-neutron-linuxbridge ebtables ipset
2.配置neutron相關配置:
配置主體配置
cp /etc/neutron/neutron.conf{,.bak}
grep -Ev '^$|#' /etc/neutron/neutron.conf.bak > /etc/neutron/neutron.conf
vi /etc/neutron/neutron.conf
完整配置:
[root@compute01 ~]# cat /etc/neutron/neutron.conf
[DEFAULT]
transport_url = rabbit://openstack:guojie.com@controller
auth_strategy = keystone
[cors]
[database]
[keystone_authtoken]
www_authenticate_uri = http://controller:5000
auth_url = http://controller:5000
memcached_servers = controller:11211
auth_type = password
project_domain_name = Default
user_domain_name = Default
project_name = service
username = neutron
password = guojie.com
[oslo_concurrency]
lock_path = /var/lib/neutron/tmp
[oslo_messaging_amqp]
[oslo_messaging_kafka]
[oslo_messaging_notifications]
[oslo_messaging_rabbit]
[oslo_middleware]
[oslo_policy]
[privsep]
[ssl]
配置ML2插件:
cp /etc/neutron/plugins/ml2/linuxbridge_agent.ini{,.bak}
grep -Ev '^$|#' /etc/neutron/plugins/ml2/linuxbridge_agent.ini.bak > /etc/neutron/plugins/ml2/linuxbridge_agent.ini
vi /etc/neutron/plugins/ml2/linuxbridge_agent.ini
完整配置:
[root@compute01 ~]# cat /etc/neutron/plugins/ml2/linuxbridge_agent.ini
[DEFAULT]
[linux_bridge]
physical_interface_mappings = extnal:ens192

[vxlan]
enable_vxlan = true
local_ip = 172.173.10.111
l2_population = true

[securitygroup]
enable_security_group = true
firewall_driver = neutron.agent.linux.iptables_firewall.IptablesFirewallDriver
注意修改網卡為上外網的網卡,ip為本機管理地址。
確保Linux操作系統內核支持網絡橋接過濾器,配置以下所有sysctl值設置為1:
cat <<EOF>> /etc/sysctl.conf
net.bridge.bridge-nf-call-iptables=1
net.bridge.bridge-nf-call-ip6tables=1
EOF
modprobe br_netfilter
sysctl -p
3.配置nova相關配置,在[neutron]項中添加如下配置:
vi /etc/nova/nova.conf

[neutron]
auth_url = http://controller:5000
auth_type = password
project_domain_name = Default
user_domain_name = Default
region_name = RegionOne
project_name = service
username = neutron
password = guojie.com
重啟nova服務
systemctl restart openstack-nova-compute.service
啟動服務
systemctl enable neutron-linuxbridge-agent.service --now
在控制節點上驗證:
openstack network agent list

2.8 Dashbaord(horizon)部署
參考:OpenStack Docs: Install and configure for Red Hat Enterprise Linux and CentOS
1.軟件安裝
yum -y install openstack-dashboard
2.配置
cp /etc/openstack-dashboard/local_settings{,.bak}
vi /etc/openstack-dashboard/local_settings
修改如下配置部分沒有的要自己添加(注意以下只是部分要修改的內容,并不是完整配置):
OPENSTACK_HOST = "controller"
ALLOWED_HOSTS = ['*', ]

SESSION_ENGINE = 'django.contrib.sessions.backends.cache'

CACHES = {
    'default': {
        'BACKEND': 'django.core.cache.backends.memcached.MemcachedCache',
        'LOCATION': 'controller:11211',
    }
}

OPENSTACK_KEYSTONE_URL = "http://%s:5000/v3" % OPENSTACK_HOST
OPENSTACK_KEYSTONE_MULTIDOMAIN_SUPPORT = True
OPENSTACK_KEYSTONE_DEFAULT_DOMAIN = "Default"
OPENSTACK_KEYSTONE_DEFAULT_ROLE = "user"
WEBROOT = '/dashboard'
POLICY_FILES_PATH = "/etc/openstack-dashboard"

OPENSTACK_API_VERSIONS = {
    "identity": 3,
    "image": 2,
    "volume": 3,
}

TIME_ZONE = "Asia/Shanghai"
配置完成之后重啟httpd
systemctl restart httpd.service memcached.service
3.驗證 打開瀏覽器,輸入網址http://HOSTIP/dashboard/,登錄 horizon。
*注意*
替換HOSTIP為控制節點管理平面IP地址
三、測試
3.1 網絡創建
1.創建橋接網絡


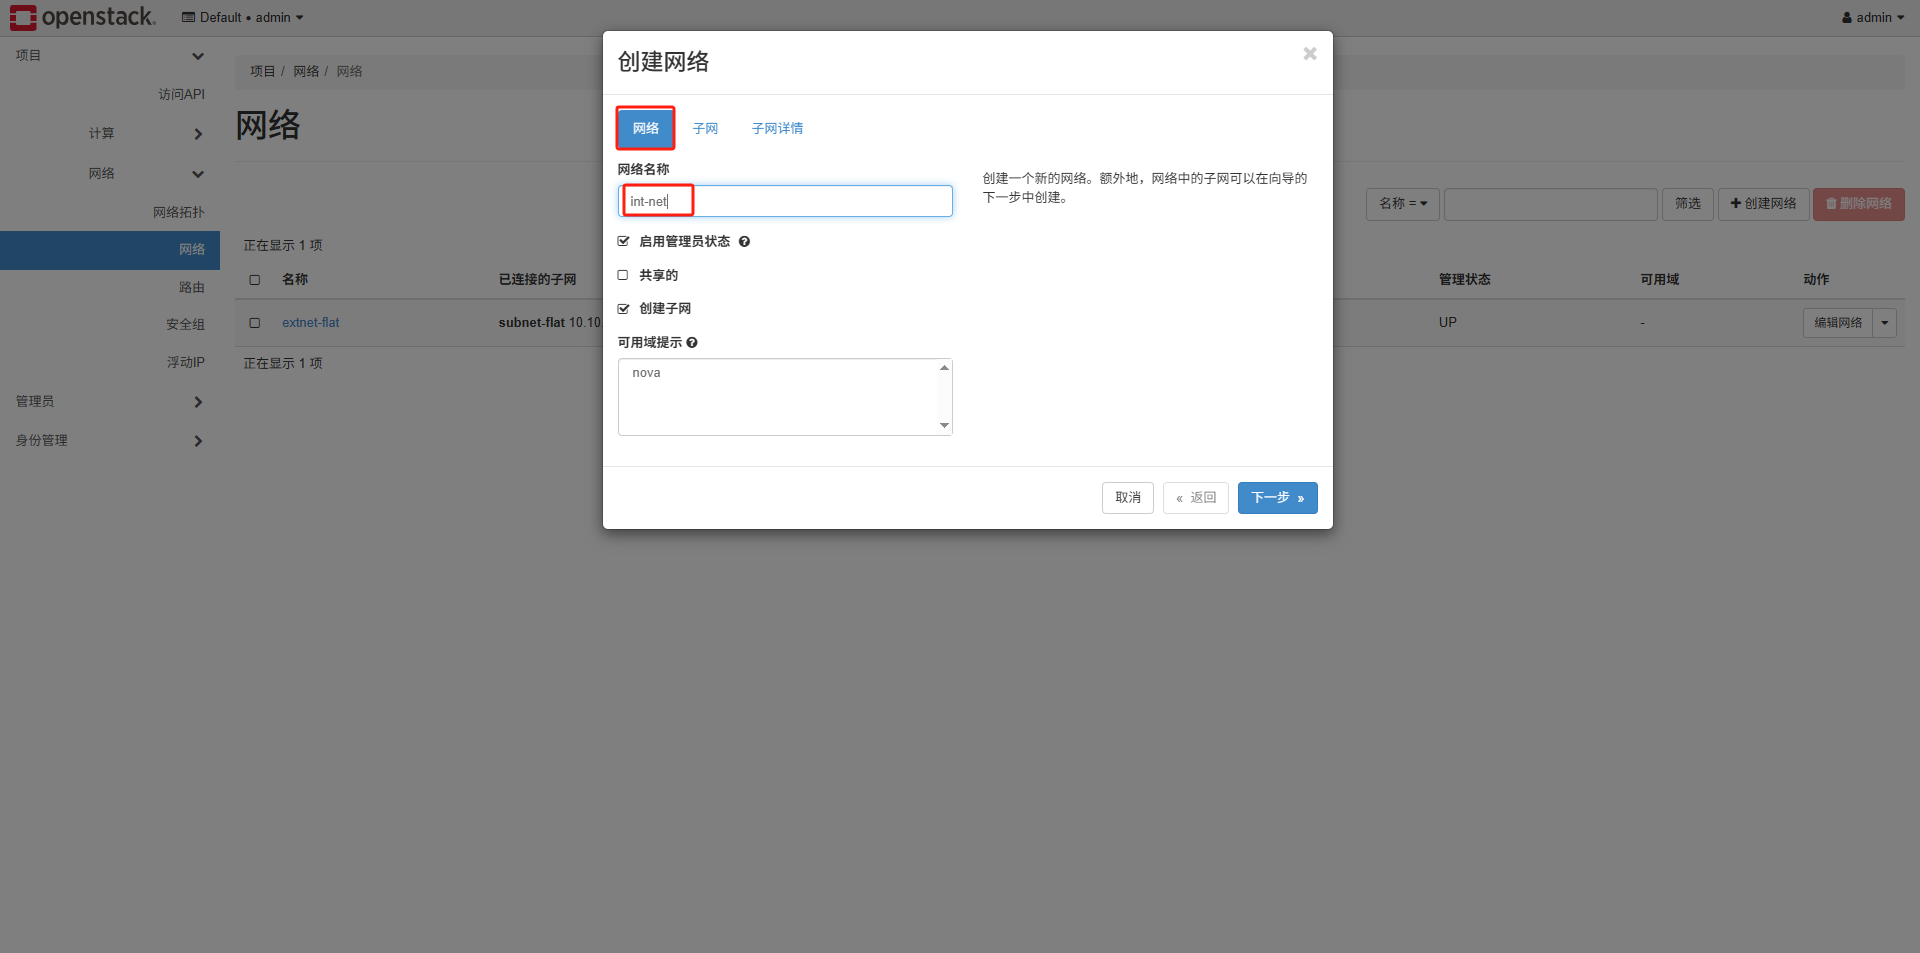
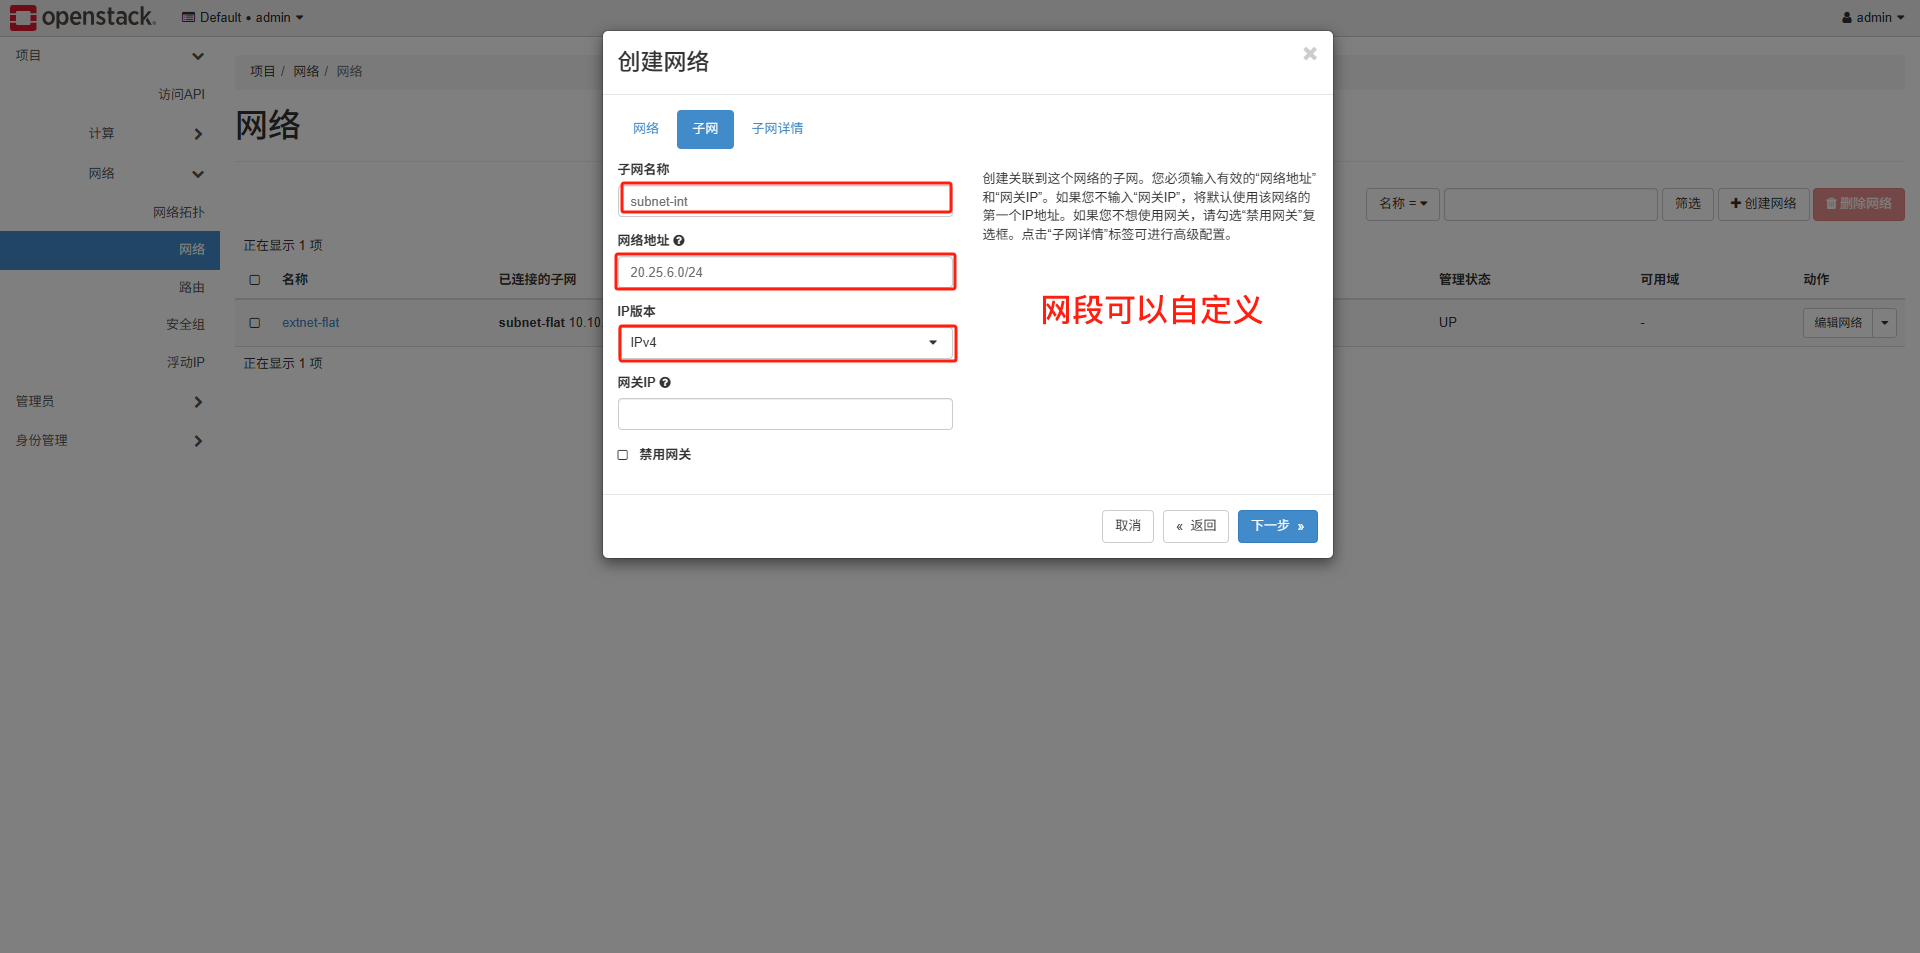
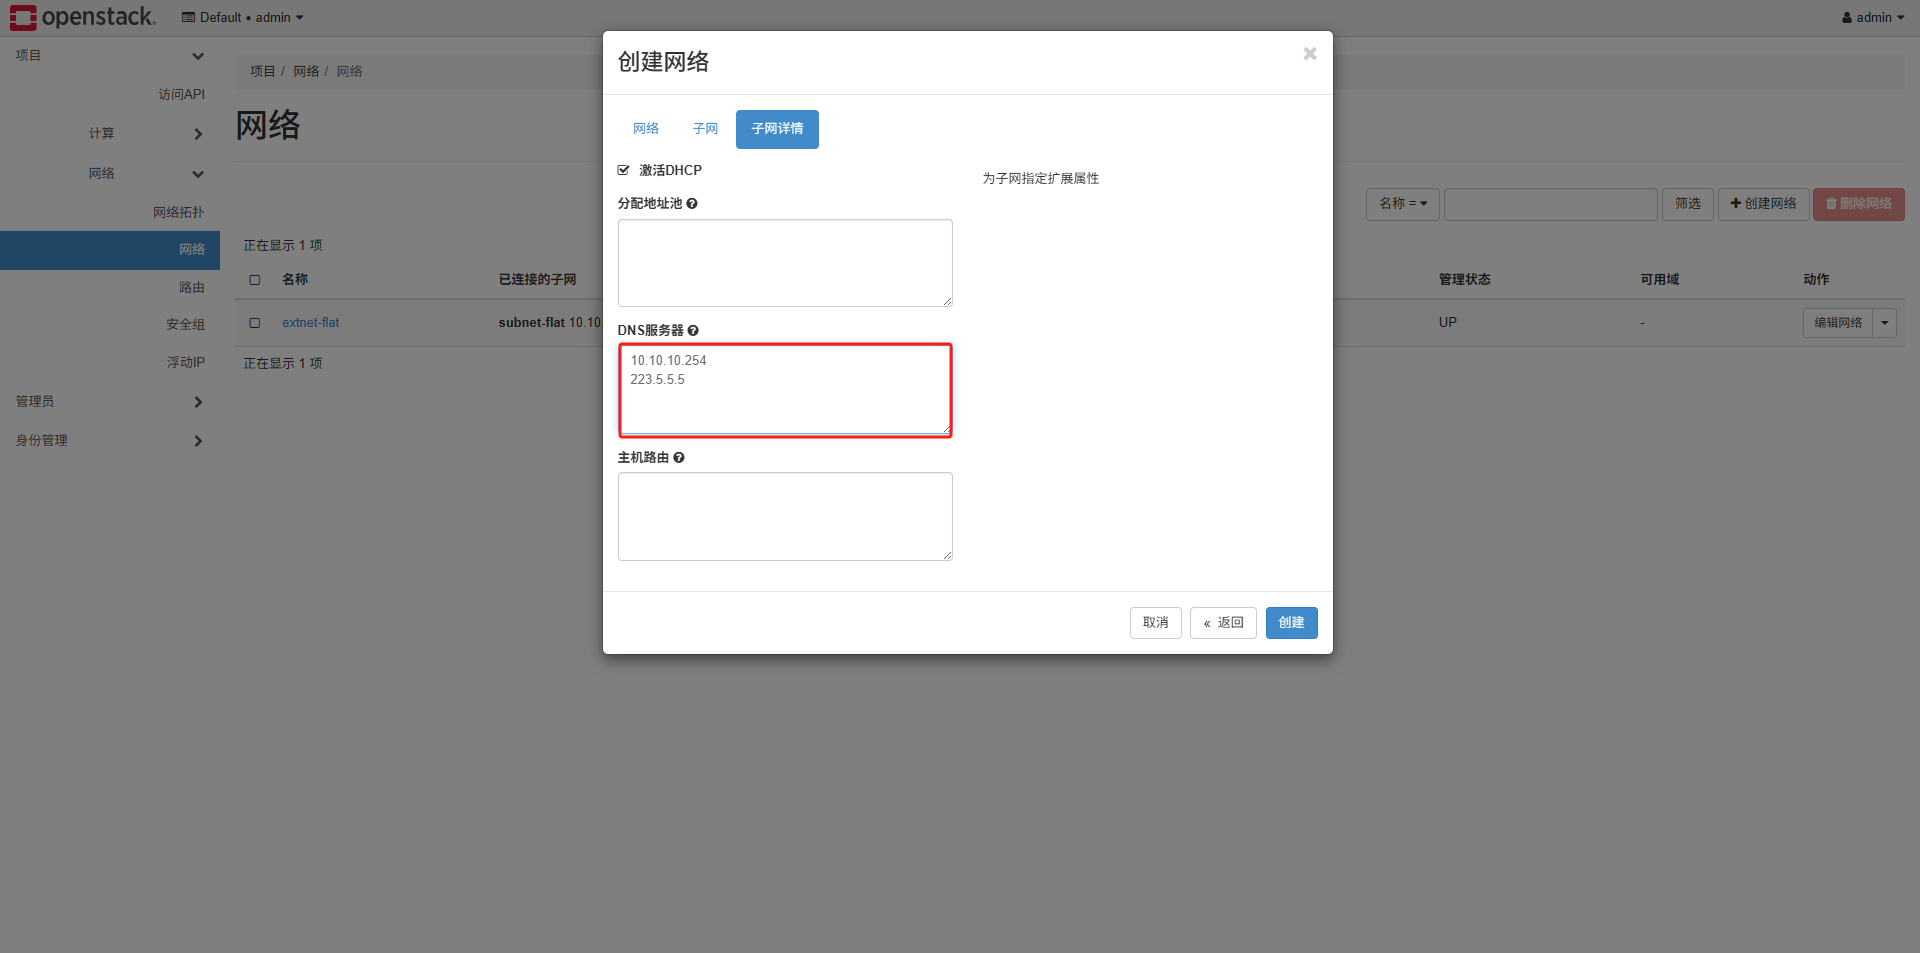
2.創建內部網絡
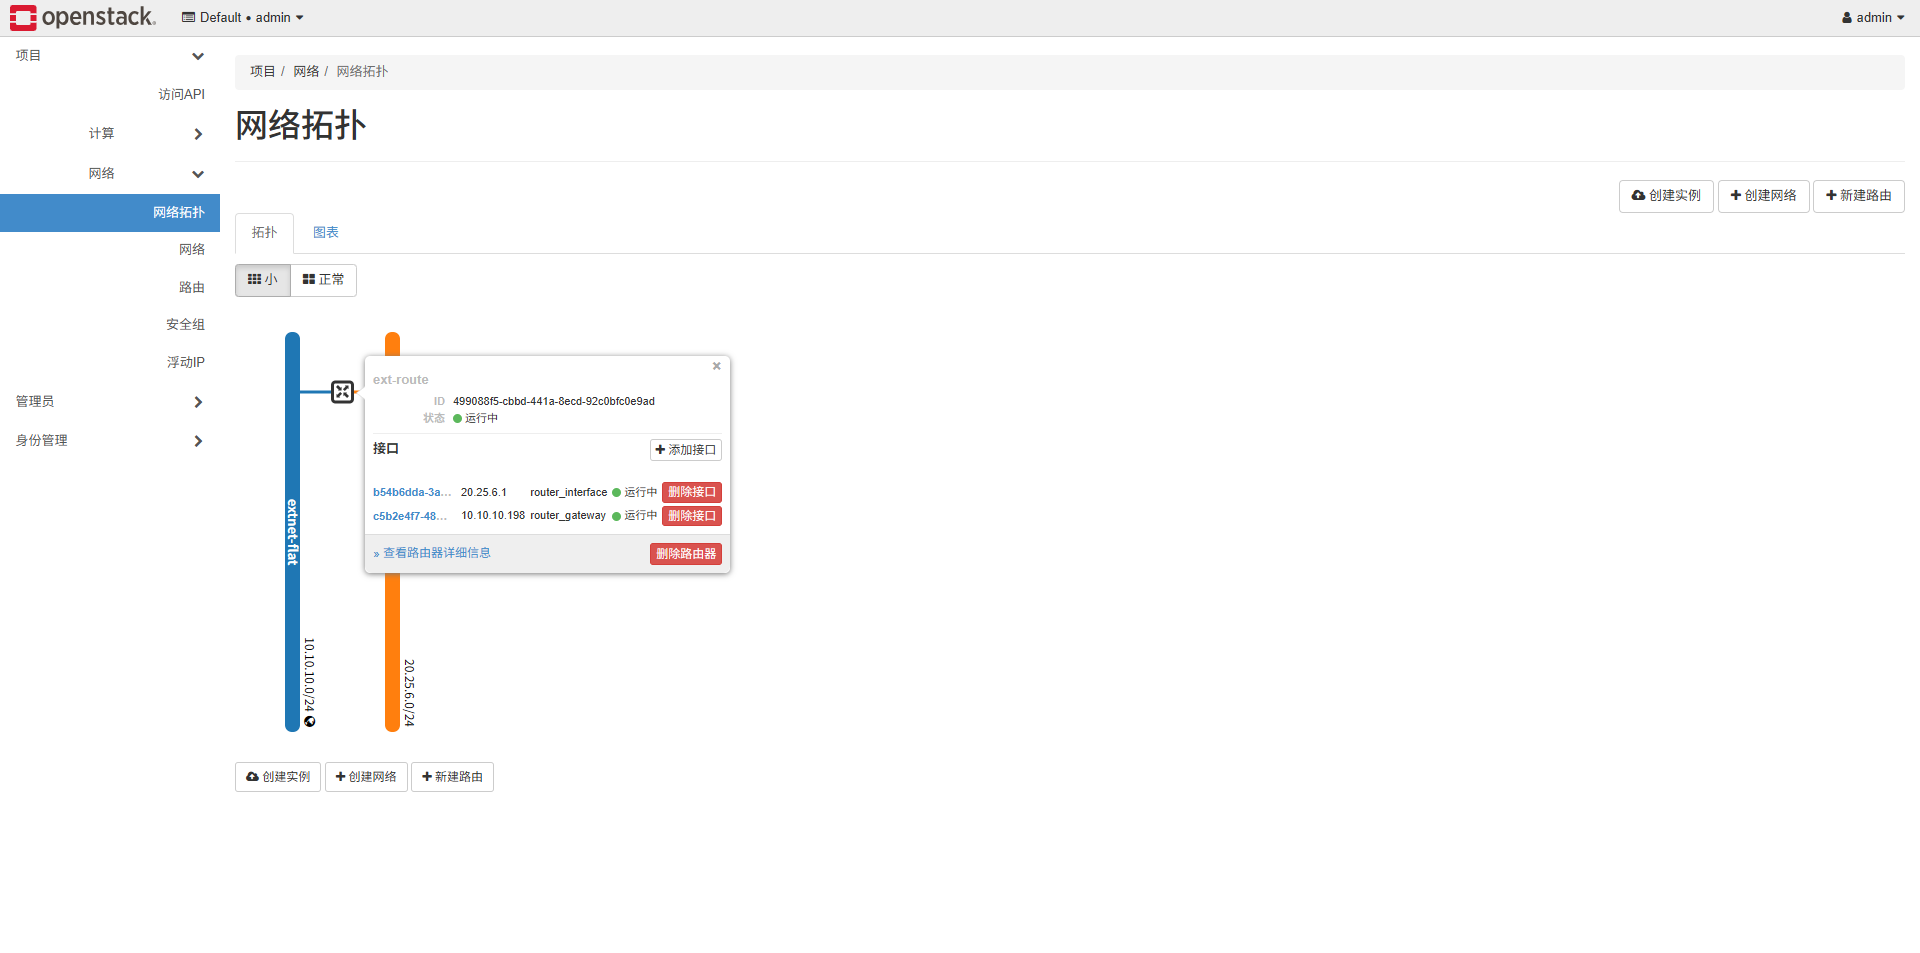
3.2 路由創建


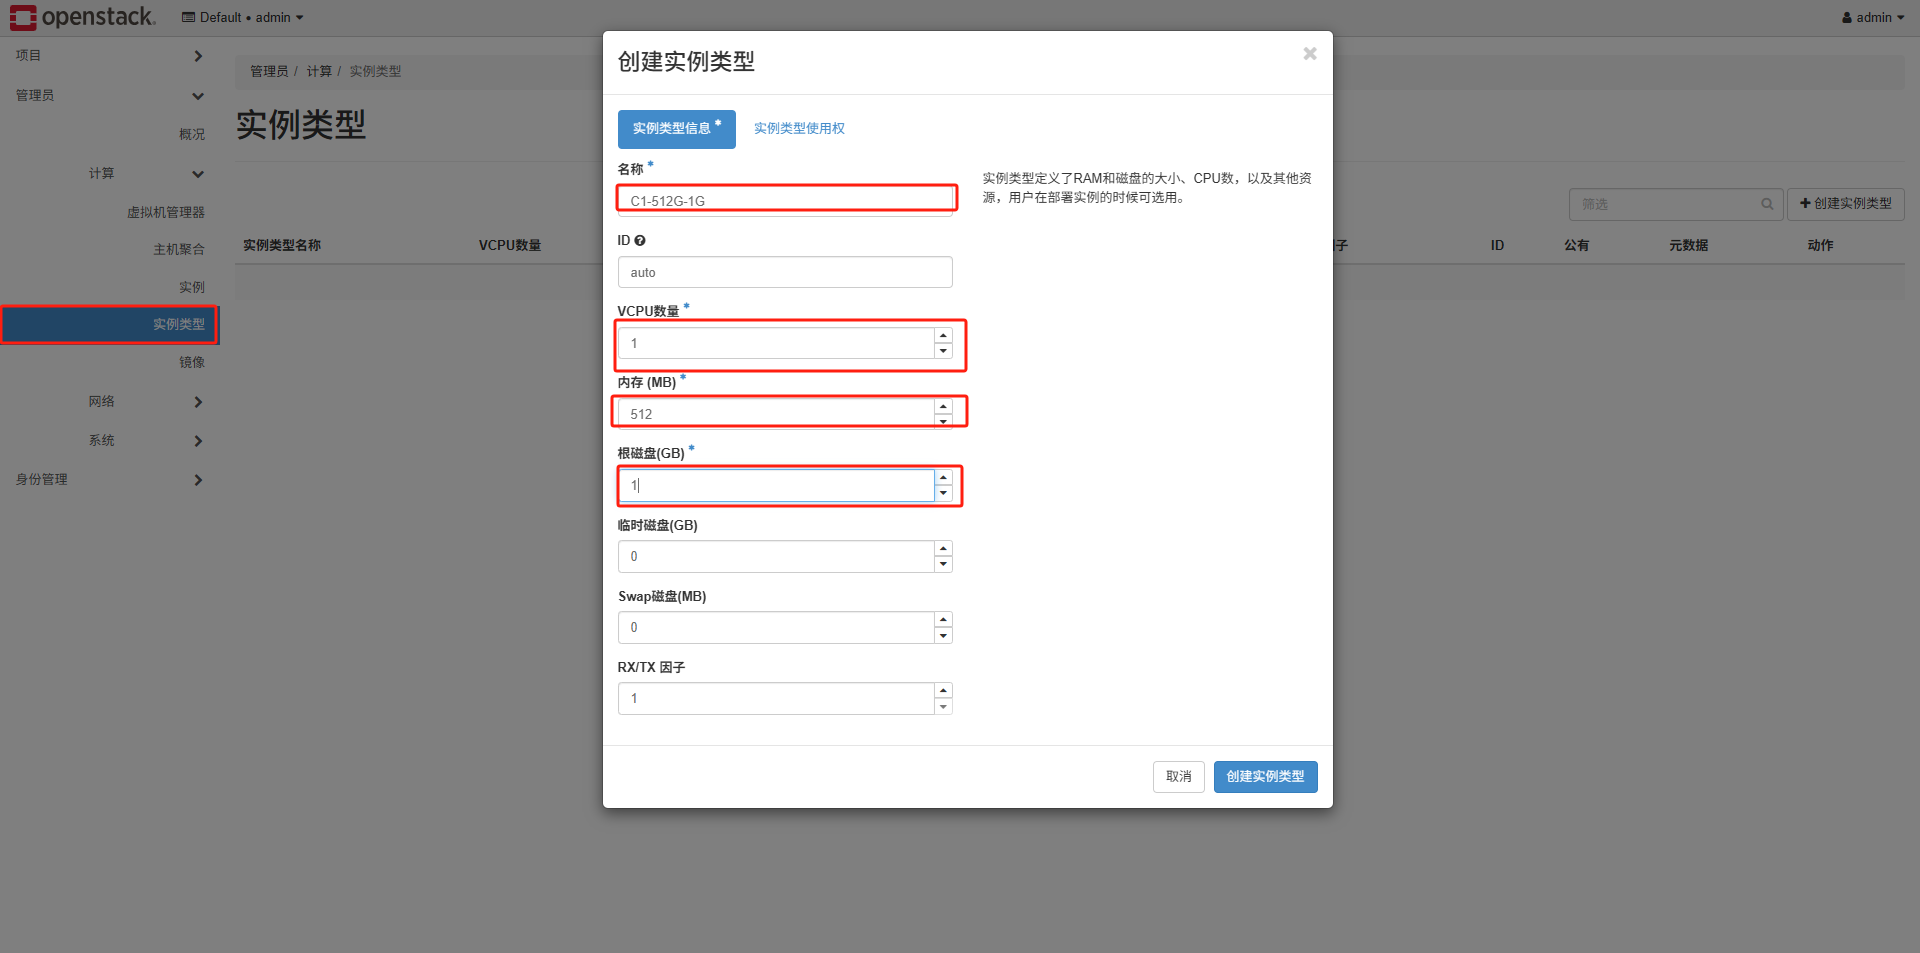
3.3 創建實例類型
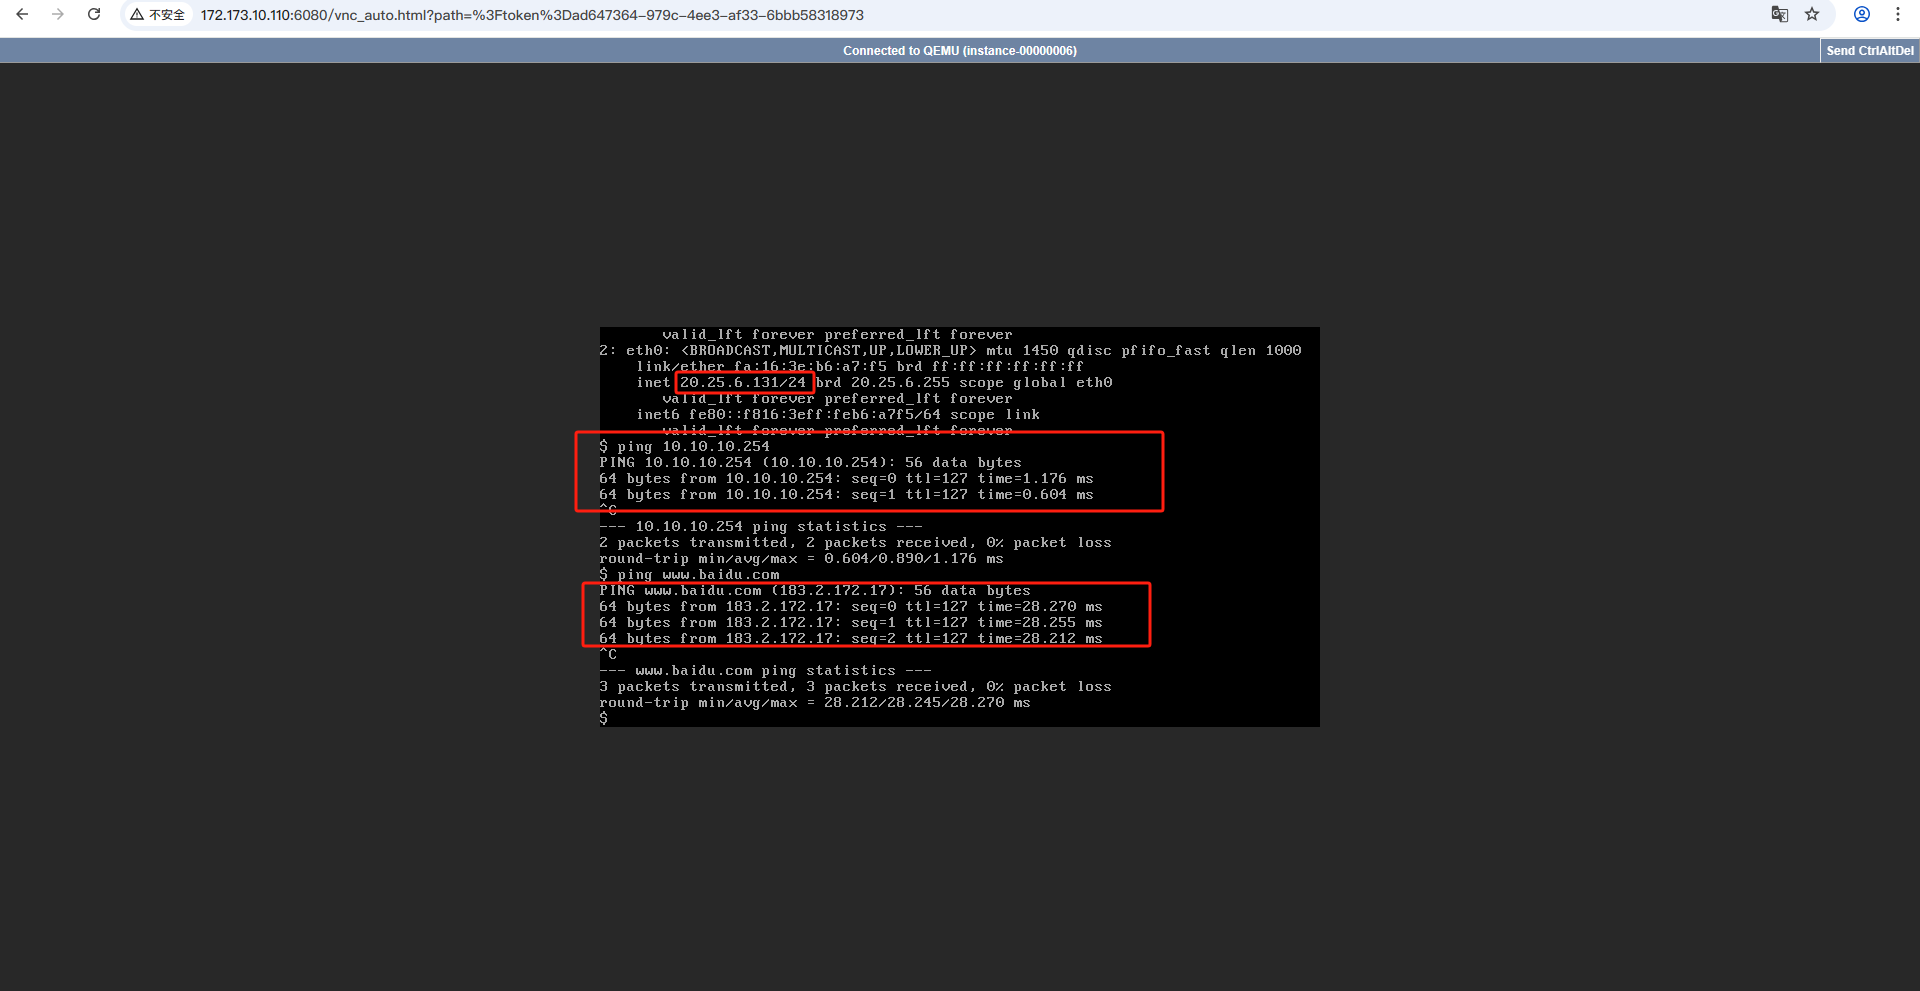
3.4 創建實例
創建實例,網卡選擇新建的int-net,之后啟動測試查看網絡是否正常。
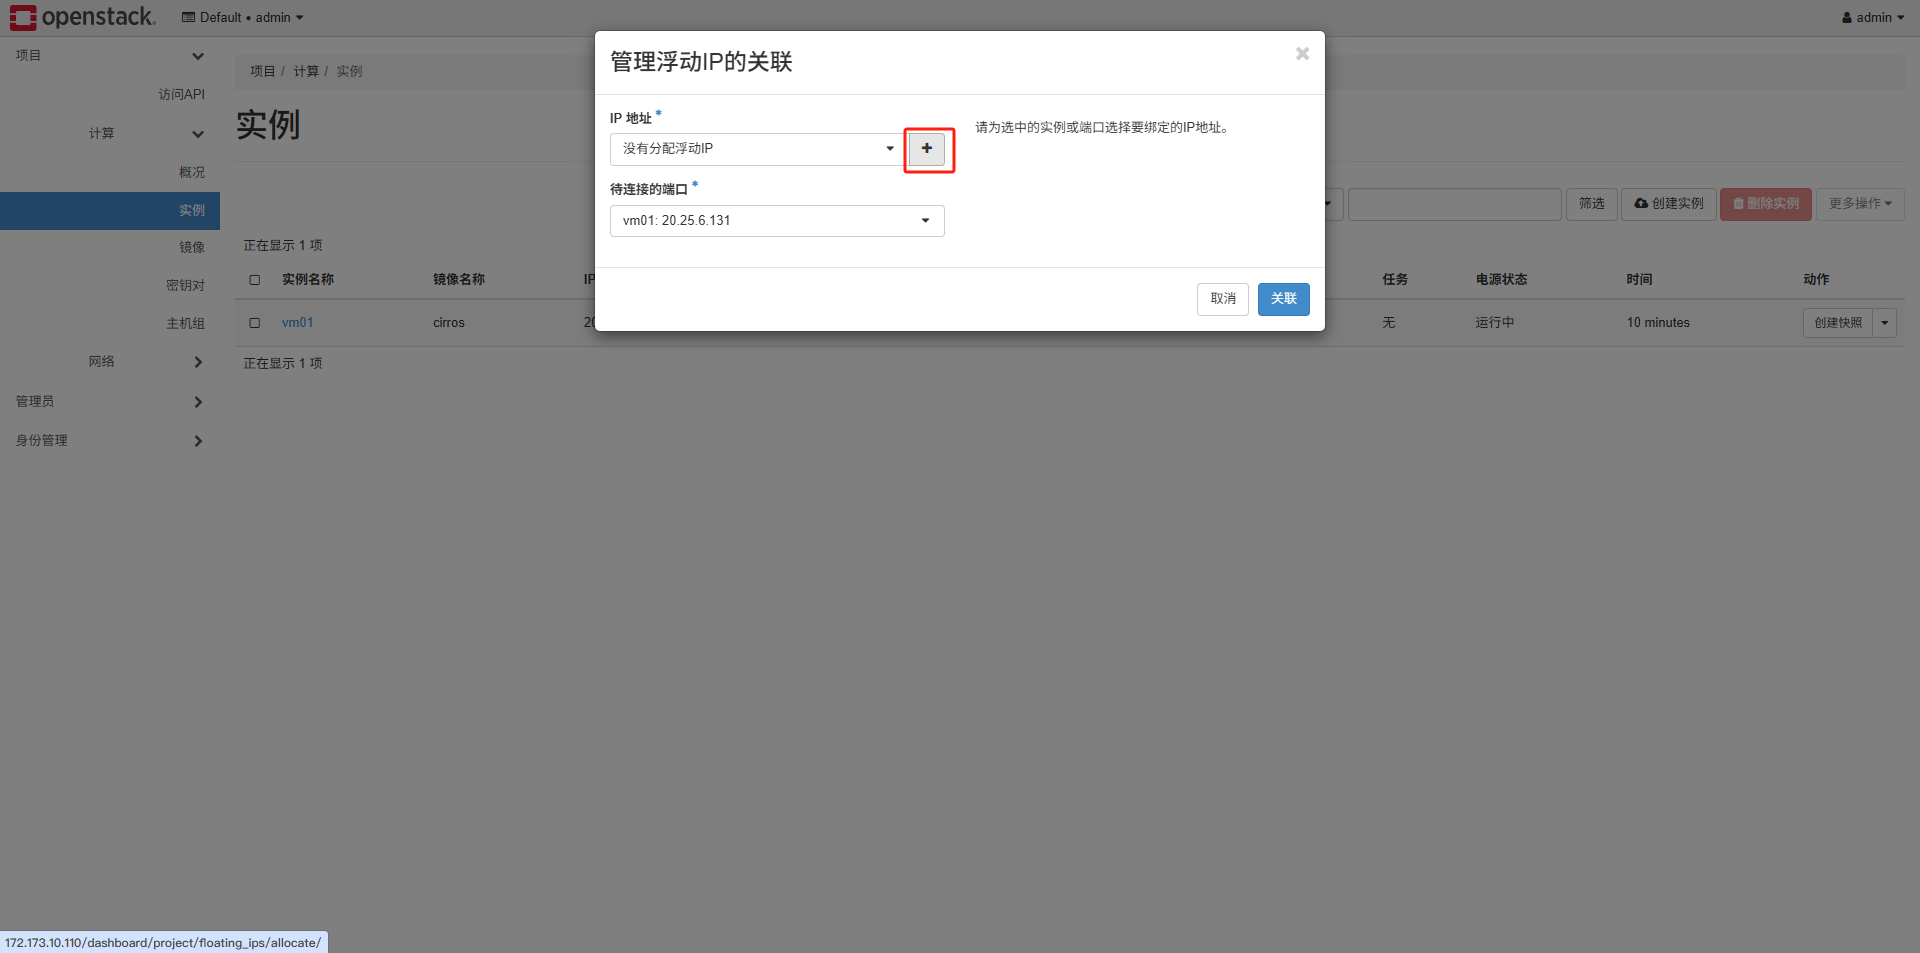
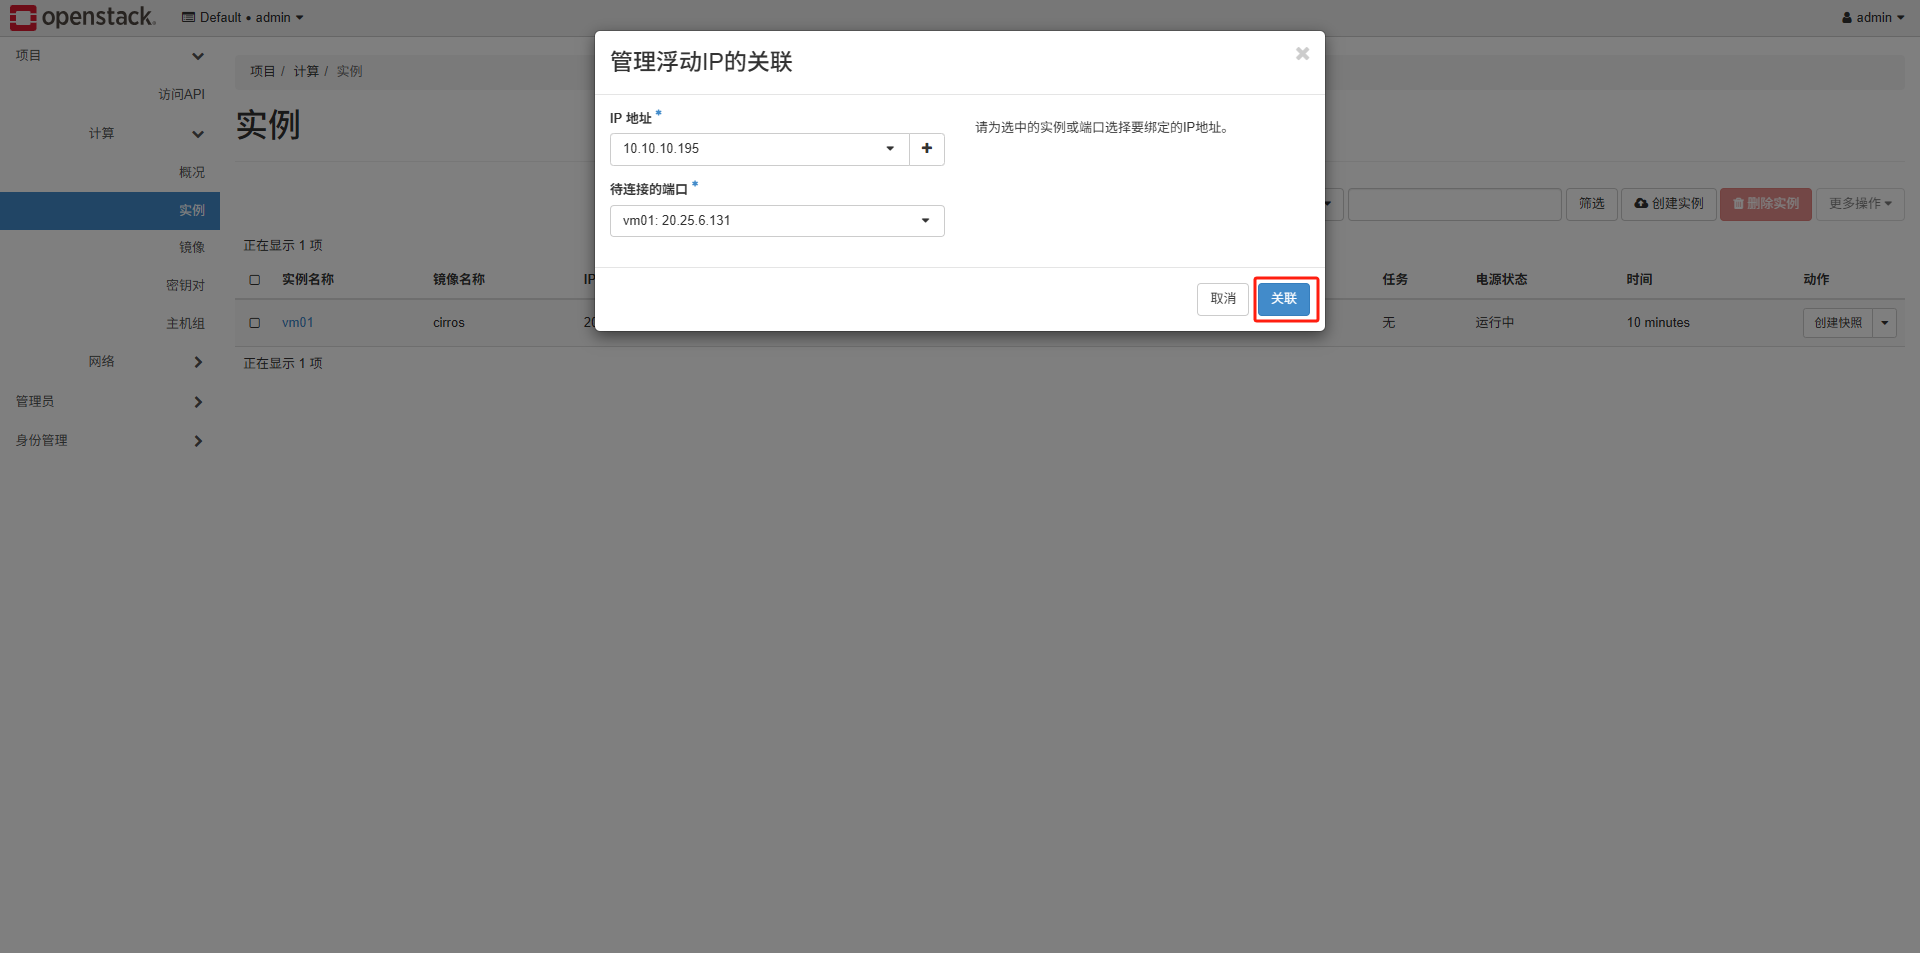
3.5 浮動ip
這樣創建好之后外部網絡是無法訪問內部虛擬機的,需要創建一個浮動ip與之綁定:
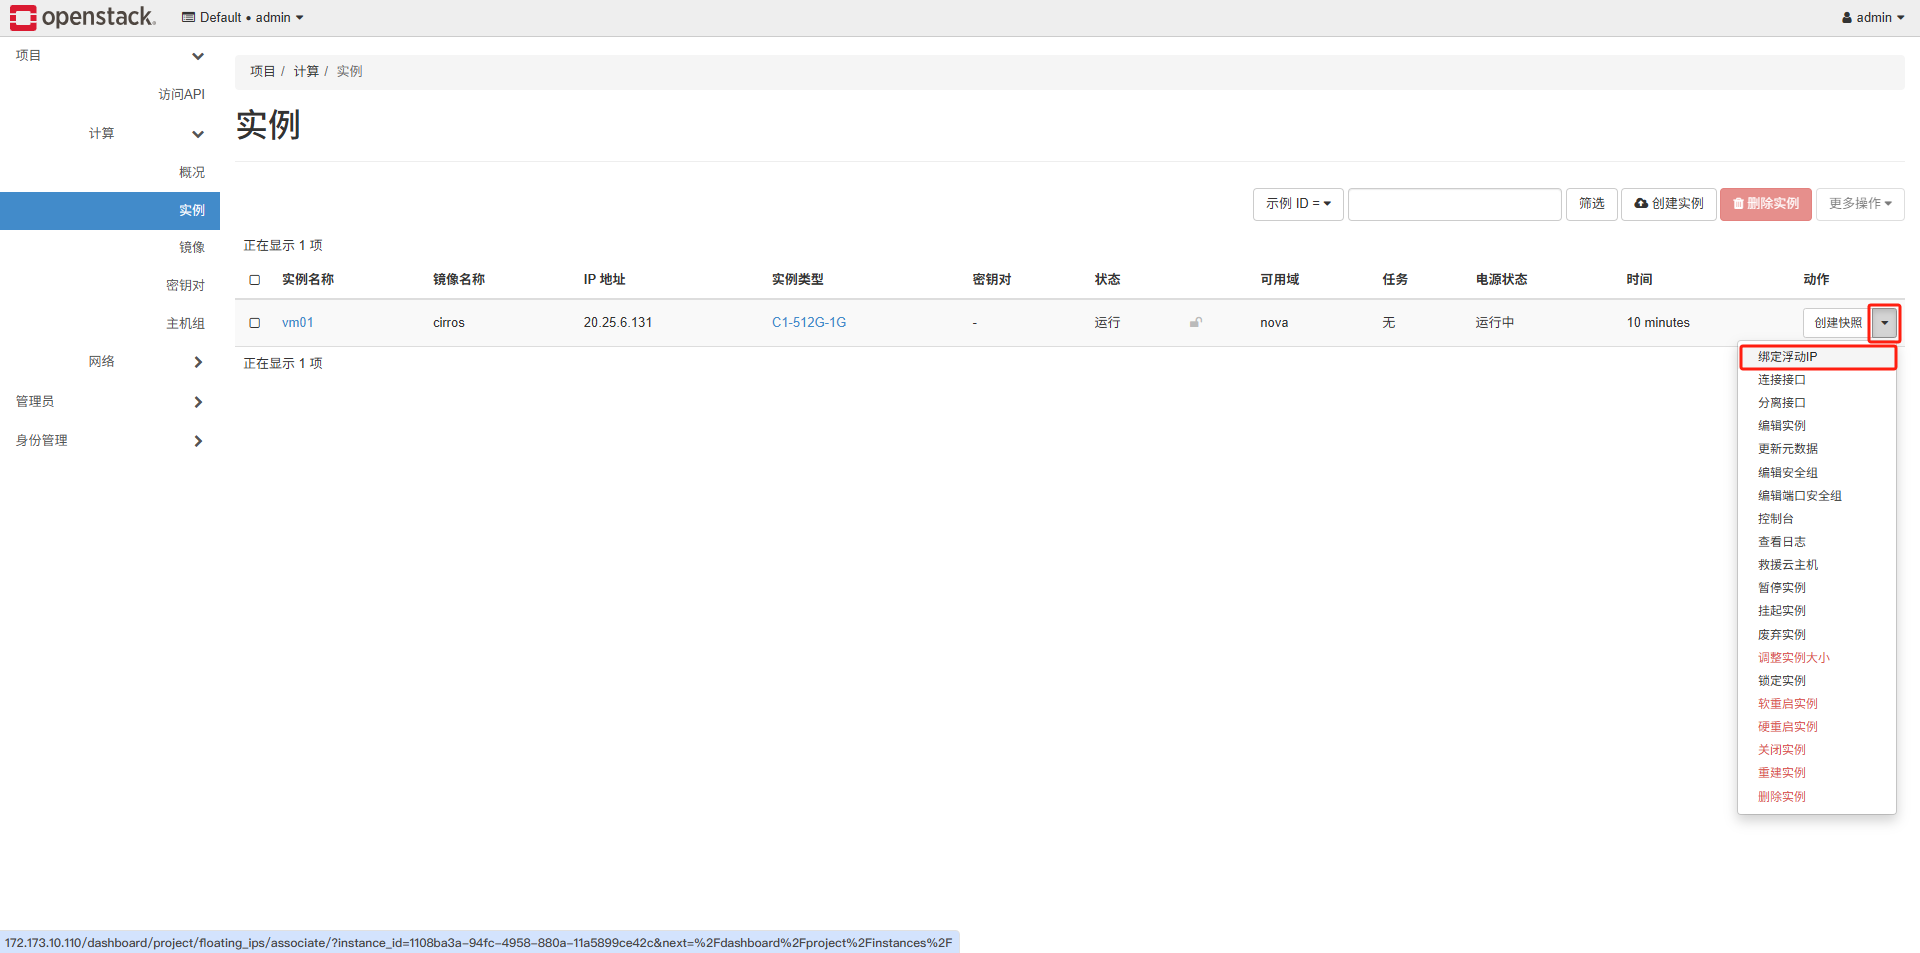

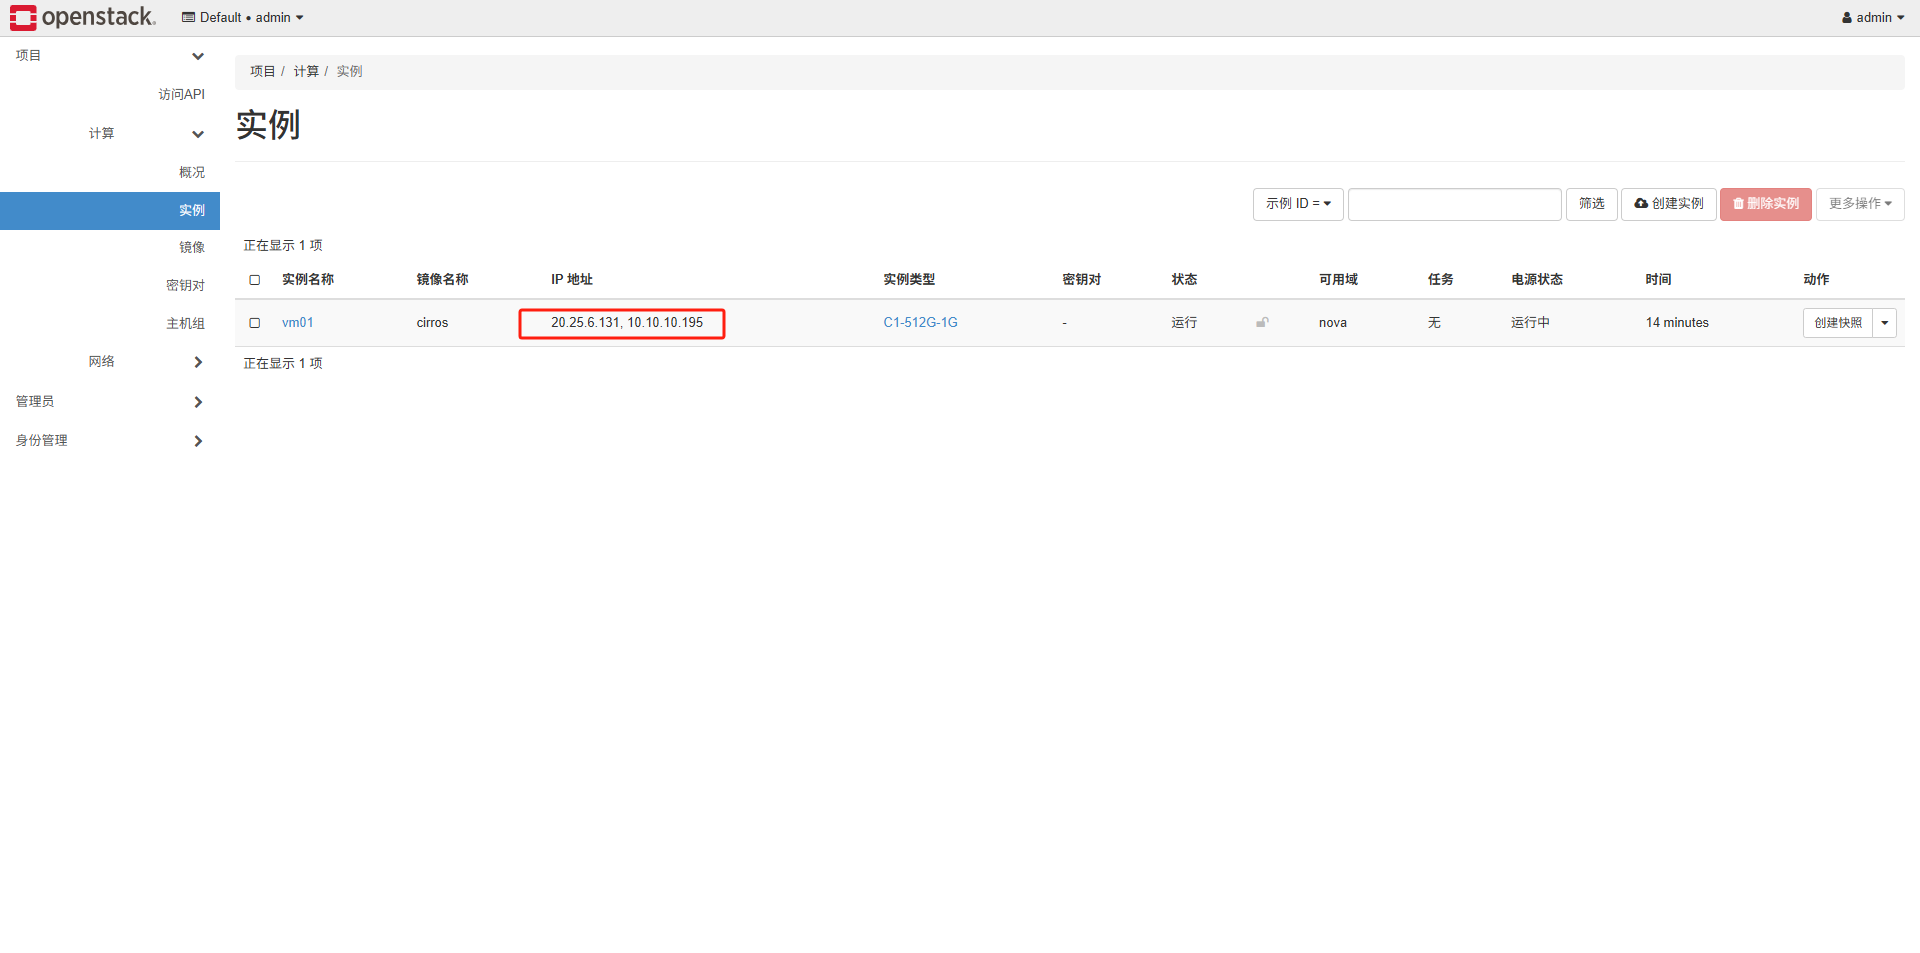
再在安全組當中運行ping和允許ssh:

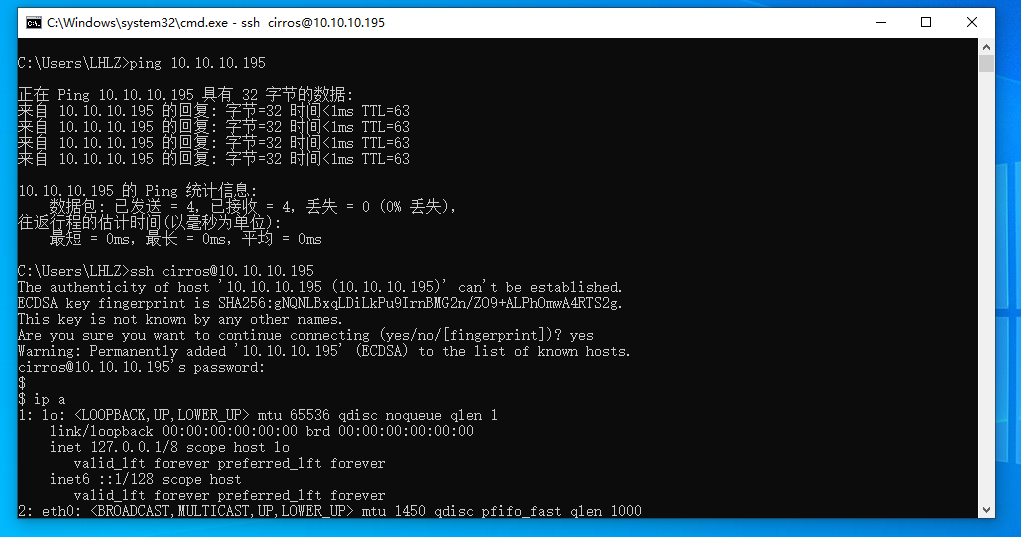
然后就可以通過浮動IP訪問內部虛擬機:
四、cinder安裝
4.1 控制節點部署cinder
參考:OpenStack Docs: Install and configure controller node
1.創建數據庫、服務憑證和 API 端點
創建數據庫:
mysql -u root -p

CREATE DATABASE cinder;
GRANT ALL PRIVILEGES ON cinder.* TO 'cinder'@'%' IDENTIFIED BY 'guojie.com';
exit;
創建cinder服務憑證:
source ~/.admin-openrc
openstack user create --domain default --password guojie.com cinder
openstack role add --project service --user cinder admin
openstack service create --name cinderv2 --description "OpenStack Block Storage" volumev2
openstack service create --name cinderv3 --description "OpenStack Block Storage" volumev3
創建塊存儲服務API端點:
openstack endpoint create --region RegionOne volumev2 public http://controller:8776/v2/%\(project_id\)s
openstack endpoint create --region RegionOne volumev2 internal http://controller:8776/v2/%\(project_id\)s
openstack endpoint create --region RegionOne volumev2 admin http://controller:8776/v2/%\(project_id\)s
openstack endpoint create --region RegionOne volumev3 public http://controller:8776/v3/%\(project_id\)s
openstack endpoint create --region RegionOne volumev3 internal http://controller:8776/v3/%\(project_id\)s
openstack endpoint create --region RegionOne volumev3 admin http://controller:8776/v3/%\(project_id\)s
2.安裝軟件包:
yum -y install openstack-cinder-api openstack-cinder-scheduler
配置cinder相關配置:
cp /etc/cinder/cinder.conf{,.bak}
grep -Ev '^$|#' /etc/cinder/cinder.conf.bak > /etc/cinder/cinder.conf
vi /etc/cinder/cinder.conf
完整配置如下:
[root@controller ~]# cat /etc/cinder/cinder.conf
[DEFAULT]
transport_url = rabbit://openstack:guojie.com@controller
auth_strategy = keystone
my_ip = 172.173.10.110
[barbican]
[cors]
[database]
connection = mysql+pymysql://cinder:guojie.com@controller/cinder
[healthcheck]
[key_manager]
[keystone_authtoken]
www_authenticate_uri = http://controller:5000
auth_url = http://controller:5000
memcached_servers = controller:11211
auth_type = password
project_domain_name = default
user_domain_name = default
project_name = service
username = cinder
password = guojie.com
[oslo_concurrency]
lock_path = /var/lib/cinder/tmp
[oslo_messaging_amqp]
[oslo_messaging_kafka]
[oslo_messaging_notifications]
[oslo_messaging_rabbit]
[oslo_middleware]
[oslo_policy]
[oslo_reports]
[oslo_versionedobjects]
[privsep]
[profiler]
[sample_castellan_source]
[sample_remote_file_source]
[ssl]
[vault]
3.同步數據庫:
su -s /bin/sh -c "cinder-manage db sync" cinder
4.nova配置:
在[cinder]下添加如下配置
vi /etc/nova/nova.conf

[cinder]
os_region_name = RegionOne
5.重啟計算API服務
systemctl restart openstack-nova-api.service
7.啟動cinder服務
systemctl enable openstack-cinder-api.service openstack-cinder-scheduler.service --now
4.2 存儲節點部署cinder
這里我們就用compute01計算節點安裝,你也可以單獨使用一個節點安裝該服務:
參考:OpenStack Docs: Install and configure a storage node
以nvme0n2這塊盤為例:

1.軟件安裝
這個軟件一般是自帶的:
yum -y install lvm2 device-mapper-persistent-data
systemctl enable lvm2-lvmetad.service --now
2.準備存儲設備,以下僅為示例:
注意我這里設備名字就叫nvme0n2,大部分情況下可能為/dev/sdb
pvcreate /dev/nvme0n2
vgcreate cinder-volumes /dev/nvme0n2
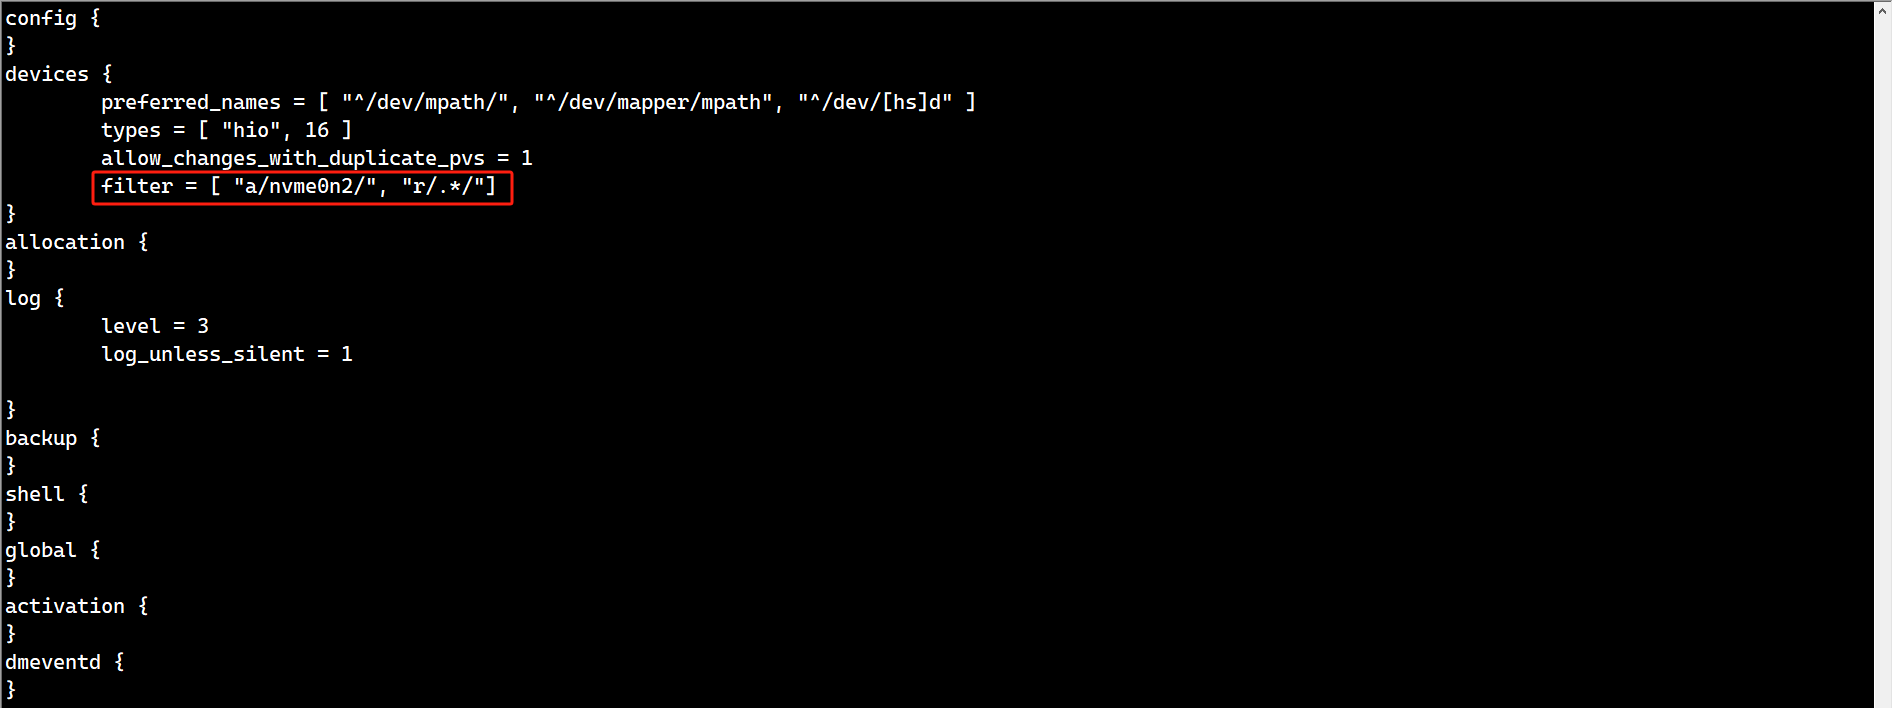
3.配置,配置/dev/nvme0n2提供給云主機,其他盤不能使用:
cp /etc/lvm/lvm.conf{,.bak}
grep -Ev '^$|#' /etc/lvm/lvm.conf.bak > /etc/lvm/lvm.conf
vi /etc/lvm/lvm.conf


filter = [ "a/sdb/", "r/.*/"]
4.安裝這些軟件
yum -y install openstack-cinder targetcli python-keystone
配置cinder相關配置:
cp /etc/cinder/cinder.conf{,.bak}
grep -Ev '^$|#' /etc/cinder/cinder.conf.bak > /etc/cinder/cinder.conf
vi /etc/cinder/cinder.conf
完整配置:
[root@compute01 ~]# cat /etc/cinder/cinder.conf
[DEFAULT]
transport_url = rabbit://openstack:guojie.com@controller
auth_strategy = keystone
my_ip = 172.173.10.111
enabled_backends = lvm
glance_api_servers = http://controller:9292
[barbican]
[cors]
[database]
mysql+pymysql://cinder:guojie.com@controller/cinder
[healthcheck]
[key_manager]
[keystone_authtoken]
www_authenticate_uri = http://controller:5000
auth_url = http://controller:5000
memcached_servers = controller:11211
auth_type = password
project_domain_name = default
user_domain_name = default
project_name = service
username = cinder
password = guojie.com
[oslo_concurrency]
lock_path = /var/lib/cinder/tmp
[oslo_messaging_amqp]
[oslo_messaging_kafka]
[oslo_messaging_notifications]
[oslo_messaging_rabbit]
[oslo_middleware]
[oslo_policy]
[oslo_reports]
[oslo_versionedobjects]
[privsep]
[profiler]
[sample_castellan_source]
[sample_remote_file_source]
[ssl]
[vault]
[lvm]
volume_driver = cinder.volume.drivers.lvm.LVMVolumeDriver
volume_group = cinder-volumes
target_protocol = iscsi
target_helper = lioadm
5.啟動服務
systemctl enable openstack-cinder-volume.service target.service iscsid.service --now
驗證:
openstack volume service list

新建卷之后連接到虛擬機上:


格式化掛載都正常。

 浙公網安備 33010602011771號