

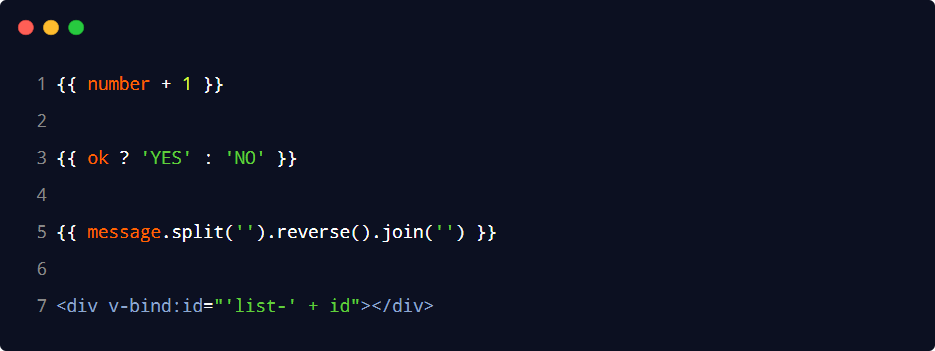
二、Vue常用操作
Vue常用操作
一、Vue指令
內(nèi)容渲染指令
<!DOCTYPE html>
<html>
	<head>
		<meta charset="utf-8" />
		<title></title>
		<!--引入vue.js-->
		<script src="lib/vue-2.6.12.js"></script>

		<style>
			[v-clock] {
				display: none;
			}
		</style>
	</head>
	<body>
		<div id="app">
			<!-- v-tetx相當于innerText,把username 對應的值渲染到第一個p標簽中 -->
			<p v-text="username">姓名</p>

			<!-- {{}}插值運算把gender對應的值渲染第二個p標簽中-->
			<p>性別:{{gender}}</p>

			<!-- v-html相當于innerHTML,把包含HTML標簽的字符串渲染到頁面上-->
			<p v-html="hobby">愛好</p>

			<hr />
			<!-- v-once元素和組件只會被渲染一次 -->
			<p v-once>原始值:{{msg}}</p>
			<p>后面值:{{msg}}</p>
			<input type="text" v-model="msg" />

			<!-- v-pre跳過元素和子元素的編譯過程,原始展示 -->
			<p v-pre>{{msg}}}</p>

			<!-- 解決因為網(wǎng)絡延遲導致的插值運算值還沒有及時渲染時情況 -->
			<p v-clock>{{msg}}</p>
		</div>

		<script>
			const vm = new Vue({
				el:'#app',
				data:{
					username:'張三',
					gender:'男',
					hobby:'<font color="red">王者榮耀</font>',
					msg:'這是一條測試消息'
				}
			});
		</script>
	</body>
</html>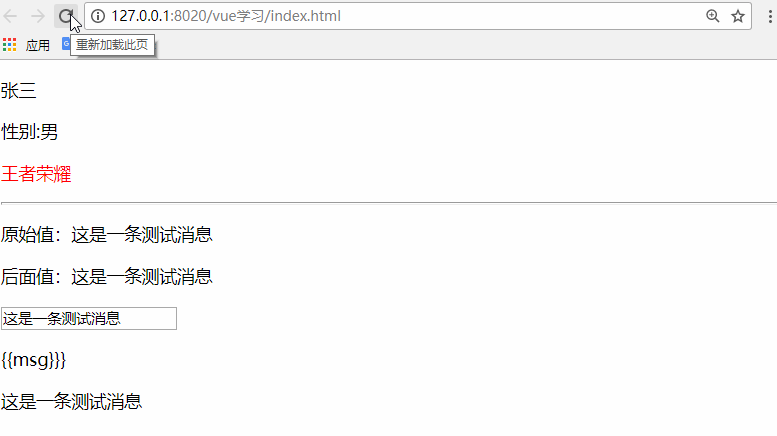
屬性綁定指令
v-bind動態(tài)地綁定一個或多個特性。給一個標簽動態(tài)綁定一個屬性、樣式、一些類,或者將一個對象綁定到一個標簽上。鑒于v-bind使用較多,官方推薦使用簡寫 :屬性。
<!DOCTYPE html>
<html>
	<head>
		<meta charset="utf-8" />
		<title></title>
		<!--引入vue.js-->
		<script src="lib/vue-2.6.12.js"></script>
		<style>
			.active {
				background-color: orange;
			}
			.fontActive {
				font-size: 20px;
			}
		</style>
	</head>
	<body>
		<div id="app">
			<!-- 綁定一個屬性 ,v-bind可以簡寫-->
			<img v-bind:src="imgSrc" height="100" width="100" />
			<img :src="imgSrc" height="100" width="100"/>
			<!-- 綁定一個樣式 -->
			<p :style='{color:fontColor}'>我愛Vue</p>
			<!-- 綁定一個類 -->
			<p v-for="(course,index) in courses" :class='index==acticeIndex?"active":""'>
				{{course}}
			</p>
			<p :class=['active',{'fontActive':bool}]>多個樣式</p>
			<!-- 綁定一個有屬性的對象-->
			<p v-bind="{id:1,name:'mytext'}">綁定有屬性的對象</p>
		</div>

		<script>
			const vm = new Vue({
				el:'#app',
				data:{
					//綁定屬性
					imgSrc:'img/1.jpeg',
					//綁定樣式
					fontColor:'red',
					bool:true,
					//綁定class
					courses:['html','css','javascript'],
					acticeIndex:2
				}
			});
		</script>
	</body>
</html>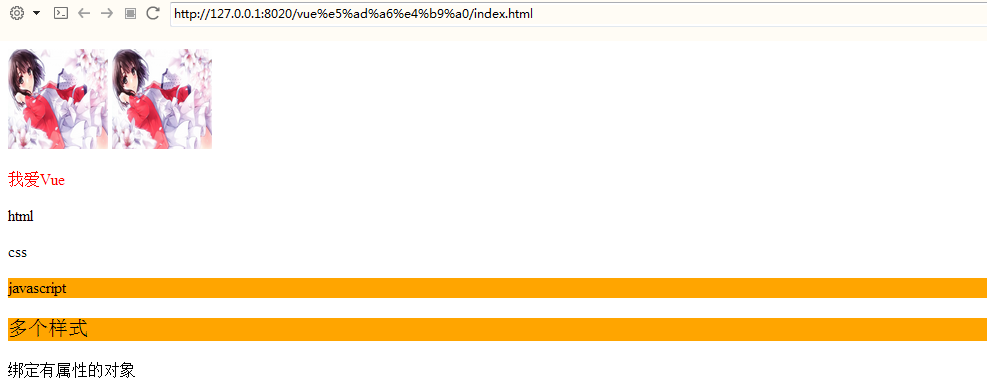
- 事件綁定指令
<!DOCTYPE html>
<html>
	<head>
		<meta charset="utf-8" />
		<title></title>
		<!--引入vue.js-->
		<script src="lib/vue-2.6.12.js"></script>
		<style>
			.active {
				background-color: orange;
			}
			.fontActive {
				font-size: 20px;
			}
		</style>
	</head>
	<body>
		<div id="app">
 			<h3>count的值為: {{count}}</h3>

 			<!-- "v-on:事件"完整寫法 -->
 			<button v-on:click="addCount">+1</button>

 			<!-- "v-on:事件"簡寫形式,把v-on:簡寫為 @符號 -->
 			<!-- 如果事件處理函數(shù)中的代碼足夠簡單,只有一行代碼,則可以簡寫到行內(nèi) -->
 			<button @click="count+=1">+1</button>
		</div>

		<script>
			const vm = new Vue({
				el:'#app',
				data:{
					count:0
				},
				methods:{
					addCount(){
						this.count+=1;
					}
				}
			});
		</script>
	</body>
</html>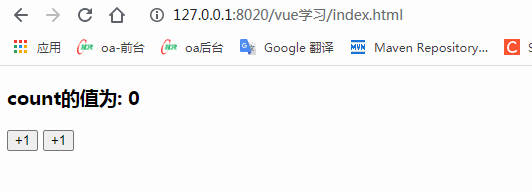
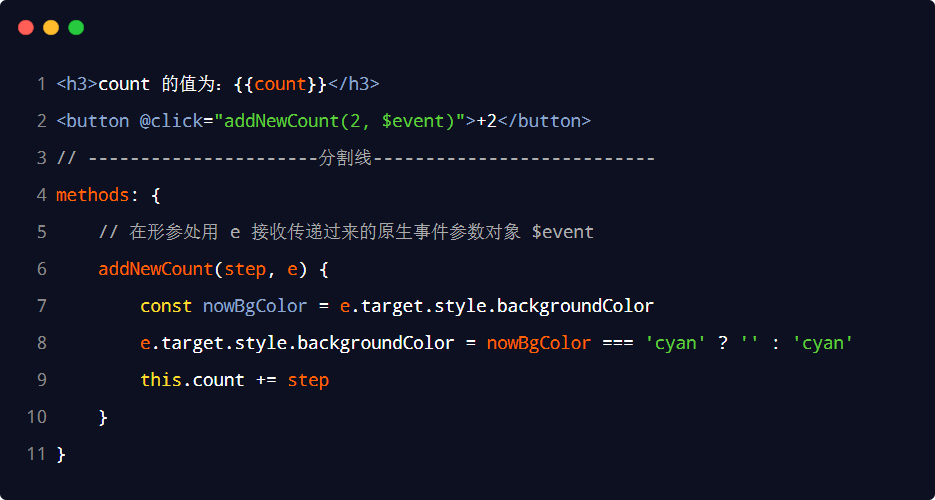
1.綁定事件并傳參
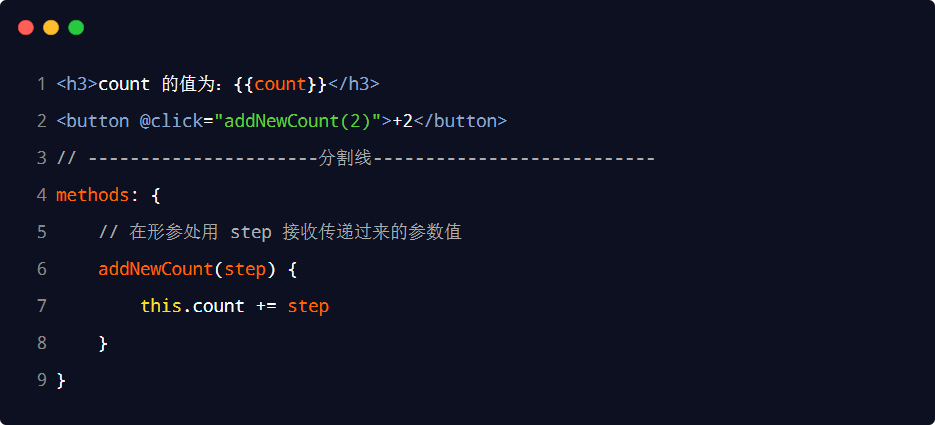
2.$event
![]() $event使用
$event使用
3.事件修飾符
| 事件修飾符 | 說明 |
| .prevent | 阻止默認行為(例如:阻止a鏈接的跳轉(zhuǎn)、阻止表單的提交等) |
| .stop | 阻止事件冒泡 |
| .capture | 以捕獲模式觸發(fā)當前的事件處理函數(shù) |
| .once | 綁定的事件只能觸發(fā)一次 |
| .self | 只有在event.target 是當前元素自身時觸發(fā)事件處理函數(shù) |

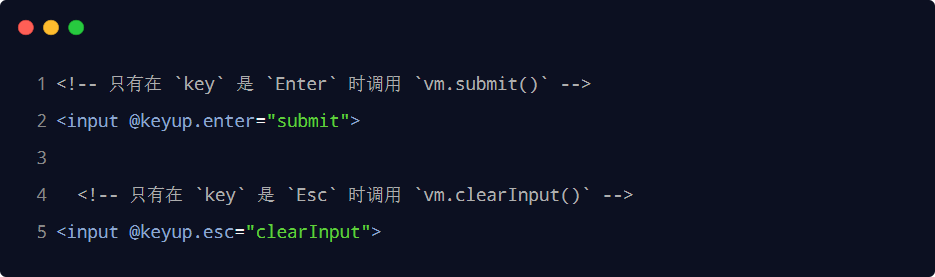
4.按鍵修飾符
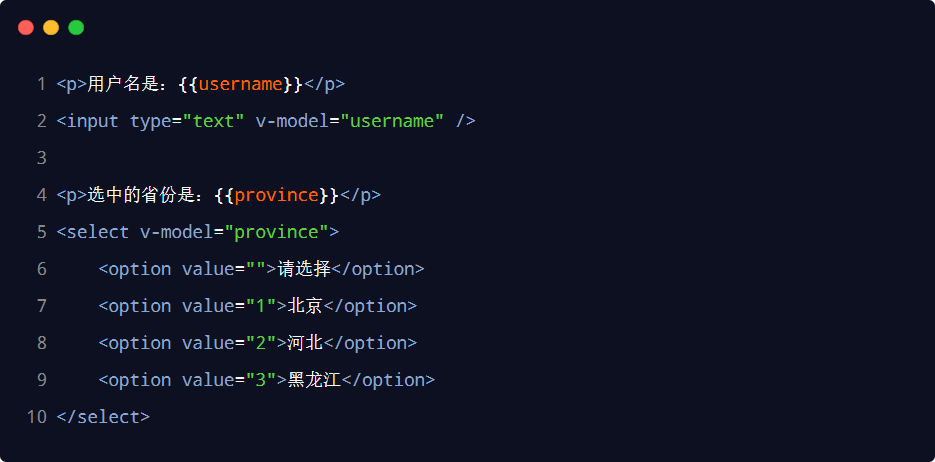
雙向綁定指令
| 事件修飾符 | 說明 | 示例 |
| .number | 自動將用戶的輸入值轉(zhuǎn)為數(shù)值類型 | <input v-model.number="age" /> |
| .trim | 自動過濾用戶輸入的首尾空白字符 | <input v-model.trim="msg" /> |
| .lazy | 在“change”時而非“input”時更新 | <input v-model.lazy="msg" /> |
條件渲染指令
<!DOCTYPE html>
<html>
	<head>
		<meta charset="utf-8" />
		<title></title>
		<!--引入vue.js-->
		<script src="lib/vue-2.6.12.js"></script>
	</head>
	<body>
		<div id="app">
			<div v-show="score<60">差</div>
			<div v-show="score>=60&&score<90">良</div>
			<div v-show="score>=90">優(yōu)秀</div>

			<!-- v-if、v-else-if、v-else相當于if、else if、else,只會展示符合條件的元素,其他元素均移除 -->
			<div v-if="score<60">差</div>
			<div v-else-if="score>=60&&score<90">良</div>
			<div v-else>優(yōu)秀</div>
		</div>

		<script>
			const vm = new Vue({
				el:'#app',
				data:{
					score:80
				}
			});
		</script>
	</body>
</html>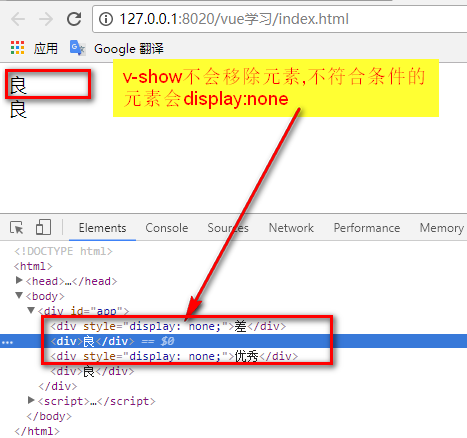
? v-if 指令會動態(tài)地創(chuàng)建或移除 DOM 元素,從而控制元素在頁面上的顯示與隱藏;? v-show 指令會動態(tài)為元素添加或移除 style="display: none;" 樣式,從而控制元素的顯示與隱藏;
v-if 有更高的切換開銷,而 v-show 有更高的初始渲染開銷。因此:? 如果需要非常頻繁地切換,則使用 v-show 較好? 如果在運行時條件很少改變,則使用 v-if 較好
列表渲染指令
<!DOCTYPE html>
<html>
	<head>
		<meta charset="utf-8" />
		<title></title>
		<!--引入vue.js-->
		<script src="lib/vue-2.6.12.js"></script>
	</head>
	<body>
		<div id="app">
			<!--遍歷數(shù)組-->
			<p v-for="(score,index) in scores">{{index +':'+score}}</p>

			<!-- 遍歷對象數(shù)組 -->
				<table border="1" align="center" width="300">
					<thead style="background-color: orange;">
						<tr align="center">
							<td>姓名</td>
							<td>年齡</td>
							<td>性別</td>
						</tr>
					</thead>
					<tbody>
						<tr v-for="p in persons" align="center">
							<td>{{p.name}}</td>
							<td>{{p.age}}</td>
							<td>{{p.sex}}</td>
						</tr>
					</tbody>
			</table>
			<!-- 對字符串進行遍歷 -->
			<p v-for ="str in hobby">
				{{str}}
			</p>
		</div>

		<script>
			const vm = new Vue({
				el: '#app',
				data: {
					scores: [100, 90, 80, 70],
					persons: [
						{ name: '張三', age: 23, sex: '男' },
						{ name: '李四', age: 24, sex: '女' },
						{ name: '王五', age: 25, sex: '男' },
						{ name: '趙六', age: 26, sex: '女' },
					],
					hobby:'籃球'
				}
			});
		</script>
	</body>
</html>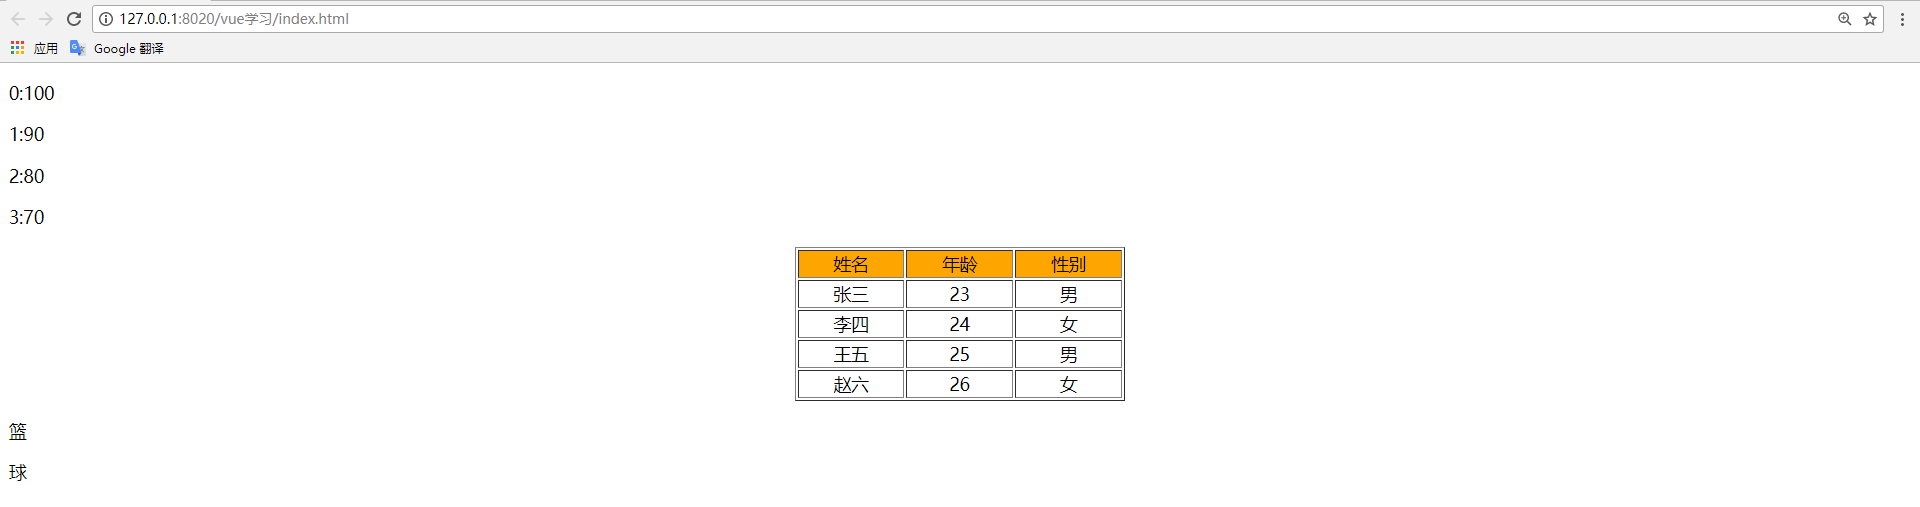

二、過濾器
<!DOCTYPE html>
<html>
	<head>
		<meta charset="utf-8" />
		<title></title>
		<!--引入vue.js-->
		<script src="lib/vue-2.6.12.js"></script>
	</head>
	<body>
		<div id="app">
			<!-- 私有過濾器使用 -->
			<p>{{sex | sexFormatter}}</p>

			<!-- 全局過濾器使用 -->
			<p>{{str | capitalize}}</p>

			<!-- 連續(xù)調(diào)用多個過濾器 -->
			<p>{{message | filterA | filterB}}</p>

			<!-- 過濾器傳參 -->
			<p>{{message | maxLength(5)}}</p>
		</div>
		<script>
			//全局過濾器 -獨立于每個vm實例之外,必須定義在vm實例之前
			//Vue.filter()方法接受兩個參數(shù):
			//第一個參數(shù),是全局過濾器的"名字"
			//第二個參數(shù),是全局過濾器的"處理函數(shù)"
			Vue.filter('capitalize',function(value){
				return value.toUpperCase().split('').reverse().join('');
			});

			//全局過濾器 - 控制文本的最大長度
			Vue.filter('maxLength',function(str,len = 4){
				if(str.length<=len) return str;
				return str.slice(0,len)+'...';
			});

			const vm = new Vue({
				el:'#app',
				data:{
					sex:0,
					str: 'abc',
					message:'chensheng'
				},
				filters:{	//局部過濾器
					sexFormatter(sex){
						if(sex==0){
							return "男";
						}else{
							return "女";
						}
					},
					filterA(value){	//將首字母大寫
						return value.charAt(0).toUpperCase()+value.slice(1);
					},
					filterB(value){	//將字符串反轉(zhuǎn)
						return value.split('').reverse().join('');
					}
				}
			});
		</script>
	</body>
</html>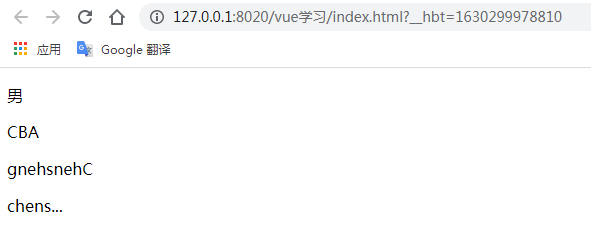
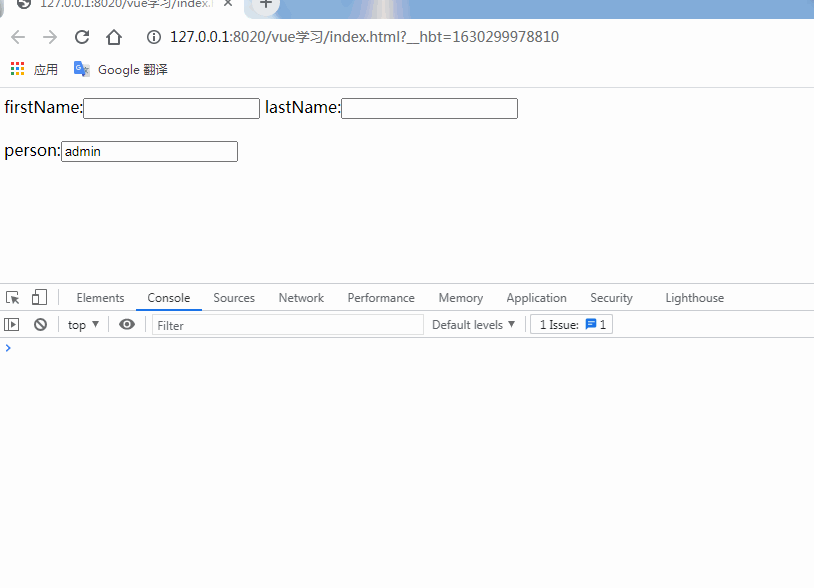
三、監(jiān)聽器
<!DOCTYPE html>
<html>
	<head>
		<meta charset="utf-8" />
		<title></title>
		<!--引入vue.js-->
		<script src="lib/vue-2.6.12.js"></script>
	</head>
	<body>
		<div id="app">
			firstName:<input type="text" v-model="firstName" />
			lastName:<input type="text" v-model="lastName" />
			<h2>{{fullName}}</h2>
			person:<input type="text" v-model="person.username" />
		</div>

		<script>
			const vm = new Vue({
				el:'#app',
				data:{
					firstName:'',
					lastName:'',
					fullName:'',
					person:{username:'admin'}
				},
				watch:{
					firstName(newVal,oldVal){
						//在vue中,操作data、method必須使用this
						this.fullName = this.firstName + this.lastName;
					},
					lastName(newVal,oldVal){
						this.fullName = this.firstName + this.lastName;
					},
					person:{             //監(jiān)聽對象內(nèi)屬性變化,handler是固定寫法,當username值變化時,自動調(diào)用handler處理函數(shù)
						handler(newVal){
							console.info('如果監(jiān)聽對象內(nèi)屬性變化,則使用這種方式'+newVal.username);
						},
					    deep: true,		 //如果watch偵聽的是一個對象,如果對象中的屬性值發(fā)生了變化,則無法被監(jiān)聽到,需要使用deep選項才能偵聽
						immediate:true   //表示頁面初次渲染好之后,就立即觸發(fā)當前的watch偵聽器
					},
					'person.username':{
						handler(newVal){
							console.info('如果只想監(jiān)聽對象單個屬性變化,則使用這種方式'+newVal)
						}
					}
				}
			});
		</script>
	</body>
</html>![]() watch監(jiān)聽器使用
watch監(jiān)聽器使用
四、計算屬性
<!DOCTYPE html>
<html>
	<head>
		<meta charset="utf-8" />
		<title></title>
		<!--引入vue.js-->
		<script src="lib/vue-2.6.12.js"></script>
	</head>
	<body>
		<div id="app">
			<p @click='show()'>計算屬性: {{reverseMsg}}</p>
		</div>

		<script>
			const vm = new Vue({
				el:'#app',
				data:{
				   msg: 'hello world'
				},
				computed: {
					//計算屬性的getter
					reverseMsg: function() {
						//this指向vm實例
						return this.msg.split('').reverse().join('');
					}
				},
				methods:{
					show(){
						console.info(this.reverseMsg);  //在methods中調(diào)用屬性
					}
				}
			});
		</script>
	</body>
</html>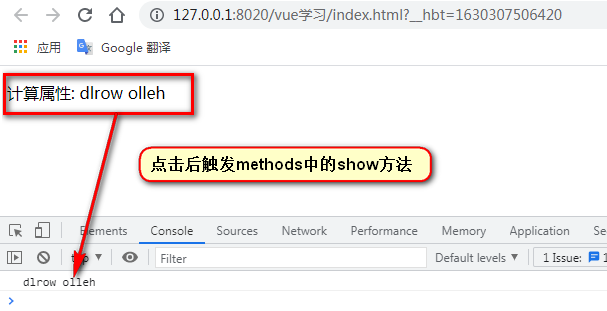
計算屬性和method區(qū)別?
- 當頁面重新渲染(不是刷新)的時候,計算屬性不會變化,直接讀取緩存使用,適合較大量的計算和改變頻率較低的屬性;而method就是當頁面重新渲染的時候(頁面元素的data變化,頁面就會重新渲染),都會重新調(diào)用method。
- 計算屬性是一個屬性,而不是方法。雖然寫法是方法,但是我們使用的時候是直接視為一個屬性去操作的,使用方式和data一致。
- 計算屬性中使用到的data中的數(shù)據(jù)只要發(fā)生了變化,計算屬性就會重新計算。如果兩次獲取計算屬性的時候,里面使用到的屬性沒有發(fā)生變化,計算屬性會直接使用之前緩存的值。
注意點:
- 計算屬性。在computed中,可以定義一些屬性,這些屬性叫做計算屬性,他本質(zhì)上就是一個方法,但是,我們使用的時候是當做屬性來使用。計算屬性使用的過程中,一定不要加(),它就是一個屬性,和data里的屬性用法一樣。
- 只要極速暗屬性中所用到的data中的屬性發(fā)生了變化,就會立即去重新計算屬性的值。
- 計算屬性的結果會被緩存起來,方便下次調(diào)用,如果計算屬性中用到的data都沒有變化,就不會重新求值。
- 在計算屬性中,無論如何都需要return一個值,用來代表這個屬性的值。
計算屬性和監(jiān)聽器的區(qū)別:
- Computed用法視為一個屬性,并且結果會被緩存。
- Methods表示方法,表示一個具體的操作,主要用來寫業(yè)務邏輯
- Watch是一個對象,key是需要監(jiān)聽的表達式,value是對應的回調(diào)函數(shù),主要用來監(jiān)聽某些數(shù)據(jù)的變化,從而執(zhí)行某些具體的業(yè)務邏輯。可以看做是計算屬性和methods的結合體。
五、全局組件
組件是可復用的Vue實例,且?guī)б粋€名字,可以復用。我們搭建的頁面其實是一個個組件組裝而成,可以分為局部組件和全局組件。
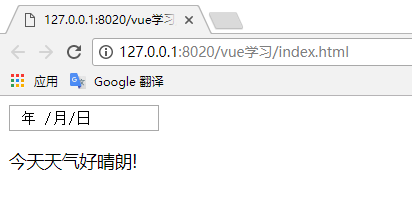
- 局部組件:只屬于當前Vue的實例,其他實例無法共享這個局部組件。
<!DOCTYPE html>
<html>
	<head>
		<meta charset="utf-8" />
		<title></title>
		<!--引入vue.js-->
		<script src="lib/vue-2.6.12.js"></script>
	</head>
	<body>
		<div id="app">
			<my-date></my-date>
		</div>

		<script>
			//1、創(chuàng)建組件構造器
			let partialTemplate = Vue.extend({
				template:`
							<div>
								<input type='date'/>
								<p>今天天氣好晴朗!</p>
							</div>
						`
			});
			const vm = new Vue({
				el: '#app',
				// 注冊局部組件,只屬于當前的vue實例
				components:{
					'my-date':partialTemplate
				}
			});
		</script>
	</body>
</html>

局部組件簡潔寫法:
			const vm = new Vue({
				el: '#app',
				// 注冊局部組件,只屬于當前的vue實例
				components:{
					'my-date':{
						template:`
							<div>
								<input type='date'/>
								<p>今天天氣好晴朗!</p>
							</div>
							`
					}
				}
			});
測試結果:
- 全局組件:屬于所有的Vue實例所有。
<!DOCTYPE html>
<html>
	<head>
		<meta charset="utf-8" />
		<title></title>
		<!--引入vue.js-->
		<script src="lib/vue-2.6.12.js"></script>
	</head>
	<body>
		<div id="app">
			<my-date></my-date>
		</div>

		<script>
			//1. 創(chuàng)建組件構造器
			let ProFile = Vue.extend({
				//1.1 模板選項
				template:`
					<div>
						<input type="date"/>
						<p>今天天氣好晴朗!</p>
					</div>
				`
			});

			//2. 注冊全局組件,參數(shù)1自定義組件名稱,參數(shù)2組件
			Vue.component('my-date',ProFile);

			const vm = new Vue({
				el: '#app'
			});
		</script>
	</body>
</html>六、父子組件
<!DOCTYPE html>
<html>
	<head>
		<meta charset="utf-8" />
		<title></title>
		<!--引入vue.js-->
		<script src="lib/vue-2.6.12.js"></script>
	</head>
	<body>
		<div id="app">
			<parent></parent>
		</div>
		<script>
			// 1. 子組件構造器
			let Child1 = Vue.extend({
				template: `<img src="img/estar.ico" width="200">`
			});

			let Child2 = Vue.extend({
				template: `<p>孤獨的星星!</p>`
			});

			// 2. 父組件構造器
			Vue.component('parent', {
				components: { 			  //注冊子組件
					'my-child1': Child1,
					'my-child2': Child2
				},
				template: `               //組裝父組件
                  <div>
                      <my-child1></my-child1>
                      <my-child2></my-child2>
                  </div>
                `
			});

			new Vue({
				el: '#app'
			});
		</script>
	</body>
</html>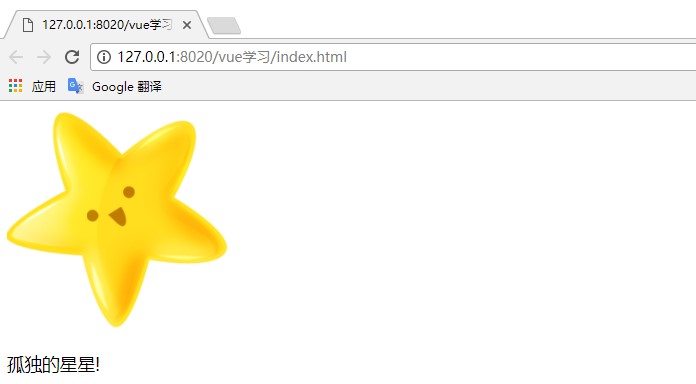
- template標簽和script標簽注冊組件
	一、使用template來注冊組件【常用】
                <body>
                    <div id="app">
                        <!-- 使用父組件 -->
                        <my-div></my-div>
                    </div>
                    <template id="parent">
                        <!-- 只能有一個出口,最外層必須有標簽包裹 -->
                        <div>
                            <img src="img/estar.ico" width="200">
                            <p>孤獨的星星!</p>
                        </div>
                    </template>
                    <script>
                        //實例化組件
                        Vue.component('my-div', {
                            template: '#parent'
                        });

                        new Vue({
                            el: '#app'
                        });
                    </script>
                </body>
 	二、使用script來注冊組件,必須聲明類型type=”text/template” 【不推薦使用】
                <body>
                    <div id="app">
                        <!-- 使用父組件 -->
                        <my-div></my-div>
                    </div>
                    <script type="text/template" id="parent">
                        <!-- 只能有一個出口,最外層必須有標簽包裹 -->
                        <div>
                            <img src="img/estar.ico" width="200">
                            <p>孤獨的星星!</p>
                        </div>
                    </script>
                    <script>
                        //實例化組件
                        Vue.component('my-div', {
                            template: '#parent'
                        });

                        new Vue({
                            el: '#app'
                        });
                    </script>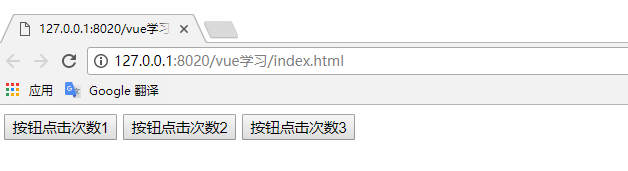
</body>- 組件中data使用
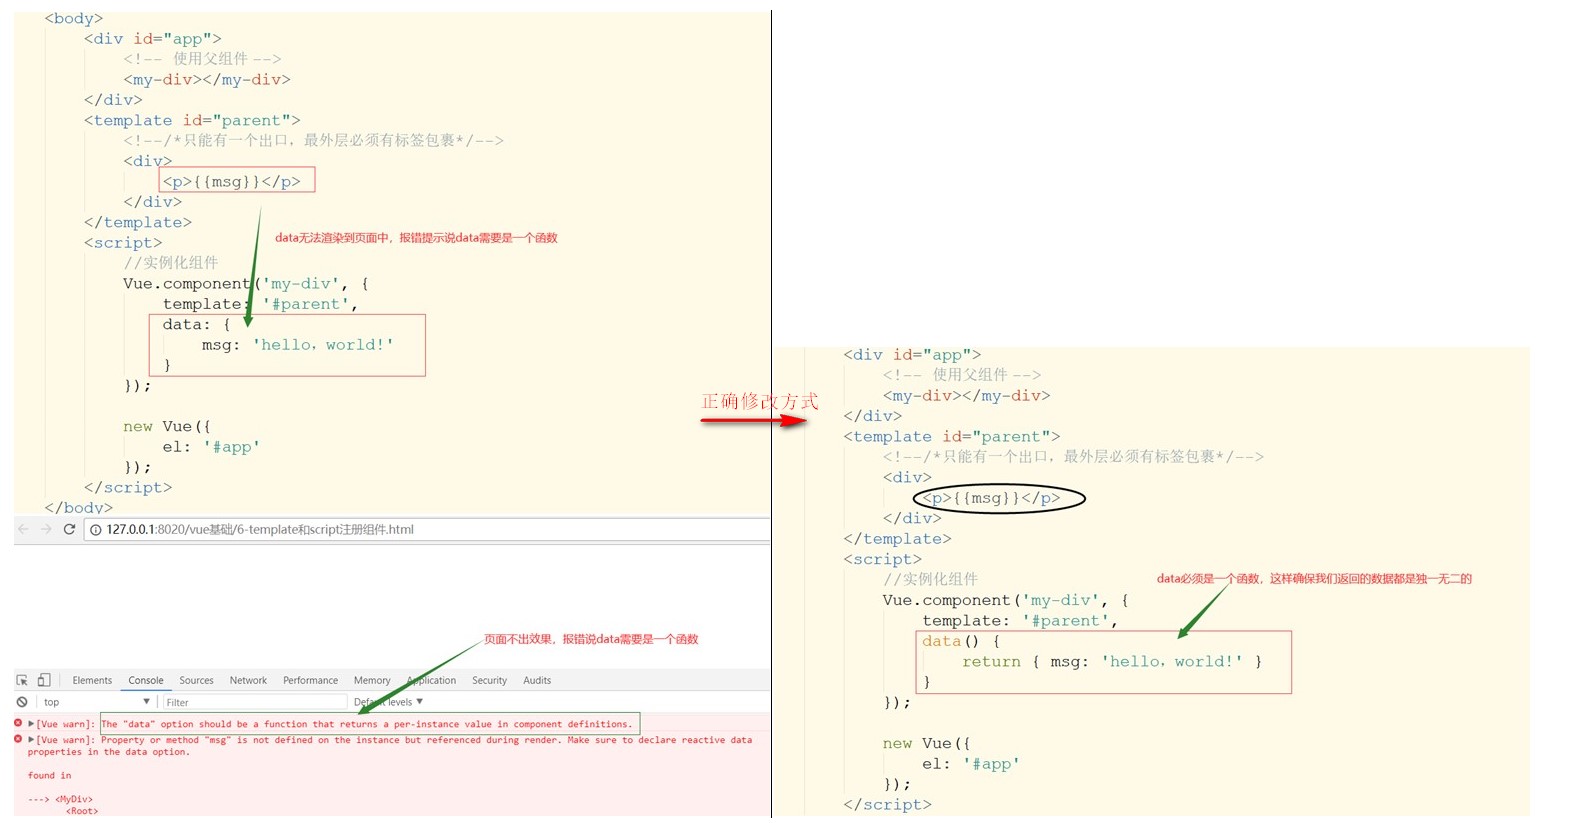
u 我們將data定義成函數(shù),這樣每個按鈕點擊后都會產(chǎn)生自己獨享的變量,而不是共享的變量。
<!DOCTYPE html>
<html>
	<head>
		<meta charset="utf-8" />
		<title></title>
		<!--引入vue.js-->
		<script src="lib/vue-2.6.12.js"></script>
	</head>

	<body>
		<div id="app">
			<!-- 使用組件 -->
			<my-btn></my-btn>
			<my-btn></my-btn>
			<my-btn></my-btn>
		</div>
		<template id="btn_group">
			<button @click="counter++">按鈕點擊次數(shù){{counter}}</button>
		</template>
		<script>
			//實例化組件
			Vue.component('my-btn', {
				template: '#btn_group',
				data() {
					return { counter: 0 }
				}
			});

			new Vue({
				el: '#app'

			});
		</script>
	</body>
</html>測試結果:(描述,我們點擊不同的按鈕統(tǒng)計的counter都是自己的)
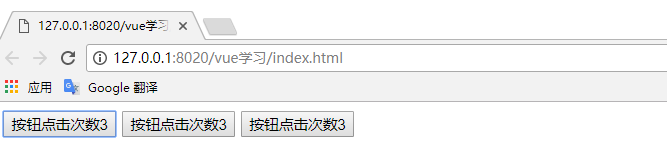
u 如果我們將counter定義到外面來
<!DOCTYPE html>
<html>

	<head>
		<meta charset="utf-8" />
		<title></title>
		<!--引入vue.js-->
		<script src="lib/vue-2.6.12.js"></script>
	</head>

	<body>
		<div id="app">
			<!-- 使用組件 -->
			<my-btn></my-btn>
			<my-btn></my-btn>
			<my-btn></my-btn>
		</div>
		<template id="btn_group">
			<button @click="counter++">按鈕點擊次數(shù){{counter}}</button>
		</template>

		<script>
			//組件將共享一個countDate
			let countDate = { counter: 0 };
			Vue.component('my-btn', {
				template: '#btn_group',
				data() {
					return countDate;
				}
			});

			new Vue({
				el: '#app'
			});
		</script>
	</body>
 </html>
測試結果:(描述:我們點擊其中一個按鈕其他按鈕點擊次數(shù)也會隨之改變,共享一個counter值)
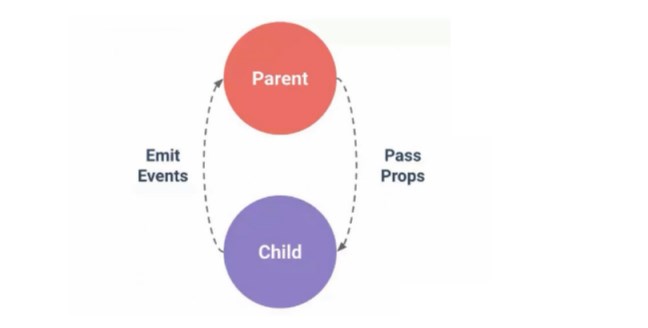
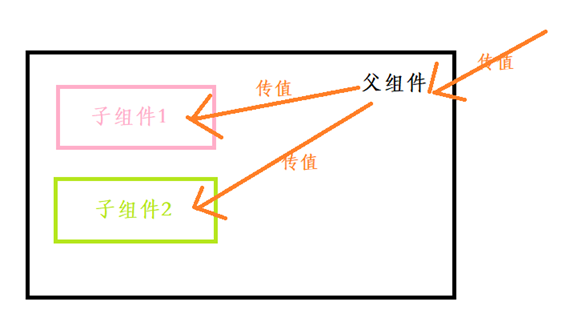
七、組件通信
父子組件之間的通信,父組件通過 prop 給子組件下發(fā)數(shù)據(jù),子組件通過$emit觸發(fā)事件給父組件發(fā)送消息,即
prop 向下傳遞,事件向上傳遞。
父組件向子組件傳值(簡單的單層組件之間的值傳遞)
   <body>
            <div id="app">
                <my-div :msg='孤獨的星星' imgsrc='img/estar.ico'></my-div>
            </div>
            <template id="my_div">
                <div>
                    <h1>{{msg}}</h1>
                    <img :src="imgsrc" width="100" height="100" />
                </div>
            </template>

            <script>
                //實例化組件
                Vue.component('my-div', {
                    template: '#my_div',
                    props:['msg','imgsrc'] //父組件通過props向子組件傳遞值
                });

                new Vue({
                    el: '#app'
                });
            </script>
        </body>

   或者使用綁定的方式將父組件的值傳遞給子組件:
    <body>
            <div id="app">
            	<!-- 使用綁定的方式,將父組件的數(shù)據(jù)綁定給子組件 -->
                <my-div :msg='msg' :imgsrc='imgsrc'></my-div>
            </div>

            <template id="my_div">
                <div>
                    <h1>{{msg}}</h1>
                    <img :src="imgsrc" width="100" height="100" />
                </div>
            </template>

            <script>
                //實例化組件
               const myCom =  Vue.component('my-div', {
				                    template: '#my_div',
				                    props:['msg','imgsrc'] //父組件通過props向子組件傳遞值,或者寫法如下
                                   //props: {
                                   //  msg: {
                                   //   type: String,   //type支持的類型有: String、Number、Boolean、Array、Object、Date、Function、Symbol
                                   //   default: '我是默認值,父組件沒有傳給我msg'
                                   // }
                                   // }
				                });

                new Vue({
                    el: '#app',
                    data:{
                    	msg:'孤獨的星星',
                    	imgsrc:'img/estar.ico'
                    },
                    components:{
                    	myCom
                    }
                });
            </script>
        </body>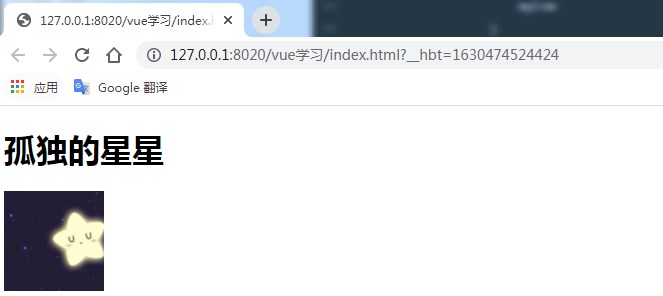
父組件向子組件傳值(多層組件之間的值傳遞)
<!DOCTYPE html>
<html>
	<head>
		<meta charset="utf-8" />
		<title></title>
		<!--引入vue.js-->
		<script src="lib/vue-2.6.12.js"></script>
	</head>

	<body>
		<div id="app">
			<!-- 使用父組件 -->
			<my-parent :imgtitle="title" :imgsrc="img"></my-parent>
		</div>
		<!-- 定義子組件 -->
		<template id="my_img">
			<img :src="imgsrc" width="200" />
		</template>
		<template id="my_title">
			<h2>{{title}}</h2>
		</template>
		<!-- 定義父組件 -->
		<template id="my_parent">
			<div>
				<child1 :imgsrc="imgsrc"></child1>
				<child2 :title="imgtitle"></child2>
			</div>
		</template>

		<script>
			//1.子組件的實例
			let child1 = Vue.extend({
				template: '#my_img',
				props: ['imgsrc']
			});
			let child2 = Vue.extend({
				template: '#my_title',
				props: ['title']
			});
			//2.注冊父組件
			Vue.component('my-parent', {
				props: ['imgtitle', 'imgsrc'],
				components: {
					'child1': child1,
					'child2': child2
				},
				template: '#my_parent'
			});

			new Vue({
				el: '#app',
				data: {
					title: '孤獨的星星',
					img: 'img/estar.ico'
				}
			});
		</script>
	</body>
 </html>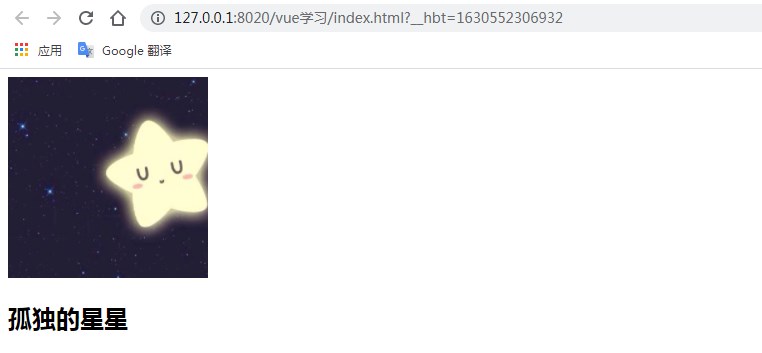
父組件向子組件傳遞事件
我們知道父組件是使用props傳遞數(shù)據(jù)給子組件,但如果子組件要把數(shù)據(jù)傳遞回去,則應該使用自定義事件來完成!
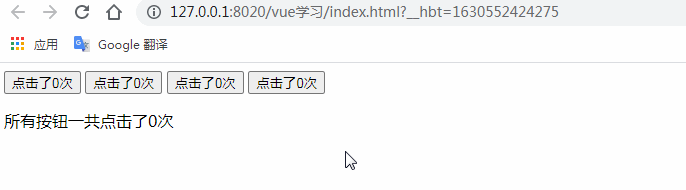
描述: 我們在父組件中自定義一個total事件,當我們觸發(fā)這個total()事件的時候通過$emit('total')來觸發(fā)外界定義的@total="allcounter()"中
      的具體的方法allcounter()。注意在此案例中按鈕與按鈕之間是相互獨立的,互不影響。
<!DOCTYPE html>
<html>
	<head>
		<meta charset="utf-8" />
		<title></title>
		<!--引入vue.js-->
		<script src="lib/vue-2.6.12.js"></script>
	</head>

	<body>
		<div id="app">
			<!—自定義事件-->
			<my-btn @total="allcounter()"></my-btn>
			<my-btn @total="allcounter()"></my-btn>
			<my-btn @total="allcounter()"></my-btn>
			<my-btn @total="allcounter()"></my-btn>
			<p>所有按鈕一共點擊了{{totalCounter}}次</p>
		</div>
		<template id="my_btn">
			<button @click="total()">點擊了{{counter}}次</button>
		</template>
		<script>
			Vue.component('my-btn', {
				template: '#my_btn',
				data() {
					return {
						counter: 0
					}
				},
				methods: {
					total() {
						this.counter += 1; //不同的按鈕享有不同的counter
						// 通知外界,我調(diào)用了這個方法
						this.$emit('total');
					}
				}
			});

			new Vue({
				el: '#app',
				data: {
					totalCounter: 0 //公共的數(shù)據(jù)
				},
				methods: {
					allcounter() {
						this.totalCounter += 1;
					}
				}
			});
		</script>
	</body>
</html>測試結果:(描述我們低級不同的按鈕分別統(tǒng)計不同的按鈕點擊次數(shù),互不影響)
父組件調(diào)用子組件方法
$refs是和ref一起使用的。通過ref給某個子組件綁定一個特定的ID,然后我們使用$refs.ID就可以訪問到子組件了。
<!DOCTYPE html>
<html>

	<head>
		<meta charset="utf-8" />
		<title></title>
		<!--引入vue.js-->
		<script src="lib/vue-2.6.12.js"></script>

	</head>

	<body>
		<div id="app">
			<button @click="countAdd">點我</button>
			<!-- 第一步,給子組件綁定一個ref -->
			<my-com ref="myComp"></my-com>
		</div>

		<template id="myTemp">
			<div>
				{{count}}
			</div>
		</template>
		<script>
			let myCom = Vue.extend({
				template: '#myTemp',
				data() {
					return {
						count: 1
					}
				},
				methods: {
					addCount() {
						this.count++
					}
				}
			})
			let app = new Vue({
				el: '#app',
				methods: {
					countAdd() {
						// 第二步,在父組件中使用this.$refs.id就行了
						console.log(this.$refs.myComp.count)
						this.$refs.myComp.addCount()
					}
				},
				components: {
					myCom
				}
			})
		</script>
	</body>
</html>
八、插槽
Slot插槽實現(xiàn)內(nèi)容分發(fā),結合日常生活中的電路板,有指定插孔,我們可以插入任何電器插頭(匿名插槽),也有專門針對手機的USB插頭(實名插槽),無法插入其他電器插頭。
- 匿名插槽
	<body>
		<div id="app">
			<my-slot>
				<img src="img/estar.ico" width="200" alt="">
				<p>{{msg}}</p>
			</my-slot>
		</div>
		<template id="my_slot">
			<div>
				<header>插槽的頭部</header>
				<!--預留一個插槽,沒有則顯示該插槽內(nèi)容-->
				<slot>可以替換任何標簽,默認顯示提示的內(nèi)容</slot>
				<footer>插槽的尾部</footer>
			</div>
		</template>
		<script>
			Vue.component('my-slot', {
				template: '#my_slot'
			});

			new Vue({
				el: '#app',
				data: {
					msg: '孤獨的星星'
				}
			});
		</script>
</body>測試結果:![]() 匿名插槽
匿名插槽

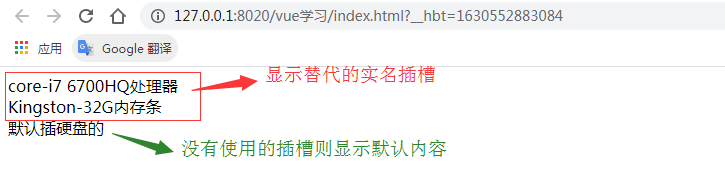
- 實名插槽
<body>
		<div id="app">
			<my-computer>
				<div slot="cpu">core-i7 6700HQ處理器</div>
				<div slot="memory">Kingston-32G內(nèi)存條</div>
			</my-computer>
		</div>

		<template id="my_computer">
			<div>
				<slot name="cpu">默認插cpu的</slot>
				<slot name="memory">默認插內(nèi)存條的</slot>
				<slot name="hard-drive">默認插硬盤的</slot>
			</div>
		</template>
		<script>
			Vue.component('my-computer', {
				template: '#my_computer'
			});

			new Vue({
				el: '#app'
			});
</script>測試結果:![]() 實名插槽
實名插槽
九、路由
- 后端路由:對于普通的網(wǎng)站,所有的超鏈接都是url地址,所有url都對應服務器上對應的資源
- 前端路由:對于單頁面應用程序來說,主要通過url的hash(#)來實現(xiàn)不同頁面的切換,同時hash還有一個特點HTTP請求中不會包含hash相關的內(nèi)容,所以單頁面程序中的頁面跳轉(zhuǎn)主要用hash實現(xiàn)
在單頁面應用程序中這種通過hash來改變頁面的方式稱作前端路由區(qū)別于后端路由
- 引入vue-router
- 路由入門
創(chuàng)建一個路由對象,當導入vue-router包之后,在window全局對象中就有一個路由的構造函數(shù)VueRouter在new路由對象的時候可以傳遞一個配置對象,這個配置對象的route表示路由器的匹配規(guī)則每個路由規(guī)則都是一個對象,這個規(guī)則對象身上必須有兩個屬性
 屬性1 path表示監(jiān)聽哪個路由鏈接地址屬性2 component,表示如果路由是前面匹配到的path,則展示component屬性對應的組件,component屬性值必須是一個組件模板對象,不能是組件的引用名稱
<!DOCTYPE html>
<html>
<head>
<meta charset="utf-8" />
<title></title>
<script src="lib/vue-2.6.12.js"></script>
<script src="lib/vue-router.js"></script>
<style>
ul li {
float: left;
width: 300px;
height: 70px;
box-sizing: border-box;
background-color: pink;
list-style: none;
line-height: 70px;
text-align: center;
}
ul li a {
text-decoration: none;
font-size: 20px;
}
.content {
clear: both;
width: 900px;
box-sizing: border-box;
border: 1px solid blue;
padding-left: 20px;
margin-left: 40px;
}
</style>
</head>
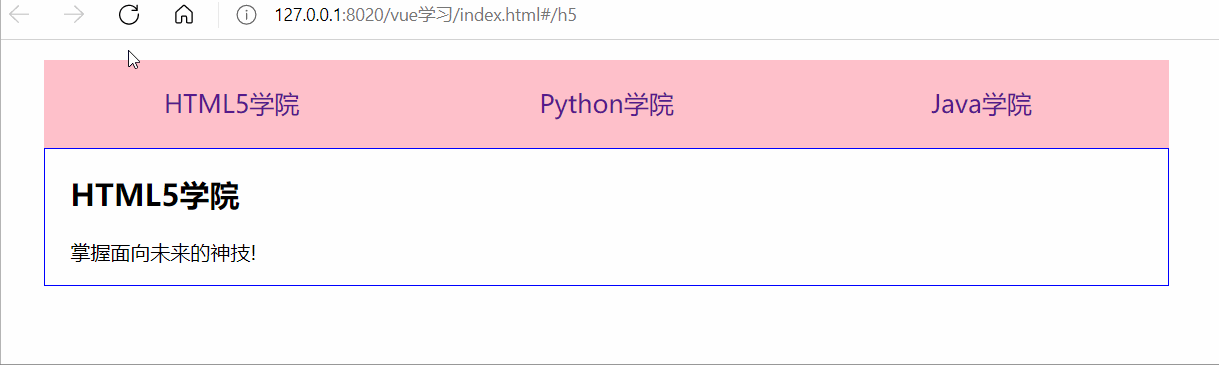
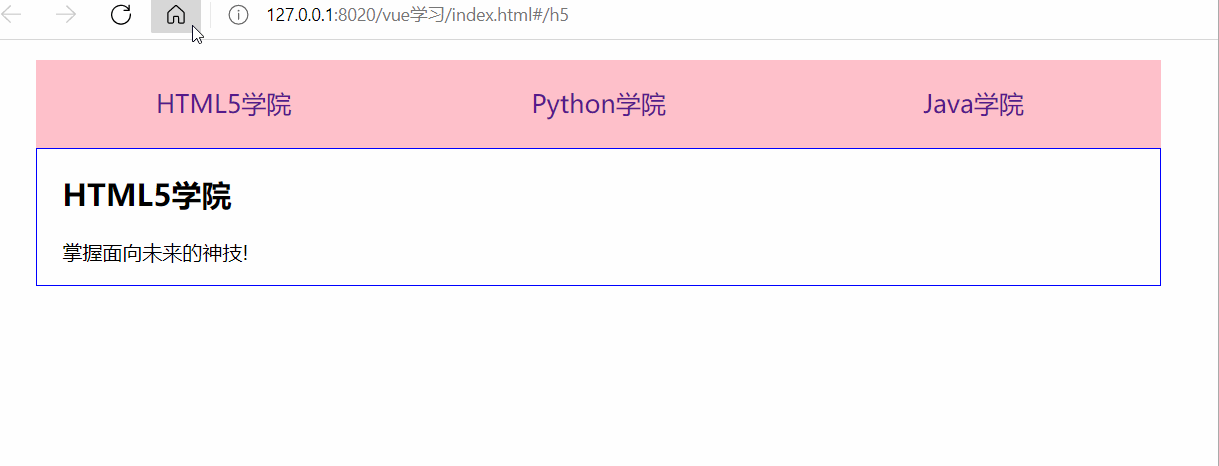
<body>
<div id="app">
<!-- 使用 router-link 組件來導航. -->
<!-- 通過傳入 `to` 屬性指定鏈接. -->
<!-- <router-link> 默認會被渲染成一個 `<a>` 標簽 -->
<ul>
<li>
<router-link to="/h5">HTML5學院</router-link>
</li>
<li>
<router-link to="/python">Python學院</router-link>
</li>
<li>
<router-link to="/java">Java學院</router-link>
</li>
</ul>
<div class="content">
<!-- 路由出口 -->
<!-- 路由匹配到的組件將渲染在這里 -->
<router-view></router-view>
</div>
</div>
<template id="h5">
<div>
<h2>HTML5學院</h2>
<p>掌握面向未來的神技!</p>
</div>
</template>
<template id="python">
<div>
<h2>Python學院</h2>
<p>人工智能的最佳選擇!</p>
</div>
</template>
<template id="java">
<div>
<h2>Java學院</h2>
<p>掌握面向工資編程!</p>
</div>
</template>
<script>
//1.創(chuàng)建組件
const Html5 = Vue.extend({
template: '#h5'
});
const Python = Vue.extend({
template: '#python'
});
const Java = Vue.extend({
template: '#java'
});
//2.定義路由
const routes = [
{ path: '/h5', component: Html5 },
{ path: '/python', component: Python },
{ path: '/java', component: Java },
//配置根路由,默認顯示
{ path: '/', redirect: '/h5' }
];
//3.創(chuàng)建路由實例
const router = new VueRouter({
routes
});
//4.創(chuàng)建Vue實例并掛載
new Vue({
router
}).$mount('#app');
</script>
</body>
</body>
</html>測試結果: (描述:我們點擊不同的tab切換頁能實現(xiàn)展示不同的內(nèi)容)
<body>
		<div id="app">
			<!-- 使用 router-link 組件來導航. -->
			<!-- 通過傳入 `to` 屬性指定鏈接. -->
			<!-- <router-link> 默認會被渲染成一個 `<a>` 標簽 -->
			<ul>
				<li><router-link :to="{name:'h5'}">HTML5學院</router-link></li>
				<li><router-link :to="{name:'python'}">Python學院</router-link></li>
				<li><router-link :to="{name:'java'}">Java學院</router-link></li>
			</ul>
			<div class="content">
				<!-- 路由出口 -->
                <!-- 路由匹配到的組件將渲染在這里 -->
                <router-view></router-view>
			</div>
		</div>

		<template id="h5">
			<div>
				<h2>HTML5學院</h2>
				<p>掌握面向未來的神技!</p>
			</div>
		</template>
		<template id="python">
			<div>
				<h2>Python學院</h2>
				<p>人工智能的最佳選擇!</p>
			</div>
		</template>
		<template id="java">
			<div>
				<h2>Java學院</h2>
				<p>掌握面向工資編程!</p>
			</div>
		</template>
		<script>
			//1.創(chuàng)建組件
			const Html5 = Vue.extend({
				template: '#h5'
			});
			const Python = Vue.extend({
				template: '#python'
			});
			const Java = Vue.extend({
				template: '#java'
			});
			//2.定義路由
			const routes = [
				{ path: '/h5', component: Html5,name:'h5' },
				{ path: '/python', component: Python,name:'python' },
				{ path: '/java', component: Java ,name:'java'},
				//配置根路由,默認顯示
				{ path: '/', redirect: '/h5' }
			];
			//3.創(chuàng)建路由實例
			const router = new VueRouter({
				routes
			});
			//4.創(chuàng)建Vue實例并掛載
			new Vue({
				router
			}).$mount('#app');
		</script>
	</body>
多級子路由
	<body>
		<div id="app">
			<!-- 使用 router-link 組件來導航. -->
			<!-- 通過傳入 `to` 屬性指定鏈接. -->
			<!-- <router-link> 默認會被渲染成一個 `<a>` 標簽 -->
			<ul>
				<li><router-link to="/h5">HTML5學院</router-link></li>
				<li><router-link to="/python">Python學院</router-link></li>
				<li><router-link to="/java">Java學院</router-link></li>
			</ul>
			<div class="content">
				<!-- 路由出口 -->
                <!-- 路由匹配到的組件將渲染在這里 -->
                <router-view></router-view>
			</div>
		</div>

		<template id="h5">
			<div>
				<h2>HTML5學院</h2>
				<p>掌握面向未來的神技!</p>
			</div>
		</template>
		<template id="python">
			<div>
				<h2>Python學院</h2>
				<p>人工智能的最佳選擇!</p>
			</div>
		</template>
		<template id="java">
			<div>
				<h2>Java學院</h2>
				<p>掌握面向工資編程!</p>
				<!--子組件路由-->
				<router-link  to="/java/base">基礎班</router-link>
                <router-link  to="/java/advance">進階班</router-link>
				<div>
					<!-- 子組件出口 -->
                    <router-view></router-view>
                </div>
			</div>
		</template>
		<!-- 定義Java組件下的子組件 -->
		<template id="base">
	        <div>
	            <h3>Java基礎班</h3>
	            <p>快速掌握Java的三大特性!</p>
	        </div>
	    </template>

	    <template id="advance">
	        <div>
	            <h3>Java進階班</h3>
	            <p>掌握高并發(fā)高可用的架構!</p>
	        </div>
	    </template>
		<script>
			//1.創(chuàng)建組件
			const Html5 = Vue.extend({
				template: '#h5'
			});
			const Python = Vue.extend({
				template: '#python'
			});
			const Java = Vue.extend({
				template: '#java'
			});
			//創(chuàng)建Java的子組件
			const base = Vue.extend({
				template: '#base'
			});
			const advance = Vue.extend({
				template: '#advance'
			});

			//2.定義路由
			const routes = [
				{ path: '/h5', component: Html5 },
				{ path: '/python', component: Python },
				{ path: '/java', component: Java,
				children: [  //使用children屬性實現(xiàn)路由嵌套,子路由path前不要加/,否則永遠以根路徑開始請求
                    {path:'base', component: base},
                    {path:'advance', component: advance},
                    // 配置Java組件的根路由,默認顯示
                    {path:'/', redirect: 'base'}
                ]
				},
				//配置根路由,默認顯示
				{ path: '/', redirect: '/h5' }
			];
			//3.創(chuàng)建路由實例
			const router = new VueRouter({
				routes
			});
			//4.創(chuàng)建Vue實例并掛載
			new Vue({
				router
			}).$mount('#app');
		</script>
	</body>
測試結果:
- 路由傳參
- 如果使用查詢字符串 給路由傳遞參數(shù)則不需要修改路由規(guī)則的path屬性,直接在組件當中使用{$route.query.字段名}}即可獲取值。
<!DOCTYPE html>
<html>
	<head>
		<meta charset="utf-8" />
		<title></title>
		<script src="lib/vue-2.6.12.js"></script>
		<script src="lib/vue-router.js"></script>
	</head>
	<body>
		<div id="app">
			<!-- 路由入口 -->
			<router-link to="/login?username=zs&password=123">登錄</router-link>

			<div>
				<!-- 路由出口 -->
				<router-view></router-view>
			</div>
		</div>

		<template id="userInfo">
			<div>
				用戶:{{$route.query.username}},密碼:{{$route.query.password}}
			</div>
		</template>
		<script>
			//1.創(chuàng)建組件
			const userInfo = Vue.extend({
				template: '#userInfo'
			});

			//2.定義路由
			const routes = [
				{ path: '/login', component: userInfo },
				//配置根路由,默認顯示
				{ path: '/', redirect: 'login' }
			];
			//3.創(chuàng)建路由實例
			const router = new VueRouter({
				routes
			});
			//4.創(chuàng)建Vue實例并掛載
			new Vue({
				router
			}).$mount('#app');
		</script>
	</body>
</html>
    <router-link to="/login/zs">登錄</router-link>

    { path: '/login/:username', component: userInfo }

    <template id="userInfo">
        <div>
            用戶:{{$route.params.username}}
        </div>
    </template>

十、過渡動畫
Vue中為我們提供了簡單的過渡動畫效果,只需要按照vue提供的標準去寫一套固定的CSS即可。
  <style>
    /* v-enter 這個是一個時間點,表示動畫進入之前,元素的起始狀態(tài),此時還沒有進入 */
    /* v-leave-to 這是一個時間點,是動畫離開之后,元素的終止狀態(tài),此時,元素動畫已經(jīng)結束了 */
    .v-enter,
    .v-leave-to {
      opacity: 0;
      transform: translateX(50px);
    }

    /* v-enter-active 表示入場動畫的時間段 */
    /* v-leave-active 表示離場動畫的時間段 */
    .v-enter-active,
    .v-leave-active {
      transition: all 0.8s ease;
    }
  </style>

<body>
  <div id="app">
    <button @click="flag = !flag">點擊</button>
    <transition>
      <div v-show="flag">這個是第一個div</div>
    </transition>
  </div>
</body>
<script>
  let app = new Vue({
    el: '#app',
    data: {
      flag: true
    },
    methods: {
    }
  })
</script>
    <transition>
      <div v-show="flag">這個是第一個div</div>
    </transition>
    <transition>
      <div v-show="!flag">這個是第二個div</div>
    </transition>
如果div1和div2不想公用一套動畫,應該怎么辦?這時候我們可以給transition命名,使用name屬性即可。定義了name之后,兩個transition則使用自己獨立的動畫效果。定義了name之后,動畫的相關class,要以name開頭,不能以v開頭。
<transition name="div1">
<div v-show="flag">這個是第一個div</div>
</transition>
<transition name="div2">
<div v-show="!flag">這個是第二個div</div>
</transition>
<style>
/* v-enter 這個是一個時間點,表示動畫進入之前,元素的起始狀態(tài),此時還沒有進入 */
/* v-leave-to 這是一個時間點,是動畫離開之后,元素的終止狀態(tài),此時,元素動畫已經(jīng)結束了 */
.div1-enter,
.div1-leave-to {
opacity: 0;
transform: translateX(50px);
}
/* v-enter-active 表示入場動畫的時間段 */
/* v-leave-active 表示離場動畫的時間段 */
.div1-enter-active,
.div1-leave-active {
transition: all 0.8s ease;
}
/* v-enter 這個是一個時間點,表示動畫進入之前,元素的起始狀態(tài),此時還沒有進入 */
/* v-leave-to 這是一個時間點,是動畫離開之后,元素的終止狀態(tài),此時,元素動畫已經(jīng)結束了 */
.div2-enter,
.div2-leave-to {
opacity: 0;
transform: translateX(50px);
}
/* v-enter-active 表示入場動畫的時間段 */
/* v-leave-active 表示離場動畫的時間段 */
.div2-enter-active,
.div2-leave-active {
transition: all 0.2s ease;
}
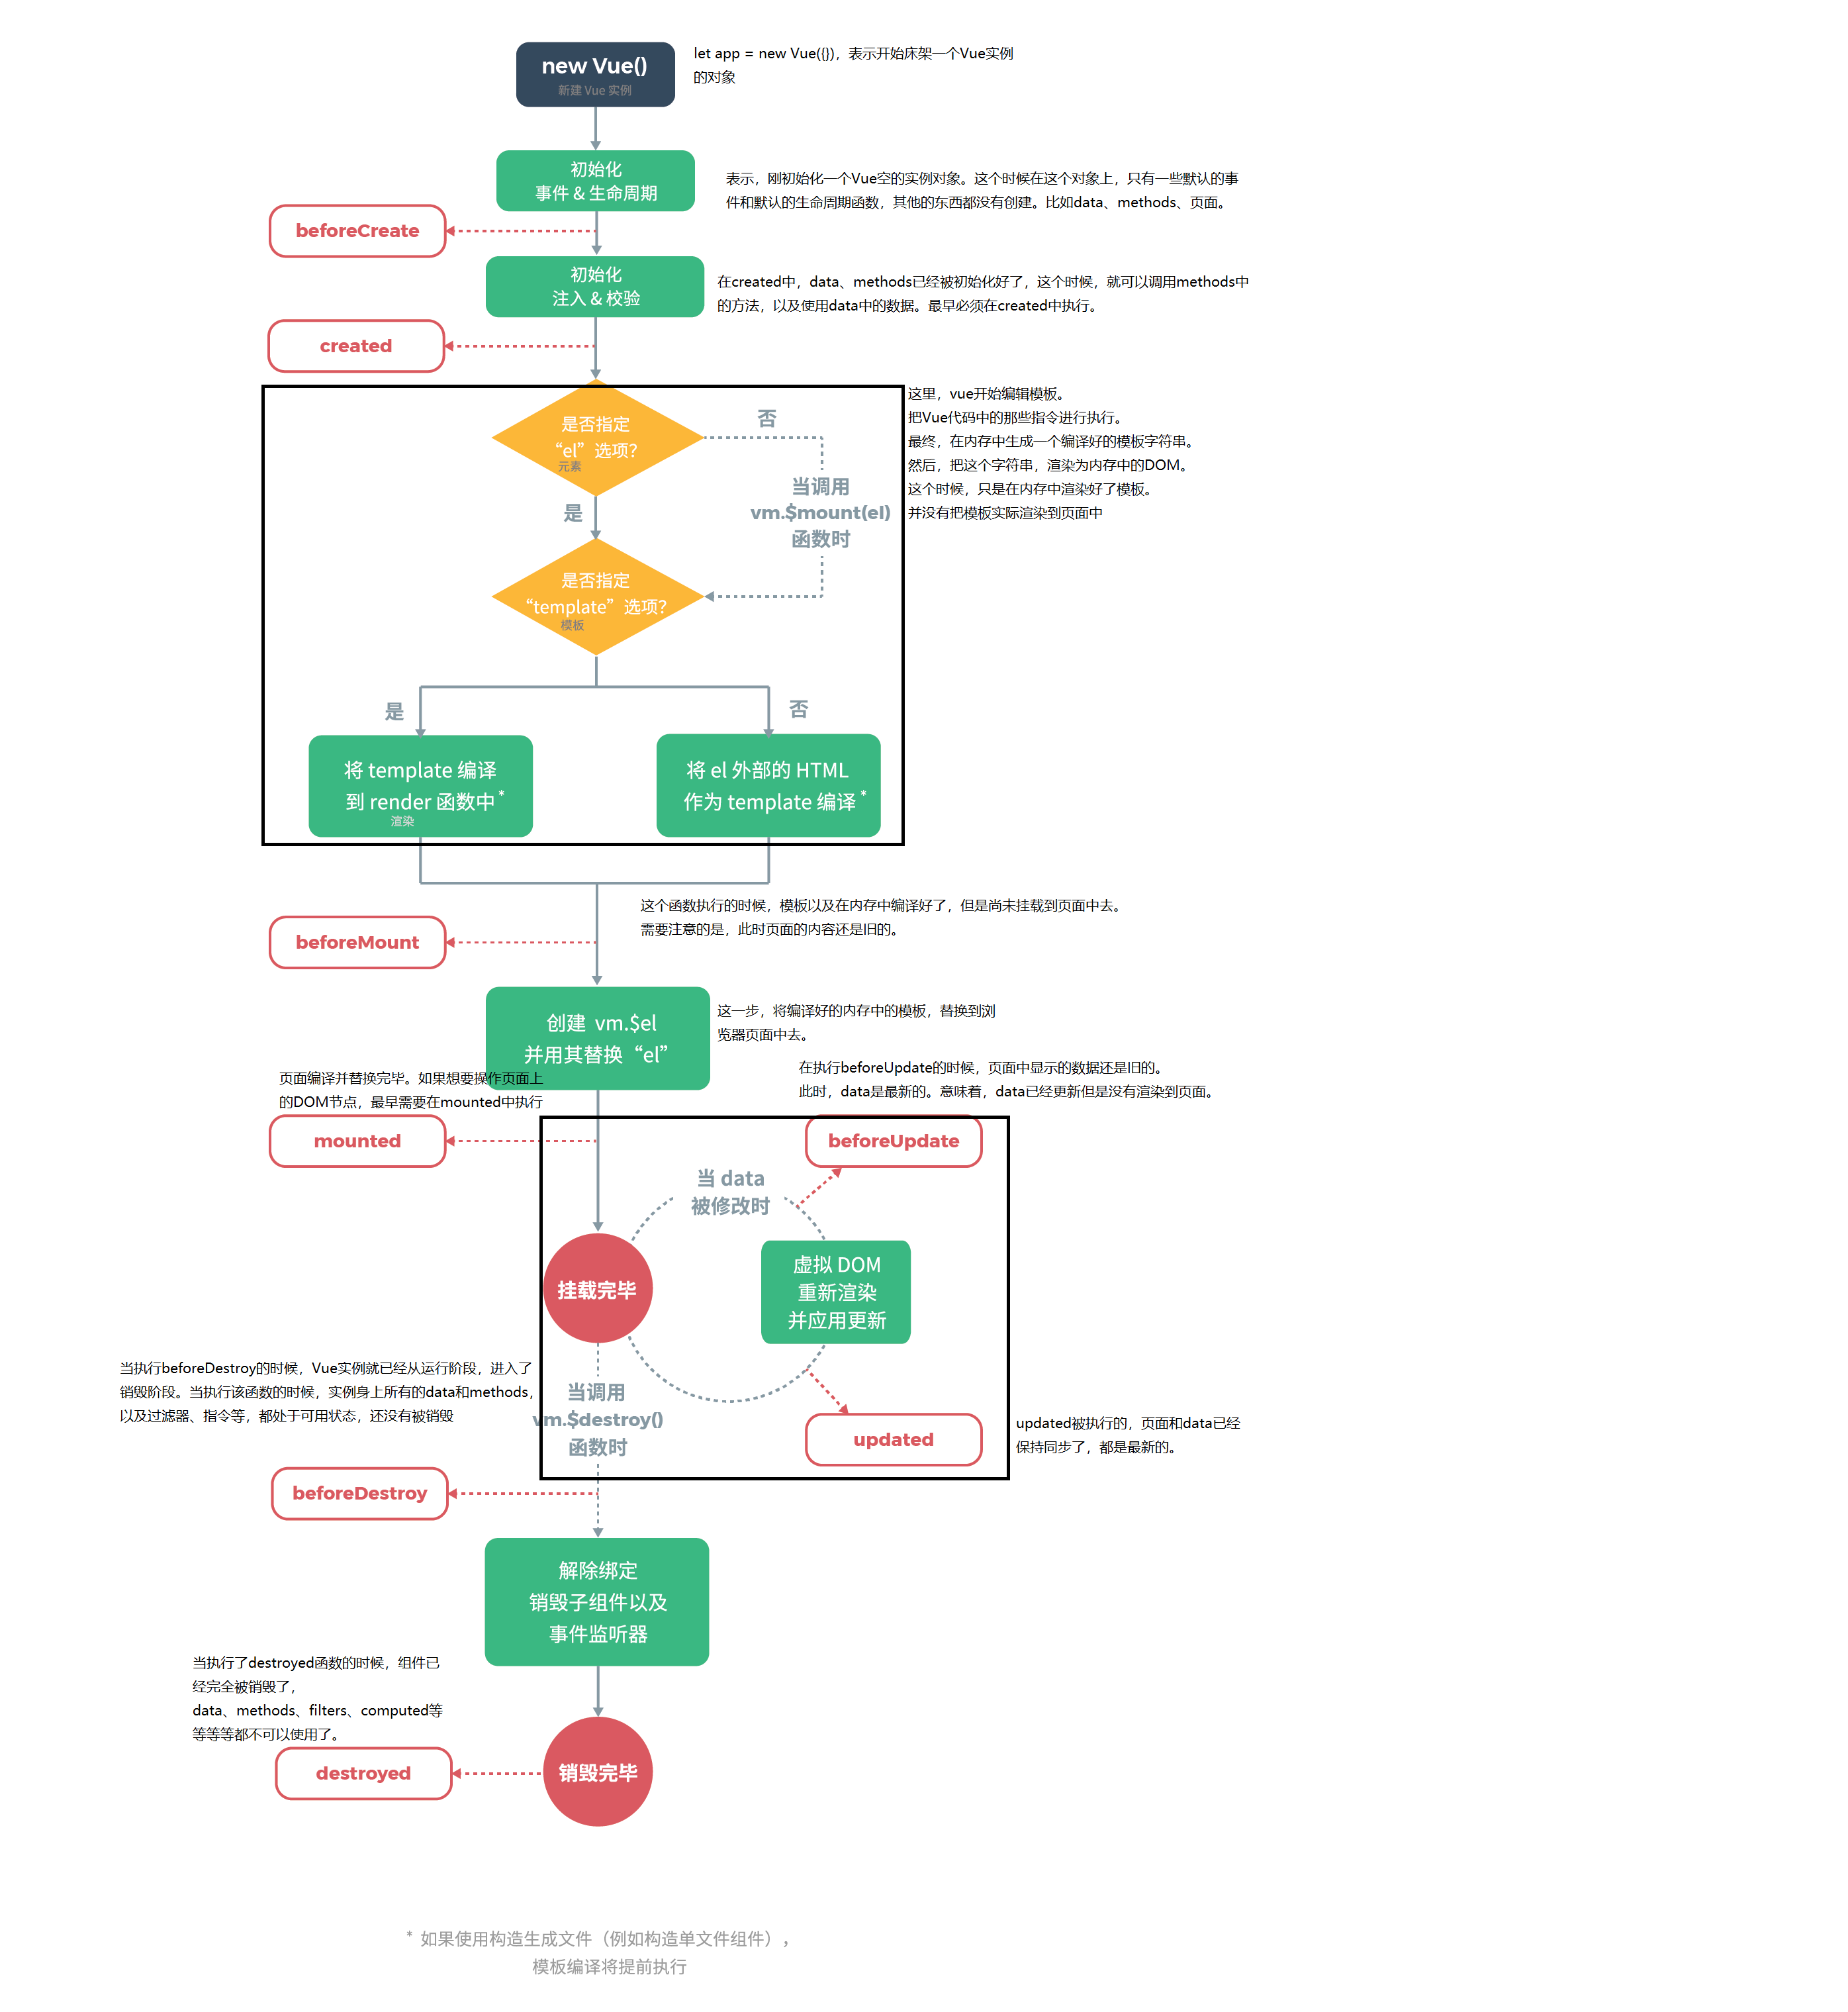
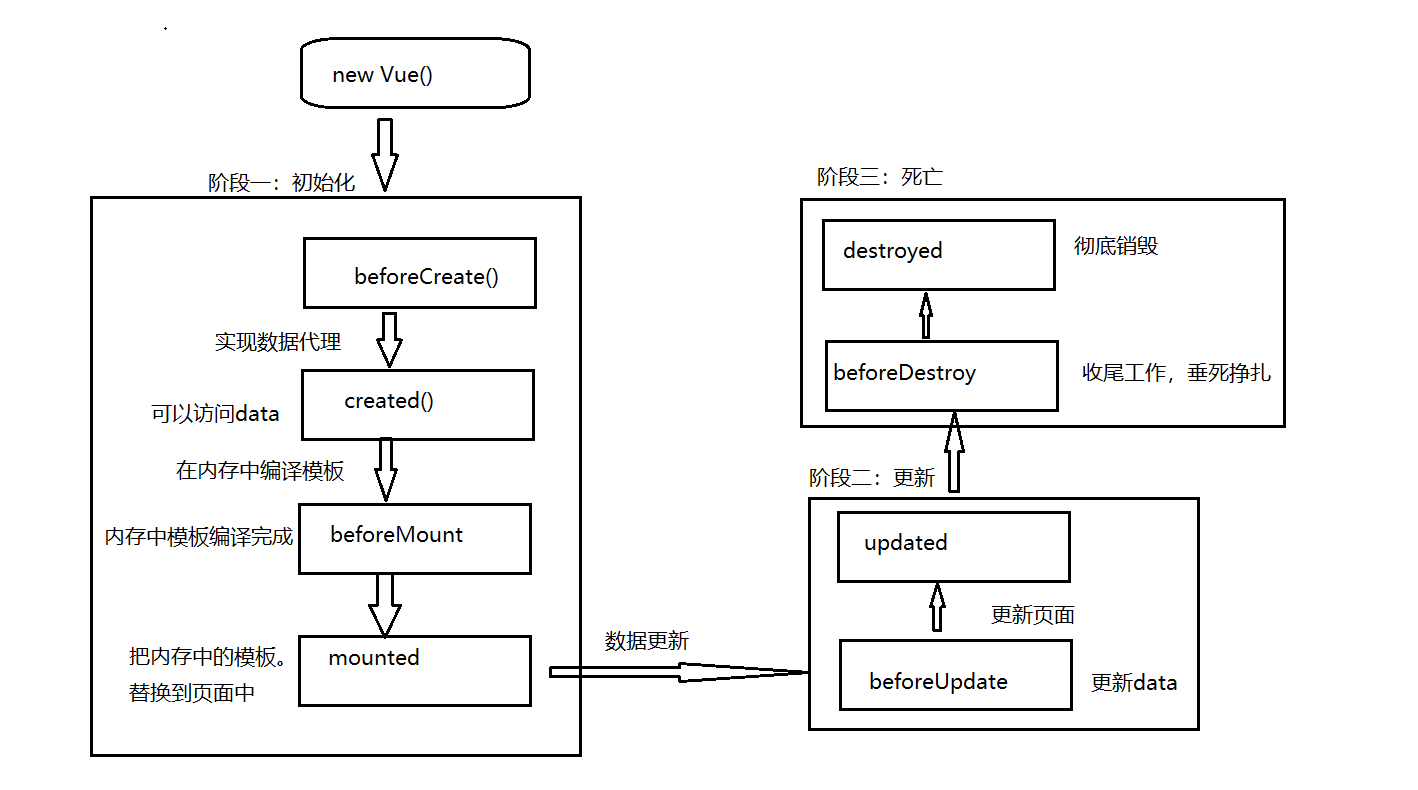
</style>十一、生命周期
<!DOCTYPE html>
<html>
	<head>
		<meta charset="utf-8" />
		<title></title>
		<script src="lib/vue-2.6.12.js"></script>
	</head>
	<body>
		<div id="app">
			<div id="divId">頁面還沒有渲染 --- {{msg}}</div>
		</div>
	</body>
	<script>
		var vue = new Vue({
			el: '#app',
			data: {
				msg: '頁面渲染完畢'
			},
			methods: {},
			filters: {},
			beforeCreate() {
				// 這是我們第一個遇到的生命周期函數(shù),實例被創(chuàng)建出來,還沒有data、methods等時,會執(zhí)行它
				let content = document.getElementById('divId')
				console.log('beforeCreate:', content.innerText)
				// 在js中,null和undefined是不同的含義。null表示有這個對象,但是這個對象的值是null。undefined表示壓根就沒有這個對象
				console.log('beforeCreate', this.msg)
			},
			created() {
				// Vue實例創(chuàng)建完畢,methods、data、filters等已經(jīng)掛載到vue實例上。如果需要調(diào)用methods,使用data,最早只能在這里操作
				let content = document.getElementById('divId')
				console.log('created', content.innerText)
				console.log('created', this.msg)
			},
			beforeMount() {
				// Vue實例創(chuàng)建完畢,頁面尚未重新渲染
				let content = document.getElementById('divId')
				console.log('beforeMounte', content.innerText)
				console.log('beforeMounte', this.msg)
			},
			mounted() {
				// 頁面渲染完畢
				let content = document.getElementById('divId')
				console.log('mounted', content.innerText)
				console.log('mounted', this.msg)
			}
		})
	</script>
</html>
十二、實戰(zhàn)演練
<!DOCTYPE html>
<html>
	<head>
		<meta charset="utf-8" />
		<title></title>
		<!-- 引入layui樣式 -->
		<link rel="stylesheet" href="lib/layui/css/layui.css" />
		<!--引入vue.js-->
		<script src="lib/vue-2.6.12.js"></script>
		<!-- 引入layui.js -->
		<script src="lib/layui/layui.all.js"></script>
	</head>

	<body>
		<div id="app">
			<fieldset class="layui-elem-field layui-field-title" style="margin-top: 20px;">
				<legend>員工管理</legend>
			</fieldset>
			<!-- 搜索欄 -->
			<form class="layui-form">
				<div class="layui-form-item">
					<div class="layui-inline">
						<label class="layui-form-label">姓 名:</label>
						<div class="layui-input-inline">
							<input type="text" v-model="searchName" placeholder="請輸入姓名" class="layui-input">
						</div>
					</div>
					<div class="layui-inline">
						<button type="button" class="layui-btn layui-btn-normal  layui-icon layui-icon-search" @click="searchUser">查詢</button>
						<button type="reset" class="layui-btn layui-btn-warm  layui-icon layui-icon-refresh">重置</button>
						<button type="button" class="layui-btn layui-btn layui-icon layui-icon-addition" @click="saveOrUpdateDiv()">添加</button>
					</div>
				</div>
			</form>

			<!-- 數(shù)據(jù)表格 -->
			<table class="layui-table">
				<thead>
					<tr>
						<th>編號</th>
						<th>姓名</th>
						<th>年齡</th>
						<th>性別</th>
						<th>備注</th>
						<th>操作</th>
					</tr>
				</thead>
				<tbody>
					<tr v-for="item in userList" :key="item.id">
						<td>{{item.id}}</td>
						<td>{{item.name}}</td>
						<td>{{item.gender | handlerGender}}</td>
						<td>{{item.remark}}</td>
						<td>
							<button type="button" class="layui-btn layui-btn-normal" @click="saveOrUpdateDiv(item)">編輯</button>
							<button type="button" class="layui-btn layui-btn-danger" @click="delUser(item.id)">刪除</button>
						</td>
					</tr>
				</tbody>
			</table>

			<!-- 添加和修改的彈出層開始 -->
			<div style="display: none;padding: 20px" id="saveOrUpdateDiv">
				<form class="layui-form">
					<div class="layui-form-item">
						<div class="layui-inline">
							<label class="layui-form-label">用戶id</label>
							<div class="layui-input-inline">
								<input type="text" v-model="user.id" placeholder="輸入用戶id" class="layui-input" readonly>
							</div>
							<label class="layui-form-label">用戶姓名</label>
							<div class="layui-input-inline">
								<input type="text" v-model="user.name" placeholder="請輸入姓名" class="layui-input">
							</div>
						</div>
					</div>
					<div class="layui-form-item">
						<div class="layui-inline">
							<label class="layui-form-label">性別</label>
							<div class="layui-input-inline">
								<input type="text" v-model="user.gender" placeholder="請輸入性別" class="layui-input">
							</div>
							<label class="layui-form-label">備注</label>
							<div class="layui-input-inline">
								<input type="text" v-model="user.remark" placeholder="請輸入備注" class="layui-input">
							</div>
						</div>
					</div>
					<div class="layui-form-item" style="text-align: center;">
						<div class="layui-input-block">
							<button type="button" class="layui-btn layui-btn-normal layui-btn-sm layui-icon layui-icon-release" v-if="!user.id" @click="addUser">新增</button>
							<button type="button" class="layui-btn layui-btn-normal layui-btn-sm layui-icon layui-icon-release" v-else @click="editUser(user)">修改</button>
							<button type="reset" class="layui-btn layui-btn-warm layui-btn-sm layui-icon layui-icon-refresh">重置</button>
						</div>
					</div>
				</form>
			</div>
			<!-- 添加和修改的彈出層結束 -->
		</div>
	</body>

	<script>
		var mainIndex;
		const vm = new Vue({
			el: '#app',
			data: {
				userList: [], //用戶列表
				data: [ //數(shù)據(jù)庫,存放用戶數(shù)據(jù)
					{ id: 1, name: '張三', gender: 1, remark: '姓張名三' },
					{ id: 2, name: '李四', gender: 2, remark: '姓李名四' },
					{ id: 3, name: '王五', gender: 1, remark: '姓王名五' },
					{ id: 4, name: '趙六', gender: 2, remark: '姓趙名六' }
				],
				user: {},
				searchName: '' //搜索用的名稱
			},
			filters: {
				handlerGender(gender) {
					if(gender == 1) {
						return '男'
					} else {
						return '女'
					}
				}
			},
			methods: {
				saveOrUpdateDiv(user) { //打開新增或者修改的彈出層
					if(!user) {
						title = '添加用戶';
						//清空新增彈出層數(shù)據(jù)
						this.user = {};
					} else {
						title = '編輯'+user.name+'信息';
						//回顯編輯的數(shù)據(jù),注意不能直接 this.user = user;
						this.user = { ...user };
						//等價于this.user = {id: user.id, name: user.name,gender: user.gender,remark: user.remark}
					}
					mainIndex = layui.layer.open({
						type: 1,
						title: title,
						content: layui.jquery("#saveOrUpdateDiv"),
						area: ['700px', '250px'],
						maxmin: true
					});
				},
				getUserList(name) { //加載用戶數(shù)據(jù)
					if(!name) {
						name = '';
					}
					const dataList = this.data.filter(e => e.name.indexOf(name) >= 0);
					this.userList = dataList;
				},
				addUser() { //添加用戶
					const user = { ...this.user };
					//等價于 const user = {id: this.user.id, name: this.user.name,gender: this.user.gender,remark: this.user.remark};
					//隨機生成id,范圍在1-100之間
					user.id = Math.round(Math.random() * (100 - 1) + 1)
					//添加到數(shù)據(jù)庫里
					this.data.push(user);
					//關閉彈出層
					layui.layer.close(mainIndex);
					//重新加載數(shù)據(jù)
					this.getUserList();
				},
				delUser(id) {
					// 查到指定id所在數(shù)組索引下標
					const index = this.userList.findIndex(e => e.id === id)
					// 刪除指定索引位置的數(shù)據(jù)
					this.data.splice(index, 1)
					// 刪除成功后,重新家在數(shù)據(jù)
					this.getUserList()
				},
				editUser(user){ //修改用戶
					const index = this.data.findIndex(e => e.id === user.id);
					this.data[index] = user;
					//關閉彈出層
					layui.layer.close(mainIndex);
					//重新加載數(shù)據(jù)
					this.getUserList();
				},
				searchUser() { // 搜索用戶
					// 遍歷用戶,找到所有復合條件的用戶
					this.getUserList(this.searchName)
				}
			},
			created() {
				// 進入頁面,組件創(chuàng)建之后,獲取數(shù)據(jù)
				this.getUserList()
			}
		})
	</script>
</html>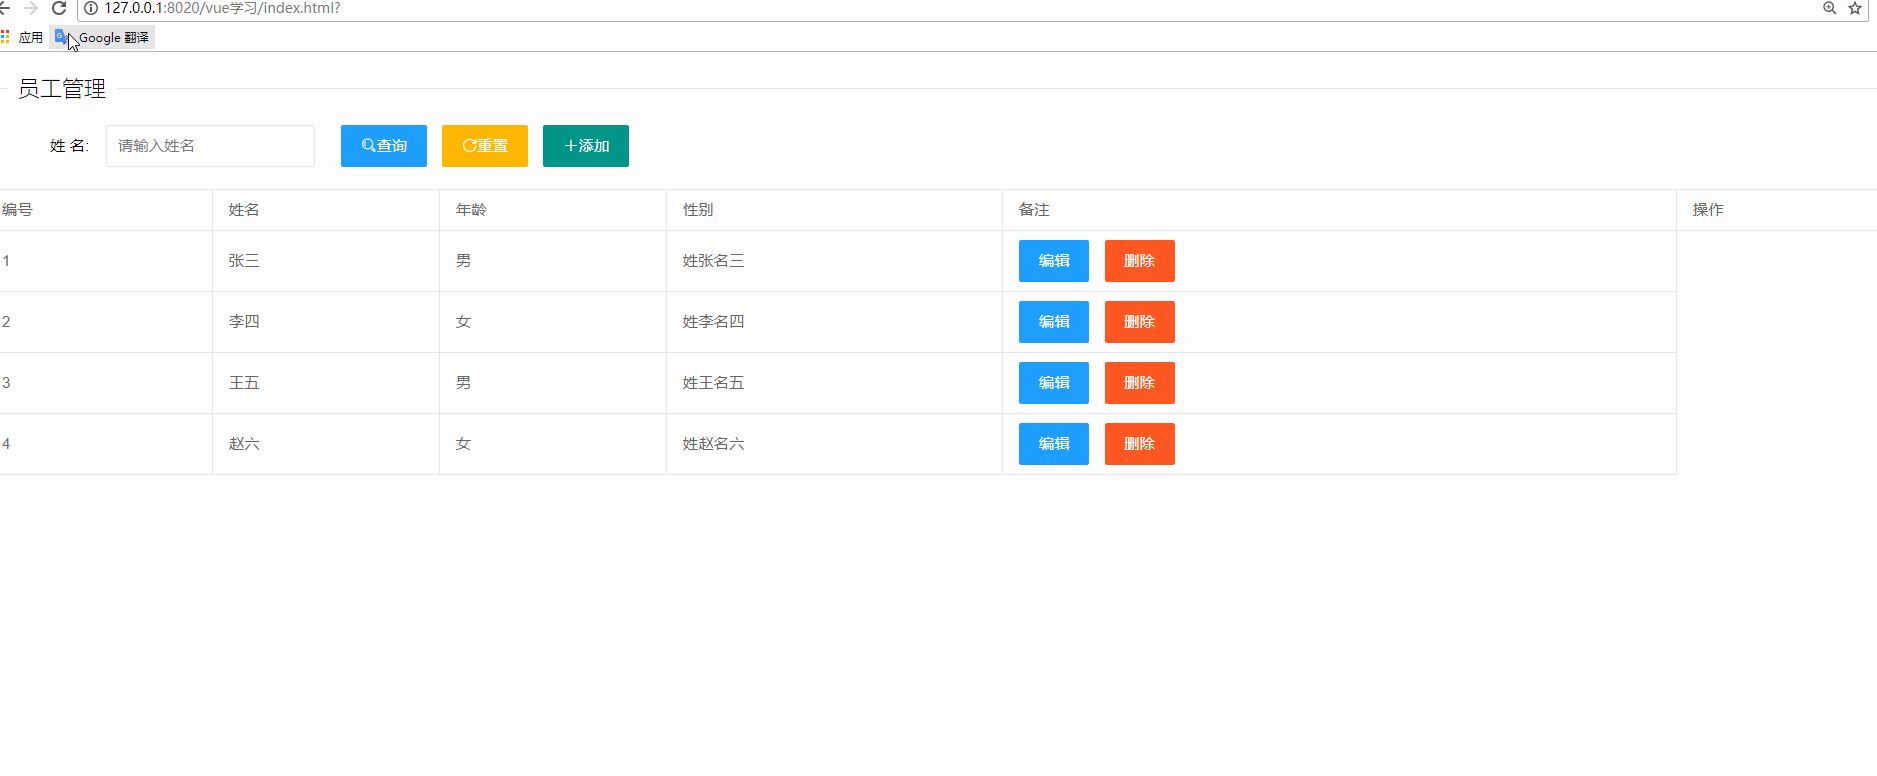
<!DOCTYPE html>
<html lang="en">

	<head>
		<meta charset="UTF-8">
		<meta http-equiv="X-UA-Compatible" content="IE=edge">
		<meta name="viewport" content="width=device-width, initial-scale=1.0">
		<title>品牌列表案例</title>
		<!-- 引入bootstrap樣式-->
		<link rel="stylesheet" href="lib/bootstrap.css">
		<style>
			body {
				padding: 15px;
				user-select: none;
			}
		</style>
	</head>
	<body>

		<div id="app">
			<!-- 卡片區(qū)域 -->
			<div class="card">
				<div class="card-header">
					添加品牌
				</div>
				<div class="card-body">
					<!-- 添加品牌的表單區(qū)域 -->
					<!-- form 表單元素有 submit 事件 -->
					<form @submit.prevent="add">
						<div class="form-row align-items-center">
							<div class="col-auto">
								<div class="input-group mb-2">
									<div class="input-group-prepend">
										<div class="input-group-text">品牌名稱</div>
									</div>
									<input type="text" class="form-control" placeholder="請輸入品牌名稱" v-model.trim="brand">
								</div>
							</div>
							<div class="col-auto">
								<button type="submit" class="btn btn-primary mb-2">添加</button>
							</div>
						</div>
					</form>
				</div>
			</div>

			<!-- 表格區(qū)域 -->
			<table class="table table-bordered table-hover table-striped">
				<thead>
					<tr>
						<th scope="col">#</th>
						<th scope="col">品牌名稱</th>
						<th scope="col">狀態(tài)</th>
						<th scope="col">創(chuàng)建時間</th>
						<th scope="col">操作</th>
					</tr>
				</thead>
				<tbody>
					<tr v-for="item in list" :key="item.id">
						<td>{{ item.id }}</td>
						<td>{{ item.name }}</td>
						<td>
							<div class="custom-control custom-switch">
								<!-- 使用 v-model 實現(xiàn)雙向數(shù)據(jù)綁定 -->
								<input type="checkbox" class="custom-control-input" :id="'cb' + item.id" v-model="item.status">
								<!-- 使用 v-if 結合 v-else 實現(xiàn)按需渲染 -->
								<label class="custom-control-label" :for="'cb' + item.id" v-if="item.status">已啟用</label>
								<label class="custom-control-label" :for="'cb' + item.id" v-else>已禁用</label>
							</div>
						</td>
						<td>{{ item.time | dateFormat }}</td>
						<td>
							<a href="javascript:;" @click="remove(item.id)">刪除</a>
						</td>
					</tr>
				</tbody>
			</table>
		</div>

		<!-- 只要導入了 dayjs 的庫文件,在 window 全局,就可以使用 dayjs() 方法了 -->
		<script src="./lib/dayjs.min.js"></script>
		<script src="./lib/vue-2.6.12.js"></script>
		<script>
			// 聲明格式化時間的全局過濾器
			Vue.filter('dateFormat', function(time) {
				// 1. 對 time 進行格式化處理,得到 YYYY-MM-DD HH:mm:ss
				// 2. 把 格式化的結果,return 出去

				// 直接調(diào)用 dayjs() 得到的是當前時間
				// dayjs(給定的日期時間) 得到指定的日期
				const dtStr = dayjs(time).format('YYYY-MM-DD HH:mm:ss')
				return dtStr
			})

			const vm = new Vue({
				el: '#app',
				data: {
					// 用戶輸入的品牌名稱
					brand: '',
					// nextId 是下一個,可用的 id
					nextId: 4,
					// 品牌的列表數(shù)據(jù)
					list: [
						{ id: 1, name: '寶馬', status: true, time: new Date() },
						{ id: 2, name: '奔馳', status: false, time: new Date() },
						{ id: 3, name: '奧迪', status: true, time: new Date() },
					],
				},
				methods: {
					show(item){
						console.info(item)
					},
					// 點擊鏈接,刪除對應的品牌信息
					remove(id) {
						this.list = this.list.filter(item => item.id !== id)
					},
					// 阻止表單的默認提交行為之后,觸發(fā) add 方法
					add() {
						// 如果判斷到 brand 的值為空字符串,則 return 出去
						if(this.brand === '') return alert('必須填寫品牌名稱!')

						// 如果沒有被 return 出去,應該執(zhí)行添加的邏輯
						// 1. 先把要添加的品牌對象,整理出來
						const obj = {
							id: this.nextId,
							name: this.brand,
							status: true,
							time: new Date()
						}
						// 2. 往 this.list 數(shù)組中 push 步驟 1 中得到的對象
						this.list.push(obj)
						// 3. 清空 this.brand;讓 this.nextId 自增 +1
						this.brand = ''
						this.nextId++
					}
				},
			})
		</script>
	</body>
</html>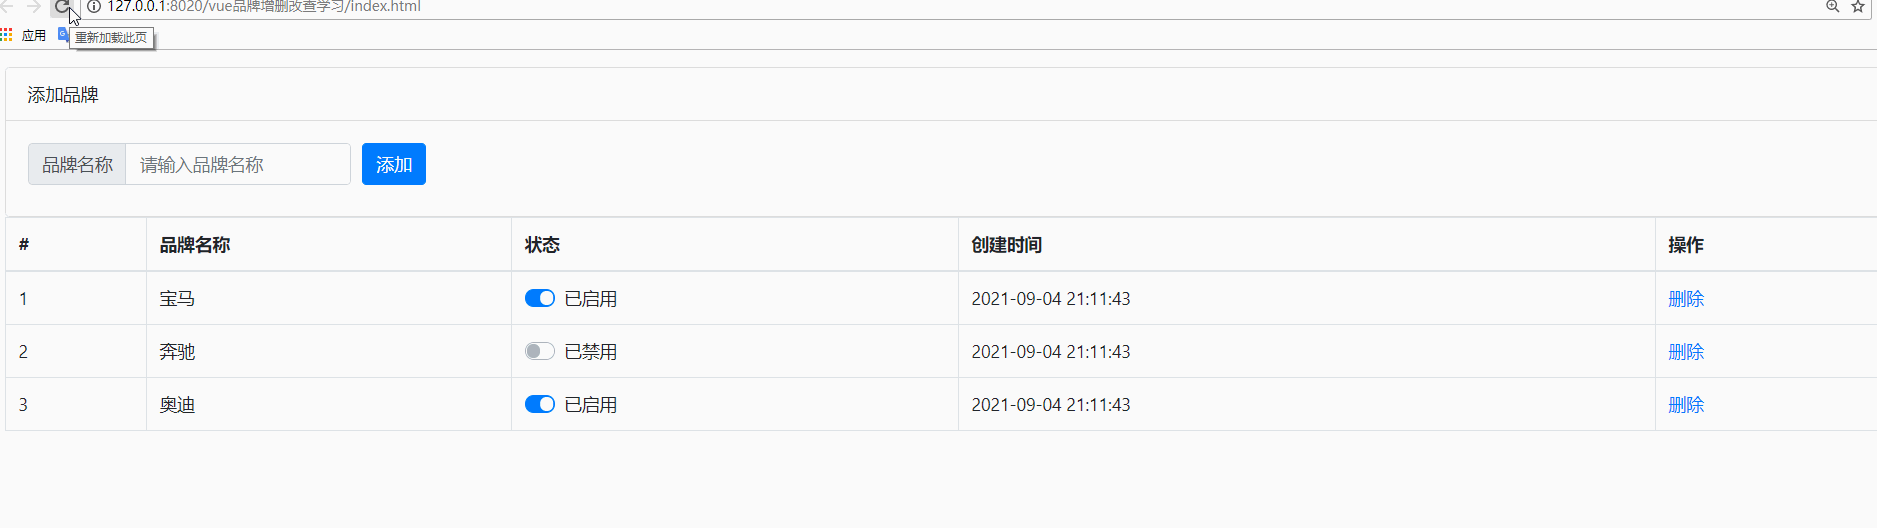
附件列表

 浙公網(wǎng)安備 33010602011771號