2.洋蔥開發法
大家好,我是K哥。一名獨立開發者,同時也是Swift開發框架【Aquarius】的作者,悅記和愛尋車app的開發者。
Aquarius開發框架旨在幫助獨立開發者和中小型團隊,完成iOS App的快速實現與迭代。使用框架開發將給你帶來簡單、高效、易維護的編程體驗。
你的代碼是這樣的嗎?
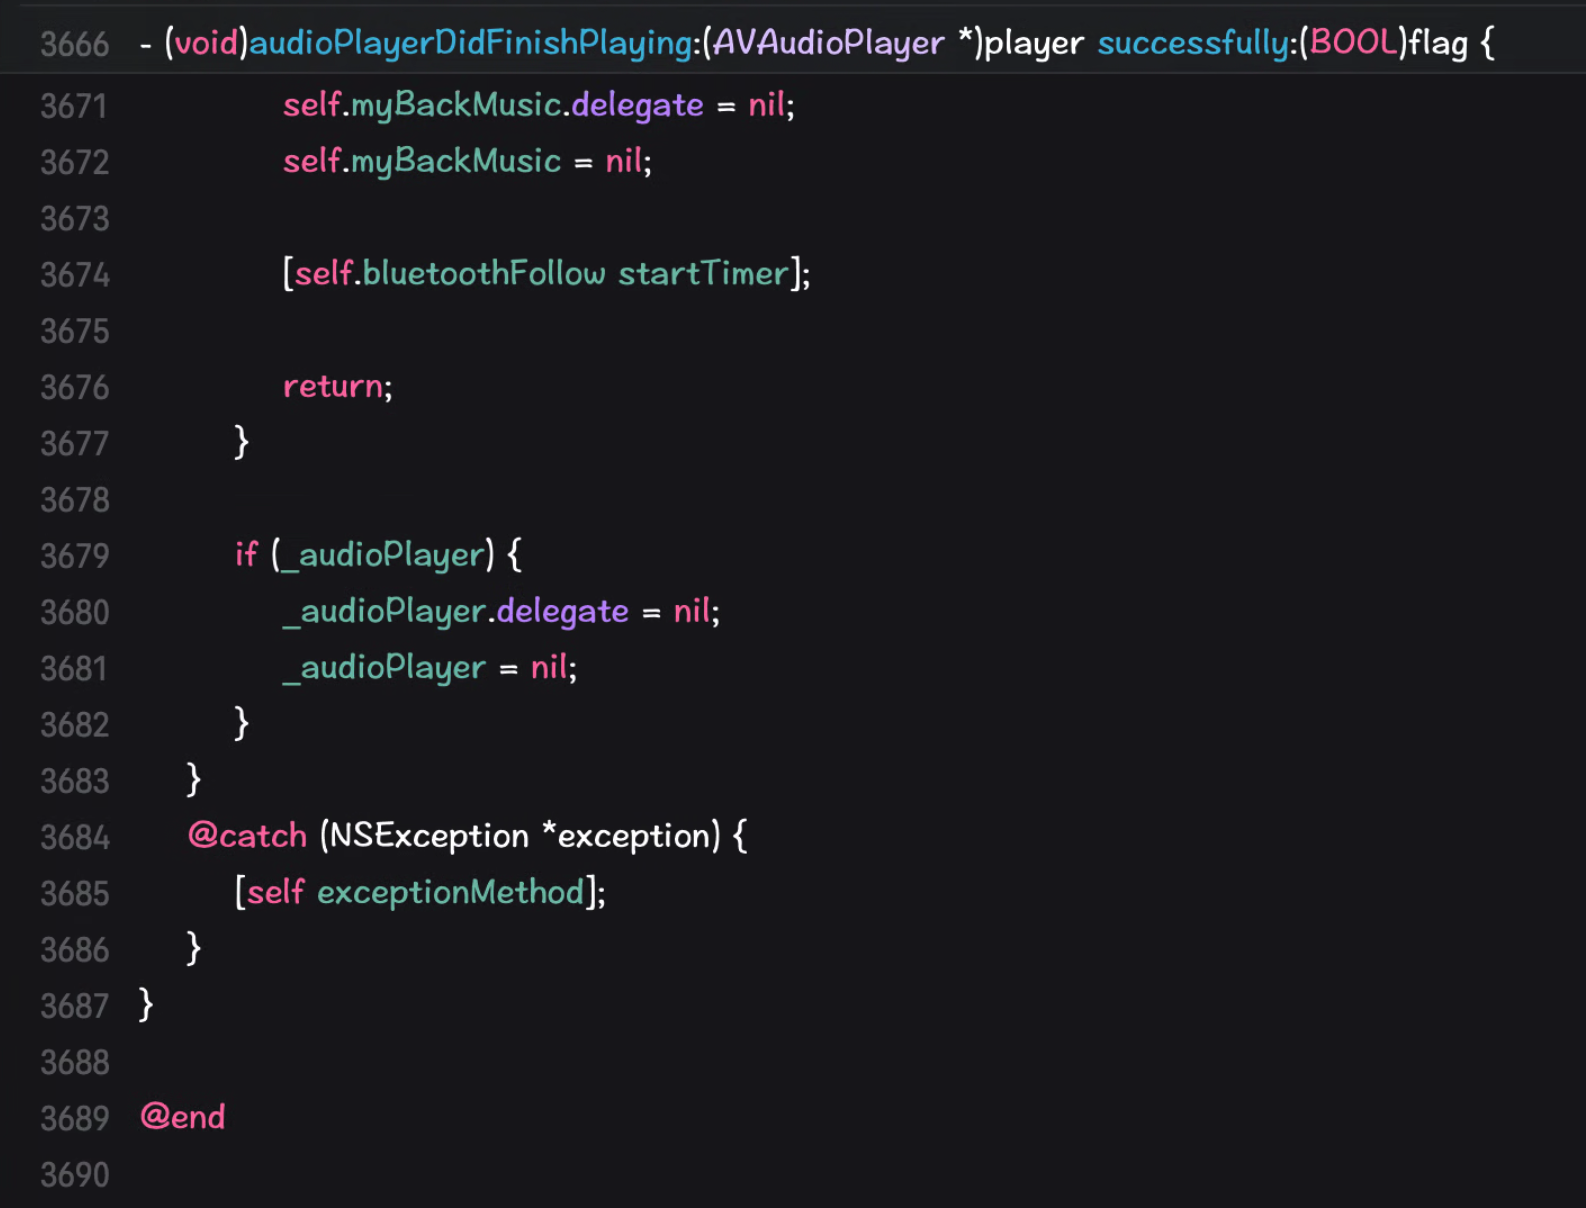
無論你是用Objective-C還是用Swift編寫你的代碼,想一想是不是viewController中擁有大量的代碼,動輒就幾千行

試想一下,如果想在這幾千行代碼里進行維護你應該怎么辦呢?
是不是非常痛苦,痛苦的還不只是這幾千行的代碼。痛苦的地方在于,來了新的需求,你要把各個關聯代碼寫在不同的方法中,幾十上百個方法,再加上沒有注釋,怎么樣?是不是頭發開始哇哇的掉。
這些K哥也和大家一樣,經歷過、體會過、痛苦過。
所以,K哥萌生要設計一款開發框架時,第一個考慮的就是如何解決在成千上萬行代碼中能夠快速定位的問題,如何讓你的代碼能夠順利的過渡給其他小伙伴。
尤其在中小型團隊中,大家編程的經驗都各不相同,如何讓團隊的小伙伴順利接手其他人的代碼,是實現快速開發、快速迭代、后期易維護的最關鍵要素。
如何解決這些問題呢?
基于以上問題,于是洋蔥開發法誕生了。
洋蔥開發法
何為洋蔥開發法
大家不妨看一下下面這張圖片里洋蔥的樣子

洋蔥具備了明顯的分層結構,各層最終組合到一起形成一個完整的洋蔥。
再想一想我們平時寫的代碼。
大家試想一下,viewController中的viewWillAppear和presentViewController這兩個方法有什么區別?
思考中……
K哥認為viewWillAppear屬于職責型方法,它是在某些特定條件下執行的,而presentViewController是功能性方法,它只負責完成某項功能的實現。
如果我們在開發過程中,加入具備類似viewWillAppear或viewDidLoad這種職責型的方法,讓負責不同職責的代碼放在它對應的職責型方法中,是不是swift文件變得非常易讀啦。
非常好。
下面我們再分析一下,我們平時在viewController中都完成了哪些功能呢?K哥來總結一下,如有遺漏,大家評論區補充哈。
- 自定義導航條
- 初始化界面中的各個UI控件
- 調整各個UI控件的參數
- 將這些UI控件放到view中
- 處理某些UI控件的Delegate,比如UITableView、UITextField等
- 處理某些通知
……
大致這些吧,當然根據不同人的喜好,可能還有負責其他功能的代碼。
有的同學可能做的比較好,會把處理UI控件的都放到view中,負責邏輯處理的放到單獨的文件中。
大體情況就是這些。
如果我們把這些職責進行分層。就像前面說的,把設置UI的部分都統一放在一起,把設置Delegate的都放在一起。
我們的代碼是不是就具有了明顯的分層結構啦。
這些分層結構組合在一起,是不是就是你原來寫的亂七八糟的viewController了。
再看一下上面洋蔥的圖片,把各個分層組合在一起,是不是就類似一個完整的洋蔥了。
這就是洋蔥開發法的核心思想。
洋蔥開發法的優點
下面我們看一下洋蔥開發法的優點。
首先,給大家看一下使用洋蔥開發法開發的代碼長什么樣。
import UIKit
import Foundation

import Aquarius
import CommonFramework

class LoginVC: BaseVC {
    private let a_view: LoginView = LoginView()
    private let viewModel: LoginVM = LoginVM()

    override func a_UI() {
        super.a_UI()

        addRootView(view: a_view)
    }

    override func a_Layout() {
        super.a_Layout()

        a_view.equalScreenSize()
        a_view.equalZeroTopAndLeft()
    }

    override func a_Event() {
        super.a_Event()
        /*
        a_view.loginButton.addTouchUpInsideBlock { [weak self] control in
            self?.viewModel.login(email: self!.a_view.userTextField.text!)
            self?.dismiss(animated: true)
        }
         */
    }
}
整體的Swift文件具備明顯的分層結構將添加UI控件的所有代碼都放到了a_UI中,將UI控件的布局方法都放到了a_Layout中,將所有的事件都放到了a_Event中。
那么使用洋蔥開發法后,明顯的變化是什么呢?
如果團隊內的小伙伴都使用洋蔥開發法開發的話,我們在看其他人代碼的時候就會很清楚,處理事件的代碼在哪里,處理通知的方法在哪里,處理UI控件布局的方法在哪里。你就能快速的知道出問題的地方在哪里。
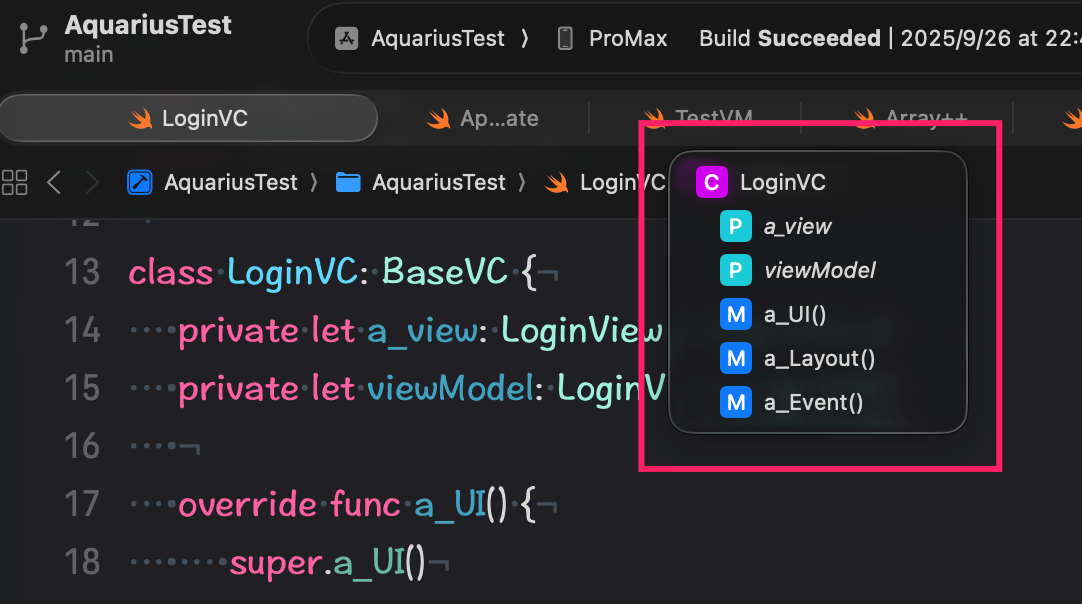
再看下面的截圖

這里顯示了整個類中都有哪些方法。
如果是基于洋蔥開發法的話,是不是我們就可以馬上知道這個類中沒有通知的處理,沒有處理Delegate。
怎么樣,是不是一目了然。
整理一下,使用洋蔥開發法的優點如下:
- 降低了組內多人協作開發的難度
- 提高了代碼易讀性
- 代碼更優雅
- 后期維護難度大大降低
- 團隊人員更迭時,更易于順利交接
- 降低代碼出錯率
- 提高代碼評審速度
- 提高了團隊整體開發能力
Aquarius開發框架中的實現方案
Aquarius開發框架針對洋蔥開發法提供了大量的分層方法。包括:
- a_Preview:開始前執行
- a_Begin:開始執行時調用
- a_Navigaiton:定制化導航條
- a_UI:設置UI組件
- a_UIConfig:設置UI組件參數
- a_Layout:設置UI組件的布局
- a_Delegate:設置delegate
- updateThemeStyle:深色模式切換時調用
- a_Notification:設置通知
- a_Bind:設置數據綁定
- a_Observe:設置Observe
- a_Event:設置事件
- a_Other:設置其它內容
- a_End:代碼末尾執行
- a_Test:測試的代碼函數,此函數只在debug模式下執行,發布后不執行
- a_Clear:銷毀時執行
哪些類支持洋蔥開發法呢
那么Aquarius開發框架中哪些類支持洋蔥開發法中的分層方法呢?
- AViewController:所有Controller的基類
- AView:所有View的基類
- AViewModel:所有ViewModel的基類
- ATableViewCell:所有TableViewCell的基類
- ACollectionViewCell:所有CollectionViewCell的基類
- ANavigationController:所有NavigationController的基類
- ATableBarController:所有TabBarController的基類
- ATableViewHeaderFooterView:所有TableViewHeaderFooterView的基類
基于Aquarius開發框架如何使用呢
當你將Aquarius開發框架導入你的工程后,當你創建上面介紹的UI控件時,請分別繼承Aquarius開發框架的基類,請放心使用它們。
舉個例子:
當你創建一個UIView的Swift文件時,你可以繼承Aquarius中的AView
舉個例子吧。
import UIKit
import Foundation

import Aquarius

class LoginView: AView {
    private let backButton: UIButton = A.ui.button
    public let titleLabel: UILabel = A.ui.label

    public let userTextField: UITextField = A.ui.textField
    private let userLeftView: UIView = A.ui.view
    private let userLeftImageView: UIImageView = A.ui.imageView

    private let passTextField: UITextField = A.ui.textField
    private let passLeftView: UIView = A.ui.view
    private let passLeftImageView: UIImageView = A.ui.imageView

    private let forgotPassButton: UIButton = A.ui.button
    public let loginButton: UIButton = A.ui.button

    private let signInWithLineView: UIView = A.ui.view
    private let signInWithLabel: UILabel = A.ui.label

    private let twitterButton: UIButton = A.ui.button
    private let facebookButton: UIButton = A.ui.button
    private let googleButton: UIButton = A.ui.button

    private let dontAccountLabel: UILabel = A.ui.label
    private let signUpButton: UIButton = A.ui.button

    private let bindID: String = "bindID"

    override func a_UI() {
        super.a_UI()

        addSubviews(views: [
            backButton,
            titleLabel,

            userTextField,
            passTextField,
            forgotPassButton,
            loginButton,

            signInWithLineView,
            signInWithLabel,
            twitterButton,
            facebookButton,
            googleButton,

            dontAccountLabel,
            signUpButton
        ])

        userLeftView.addSubview(userLeftImageView)
        userTextField.leftView = userLeftView

        passLeftView.addSubview(passLeftImageView)
        passTextField.leftView = passLeftView
    }

    override func a_UIConfig() {
        super.a_UIConfig()

        backButton.setImage("back.png".toNamedImage(), for: .normal)
        titleLabel.textLeftAlignment()
        titleLabel.font(28.0.toBoldFont)
        titleLabel.text = "Welcome back"

        userTextField.styleDesign(textFieldStyle)
        userTextField.placeholder = "Enter your Email"
        userLeftImageView.image = "email-icon.png".toNamedImage()

        passTextField.styleDesign(textFieldStyle)
        passTextField.placeholder = "Enter your password"
        passLeftImageView.image = "Pat.png".toNamedImage()

        forgotPassButton.setTitle("Forgot password?", for: .normal)
        forgotPassButton.titleLabel?.font = 17.toFont

        loginButton.layerCornerRadius(12.0)
        loginButton.setTitle("Login", for: .normal)
        loginButton.titleLabel?.font = 20.toBoldFont
        loginButton.liquid_ProminentClearGlass()

        signInWithLabel.font = 17.0.toFont
        signInWithLabel.textCenterAlignment()
        signInWithLabel.text = "  Sign In With  "

        facebookButton.setImage("facebook.png".toNamedImage(), for: .normal)
        facebookButton.layerCornerRadius(20.0)
        facebookButton.layerBorderWidth(1.0)

        //twitterButton.setImage("twetter.png".toNamedImage(), for: .normal)
        twitterButton.layerCornerRadius(20.0)
        //twitterButton.layerBorderWidth(1.0)

        twitterButton.liquid_ProminentClearGlass(image: "twetter.png".toNamedImage())

        googleButton.setImage("Google.png".toNamedImage(), for: .normal)
        googleButton.layerCornerRadius(20.0)
        googleButton.layerBorderWidth(1.0)

        dontAccountLabel.text = "Don't have an account?"
        dontAccountLabel.textRightAlignment()
        dontAccountLabel.font(17.0.toFont)

        signUpButton.setTitle("SIGN UP", for: .normal)
        signUpButton.titleLabel?.font(17.0.toFont)
    }

    override func a_Layout() {
        super.a_Layout()

        backButton.size(sizes: [20, 17])
        backButton.left(left: 26.0)
        backButton.top(top: statusBarHeight()+10.0)

        titleLabel.equalTextSize()
        titleLabel.left(left: 37.0)
        titleLabel.alignTop(view: backButton, offset: 58.0)

        userTextField.equalScreenWidth(37.0*2)
        userTextField.height(height: 46.0)
        userTextField.left(left: 37.0)
        userTextField.alignTop(view: titleLabel, offset: 49.0)

        userLeftImageView.size(sizes: [16, 12])
        userLeftImageView.left(left: 15.0)
        userLeftImageView.top(top: (49-12)/2)

        userLeftView.width(width: 16+15*2)
        userLeftView.equalHeight(target: userTextField)
        userLeftView.equalZeroTopAndLeft()

        passTextField.equalSize(target: userTextField)
        passTextField.equalLeft(target: userTextField)
        passTextField.alignTop(view: userTextField, offset: 20.0)

        passLeftImageView.size(sizes: [16, 19])
        passLeftImageView.left(left: 15.0)
        passLeftImageView.top(top: (49-19)/2)

        passLeftView.equalSize(target: userLeftView)
        passLeftView.equalZeroTopAndLeft()

        forgotPassButton.size(size: forgotPassButton.titleLabel!.getTextSize())
        forgotPassButton.equalRight(target: userTextField)
        forgotPassButton.alignTop(view: passTextField, offset: 13.0)

        loginButton.equalSize(target: userTextField)
        loginButton.equalLeft(target: userTextField)
        loginButton.alignTop(view: forgotPassButton, offset: 49.0)

        signInWithLineView.equalScreenWidth(107.5*2)
        signInWithLineView.height(height: 1.0)
        signInWithLineView.left(left: 107.5)
        signInWithLineView.alignTop(view: loginButton, offset: 76.5)

        signInWithLabel.equalTextSize()
        signInWithLabel.left(left: (screenWidth()-signInWithLabel.width())/2)
        signInWithLabel.equalTop(target: signInWithLineView, offset: -signInWithLabel.height()/2)

        facebookButton.size(widthHeight: 40.0)
        facebookButton.left(left: (screenWidth()-facebookButton.width())/2)
        facebookButton.alignTop(view: signInWithLabel, offset: 28.0)

        twitterButton.equalSize(target: facebookButton)
        twitterButton.equalTop(target: facebookButton)
        twitterButton.equalLeft(target: facebookButton, offset: -(45.0+twitterButton.width()))

        googleButton.equalSize(target: facebookButton)
        googleButton.equalTop(target: facebookButton)
        googleButton.alignLeft(view: facebookButton, offset: 45.0)

        dontAccountLabel.equalTextSize()
        dontAccountLabel.left(left: 10.0)
        dontAccountLabel.equalBottom(target: self, offset: tabBarHeight()+safeAreaFooterHeight()+30.0)

        signUpButton.size(size: signUpButton.titleLabel!.getTextSize())
        signUpButton.equalTop(target: dontAccountLabel)

        dontAccountLabel.left(left: (screenWidth()-dontAccountLabel.width()-signUpButton.width()-8)/2)
        signUpButton.alignLeft(view: dontAccountLabel, offset: 8.0)
    }

    override func a_Bind() {
        super.a_Bind()

        let key: String = bindText(ui: userTextField)
        bindText(bindKey: key, ui: passTextField)
    }

    override func updateThemeStyle() {
        super.updateThemeStyle()

        titleLabel.textColor = 0x00B5BA.toColor
        userTextField.textColor = 0x3E3E3E.toColor
        userTextField.placeHolderColor = 0xB2BDC4.toColor
        userTextField.backgroundColor = 0xF6F6F6.toColor

        passTextField.textColor = 0x3E3E3E.toColor
        passTextField.placeHolderColor = 0xB2BDC4.toColor
        passTextField.backgroundColor = 0xF6F6F6.toColor

        forgotPassButton.setTitleColor(0x3E3E3E.toColor, for: .normal)
        loginButton.backgroundColor = 0x00B5BA.toColor
        loginButton.setTitleColor(.white, for: .normal)

        signInWithLineView.backgroundColor = 0xD2D2D2.toColor
        signInWithLabel.textColor = 0x7B7B7B.toColor
        signInWithLabel.whiteBackgroundColor()

        facebookButton.layerBorderColor(0xD2D2D2.toColor)
        twitterButton.layerBorderColor(0xD2D2D2.toColor)
        googleButton.layerBorderColor(0xD2D2D2.toColor)

        dontAccountLabel.textColor = 0x3E3E3E.toColor
        signUpButton.setTitleColor(0x00B5BA.toColor, for: .normal)
    }

    override func a_Event() {
        super.a_Event()

        loginButton.addTouchUpInsideBlock { [weak self] control in
            self?.passTextField.equalSize(target: self!.userTextField)
            self?.passTextField.equalLeft(target: self!.userTextField)
            self?.passTextField.alignTop(view: self!.userTextField, offset: 8.0)
        }
    }

    override func a_Test() {
        super.a_Test()

        //[backButton, titleLabel].debugMode()

        let testView: UIView = A.ui.view
        testView.size(widthHeight: 50.0)
        testView.equalLeft(target: twitterButton)
        testView.alignTop(view: twitterButton, offset: 16.0)
        testView.redBackgroundColor()
        if #available(iOS 26.0, *) {
            testView.cornerConfiguration = .corners(topLeftRadius: 10, topRightRadius: 20, bottomLeftRadius: 30, bottomRightRadius: 40)
        }
        addSubView(testView)
    }
}
是不是覺得上面的代碼中,有很多代碼你都不認得,這還是Swift嗎?
請不要在意它們,在接下來的文章中,我都會詳細介紹。
你只需要關心這個UIView中,洋蔥開發法是如何實現的即可。
看完以上代碼有何感覺?
是不是代碼變得特別清晰,特別有層次。
試想一下
如果你是一名iOS開發工程師的話,你和你的小伙伴都會使用洋蔥開發法開發,你再看他的代碼,或者他看你的代碼時是不是很快就能上手繼續開發新的功能,或者維護這些代碼了。
如果你是一名開發經理的話,如果你手下的小伙伴都會基于洋蔥開發法開發的話,項目的開發難度是不是會大大的降低呢?
如果你是一名項目經理的話,如果你團隊的小伙伴都會洋蔥開發法的話,是不是你的開發進度會大大的提前呢?
如果你是一家中小型公司的老板的話,如果你的手下都會洋蔥開發法的話,是不是會幫你節約一大部分開發成本呢?無論是人員的變動還是招納新的開發人員,是不是會洋蔥開發法將是你的首要要求了呢?
如果你是一名獨立開發者,當你的產品越來越復雜,你勢必有一天會將你的代碼托管給其他小伙伴來幫你完成。如果你和他都使用洋蔥開發法的話,那么交接的難度是不是就會大大的降低了呢?
注意
需要注意的是,Aquarius開發框架提供的洋蔥開發法方案,Controller是運行在viewDidLoad方法中的,其余基本都運行在初始化的方法中。
如果你想在現有的類中使用洋蔥開發法的話,要注意這一點。
另外需要注意的一點是,Aquarius開發框架中提供的分層方法都是有實際職責的,如果你的類中沒有相關的功能,請不要編寫這個方法。
舉個例子,如果你的UIView中,所有的UI控件都不需要添加Delegate,那么你在這個類文件中就不要添加a_Delegate方法,如果添加的話,就會對整個代碼造成污染。后期無論是你自己review或其他小伙伴review的時候就會造成困擾。
如果,對Aquarius開發框架的洋蔥開發法感興趣的話,可以下載源碼,在源碼中查看如何實現。
尾聲
好了,今天的內容就介紹到這了。
洋蔥開發法是Aquarius開發框架提供的最核心的開發理念。
有了洋蔥開發法,你的代碼將變得非常易讀、易維護,尤其在團隊開發中,非常適合代碼交接、協作開發。
對獨立開發者來說,洋蔥開發法是非常有意義的。無論是你自己獨立完成,還是將來將你的代碼交接給其他小伙伴幫你完成。你們的工作交接過程將變得非常nice。也會節約你大量的開發時間,提高你的開發效率。
立即體驗Aquarius:
- ? Star & Fork 框架源碼: GitHub - JZXStudio/Aquarius
- ?? 下載示例APP: 悅記 | 愛尋車
- ?? 聯系與反饋: studio_jzx@163.com


 Aquarius開發框架旨在幫助獨立開發者和中小型團隊,完成iOS App的快速實現與迭代。使用框架開發將給你帶來簡單、高效、易維護的編程體驗。

 浙公網安備 33010602011771號