SpringBoot啟動方法分析
SpringBoot啟動run方法分析
1.場景引入
在項目啟動的時候,有時候我們需要在啟動的時候,執行一些邏輯。
比如說,項目啟動的時候,我想把一些熱門商品的數據加載到緩存中去;
比如說,自定義了一個netty服務,我想在項目啟動的時候,自動開啟這個netty服務;
比如說,................
反正,這個場景大家肯定或多或少會碰到的吧。
下面就按照先后順序依次介紹各種方式。
// 這個是示例初始化的方法
@Slf4j
public class InitCode {
    public static void startMethod( String str) {
        log.info("========================【{}】 就是這個~~~~~~~######", str);
    }
}
下面的六個方法參考了 https://blog.csdn.net/QIU176161650/article/details/118087254
這篇文章。其中的Servlet相關的,沒有作細致分析,故打了**做標記。
①.實現ServletContextListener接口contextInitialized方法**
@Component
public class MyServletContextListener implements ServletContextListener {
    @Override
    public void contextInitialized(ServletContextEvent sce) {
        InitCode.startMethod("ServletContextListener");
    }
}
②.@PostConstruct注解方式
這里順便比較一下InitializingBean接口的方法。
@Component
public class NettyStarter implements InitializingBean {
    @Override
    public void afterPropertiesSet() throws Exception {
        InitCode.startMethod("InitializingBean接口");
    }

    @PostConstruct
    public void init() {
        InitCode.startMethod("@PostConstruct");
    }
}
③.實現ServletContextAware接口setServletContext 方法**
@Component
public class MyServletContextAware implements ServletContextAware {
    @Override
    public void setServletContext(ServletContext servletContext) {
        InitCode.startMethod("ServletContextAware");
    }
}
④.@EventListener方式
@Component
public class MyEventListener {

    // 監聽ContextRefreshedEvent事件
    @EventListener
    public void onApplicationEvent(ContextRefreshedEvent event) {
        InitCode.startMethod("EventListener");
    }
}
⑤.實現ApplicationRunner接口run 方法
@Component
public class MyApplicationRunner implements ApplicationRunner {
    @Override
    public void run(ApplicationArguments args) throws Exception {
        InitCode.startMethod("ApplicationRunner");
    }
}
⑥.實現CommandLineRunner接口run 方法
@Component
public class MyCommandLineRunner implements CommandLineRunner {
    @Override
    public void run(String... args) throws Exception {
        InitCode.startMethod("CommandLineRunner");
    }
}
⑦.順序演示
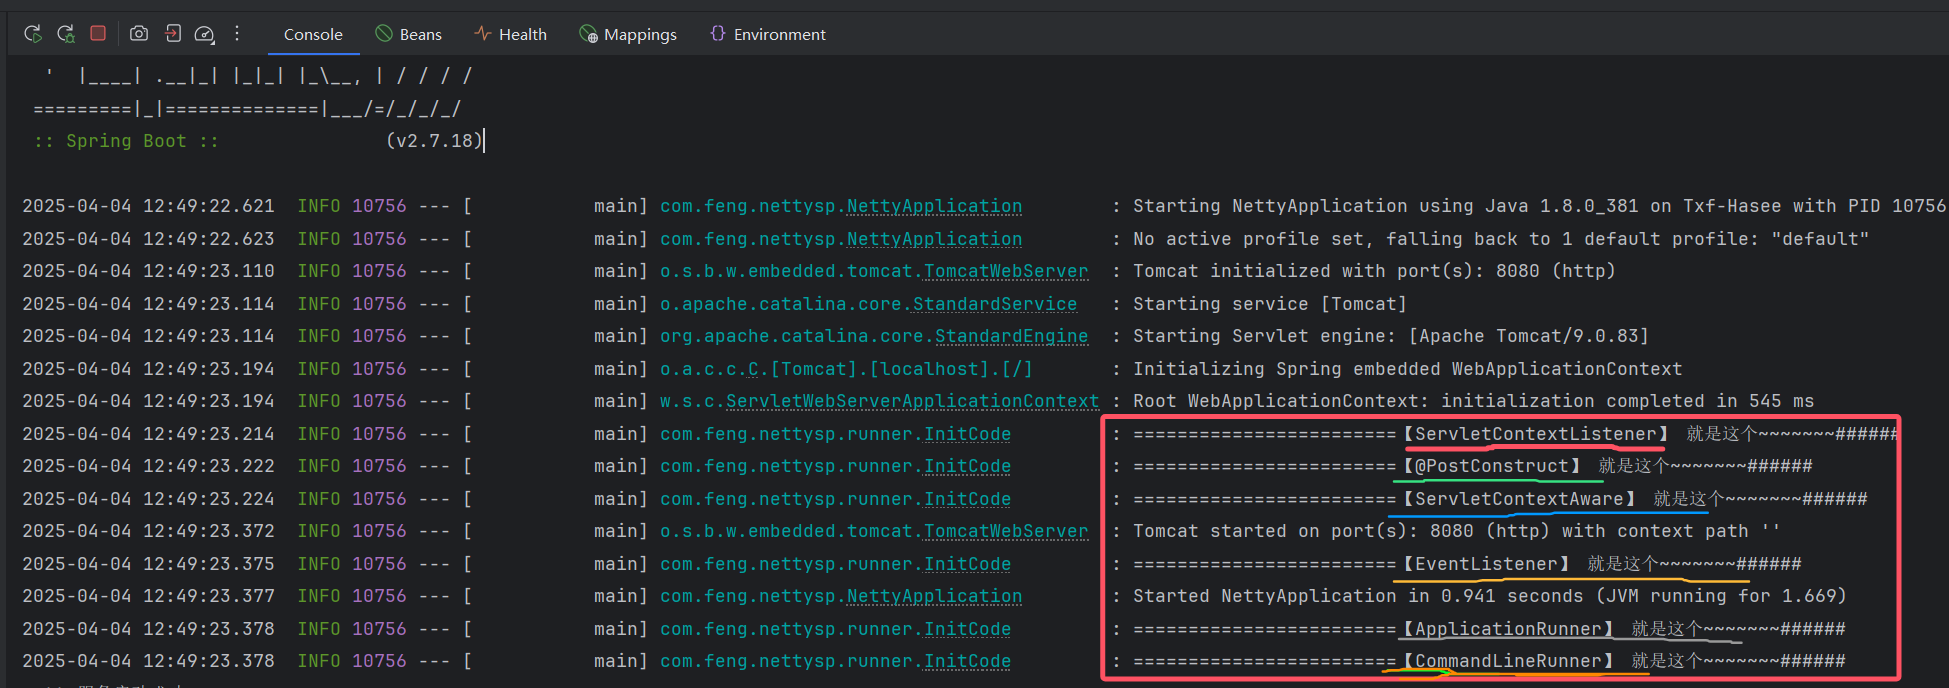
通過debug,我們發現前四個打印的是在springBoot的refreshContext(context);之后的。后面兩個Runner是callRunners(context, applicationArguments);之后打印的
2.run(args )
這要從SpringBoot的啟動流程講起了。在這篇文章【springboot】【http://www.rzrgm.cn/jackjavacpp/p/18653391】中,對run的方法沒有作分析,現在我們來看一下run方法。
Spring Boot的啟動流程可劃分為以下階段:
- 環境準備:加載配置文件、初始化環境變量。
- 容器創建:創建
ApplicationContext,加載Bean定義。 - Bean實例化:實例化Bean并完成依賴注入。
- 啟動完成:執行后置任務,如緩存預熱、定時任務啟動。
每個階段均提供擴展點供開發者介入自己的邏輯。
下面以SpringBoot2.7.18源碼為例子
//Spring Boot應用啟動入口方法,返回已初始化的應用上下文。
public ConfigurableApplicationContext run(String... args) {
    // 1.啟動計時與引導上下文
    long startTime = System.nanoTime();
    DefaultBootstrapContext bootstrapContext = createBootstrapContext();
    ConfigurableApplicationContext context = null;
    configureHeadlessProperty();
    // 2.事件監聽器初始化
    SpringApplicationRunListeners listeners = getRunListeners(args);
    listeners.starting(bootstrapContext, this.mainApplicationClass);
    try {
        // 3.環境準備階段
        ApplicationArguments applicationArguments = new DefaultApplicationArguments(args);
        ConfigurableEnvironment environment = prepareEnvironment(listeners, bootstrapContext, applicationArguments);
        configureIgnoreBeanInfo(environment);
        // 4.Banner打印與上下文創建
        Banner printedBanner = printBanner(environment);
        context = createApplicationContext();
        context.setApplicationStartup(this.applicationStartup);
        // 5.上下文準備階段
        prepareContext(bootstrapContext, context, environment, listeners, applicationArguments, printedBanner);
        // 6.容器刷新(!!!最核心階段!!!)
        refreshContext(context);
        // 7.啟動后處理
        afterRefresh(context, applicationArguments);
        Duration timeTakenToStartup = Duration.ofNanos(System.nanoTime() - startTime);
        if (this.logStartupInfo) {
            new StartupInfoLogger(this.mainApplicationClass).logStarted(getApplicationLog(), timeTakenToStartup);
        }
        listeners.started(context, timeTakenToStartup);
        callRunners(context, applicationArguments);
    }
    catch (Throwable ex) {
        handleRunFailure(context, ex, listeners);
        throw new IllegalStateException(ex);
    }
    try {
        // 8.應用就緒階段
        Duration timeTakenToReady = Duration.ofNanos(System.nanoTime() - startTime);
        listeners.ready(context, timeTakenToReady); // ready事件
    }
    catch (Throwable ex) {
        handleRunFailure(context, ex, null);
        throw new IllegalStateException(ex);
    }
    return context;
}
根據上面的源碼結構大致總結出以下流程:
graph TD
A[run()啟動] --> B[初始化引導上下文]
B --> C[配置Headless模式]
C --> D[初始化事件監聽器]
D --> E[發布ApplicationStartingEvent]
E --> F[準備環境變量]
F --> G[打印Banner]
G --> H[創建應用上下文]
H --> I[準備上下文]
I --> J[刷新上下文]==================最核心
J --> K[發布ApplicationStartedEvent]
K --> L[執行ApplicationRunner]
L --> M[發布ApplicationReadyEvent]
M --> N[返回上下文]
下面對run方法中重要的部分作分析。
①事件監聽器初始化
SpringApplicationRunListeners listeners = getRunListeners(args);
listeners.starting(bootstrapContext, this.mainApplicationClass);

// getRunListeners(args)
private SpringApplicationRunListeners getRunListeners(String[] args) {
    Class<?>[] types = new Class<?>[] { SpringApplication.class, String[].class };
    return new SpringApplicationRunListeners(logger,
        getSpringFactoriesInstances(SpringApplicationRunListener.class, types, this, args),
        this.applicationStartup);
}
// getSpringFactoriesInstances(xxx)
private <T> Collection<T> getSpringFactoriesInstances(Class<T> type, Class<?>[] parameterTypes, Object... args) {
    ClassLoader classLoader = getClassLoader();
    //SpringFactoriesLoader.loadFactoryNames----
    Set<String> names = new LinkedHashSet<>(SpringFactoriesLoader.loadFactoryNames(type, classLoader));
    List<T> instances = createSpringFactoriesInstances(type, parameterTypes, classLoader, args, names);
    AnnotationAwareOrderComparator.sort(instances);
    return instances;
}
通過spring.factories加載所有SpringApplicationRunListener實現類,發布ApplicationStartingEvent事件(最早觸發的生命周期事件)
// 發布starting事件
void starting(ConfigurableBootstrapContext bootstrapContext, Class<?> mainApplicationClass) {
    doWithListeners("spring.boot.application.starting", (listener) -> listener.starting(bootstrapContext),
                    (step) -> {
                        if (mainApplicationClass != null) {
                            step.tag("mainApplicationClass", mainApplicationClass.getName());
                        }
                    });
}
②容器刷新
refreshContext(context);

private void refreshContext(ConfigurableApplicationContext context) {
    // Spring Boot 擴展點:應用上下文刷新前的處理
    if (this.registerShutdownHook) {
        shutdownHook.registerApplicationContext(context);
    }
    refresh(context);
}

// 核心邏輯:調用 Spring Framework 的 refresh() 方法
protected void refresh(ConfigurableApplicationContext applicationContext) {
    applicationContext.refresh();
}

// 到抽象類AbstractApplicationContext.java這里來了
@Override
public void refresh() throws BeansException, IllegalStateException {
    synchronized (this.startupShutdownMonitor) {
        StartupStep contextRefresh = this.applicationStartup.start("spring.context.refresh");
        prepareRefresh(); // 1.準備刷新
        // 2. 獲取BeanFactory
        ConfigurableListableBeanFactory beanFactory = obtainFreshBeanFactory();
        prepareBeanFactory(beanFactory);

        try {
            postProcessBeanFactory(beanFactory);
            StartupStep beanPostProcess = this.applicationStartup.start("spring.context.beans.post-process");
            invokeBeanFactoryPostProcessors(beanFactory);
            registerBeanPostProcessors(beanFactory);
            beanPostProcess.end();
            initMessageSource();
            initApplicationEventMulticaster();
            onRefresh();
            registerListeners();
            finishBeanFactoryInitialization(beanFactory);
            finishRefresh();
        }

        catch (BeansException ex) {
            if (logger.isWarnEnabled()) {
                logger.warn("Exception encountered during context initialization - " +
                            "cancelling refresh attempt: " + ex);
            }
            // Destroy already created singletons to avoid dangling resources.
            destroyBeans();
            // Reset 'active' flag.
            cancelRefresh(ex);
            // Propagate exception to caller.
            throw ex;
        }
        finally {
            resetCommonCaches();
            contextRefresh.end();
        }
    }
}
refreshContext(context) 是 Spring Boot 啟動過程中最核心的階段之一,負責 Spring 容器的創建、配置和初始化。它直接調用了 Spring Framework 的 AbstractApplicationContext.refresh() 方法,由于我們demo引入了web依賴, Spring Boot 在此基礎上進行了擴展(故會有內嵌 Web 容器的啟動)。
1) 準備刷新
2) 獲取BeanFactory
// AbstractApplicationContext.java
protected ConfigurableListableBeanFactory obtainFreshBeanFactory() {
    // 銷毀舊 BeanFactory(如果存在)
    refreshBeanFactory();
    // 創建新的 BeanFactory(默認實現為 DefaultListableBeanFactory)
    return getBeanFactory();
}
3) 配置BeanFactory
// AbstractApplicationContext.java
protected void prepareBeanFactory(ConfigurableListableBeanFactory beanFactory) {
    beanFactory.setBeanClassLoader(getClassLoader());
    beanFactory.setBeanExpressionResolver(new StandardBeanExpressionResolver());
    beanFactory.addPropertyEditorRegistrar(new ResourceEditorRegistrar());
    // 添加 BeanPostProcessor(如處理 @Autowired)
    beanFactory.addBeanPostProcessor(new ApplicationContextAwareProcessor(this));
    beanFactory.ignoreDependencyInterface(EnvironmentAware.class);
    // 注冊環境變量等內置 Bean
    beanFactory.registerSingleton("environment", getEnvironment());
}
核心操作:注冊內置 Bean(如 Environment)和基礎 BeanPostProcessor。
4) 后處理BeanFactory(擴展點)
// 子類可覆蓋此方法(如 WebApplicationContext)
protected void postProcessBeanFactory(ConfigurableListableBeanFactory beanFactory) {
}
5) 執行BeanFactoryPostProcessor
protected void invokeBeanFactoryPostProcessors(ConfigurableListableBeanFactory beanFactory) {
    PostProcessorRegistrationDelegate.invokeBeanFactoryPostProcessors(beanFactory, getBeanFactoryPostProcessors());

    // Detect a LoadTimeWeaver and prepare for weaving, if found in the meantime
    // (e.g. through an @Bean method registered by ConfigurationClassPostProcessor)
    if (!NativeDetector.inNativeImage() && beanFactory.getTempClassLoader() == null &&
        beanFactory.containsBean(LOAD_TIME_WEAVER_BEAN_NAME)) {
        beanFactory.addBeanPostProcessor(new LoadTimeWeaverAwareProcessor(beanFactory));
        beanFactory.setTempClassLoader(new ContextTypeMatchClassLoader(beanFactory.getBeanClassLoader()));
    }
}
// PostProcessorRegistrationDelegate.java
public static void invokeBeanFactoryPostProcessors(
    ConfigurableListableBeanFactory beanFactory, List<BeanFactoryPostProcessor> beanFactoryPostProcessors) {
    // 處理 BeanDefinitionRegistryPostProcessor(優先級高)
    invokeBeanDefinitionRegistryPostProcessors(postProcessors, registry);
    // 處理 BeanFactoryPostProcessor
    invokeBeanFactoryPostProcessors(nonOrderedPostProcessors, beanFactory);
}
- 關鍵擴展點:
- BeanDefinitionRegistryPostProcessor:動態注冊 Bean 定義(如
@Configuration類的解析)。 - BeanFactoryPostProcessor:修改 Bean 定義(如屬性占位符替換
PropertySourcesPlaceholderConfigurer)。
- BeanDefinitionRegistryPostProcessor:動態注冊 Bean 定義(如
- Spring Boot 應用:
ConfigurationClassPostProcessor在此階段解析@ComponentScan、@Import(包括@EnableAutoConfiguration)等注解。
6) 注冊 BeanPostProcessor
protected void registerBeanPostProcessors(ConfigurableListableBeanFactory beanFactory) {
    PostProcessorRegistrationDelegate.registerBeanPostProcessors(beanFactory, this);
}
// PostProcessorRegistrationDelegate.java
public static void registerBeanPostProcessors(
    ConfigurableListableBeanFactory beanFactory, AbstractApplicationContext applicationContext) {
    // 獲取所有 BeanPostProcessor 并排序
    String[] postProcessorNames = beanFactory.getBeanNamesForType(BeanPostProcessor.class);
    for (String ppName : postProcessorNames) {
        beanFactory.addBeanPostProcessor(beanFactory.getBean(ppName, BeanPostProcessor.class));
    }
}
- 作用:將
BeanPostProcessor實例注冊到容器,后續 Bean 初始化時會經過這些處理器。 - 關鍵處理器:
AutowiredAnnotationBeanPostProcessor:處理@Autowired和@Value。CommonAnnotationBeanPostProcessor:處理@PostConstruct、@PreDestroy。AnnotationAwareAspectJAutoProxyCreator:AOP 代理生成。
7) 初始化事件廣播器
// AbstractApplicationContext.java
protected void initApplicationEventMulticaster() {
    if (beanFactory.containsLocalBean(APPLICATION_EVENT_MULTICASTER_BEAN_NAME)) {
        this.applicationEventMulticaster =
            beanFactory.getBean(APPLICATION_EVENT_MULTICASTER_BEAN_NAME, ApplicationEventMulticaster.class);
    } else {
        // 默認使用 SimpleApplicationEventMulticaster
        this.applicationEventMulticaster = new SimpleApplicationEventMulticaster(beanFactory);
        beanFactory.registerSingleton(APPLICATION_EVENT_MULTICASTER_BEAN_NAME, this.applicationEventMulticaster);
    }
}
初始化事件發布機制,用于后續發布 ContextRefreshedEvent 等事件。
8) 模板方法(onRefresh())--內嵌web容器
protected void onRefresh() throws BeansException {
    // For subclasses: do nothing by default.
}

//我們是 ServletWebServerApplicationContext.java
@Override
protected void onRefresh() {
    super.onRefresh();
    try {
        // 創建并啟動內嵌的 Web 服務器(如 Tomcat)
        createWebServer();
    }
    catch (Throwable ex) {
        throw new ApplicationContextException("Unable to start web server", ex);
    }
}

private void createWebServer() {
    WebServer webServer = this.webServer;
    ServletContext servletContext = getServletContext();
    if (webServer == null && servletContext == null) {
        StartupStep createWebServer = this.getApplicationStartup().start("spring.boot.webserver.create");
        ServletWebServerFactory factory = getWebServerFactory();
        createWebServer.tag("factory", factory.getClass().toString());
        // ServletWebServerFactory 創建 WebServer
        this.webServer = factory.getWebServer(getSelfInitializer());
        createWebServer.end();
        getBeanFactory().registerSingleton("webServerGracefulShutdown",
                                           new WebServerGracefulShutdownLifecycle(this.webServer));
        getBeanFactory().registerSingleton("webServerStartStop",
                                           new WebServerStartStopLifecycle(this, this.webServer));
    }
    else if (servletContext != null) {
        try {
            getSelfInitializer().onStartup(servletContext);
        }
        catch (ServletException ex) {
            throw new ApplicationContextException("Cannot initialize servlet context", ex);
        }
    }
    initPropertySources();
}

// 經過調試發現運行到了StandardContext.java 不是spring框架范圍了
 public boolean listenerStart() {
     ...
     ServletContextEvent event = new ServletContextEvent(getServletContext());
     ServletContextEvent tldEvent = null;
     ....
     ServletContextListener listener = (ServletContextListener) instance;
     try {
         fireContainerEvent("beforeContextInitialized", listener);
         if (noPluggabilityListeners.contains(listener)) {
             // ServletContextListener接口contextInitialized
             listener.contextInitialized(tldEvent);
         } else {
             // ServletContextListener接口contextInitialized
             listener.contextInitialized(event);
         }
     } ......
 }
- Spring Boot 核心擴展:在此方法中啟動內嵌的 Web 容器(如 Tomcat),這是 Spring Boot 與 Spring Framework 的重要區別。
- 流程:
- 通過
ServletWebServerFactory創建WebServer。 - 初始化
DispatcherServlet并注冊到 Servlet 容器。
- 通過
9) 注冊監聽器
// AbstractApplicationContext.java
protected void registerListeners() {
    // 添加靜態指定的監聽器
    for (ApplicationListener<?> listener : getApplicationListeners()) {
        getApplicationEventMulticaster().addApplicationListener(listener);
    }
    // 注冊 Bean 形式的監聽器
    String[] listenerBeanNames = getBeanNamesForType(ApplicationListener.class);
    for (String listenerBeanName : listenerBeanNames) {
        getApplicationEventMulticaster().addApplicationListenerBean(listenerBeanName);
    }
    // 發布早期事件(如果有)
    publishEarlyApplicationEvents();
}
將 ApplicationListener 注冊到事件廣播器,確保后續事件能被監聽。
10) 【重要】初始化所有單例 Bean
// AbstractApplicationContext.java
protected void finishBeanFactoryInitialization(ConfigurableListableBeanFactory beanFactory) {
    // Initialize conversion service for this context.
    if (beanFactory.containsBean(CONVERSION_SERVICE_BEAN_NAME) &&
        beanFactory.isTypeMatch(CONVERSION_SERVICE_BEAN_NAME, ConversionService.class)) {
        beanFactory.setConversionService(
            beanFactory.getBean(CONVERSION_SERVICE_BEAN_NAME, ConversionService.class));
    }
    if (!beanFactory.hasEmbeddedValueResolver()) {
        beanFactory.addEmbeddedValueResolver(strVal -> getEnvironment().resolvePlaceholders(strVal));
    }
    // Initialize LoadTimeWeaverAware beans early to allow for registering their transformers early.
    String[] weaverAwareNames = beanFactory.getBeanNamesForType(LoadTimeWeaverAware.class, false, false);
    for (String weaverAwareName : weaverAwareNames) {
        getBean(weaverAwareName);
    }
    // Stop using the temporary ClassLoader for type matching.
    beanFactory.setTempClassLoader(null);
    // Allow for caching all bean definition metadata, not expecting further changes.
    beanFactory.freezeConfiguration();

    // Instantiate all remaining (non-lazy-init) singletons.
    beanFactory.preInstantiateSingletons();
}

// DefaultListableBeanFactory.java
public void preInstantiateSingletons() throws BeansException {
    ...
    Object singletonInstance = getSingleton(beanName);
    ...
}
// DefaultSingletonBeanRegistry.java
@Nullable
protected Object getSingleton(String beanName, boolean allowEarlyReference) {
    // Quick check for existing instance without full singleton lock
    Object singletonObject = this.singletonObjects.get(beanName);
    if (singletonObject == null && isSingletonCurrentlyInCreation(beanName)) {
        singletonObject = this.earlySingletonObjects.get(beanName);
        if (singletonObject == null && allowEarlyReference) {
            synchronized (this.singletonObjects) {
                // Consistent creation of early reference within full singleton lock
                singletonObject = this.singletonObjects.get(beanName);
                if (singletonObject == null) {
                    singletonObject = this.earlySingletonObjects.get(beanName);
                    if (singletonObject == null) {
                        ObjectFactory<?> singletonFactory = this.singletonFactories.get(beanName);
                        if (singletonFactory != null) {
                            singletonObject = singletonFactory.getObject();
                            this.earlySingletonObjects.put(beanName, singletonObject);
                            this.singletonFactories.remove(beanName);
                        }
                    }
                }
            }
        }
    }
    return singletonObject;
}
- 核心邏輯:
DefaultListableBeanFactory.preInstantiateSingletons()方法會遍歷所有 Bean 定義,實例化并初始化非懶加載的單例 Bean。 - 關鍵過程:
- 調用
BeanPostProcessor的前置處理(如 AOP 代理生成)。 - 執行
@PostConstruct方法。 - 調用
InitializingBean.afterPropertiesSet()。
- 調用
getSingleton(String beanName, boolean allowEarlyReference) 如果allowEarlyReference是true的話,就用三級緩存來解決循環依賴【見后續文章】的問題。
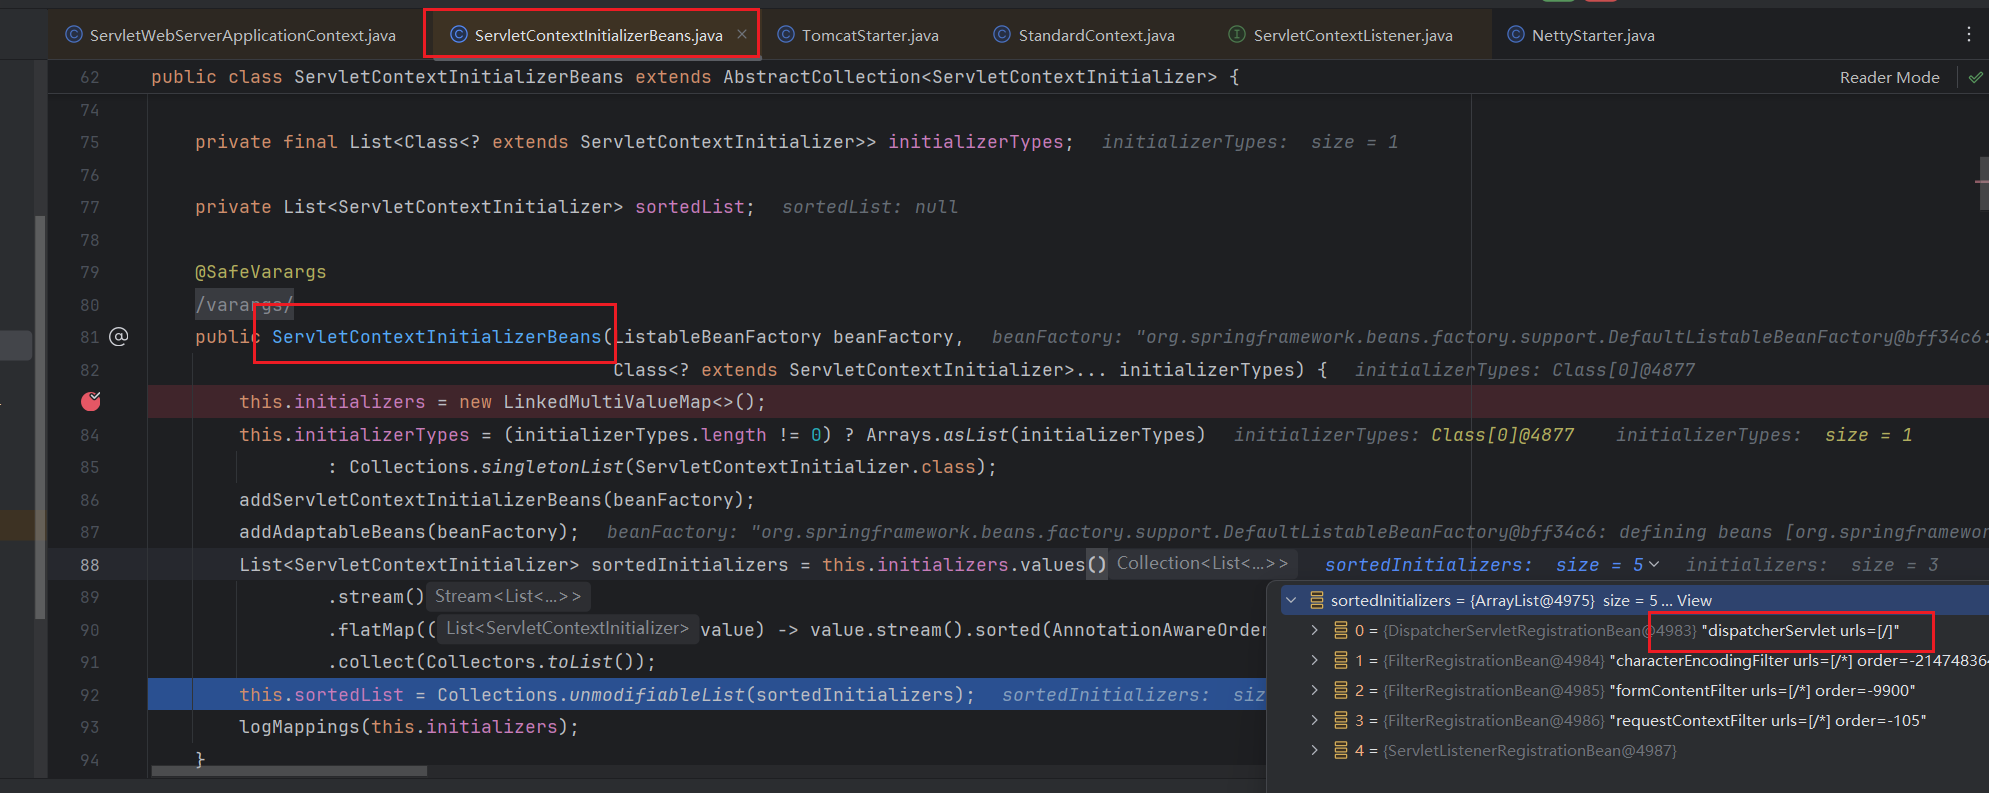
debug源碼得知,在DefaultListableBeanFactory::preInstantiateSingletons()中,調用了AbstractBeanFactory::getBean(String name)方法,接著往下是,AbstractBeanFactory::doGetBean(xx)方法,在該方法中有這樣一個片段
// AbstractBeanFactory.java
// Create bean instance.
if (mbd.isSingleton()) {
    sharedInstance = getSingleton(beanName, () -> {
        try {
            return createBean(beanName, mbd, args); //==========這里往下
        }
        catch (BeansException ex) {
            // Explicitly remove instance from singleton cache: It might have been put there
            // eagerly by the creation process, to allow for circular reference resolution.
            // Also remove any beans that received a temporary reference to the bean.
            destroySingleton(beanName);
            throw ex;
        }
    });
    beanInstance = getObjectForBeanInstance(sharedInstance, name, beanName, mbd);
}

// AbstractAutowireCapableBeanFactory.java
@Override
protected Object createBean(String beanName, RootBeanDefinition mbd, @Nullable Object[] args)
    throws BeanCreationException {
	....
    Object beanInstance = doCreateBean(beanName, mbdToUse, args);
}
protected Object doCreateBean(String beanName, RootBeanDefinition mbd, @Nullable Object[] args)
			throws BeanCreationException {
    ... // 有如下片段
    // Initialize the bean instance.
    Object exposedObject = bean;
    try {
        populateBean(beanName, mbd, instanceWrapper);
        exposedObject = initializeBean(beanName, exposedObject, mbd);
    }.....
}

// AbstractAutowireCapableBeanFactory.java
protected Object initializeBean(String beanName, Object bean, @Nullable RootBeanDefinition mbd) {
    if (System.getSecurityManager() != null) {
        AccessController.doPrivileged((PrivilegedAction<Object>) () -> {
            invokeAwareMethods(beanName, bean);
            return null;
        }, getAccessControlContext());
    }
    else {
        // 調用 Aware 接口回調
        invokeAwareMethods(beanName, bean);
    }

    Object wrappedBean = bean;
    if (mbd == null || !mbd.isSynthetic()) {
        // 1.調用BeanPostProcessors
        // ---觸發BeanPostProcessor的前置處理
        wrappedBean = applyBeanPostProcessorsBeforeInitialization(wrappedBean, beanName);
    }

    try {
        // 2.調用初始化的方法
        /*
        在這個里面
        先((InitializingBean) bean).afterPropertiesSet();
        接著
        String initMethodName = mbd.getInitMethodName();
		if (StringUtils.hasLength(initMethodName) &&
				!(isInitializingBean && "afterPropertiesSet".equals(initMethodName)) &&
				!mbd.hasAnyExternallyManagedInitMethod(initMethodName)) {
			invokeCustomInitMethod(beanName, bean, mbd);
		}
        */
        invokeInitMethods(beanName, wrappedBean, mbd);
    }
    catch (Throwable ex) {
        throw new BeanCreationException(
            (mbd != null ? mbd.getResourceDescription() : null),
            beanName, "Invocation of init method failed", ex);
    }
    if (mbd == null || !mbd.isSynthetic()) {
        // 觸發BeanPostProcessor的后置處理
        wrappedBean = applyBeanPostProcessorsAfterInitialization(wrappedBean, beanName);
    }

    return wrappedBean;
}
initializeBean 方法是 Spring 框架中 Bean 生命周期的核心方法之一,負責:
- 調用 Aware 接口回調(如
BeanNameAware、BeanFactoryAware等)。 - 觸發
BeanPostProcessor的前置處理(postProcessBeforeInitialization)。 - 執行 Bean 的初始化方法(
InitializingBean-->invokeInitMethods::afterPropertiesSet或自定義init-method)。 - 觸發
BeanPostProcessor的后置處理(postProcessAfterInitialization)。
對于場景引入的例子②中,發現@PostConstruct注解標注的方法,在applyBeanPostProcessorsBeforeInitialization()調用的,也就是在bean的InitializingBean之前就執行了。也就是說@PostConstruct 注解先執行 、 InitializingBean 接口方法 次之。
// 由上面可見,我們可以推斷執行順序如下:
Bean本身的構造函數
BeanPostProcessor的postProcessBeforeInitialization方法
類中添加了注解@PostConstruct 的方法 【上圖中的CommonAnnotationBeanPostProcessor】
InitializingBean的afterPropertiesSet方法
initMethod
BeanPostProcessor的postProcessAftrInitialization方法
11) 完成刷新
protected void finishRefresh() {
    // Clear context-level resource caches (such as ASM metadata from scanning).
    clearResourceCaches();

    // Initialize lifecycle processor for this context.
    initLifecycleProcessor();

    // Propagate refresh to lifecycle processor first.
    getLifecycleProcessor().onRefresh();

    // Publish the final event.
    // 發布一個ContextRefreshed的事件-----------
    publishEvent(new ContextRefreshedEvent(this));

    // Participate in LiveBeansView MBean, if active.
    if (!NativeDetector.inNativeImage()) {
        LiveBeansView.registerApplicationContext(this);
    }
}
可以看到,在容器刷新完成之后,會發布一個ContextRefreshed的事件,所以下面的監聽器會監聽到。
// 監聽ContextRefreshedEvent事件
@EventListener
public void onApplicationEvent(ContextRefreshedEvent event) {
    InitCode.startMethod("EventListener");
}
從這里可以看出來,我們框架使用者可以擴展的位置如下:
- BeanFactoryPostProcessor:動態修改 Bean 定義。
- BeanPostProcessor:干預 Bean 的初始化過程(如 AOP)。
- ApplicationListener
:監聽容器刷新完成事件。 - 自定義 ServletWebServerFactory:修改內嵌服務器配置。
容器刷新這一小節目前就分析到這里了。
③callRunners()
執行所有ApplicationRunner和CommandLineRunner的實現類。執行順序:通過@Order注解或Ordered接口控制。
//SpringApplication.java
private void callRunners(ApplicationContext context, ApplicationArguments args) {
    context.getBeanProvider(Runner.class).orderedStream().forEach((runner) -> {
        if (runner instanceof ApplicationRunner) {
            callRunner((ApplicationRunner) runner, args);
        }
        if (runner instanceof CommandLineRunner) {
            callRunner((CommandLineRunner) runner, args);
        }
    });
}


// 執行run方法了,就是我們重寫的run
private void callRunner(ApplicationRunner runner, ApplicationArguments args) {
    try {
        (runner).run(args);
    }
    catch (Exception ex) {
        throw new IllegalStateException("Failed to execute ApplicationRunner", ex);
    }
}

private void callRunner(CommandLineRunner runner, ApplicationArguments args) {
    try {
        (runner).run(args.getSourceArgs());
    }
    catch (Exception ex) {
        throw new IllegalStateException("Failed to execute CommandLineRunner", ex);
    }
}
3.總結
經過第二大節的整體分析,我們大致可以知道
- 在容器刷新之前,由于是Servlet的Application,故由模板方法運行創建Servlet容器,ServletContextListener接口contextInitialized會先執行。
- 調用構造方法創建bean對象,實例化
- aware接口
- BeanPostProcessor :: postProcessBeforeInitialization()
- @PostConstruct ---- 【CommonAnnotationBeanPostProcessor】
- InitializingBean接口的afterPropertiesSet()
- 自定義的initMethod
- BeanPostProcessor :: postProcessAfterInitialization()
- Runners
對于Spring的容器創建、bean的創建、以及事件等內容的詳細分析,請見后續文章。本文通過對SpringBoot一個使用場景,在參考了別人的方法之后,想要探究其原理,對其啟動過程作了一個大致的分析。
4.思考題
對上面作了大致分析后,其實還有其他方法,可以在需要在啟動的時候,執行一些邏輯。
監聽 ApplicationReadyEvent 事件.
@Component
public class StartupListener {
    @EventListener(ApplicationReadyEvent.class)
    public void onApplicationReady() {
        InitCode.startMethod("ApplicationReadyEventListener");
    }
}
這個在什么階段執行呢?
第二個問題?上面的4種方法【去掉**的】 + 思考題中的方法 = 5種方法。他們各自有什么優劣呢?
end. 參考
- https://blog.csdn.net/QIU176161650/article/details/118087254
- https://blog.csdn.net/weixin_53287520/article/details/139484810
- https://blog.csdn.net/yerenyuan_pku/article/details/110442093
- https://blog.csdn.net/m0_61933976/article/details/128697003
示例代碼倉庫見 【https://gitee.com/quercus-sp204/sourcecode-and-demos】中的 “netty-sp” 模塊部分。

 浙公網安備 33010602011771號