
帶你徹底掌握Bean的生命周期
摘要:我們將深入研究Spring Framework的核心部分——Spring Bean的生命周期。
本文分享自華為云社區《Spring高手之路5——徹底掌握Bean的生命周期》,作者: 磚業洋__ 。
1. 理解Bean的生命周期
1.1 生命周期的各個階段
在Spring IOC容器中,Bean的生命周期大致如下:
- 實例化:當啟動Spring應用時,IOC容器就會為在配置文件中聲明的每個<bean>創建一個實例。
- 屬性賦值:實例化后,Spring就通過反射機制給Bean的屬性賦值。
- 調用初始化方法:如果Bean配置了初始化方法,Spring就會調用它。初始化方法是在Bean創建并賦值之后調用,可以在這個方法里面寫一些業務處理代碼或者做一些初始化的工作。
- Bean運行期:此時,Bean已經準備好被程序使用了,它已經被初始化并賦值完成。
- 應用程序關閉:當關閉IOC容器時,Spring會處理配置了銷毀方法的Bean。
- 調用銷毀方法:如果Bean配置了銷毀方法,Spring會在所有Bean都已經使用完畢,且IOC容器關閉之前調用它,可以在銷毀方法里面做一些資源釋放的工作,比如關閉連接、清理緩存等。
這就是Spring IOC容器管理Bean的生命周期,幫助我們管理對象的創建和銷毀,以及在適當的時機做適當的事情。
我們可以將生命周期的觸發稱為回調,因為生命周期的方法是我們自己定義的,但方法的調用是由框架內部幫我們完成的,所以可以稱之為“回調”。
2. 理解init-method和destroy-method
讓我們先了解一種最容易理解的生命周期階段:初始化和銷毀方法。這些方法可以在Bean的初始化和銷毀階段起作用,我們通過示例來演示這種方式。
為了方便演示XML和注解的方式,接下來我們會創建兩個類來分別進行演示,分別為Lion和Elephant,讓我們一步一步對比觀察。
2.1 從XML配置創建Bean看生命周期
先創建一個類Lion
package com.example.demo.bean;
public class Lion {
 private String name;
 public void setName(String name) {
 this.name = name;
 }
 public void init() {
 System.out.println(name + " has been initialized...");
 }
 public void destroy() {
 System.out.println(name + " has been destroyed...");
 }
}
在XML中,我們使用<bean>標簽來注冊Lion:
applicationContext.xml
<?xml version="1.0" encoding="UTF-8"?>
<beans xmlns="http://www.springframework.org/schema/beans"
 xmlns:xsi="http://www.w3.org/2001/XMLSchema-instance"
 xsi:schemaLocation="http://www.springframework.org/schema/beans http://www.springframework.org/schema/beans/spring-beans.xsd">
 <bean class="com.example.demo.bean.Lion"
 init-method="init" destroy-method="destroy">
 <property name="name" value="simba"/>
 </bean>
</beans>
加上主程序
package com.example.demo.application;
import org.springframework.context.annotation.ComponentScan;
import org.springframework.context.support.ClassPathXmlApplicationContext;
@ComponentScan("com.example")
public class DemoApplication {
 public static void main(String[] args) {
 System.out.println("Spring容器初始化開始");
 ClassPathXmlApplicationContext context = new ClassPathXmlApplicationContext("applicationContext.xml");
 System.out.println("Spring容器初始化完成。");
 System.out.println("==================");
 System.out.println("Spring容器準備關閉");
 context.close();
 System.out.println("Spring容器已關閉。");
 }
}
運行結果
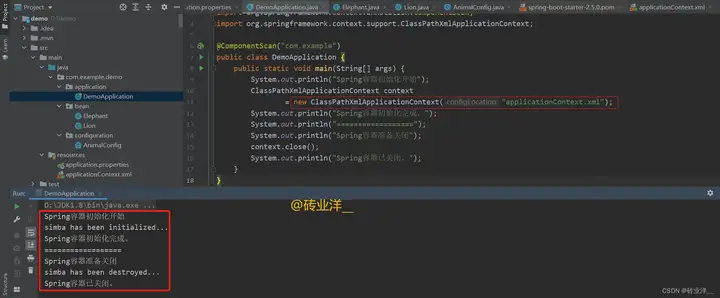
在<bean>標簽中,有兩個屬性:init-method和destroy-method,這兩個屬性用于指定初始化和銷毀方法。
這里"simba has been initialized...",證明init()方法被調用了。當context.close()被調用時,看到"simba has been destroyed...",證明destroy()方法被調用了。
在 IOC 容器初始化之前,默認情況下 Bean 已經創建好了,而且完成了初始化動作;容器調用銷毀動作時,先銷毀所有 Bean ,最后 IOC 容器全部銷毀完成。
這個例子通過一個簡單的Spring應用程序顯示了Spring bean的生命周期。我們可以在創建bean時根據需要使用這些生命周期方法。
2.2 從配置類注解配置創建Bean看生命周期
這里再創建一個類Elephant和上面對比
package com.example.demo.bean;
public class Elephant {
 private String name;
 public void setName(String name) {
 this.name = name;
 }
 public void init() {
 System.out.println(name + " has been initialized...");
 }
 public void destroy() {
 System.out.println(name + " has been destroyed...");
 }
}
對于注解,@Bean注解中也有類似的屬性:initMethod和destroyMethod,這兩個屬性的作用與XML配置中的相同。
package com.example.demo.configuration;
import com.example.demo.bean.Elephant;
import org.springframework.context.annotation.Bean;
import org.springframework.context.annotation.Configuration;
import org.springframework.context.annotation.ImportResource;
@Configuration
@ImportResource("classpath:applicationContext.xml")
public class AnimalConfig {
 @Bean(initMethod = "init", destroyMethod = "destroy")
 public Elephant elephant() {
 Elephant elephant = new Elephant();
 elephant.setName("Dumbo");
 return elephant;
 }
}
這里用@ImportResource("classpath:applicationContext.xml")引入xml配置創建Bean進行對比。
主程序改為如下:
package com.example.demo.application;
import com.example.demo.configuration.AnimalConfig;
import org.springframework.context.annotation.AnnotationConfigApplicationContext;
import org.springframework.context.annotation.ComponentScan;
@ComponentScan("com.example")
public class DemoApplication {
 public static void main(String[] args) {
 System.out.println("Spring容器初始化開始");
 AnnotationConfigApplicationContext context = new AnnotationConfigApplicationContext(AnimalConfig.class);
 System.out.println("Spring容器初始化完成。");
 System.out.println("==================");
 System.out.println("Spring容器準備關閉");
 context.close();
 System.out.println("Spring容器已關閉。");
 }
}
運行結果

注意:在Spring中,如果在Java配置中定義了一個Bean,并在XML中定義了一個相同id或name的Bean,那么最后注冊的那個Bean會覆蓋之前注冊的,這取決于配置文件加載順序,無論在Java配置中還是XML配置中定義的initMethod或destroyMethod,最后生效的總是后加載的配置中定義的。
“init-method”是指定初始化回調方法的屬性的統稱,無論它是在XML配置還是Java配置中使用。同樣地,“destroy-method”是指定銷毀回調方法的屬性的統稱。后文我們講解多種聲明周期共存的時候,將延續這種說法。
2.3 初始化和銷毀方法的特性
在Spring框架中配置Bean的初始化和銷毀方法時,需要按照Spring的規范來配置這些方法,否則Spring可能無法正確地調用它們。下面給每個特性提供一個解釋和示例:
1、方法的訪問權限無限制:這意味著無論方法是public、protected還是private,Spring都可以調用。Spring通過反射來調用這些方法,所以它可以忽略Java的訪問權限限制。示例:
public class MyBean {
 private void init() {
 // 初始化代碼
 }
}
在上述代碼中,即使init方法是private的,Spring也可以正常調用。
2、方法沒有參數:由于Spring不知道需要傳遞什么參數給這些方法,所以這些方法不能有參數。示例:
public class MyBean {
 public void init() {
 // 初始化代碼
 }
}
在上述代碼中,init方法沒有參數,如果添加了參數,如public void init(String arg),Spring將無法調用此方法。
3、方法沒有返回值:由于返回的值對Spring來說沒有意義,所以這些方法不應該有返回值。示例:
public class MyBean {
 public void init() {
 // 初始化代碼
 }
}
在上述代碼中,init方法是void的,如果讓此方法返回一個值,如public String init(),那么Spring將忽略此返回值。
4、方法可以拋出異常:如果在初始化或銷毀過程中發生錯誤,這些方法可以拋出異常來通知Spring。示例:
public class MyBean {
 public void init() throws Exception {
 // 初始化代碼
 if (somethingGoesWrong) {
 throw new Exception("Initialization failed.");
 }
 }
}
在上述代碼中,如果在init方法中的初始化代碼出錯,它會拋出一個異常。Spring框架默認會停止Bean的創建,并拋出異常。
2.4 探究Bean的初始化流程順序
在上面的代碼中,我們可以看出Bean在IOC容器初始化階段就已經創建并初始化了,那么每個Bean的初始化動作又是如何進行的呢?我們修改一下Lion,在構造方法和setName方法中加入控制臺打印,這樣在調用這些方法時,會在控制臺上得到反饋。
package com.example.demo.bean;
public class Lion {
 private String name;
 public Lion() {
 System.out.println("Lion's constructor is called...");
 }
 public void setName(String name) {
 System.out.println("setName method is called...");
 this.name = name;
 }
 public void init() {
 System.out.println(name + " has been initialized...");
 }
 public void destroy() {
 System.out.println(name + " has been destroyed...");
 }
}
我們重新運行主程序:
@ComponentScan("com.example")
public class DemoApplication {
 public static void main(String[] args) {
 System.out.println("Spring容器初始化開始");
 ClassPathXmlApplicationContext context = new ClassPathXmlApplicationContext("applicationContext.xml");
 System.out.println("Spring容器初始化完成。");
 System.out.println("==================");
 System.out.println("Spring容器準備關閉");
 context.close();
 System.out.println("Spring容器已關閉。");
 }
}
運行結果
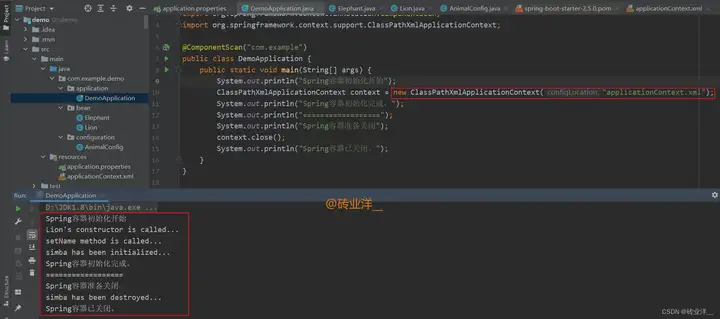
我們可以得出結論:在Bean的生命周期中,首先進行屬性賦值,然后執行init-method標記的方法。
3. @PostConstruct和@PreDestroy
在JSR250規范中,有兩個與Bean生命周期相關的注解,即@PostConstruct和@PreDestroy。這兩個注解對應了Bean的初始化和銷毀階段。
@PostConstruct注解標記的方法會在bean屬性設置完畢后(即完成依賴注入),但在bean對外暴露(即可以被其他bean引用)之前被調用,這個時機通常用于完成一些初始化工作。
@PreDestroy注解標記的方法會在Spring容器銷毀bean之前調用,這通常用于釋放資源。
3.1 示例:@PostConstruct和@PreDestroy的使用
我們這里還是用Lion類來創建這個例子,將Lion類修改為使用@PostConstruct和@PreDestroy注解
package com.example.demo.bean;
import org.springframework.stereotype.Component;
import javax.annotation.PostConstruct;
import javax.annotation.PreDestroy;
@Component
public class Lion {
 private String name;
 public void setName(String name) {
 this.name = name;
 }
 @PostConstruct
 public void init() {
 System.out.println("Lion is going through init.");
 }
 @PreDestroy
 public void destroy() {
 System.out.println("Lion is going through destroy.");
 }
 @Override
 public String toString() {
 return "Lion{" + "name=" + name + '}';
 }
}
給Lion類加上@Component注解,讓IOC容器去管理這個類,我們這里就不把Elephant類加進來增加理解難度了。
被 @PostConstruct 和 @PreDestroy 注解標注的方法與 init-method / destroy-method 方法的初始化和銷毀的要求是一樣的,訪問修飾符沒有限制,private也可以。
我們可以注釋掉之前的配置類和XML配置,因為和這里的例子沒有關系,我們來看看主程序:
package com.example.demo.application;
import org.springframework.context.annotation.AnnotationConfigApplicationContext;
public class DemoApplication {
 public static void main(String[] args) {
 System.out.println("Spring容器初始化開始");
 AnnotationConfigApplicationContext context = new AnnotationConfigApplicationContext("com.example.demo.bean");
 System.out.println("Spring容器初始化完成。");
 System.out.println("==================");
 System.out.println("Spring容器準備關閉");
 context.close();
 System.out.println("Spring容器已關閉。");
 }
}
運行結果
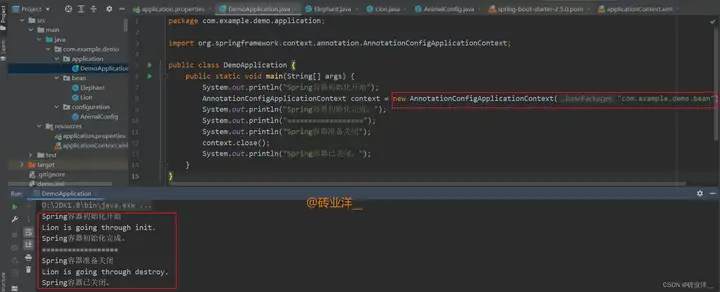
這里可以看到@PostConstruct和@PreDestroy注解正確地應用在了Lion的初始化和銷毀過程中。
3.2 初始化和銷毀——注解和init-method共存對比
@PostConstruct和@PreDestroy注解與init-method/destroy-method屬性如何共存呢?我們來看看
我們只用Lion類來舉例子,在Lion類中添加新的open()和close()方法
需要的全部代碼如下:
Lion.java
package com.example.demo.bean;
import javax.annotation.PostConstruct;
import javax.annotation.PreDestroy;
public class Lion {
 private String name;
 public Lion() {
 System.out.println("Lion構造器");
 }
 public void setName(String name) {
 System.out.println("Lion設置name");
 this.name = name;
 }
 public void open() {
 System.out.println("配置類initMethod - 打開Lion。。。");
 }
 public void close() {
 System.out.println("配置類destroyMethod - 關閉Lion。。。");
 }
 @PostConstruct
 public void init() {
 System.out.println("@PostConstruct - Lion正在進行初始化。。。");
 }
 @PreDestroy
 public void destroy() {
 System.out.println("@PreDestroy - Lion正在進行銷毀。。。");
 }
 @Override
 public String toString() {
 return "Lion{" + "name=" + name + '}';
 }
}
配置類AnimalConfig.java
package com.example.demo.configuration;
import com.example.demo.bean.Lion;
import org.springframework.context.annotation.Bean;
import org.springframework.context.annotation.Configuration;
@Configuration
public class AnimalConfig {
 @Bean(initMethod = "open", destroyMethod = "close")
 public Lion lion() {
 return new Lion();
 }
}
主程序
package com.example.demo.application;
import com.example.demo.configuration.AnimalConfig;
import org.springframework.context.annotation.AnnotationConfigApplicationContext;
public class DemoApplication {
 public static void main(String[] args) {
 System.out.println("Spring容器初始化開始");
 AnnotationConfigApplicationContext context = new AnnotationConfigApplicationContext(AnimalConfig.class);
 System.out.println("Spring容器初始化完成。");
 System.out.println("==================");
 System.out.println("Spring容器準備關閉");
 context.close();
 System.out.println("Spring容器已關閉。");
 }
}
運行結果
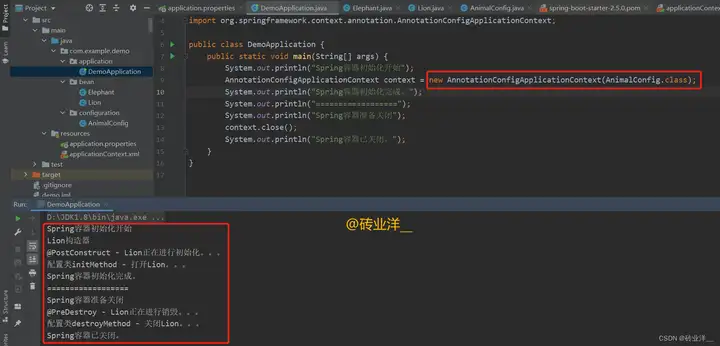
這里可以看到@PostConstruct和@PreDestroy注解的優先級始終高于配置類中@Bean注解的initMethod和destroyMethod屬性。
4. 實現InitializingBean和DisposableBean接口
這兩個接口是 Spring 預定義的兩個關于生命周期的接口。他們被觸發的時機與上文中的 init-method / destroy-method 以及 JSR250 規范的注解相同,都是在 Bean 的初始化和銷毀階段回調的。下面演示如何使用這兩個接口。
4.1 示例:實現InitializingBean和DisposableBean接口
創建Bean,我們讓Lion類實現這兩個接口:
Lion.java
package com.example.demo.bean;
import org.springframework.beans.factory.DisposableBean;
import org.springframework.beans.factory.InitializingBean;
import org.springframework.stereotype.Component;
@Component
public class Lion implements InitializingBean, DisposableBean {
 private Integer energy;
 @Override
 public void afterPropertiesSet() throws Exception {
 System.out.println("獅子已經充滿能量。。。");
 this.energy = 100;
 }
 @Override
 public void destroy() throws Exception {
 System.out.println("獅子已經消耗完所有能量。。。");
 this.energy = 0;
 }
 @Override
 public String toString() {
 return "Lion{" + "energy=" + energy + '}';
 }
}
InitializingBean接口只有一個方法:afterPropertiesSet()。在Spring框架中,當一個bean的所有屬性都已經被設置完畢后,這個方法就會被調用。也就是說,這個bean一旦被初始化,Spring就會調用這個方法。我們可以在bean的所有屬性被設置后,進行一些自定義的初始化工作。
DisposableBean接口也只有一個方法:destroy()。當Spring容器關閉并銷毀bean時,這個方法就會被調用。我們可以在bean被銷毀前,進行一些清理工作。
主程序:
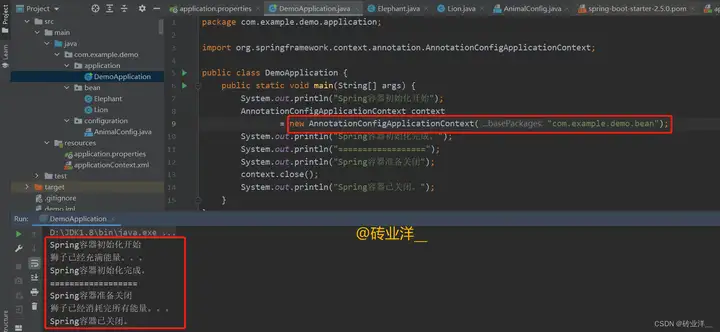
package com.example.demo.application;
import org.springframework.context.annotation.AnnotationConfigApplicationContext;
public class DemoApplication {
 public static void main(String[] args) {
 System.out.println("Spring容器初始化開始");
 AnnotationConfigApplicationContext context
 = new AnnotationConfigApplicationContext("com.example.demo.bean");
 System.out.println("Spring容器初始化完成。");
 System.out.println("==================");
 System.out.println("Spring容器準備關閉");
 context.close();
 System.out.println("Spring容器已關閉。");
 }
}
運行結果:
4.2 三種生命周期并存
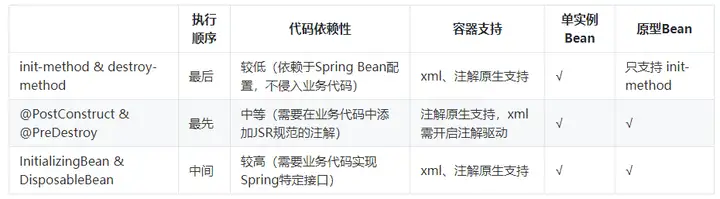
在Spring框架中,控制Bean生命周期的三種方式是:
- 使用Spring的init-method和destroy-method(在XML配置或者Java配置中自定義的初始化和銷毀方法);
- 使用JSR-250規范的@PostConstruct和@PreDestroy注解;
- 實現Spring的InitializingBean和DisposableBean接口。
接下來我們測試一下,一個Bean同時定義init-method、destroy-method方法,使用@PostConstruct、@PreDestroy注解,以及實現InitializingBean、DisposableBean接口,執行順序是怎樣的。
我們創建一個新的類Lion2,并同時進行三種方式的生命周期控制:
需要運行的全部代碼如下:
package com.example.demo.bean;
import org.springframework.beans.factory.DisposableBean;
import org.springframework.beans.factory.InitializingBean;
import org.springframework.stereotype.Component;
import javax.annotation.PostConstruct;
import javax.annotation.PreDestroy;
@Component
public class Lion2 implements InitializingBean, DisposableBean {
 private Integer energy;
 public void open() {
 System.out.println("init-method - 獅子開始行動。。。");
 }
 public void close() {
 System.out.println("destroy-method - 獅子結束行動。。。");
 }
 @PostConstruct
 public void gainEnergy() {
 System.out.println("@PostConstruct - 獅子已經充滿能量。。。");
 this.energy = 100;
 }
 @PreDestroy
 public void loseEnergy() {
 System.out.println("@PreDestroy - 獅子已經消耗完所有能量。。。");
 this.energy = 0;
 }
 @Override
 public void afterPropertiesSet() throws Exception {
 System.out.println("InitializingBean - 獅子準備行動。。。");
 }
 @Override
 public void destroy() throws Exception {
 System.out.println("DisposableBean - 獅子行動結束。。。");
 }
}
接著,我們注冊Lion2:
package com.example.demo.configuration;
import com.example.demo.bean.Lion2;
import org.springframework.context.annotation.Bean;
import org.springframework.context.annotation.Configuration;
@Configuration
public class AnimalConfig {
 @Bean(initMethod = "open", destroyMethod = "close")
 public Lion2 lion2() {
 return new Lion2();
 }
}
然后讓注解 IOC 容器驅動這個配置類,主程序如下:
package com.example.demo.application;
import org.springframework.context.annotation.AnnotationConfigApplicationContext;
public class DemoApplication {
 public static void main(String[] args) {
 System.out.println("Spring容器初始化開始");
 AnnotationConfigApplicationContext context
 = new AnnotationConfigApplicationContext("com.example.demo");
 System.out.println("Spring容器初始化完成。");
 System.out.println("==================");
 System.out.println("Spring容器準備關閉");
 context.close();
 System.out.println("Spring容器已關閉。");
 }
}
運行結果:
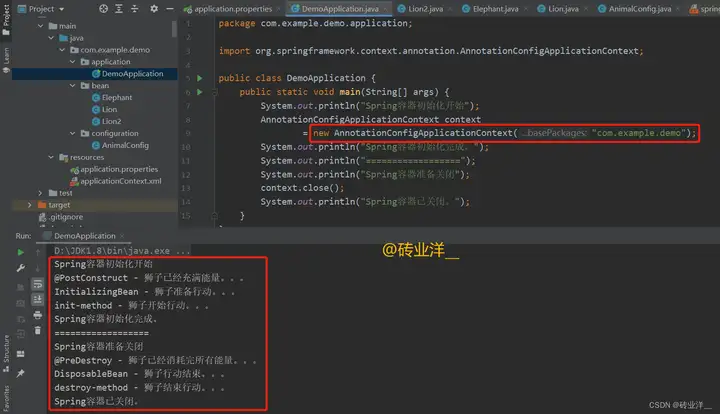
從上面的結果,我們可以得出以下結論,在Spring框架中單實例Bean的初始化和銷毀過程有這樣的執行順序:
初始化順序:@PostConstruct → InitializingBean → init-method
銷毀順序:@PreDestroy → DisposableBean → destroy-method
在初始化Bean時,@PostConstruct注解方法會首先被執行,然后是實現InitializingBean接口的afterPropertiesSet方法,最后是init-method指定的方法。
在銷毀Bean時,@PreDestroy注解方法會首先被執行,然后是實現DisposableBean接口的destroy方法,最后是destroy-method指定的方法
結合前面說過的屬性賦值(構造器方法和setter方法),簡單總結一下Spring Bean生命周期的流程:
- 實例化(通過構造器方法);
- 設置Bean的屬性(通過setter方法);
- 調用Bean的初始化方法(@PostConstruct、afterPropertiesSet方法或者init-method指定的方法);
- Bean可以被應用程序使用;
- 當容器關閉時,調用Bean的銷毀方法(@PreDestroy、destroy方法或者destroy-method指定的方法)。
5. 原型Bean的生命周期
原型Bean的創建和初始化過程與單例Bean類似,但由于原型Bean的性質,其生命周期與IOC容器的生命周期并不相同。
這里展示一下需要的全部代碼。
Lion2.java
package com.example.demo.bean;
import org.springframework.beans.factory.DisposableBean;
import org.springframework.beans.factory.InitializingBean;
import org.springframework.stereotype.Component;
import javax.annotation.PostConstruct;
import javax.annotation.PreDestroy;
public class Lion2 implements InitializingBean, DisposableBean {
 private Integer energy;
 public void roar() {
 System.out.println("The lion is roaring...");
 }
 public void rest() {
 System.out.println("The lion is resting...");
 }
 @PostConstruct
 public void gainEnergy() {
 System.out.println("@PostConstruct - 獅子已經充滿能量。。。");
 this.energy = 100;
 }
 @PreDestroy
 public void loseEnergy() {
 System.out.println("@PreDestroy - 獅子已經消耗完所有能量。。。");
 this.energy = 0;
 }
 @Override
 public void afterPropertiesSet() throws Exception {
 System.out.println("InitializingBean - 獅子準備行動。。。");
 }
 @Override
 public void destroy() throws Exception {
 System.out.println("DisposableBean - 獅子行動結束。。。");
 }
}
然后在Spring的Java配置中聲明并設定其為原型Bean
package com.example.demo.configuration;
import com.example.demo.bean.Lion2;
import org.springframework.beans.factory.config.ConfigurableBeanFactory;
import org.springframework.context.annotation.Bean;
import org.springframework.context.annotation.Configuration;
import org.springframework.context.annotation.Scope;
@Configuration
public class PrototypeLifecycleConfiguration {
 @Bean(initMethod = "roar", destroyMethod = "rest")
 @Scope(ConfigurableBeanFactory.SCOPE_PROTOTYPE)
 public Lion2 lion() {
 return new Lion2();
 }
}
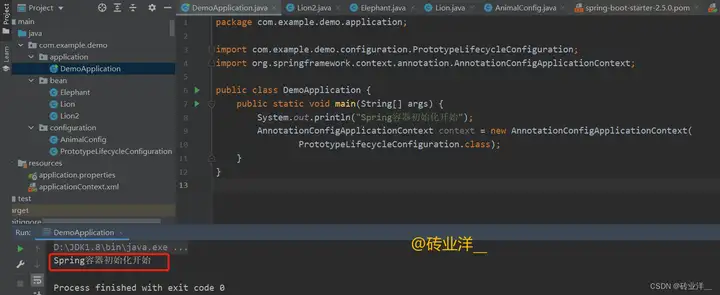
如果我們只是啟動了IOC容器,但并未請求Lion2的實例,Lion Bean的初始化不會立刻發生。也就是說,原型Bean不會隨著IOC容器的啟動而初始化。以下是啟動容器但并未請求Bean的代碼:
package com.example.demo.application;
import com.example.demo.configuration.PrototypeLifecycleConfiguration;
import org.springframework.context.annotation.AnnotationConfigApplicationContext;
public class DemoApplication {
 public static void main(String[] args) {
 System.out.println("Spring容器初始化開始");
 AnnotationConfigApplicationContext context = new AnnotationConfigApplicationContext(
 PrototypeLifecycleConfiguration.class);
 }
}
運行結果:
當我們明確請求一個Lion2的實例時,我們會看到所有的初始化方法按照預定的順序執行,這個順序跟單例Bean完全一致:
package com.example.demo.application;
import com.example.demo.bean.Lion2;
import com.example.demo.configuration.PrototypeLifecycleConfiguration;
import org.springframework.context.annotation.AnnotationConfigApplicationContext;
public class DemoApplication {
 public static void main(String[] args) {
 System.out.println("Spring容器初始化開始");
 AnnotationConfigApplicationContext context = new AnnotationConfigApplicationContext(
 PrototypeLifecycleConfiguration.class);
 System.out.println("Ready to get a Lion instance...");
 Lion2 lion = context.getBean(Lion2.class);
 System.out.println("A Lion instance has been fetched...");
 System.out.println("Lion instance is no longer needed, preparing to destroy...");
 context.getBeanFactory().destroyBean(lion);
 System.out.println("Lion instance has been destroyed...");
 }
}
運行結果:
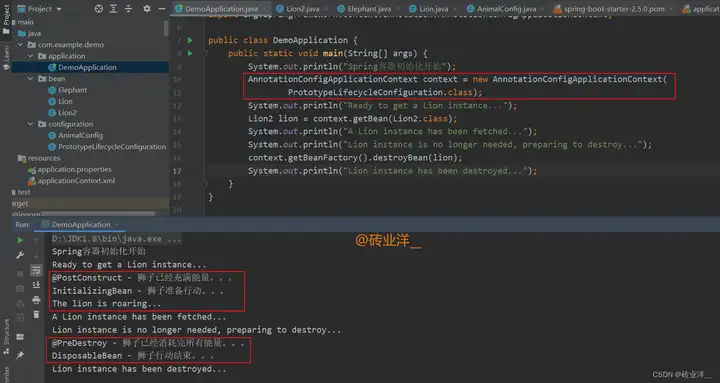
將原型Bean和單例Bean的三種生命周期進行對比后發現,調用IOC容器的destroyBean()方法銷毀原型Bean時,只有@PreDestroy注解和DisposableBean接口的destroy方法會被觸發,而被destroy-method標記的自定義銷毀方法并不會被執行。
從這里我們可以得出結論:在銷毀原型Bean時,Spring不會執行由destroy-method標記的自定義銷毀方法,所以原型Bean的destroy-method的也有局限性。如果有重要的清理邏輯需要在Bean銷毀時執行,那么應該將這部分邏輯放在@PreDestroy注解的方法或DisposableBean接口的destroy方法中。
6. Spring中控制Bean生命周期的三種方式總結

 浙公網安備 33010602011771號