
推薦一款基于.NET的進程間數據交互經典解決方案
在前面的文章中,我們介紹了基于Remoting,共享內存等技術的進程間通信方案,今天介紹一款基于.NET的進程間數據交互經典解決方案-管道(Pipes),僅供學習分享使用,如有不足之處,還請指正。

管道概述
在C#中,管道(Pipes)是一種進程間通信(IPC)機制,允許不同進程進行數據傳輸,位于System.IO.Pipes命名空間。C#提供了兩種類型的管道:匿名管道和命名管道,分別適用于不同場景:
- 匿名管道:匿名管道在本地計算機上提供進程間通信。 它們提供的功能比命名管道少,但也需要更少的開銷。 可以使用匿名管道來簡化本地計算機上的進程間通信。 不能使用匿名管道通過網絡進行通信。
- 命名管道:命名管道提供管道服務器與一個或多個管道客戶端之間的進程間通信。 它們提供的功能比匿名管道更多,這些管道在本地計算機上提供進程間通信。 命名管道支持通過網絡和多個服務器實例、基于消息的通信和客戶端模擬進行全雙工通信,這樣連接進程就可以在遠程服務器上使用自己的權限集。
匿名管道
匿名管道功能比較少,具有如下特點:
- 匿名管道只能在單一計算機上進行通信,不能跨服務器進行通信。
- 匿名管道只適于父子進程,不適于兩個相關獨立無任何關系的進程。
- 匿名管道只支持單向傳輸,不支持雙擊傳輸。
匿名管道通過AnonymousPipeServerStream實現服務端,AnonymousPipeClientStream實現客戶端,服務端和客戶端可以分別進行接收(PipeDirection.In)或輸出數據(PipeDirection.Out),但不是既接收又發送數據(PipeDirection.InOut)。
服務端
在本實例中,服務端是一個WinForm可執行程序【DemoAnonymousPipeServer】,用于接收客戶端發送的數據,首先定義一個AnonymousPipeServer類,用于封裝匿名管道服務端(AnonymousPipeServerStream)的操作。如下所示:
using System.IO.Pipes;

namespace DemoPipe.Common
{
    /// <summary>
    /// 匿名管道幫助類
    /// </summary>
    public class AnonymousPipeServer:IDisposable
    {
        private AnonymousPipeServerStream pipeServerStream;

        private CancellationTokenSource cts;

        private CancellationToken token;

        public Action<string> Received;

        private string clientHandle;
        public string ClientHandle
        {
            get { return clientHandle; }
            set { clientHandle = value; }
        }

        private Task receiveTask;

        public AnonymousPipeServer()
        {
            pipeServerStream = new AnonymousPipeServerStream(PipeDirection.In, HandleInheritability.Inheritable);
            this.clientHandle = pipeServerStream.GetClientHandleAsString();
            cts = new CancellationTokenSource();
            token = cts.Token;
        }

        public void BeginReceive()
        {
            receiveTask = Task.Run(() =>
            {
                using (StreamReader sr = new StreamReader(pipeServerStream))
                {
                    while (!token.IsCancellationRequested)
                    {
                        try
                        {
                            string? msg = sr.ReadLine();
                            if (!string.IsNullOrEmpty(msg))
                            {
                                Received?.Invoke($"[{ClientHandle}]{msg}");
                            }
                        }
                        catch (Exception ex)
                        {
                            Console.WriteLine(ex.Message);
                            Console.WriteLine(ex.StackTrace);
                        }
                        finally
                        {
                            Task.Delay(500);
                        }
                    }
                }
            });
        }


        /// <summary>
        /// 資源釋放
        /// </summary>
        public void Dispose()
        {
            this.cts.Cancel();
            if (pipeServerStream != null)
            {
                pipeServerStream.DisposeLocalCopyOfClientHandle();
                pipeServerStream.Close();
                pipeServerStream.Dispose();
            }
        }
    }
}
在上述代碼中,服務端通過StreamReader實現對流的讀取,用于不斷的接收數據,如接收到數據,則調用輸出的Received委托方法。接下來,FrmMain頁面實例化AnonymousPipeServer,并訂閱Received委托方法,當接收到數據時,觸發此方法,并將接收到的數據顯示在UI頁面上。
由于匿名管道只支持父子進程,所以在FrmMain頁面打開子進程客戶端,并將客戶端句柄傳遞給客戶端,用于初始化客戶端對象。如下所示:
using DemoPipe.Common;
using System.Diagnostics;

namespace DemoAnonymousPipeServer
{
    public partial class FrmMain : Form
    {
        private AnonymousPipeServer server;

        private Process client;

        public FrmMain()
        {
            InitializeComponent();
            server = new AnonymousPipeServer();
            this.lblClientHandle.Text = server.ClientHandle;
            server.Received += new Action<string>((string msg) =>
            {
                this.txtReceiveMsg.Invoke(() =>
                {
                    this.txtReceiveMsg.AppendText($"{DateTime.Now.ToString("yyyy-MM-dd HH:mm:ss.fff")}:{msg}\r\n");
                });
            });
            server.BeginReceive();
        }

        private void btnOpenClient_Click(object sender, EventArgs e)
        {
            string clientName = "DemoAnonymousPipeClient.exe";
            if (Process.GetProcessesByName(clientName).Length < 1)
            {
                client = new Process();
                client.StartInfo.FileName = clientName;
                client.StartInfo.Arguments = server.ClientHandle;
                client.StartInfo.UseShellExecute = false;
                client.Start();
            }
        }
    }
}
客戶端
在本示例中,客戶端是一個WinForm可執行程序【DemoAnonymousPipeClient】,用于和服務端建立連接,并發送數據到服務端,首先創建AnonymousPipeClient類,用于封裝對匿名管道客戶端AnonymousPipeClientStream的操作。如下所示:
using System;
using System.Collections.Generic;
using System.IO.Pipes;
using System.Linq;
using System.Text;
using System.Threading.Tasks;

namespace DemoPipe.Common
{
    public class AnonymousPipeClient:IDisposable
    {
        private PipeStream pipeClientStream;

        private string pipeHandle;

        private StreamWriter streamWriter;

        public AnonymousPipeClient(string pipeHandle)
        {
            this.pipeHandle = pipeHandle;
            pipeClientStream = new AnonymousPipeClientStream(PipeDirection.Out, this.pipeHandle);
            this.streamWriter = new StreamWriter(pipeClientStream);
            this.streamWriter.AutoFlush = true;
        }

        public void Send(string msg)
        {
            try
            {
                this.streamWriter.WriteLine(msg);
                pipeClientStream.WaitForPipeDrain();
            }
            catch (IOException ex)
            {
                Console.WriteLine(ex.Message);
                Console.WriteLine(ex.StackTrace);
            }
        }

        public void Dispose()
        {
            if (this.streamWriter != null)
            {
                this.streamWriter.Close();
                this.streamWriter.Dispose();
            }
            if (pipeClientStream != null)
            {
                pipeClientStream.Close();
                pipeClientStream.Dispose();
            }
        }
    }
}
在上述代碼中,客戶端通過StreamWriter實現對流的寫入, 用于將UI頁面用戶輸入的信息發送到服務端。接下來在FrmMain頁面中創建AnonymousPipeClient實例,并傳入父進程傳遞來的句柄。如下所示:
using DemoPipe.Common;

namespace DemoAnonymousPipeClient
{
    public partial class FrmMain : Form
    {
        private AnonymousPipeClient client;
        public FrmMain()
        {
            InitializeComponent();
            this.txtClientHandle.Text = PipeInstance.PipeHandle;
        }

        private void btnSend_Click(object sender, EventArgs e)
        {
            try
            {
                string msg = this.txtSendMsg.Text;
                if (!string.IsNullOrEmpty(msg))
                {
                    client.Send(msg);
                }
            }
            catch (Exception ex)
            {
                Console.WriteLine(ex.Message);
                Console.WriteLine(ex.StackTrace);
            }
        }

        private void btnInit_Click(object sender, EventArgs e)
        {
            try
            {
                string clientHandle = this.txtClientHandle.Text;
                client = new AnonymousPipeClient(clientHandle);
                MessageBox.Show("Init success.","Info",MessageBoxButtons.OK,MessageBoxIcon.Information);
            }
            catch (Exception ex)
            {
                Console.WriteLine(ex.Message);
                Console.WriteLine(ex.StackTrace);
            }
        }
    }
}
實例演示
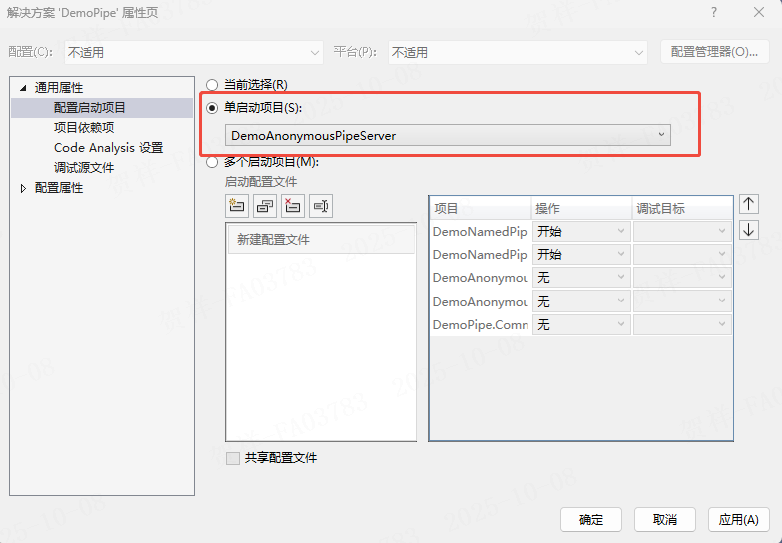
由于客戶端以子進程的方式啟動,在Visual Studio中啟動時只需要啟動服務端一個項目,可以在解決方案右鍵打開“配置啟動項”對話框,如下所示:
運行實例效果如下所示:
命名管道
命名管道相對于匿名管道,功能較多,具有如下特點:
- 命名管道支持跨服務進程間通信
- 命名管道支持多管道通信。
- 命名管道支持單向通信和雙向通信。
命名管道通過NamedPipeServerStream實現服務端,NamedPipeClientStream實現客戶端,服務端和客戶端可以分別進行接收(PipeDirection.In)或輸出數據(PipeDirection.Out),也支持既接收又發送數據(PipeDirection.InOut)。但需要注意管道資源的占用問題。
服務端
在本示例中,服務端采用WinForm的形式【DemoNamedPipeServer】,它用于接收數據和發送數據。首先創建NamedPipeServer類,用于封裝NamedPipeServerStream的操作。如下所示:
using System;
using System.Collections.Generic;
using System.IO.Pipes;
using System.Linq;
using System.Text;
using System.Threading.Tasks;

namespace DemoPipe.Common
{
    public class NamedPipeServer:IDisposable
    {
        private readonly int NUMOFTHREADS=4;

        private string pipeName;

        private NamedPipeServerStream pipeServerStream;

        private StreamWriter streamWriter;

        public Action<string> Received;

        private StreamReader streamReader;

        public NamedPipeServer(string pipeName)
        {
            this.pipeName = pipeName;
            this.pipeServerStream = new NamedPipeServerStream(this.pipeName, PipeDirection.InOut,NUMOFTHREADS);
        }

        public void Send(string msg)
        {
            Task.Run(() =>
            {
                if (!this.pipeServerStream.IsConnected)
                {
                    return;
                }
                if (this.streamWriter == null)
                {
                    this.streamWriter = new StreamWriter(pipeServerStream);
                    this.streamWriter.AutoFlush = true;
                }
                this.streamWriter.WriteLine(msg);
                this.streamWriter.Flush();
                this.pipeServerStream.WaitForPipeDrain();
            });
        }

        public void Receive()
        {
            Task.Run(() =>
            {
                if (!this.pipeServerStream.IsConnected)
                {
                    this.pipeServerStream.WaitForConnection();
                }
                if (this.streamReader == null)
                {
                    this.streamReader = new StreamReader(pipeServerStream);
                }
                try
                {
                    string? msg = streamReader.ReadLine();
                    if (!string.IsNullOrEmpty(msg))
                    {
                        Received?.Invoke($"[]{msg}");
                    }
                }
                catch (Exception ex)
                {
                    Console.WriteLine(ex.Message);
                    Console.WriteLine(ex.StackTrace);
                }
                finally
                {
                    Task.Delay(500);
                }
            });
        }

        public void Dispose()
        {
            if (pipeServerStream != null)
            {
                pipeServerStream.Close();
                pipeServerStream.Dispose();
            }
        }
    }
}
在上述示例中,有兩個方法分別用于實現數據的發送(Send)和和接收(Receive)。接下來在FrmMain 頁面中創建NamedPipeServer實例,以及分別用于實現接收和發送的事件,如下所示:
using DemoPipe.Common;

namespace DemoNamedPipeServer
{
    public partial class FrmMain : Form
    {
        private NamedPipeServer pipeServer;

        public FrmMain()
        {
            InitializeComponent();
            pipeServer = new NamedPipeServer("okcoder");
            pipeServer.Received += new Action<string>((string msg) =>
            {
                this.txtReceiveMsg.Invoke(() =>
                {
                    this.txtReceiveMsg.AppendText($"{DateTime.Now.ToString("yyyy-MM-dd HH:mm:ss.fff")}:{msg}\r\n");
                });
            });
        }

        private void btnSend_Click(object sender, EventArgs e)
        {
            try
            {
                string msg = this.txtSendMsg.Text;
                if (!string.IsNullOrEmpty(msg))
                {
                    pipeServer.Send(msg);
                }
            }
            catch (Exception ex)
            {
                Console.WriteLine(ex.Message);
                Console.WriteLine(ex.StackTrace);
            }
        }

        private void btnReceive_Click(object sender, EventArgs e)
        {
            this.pipeServer.Receive();
        }
    }
}
客戶端
客戶端采用WinForm可執行程序的方式實現【DemoNamedPipeClient】,主要實現數據的發送和接收,首選創建NamedPipeClient類,封裝對NamedPipeClientStream的操作。在此實例中如果沒有連接 ,則先進行連接 ,然后再進行數據交互,如下所示:
using System;
using System.Collections.Generic;
using System.IO.Pipes;
using System.Linq;
using System.Security.Cryptography;
using System.Text;
using System.Threading.Tasks;

namespace DemoPipe.Common
{
    public class NamedPipeClient:IDisposable
    {
        private readonly int NUMOFTHREADS = 4;

        private string pipeName;

        private NamedPipeClientStream pipeClientStream;

        private StreamWriter streamWriter;

        private CancellationTokenSource cts;

        private CancellationToken token;

        public Action<string> Received;

        private StreamReader streamReader;

        public NamedPipeClient(string pipeName)
        {
            this.pipeName = pipeName;
            this.pipeClientStream = new NamedPipeClientStream(".", this.pipeName, PipeDirection.InOut);
        }

        public void Send(string msg)
        {
            Task.Run(() =>
            {
                if (!this.pipeClientStream.IsConnected)
                {
                    this.pipeClientStream.Connect(1000);
                }
                if (this.streamWriter == null)
                {
                    this.streamWriter = new StreamWriter(pipeClientStream);
                    this.streamWriter.AutoFlush = true;
                }
                this.streamWriter.WriteLine(msg);
                this.streamWriter.Flush();
                this.pipeClientStream.WaitForPipeDrain();
            });
        }

        public void Receive()
        {
            Task.Run(() =>
            {
                if (!this.pipeClientStream.IsConnected)
                {
                    this.pipeClientStream.Connect(1000);
                }
                if (this.streamReader == null)
                {
                    this.streamReader = new StreamReader(pipeClientStream);
                }
                try
                {
                    string? msg = streamReader.ReadLine();
                    if (!string.IsNullOrEmpty(msg))
                    {
                        Received?.Invoke($"[]{msg}");
                    }
                }
                catch (Exception ex)
                {
                    Console.WriteLine(ex.Message);
                    Console.WriteLine(ex.StackTrace);
                }
                finally
                {
                    Task.Delay(500);
                }
            });
        }

        public void Dispose()
        {
            this.cts.Cancel();
            if (pipeClientStream != null)
            {
                pipeClientStream.Close();
                pipeClientStream.Dispose();
            }
        }
    }
}
在上述實例中,接收和發送,都采用后臺線程異步操作,避免線程阻塞造成UI主線程卡頓。接下來創建FrmMain中創建NamedPipeClient類的實例,以及UI上發送和接收的事件,如下所示:
using DemoPipe.Common;

namespace DemoNamedPipeClient
{
    public partial class FrmMain : Form
    {
        private NamedPipeClient pipeClient;

        public FrmMain()
        {
            InitializeComponent();
            this.pipeClient = new NamedPipeClient("okcoder");
            pipeClient.Received += new Action<string>((string msg) =>
            {
                this.txtReceiveMsg.Invoke(() =>
                {
                    this.txtReceiveMsg.AppendText($"{DateTime.Now.ToString("yyyy-MM-dd HH:mm:ss.fff")}:{msg}\r\n");
                });
            });
        }

        private void btnSend_Click(object sender, EventArgs e)
        {
            try
            {
                string msg = this.txtSendMsg.Text;
                if (!string.IsNullOrEmpty(msg))
                {
                    pipeClient.Send(msg);
                }
            }
            catch (Exception ex)
            {
                Console.WriteLine(ex.Message);
                Console.WriteLine(ex.StackTrace);
            }
        }

        private void btnReceive_Click(object sender, EventArgs e)
        {
            pipeClient.Receive();
        }
    }
}
在上述實例中,客戶端和服務端采用同一個管道名稱,這樣才能進行通信。
實例演示
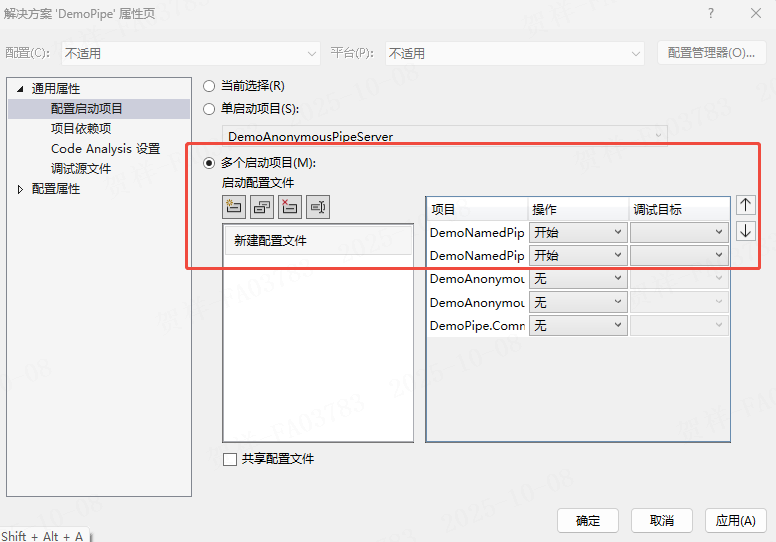
命名管道可以跨進程進行數據交互,并不局限于父子進程,可以同時啟動,在Visual Studio中,可以在解決方案右鍵打開“配置啟動項”對話框,如下所示:
運行實例效果如下所示:

在本實例中,為了簡化程序復雜度,分別手動點擊進行發送和接收,實際工作中,可以采用事件同步機制實現數據的操作一致性。
以上就是《推薦一款基于.NET的進程間數據交互經典解決方案》的全部內容,旨在拋磚引玉,一起學習,共同進步。
 作者:老碼識途
出處:http://www.rzrgm.cn/hsiang/
本文版權歸作者和博客園共有,寫文不易,支持原創,歡迎轉載【點贊】,轉載請保留此段聲明,且在文章頁面明顯位置給出原文連接,謝謝。
關注個人公眾號,定時同步更新技術及職場文章

 浙公網安備 33010602011771號