| H__D |
|
||
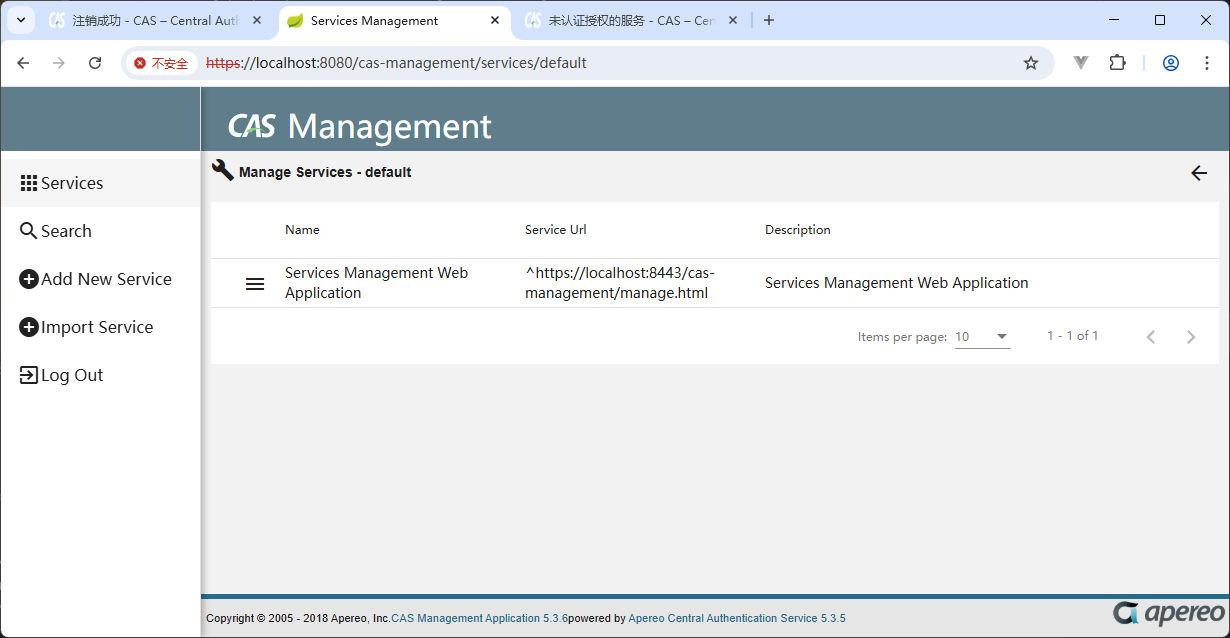
Cas-Management介紹 cas-management也簡稱為service-management可以理解為服務管理。 官方也提供了具體的配置文檔 項目地址:cas-management 本例使用的版本是 5.3.x 項目運行 1、下載 cas-management-overlay,閱讀README.md 2、啟動cas服務,【CAS】CAS介紹與安裝(一) - H__D - 博客園 3、打包 managenment項目,命令:build.cmd package 4、新建目錄 src\main\resources 5、\target\cas-management\WEB-INF\classes\application.properties文件 ,拷貝的 resources目錄中 修改application.properties文件 ##
# CAS Thymeleaf Views
#
spring.thymeleaf.cache=false
spring.thymeleaf.mode=HTML
spring.thymeleaf.order=1
##
# Embedded CAS Tomcat Container
#
server.context-path=/cas-management
#server.port=8444
server.ssl.key-store=file:/etc/cas/thekeystore
server.ssl.key-store-password=changeit
server.ssl.key-password=changeit
##
# Log4J Configuration
#
server.context-parameters.isLog4jAutoInitializationDisabled=true
# logging.config=file:/etc/cas/log4j2.xml
##
# CAS Server
cas.server.name=https://localhost:8443
cas.server.prefix=${cas.server.name}/cas
##
# CAS Authentication Attributes
#
cas.authn.attributeRepository.stub.attributes.uid=uid
cas.authn.attributeRepository.stub.attributes.givenName=givenName
cas.authn.attributeRepository.stub.attributes.eppn=eppn
mgmt.serverName=https://localhost:${server.port}
##
# CAS Web Application Config
#
server.session.timeout=1800
server.session.cookie.http-only=true
server.session.tracking-modes=COOKIE
##
# CAS Cloud Bus Configuration
# Please leave spring.cloud.bus.enabled set to false
#
spring.cloud.bus.enabled=false
#Indicates that systemPropertiesOverride can be used.
# Set to false to prevent users from changing the default accidentally. Default true.
spring.cloud.config.allow-override=true
# External properties should override system properties.
spring.cloud.config.override-system-properties=false
# When allowOverride is true, external properties should take lowest priority, and not override any
# existing property sources (including local config files).
spring.cloud.config.override-none=false
##
# Actuator Endpoint Security Defaults
#
endpoints.sensitive=true
endpoints.enabled=false
endpoints.actuator.enabled=false
6、在\target\cas-management\WEB-INF\classes目錄中,找到user-details.properties,復制到resources目錄中
7、運行項目,命令:build.cmd run
8、訪問 ,地址:https://localhost:8080/cas-management
 錯誤解決問題1:證書未導入JDK報錯: 2025-04-03 00:20:47,851 ERROR [org.apereo.cas.util.HttpUtils] - <sun.security.validator.ValidatorException: PKIX path building failed: sun.security.provider.certpath.SunCertPathBuilderException: unable to find valid certification path to requested target>
javax.net.ssl.SSLHandshakeException: sun.security.validator.ValidatorException: PKIX path building failed: sun.security.provider.certpath.SunCertPathBuilderException: unable to find valid certification path to requested target
at sun.security.ssl.Alert.createSSLException(Unknown Source) ~[?:1.8.0_341]
at sun.security.ssl.TransportContext.fatal(Unknown Source) ~[?:1.8.0_341]
at sun.security.ssl.TransportContext.fatal(Unknown Source) ~[?:1.8.0_341]
at sun.security.ssl.TransportContext.fatal(Unknown Source) ~[?:1.8.0_341]
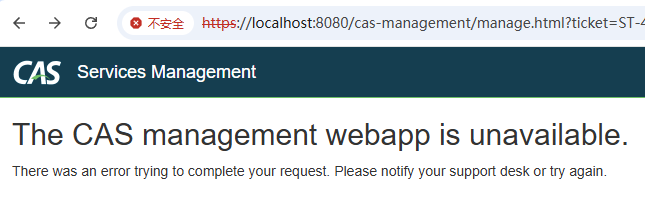
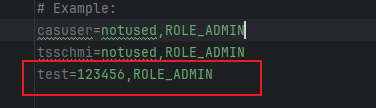
導入證書: 命令:keytool -import -alias cas -file "E:\etc\cas\cas.cer" -keystore "C:\Program Files\Java\jre1.8.0_341\lib\security\cacerts" -storepass changeit 問題2:用戶未授權問題描述: 解決: 在\target\cas-management\WEB-INF\classes目錄中,找到user-details.properties,復制到resources目錄中 編輯內容,將對應用戶添加進去
參考:CAS單點登錄(五)——Service配置及管理_casservice-CSDN博客 |


 |
|
博客園
 浙公網安備 33010602011771號
浙ICP備2021040463號-3 浙公網安備 33010602011771號
浙ICP備2021040463號-3
|
|