
【精選】SpringDI依賴注入及注解實現SpringIoC
SpringDI
什么是依賴注入
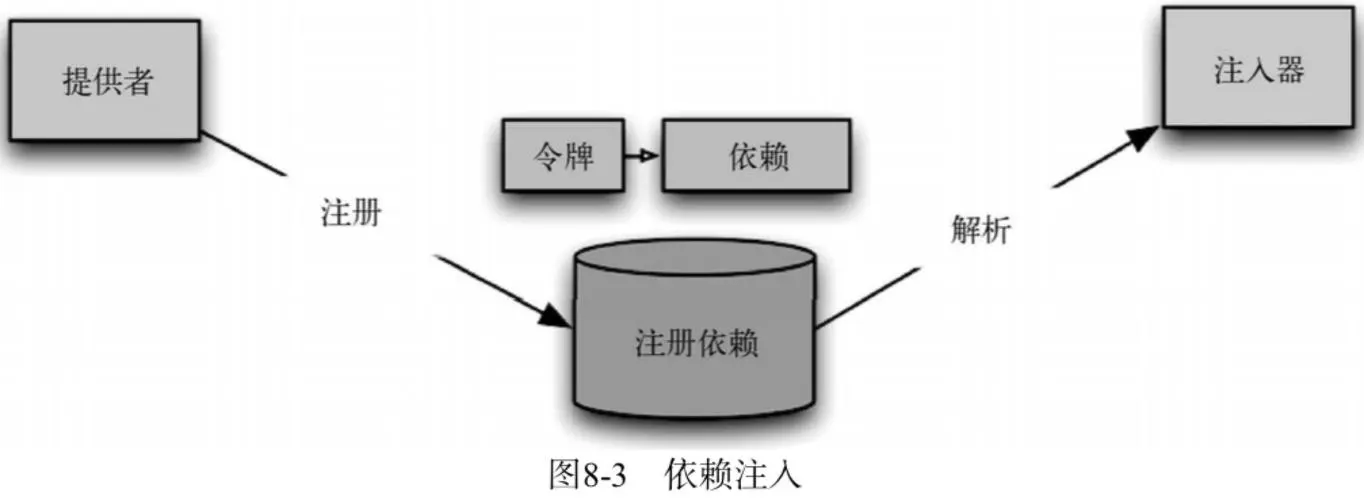
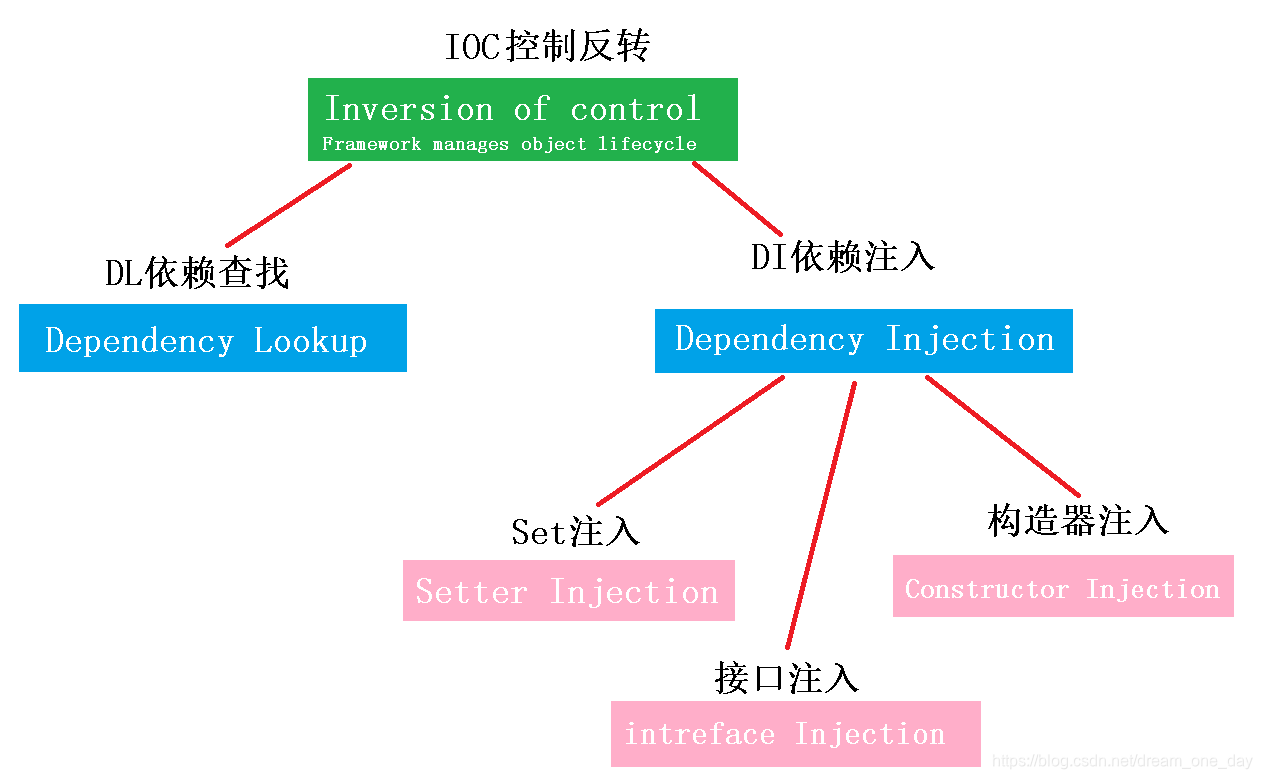
依賴注入(Dependency Injection,簡稱DI),它是Spring控制反轉思想的具體實現。
控制反轉將對象的創建交給了Spring,但是對象中可能會依賴其他對象。比如service類中要有dao類的屬性,我們稱service依賴于dao。之前需要手動注入屬性值,代碼如下:
public interface StudentDao {
  Student findById(int id);
}


public class StudentDaoImpl implements StudentDao{
  @Override
  public Student findById(int id) {
    // 模擬根據id查詢學生
    return new Student(1,"張三","北京");
   }
}


public class StudentService {
  // service依賴dao,手動注入屬性值,即手動維護依賴關系
  private StudentDao studentDao = new StudentDaoImpl();


  public Student findStudentById(int id){
    return studentDao.findById(id);
   }
}
此時,當StudentService的想要使用StudentDao的另一個實現類如StudentDaoImpl2時,則需要修改Java源碼,造成代碼的可維護性降低。
而使用Spring框架后,Spring管理Service對象與Dao對象,此時它能夠為Service對象注入依賴的Dao屬性值。這就是Spring的依賴注入。簡單來說,控制反轉是創建對象,依賴注入是為對象的屬性賦值。
依賴注入方式
在之前開發中,可以通過setter方法或構造方法設置對象屬性值:
// setter方法設置屬性
StudentService studentService = new StudentService();
StudentDao studentDao = new StudentDao();
studentService.setStudentDao(studentDao);


// 構造方法設置屬性
StudentDao studentDao = new StudentDao();
StudentService studentService = new StudentService(studentDao);
Spring可以通過調用setter方法或構造方法給屬性賦值
Setter注入
-
被注入類編寫屬性的setter方法
public class StudentService { private StudentDao studentDao; public void setStudentDao(StudentDao studentDao) { this.studentDao = studentDao; } } -
配置文件中,給需要注入屬性值的
<bean>中設置<property><bean id="studentDao" class="com.Spring.dao.StudentDaoImpl"></bean> <bean id="studentService" class="com.Spring.service.StudentService"> <!--依賴注入--> <!--name:對象的屬性名 ref:容器中對象的id值--> <property name="studentDao" ref="studentDao"></property> </bean> -
測試是否注入成功
@Test
public void t2(){
  ApplicationContext ac = new ClassPathXmlApplicationContext("bean.xml");
  StudentService studentService = (StudentService) ac.getBean("studentService");
  System.out.println(studentService.findStudentById(1));
}
構造方法注入
-
被注入類編寫有參的構造方法
public class StudentService { private StudentDao studentDao; public StudentService(StudentDao studentDao) { this.studentDao = studentDao; } } -
給需要注入屬性值的
<bean>中設置<constructor-arg><bean id="studentDao" class="com.Spring.dao.StudentDaoImpl"></bean> <bean id="studentService" class="com.Spring.service.StudentService"> <!-- 依賴注入 --> <!-- name:對象的屬性名 ref:配置文件中注入對象的id值 --> <constructor-arg name="studentDao" ref="studentDao"></constructor-arg> </bean> -
測試是否注入成功
@Test
public void t2(){
  ApplicationContext ac = new ClassPathXmlApplicationContext("bean.xml");
  StudentService studentService = (StudentService) ac.getBean("studentService");
  System.out.println(studentService.findStudentById(1));
}
自動注入
自動注入不需要在<bean>標簽中添加其他標簽注入屬性值,而是自動從容器中找到相應的bean對象設置為屬性值。
自動注入有兩種配置方式:
- 全局配置:在
<beans>中設置default-autowire屬性可以定義所有bean對象的自動注入策略。- 局部配置:在
<bean>中設置autowire屬性可以定義當前bean對象的自動注入策略。
autowire的取值如下:
- no:不會進行自動注入。
- default:全局配置default相當于no,局部配置default表示使用全局配置
- byName:在Spring容器中查找id與屬性名相同的bean,并進行注入。需要提供set方法。
- byType:在Spring容器中查找類型與屬性類型相同的bean,并進行注入。需要提供set方法。
- constructor:在Spring容器中查找id與屬性名相同的bean,并進行注入。需要提供構造方法。
測試自動注入:
-
為依賴的對象提供setter和構造方法:
public class StudentService { // 依賴 private StudentDao studentDao; // 構造方法 public StudentService() { } public StudentService(StudentDao studentDao) { this.studentDao = studentDao; } // setter方法 public void setStudentDao(StudentDao studentDao) { this.studentDao = studentDao; } // 調用依賴的方法 public Student findStudentById(int id) { return studentDao.findById(id); } } -
配置自動注入:
<!-- 根據beanId等于屬性名自動注入 -->
<bean id="studentDao" class="com.Spring.dao.StudentDaoImpl"></bean>
<bean id="studentService" class="com.Spring.service.StudentService" autowire="byName"></bean>
<!-- 根據bean類型等于屬性類型自動注入 --> <bean id="studentDao" class="com.Spring.dao.StudentDaoImpl"></bean> <bean id="studentService" class="com.Spring.service.StudentService" autowire="byType"></bean><!-- 利用構造方法自動注入 --> <bean id="studentDao" class="com.Spring.dao.StudentDaoImpl"></bean> <bean id="studentService" class="com.Spring.service.StudentService" autowire="constructor"></bean><!-- 配置全局自動注入 --> <beans xmlns="http://www.springframework.org/schema/beans" xmlns:xsi="http://www.w3.org/2001/XMLSchema-instance" xsi:schemaLocation="http://www.springframework.org/schema/beans http://www.springframework.org/schema/beans/spring-beans.xsd" default-autowire="constructor">
依賴注入類型
DI支持注入bean類型、基本數據類型和字符串、List集合、Set集合、Map集合、Properties對象類型等,他們的寫法如下:
-
準備注入屬性的類
public class StudentService { private StudentDao studentDao; // bean屬性 private String name; //字符串類型 private int count; //基本數據類型 private List<String> names; // 字符串類型List集合 private List<Student> students1; // 對象類型List集合 private Set<Student> students2; // 對象類型Set集合 private Map<String,String> names2; // 字符串類型Map集合 private Map<String,Student> students3; // 對象類型Map集合 private Properties properties; //Properties類型 // 省略getter/setter/toString } -
準備測試方法
@Test
public void t3(){
  ApplicationContext ac = new ClassPathXmlApplicationContext("bean.xml");
  StudentService studentService = (StudentService) ac.getBean("studentService");
  System.out.println(studentService);
}
注入bean類型
寫法一:
<bean id="studentDao" class="com.Spring.dao.StudentDaoImpl"></bean>


<bean id="studentService" class="com.Spring.service.StudentService">
  <property name="studentDao" ref="studentDao"></property>
</bean>
寫法二:
<bean id="studentDao" class="com.Spring.dao.StudentDaoImpl"></bean>


<bean id="studentService" class="com.Spring.service.StudentService">
  <property name="studentDao" >
    <ref bean="studentDao"></ref>
  </property>
</bean>
注入基本數據類型和字符串類型
<bean id="studentService" class="com.Spring.service.StudentService">
  <!--  寫法一 name:屬性名  value:屬性值-->
  <property name="name" value="李四"></property>


  <!--  寫法二 name:屬性名  value:屬性值-->
  <property name="count">
    <value>10</value>
  </property>
</bean>
注入List集合
<bean id="studentService" class="com.Spring.service.StudentService">
  <!-- 簡單數據類型List集合 name:屬性名 -->
  <property name="names">
    <list>
      <value>Spring</value>
      <value>張三</value>
    </list>
  </property>


  <!-- 對象類型List集合 name:屬性名 -->
  <property name="students1">
    <list>
      <bean class="com.Spring.domain.Student">
        <property name="id" value="1"/>
        <property name="name" value="Spring"/>
        <property name="address" value="北京"/>
      </bean>
      <bean class="com.Spring.domain.Student">
        <property name="id" value="2"/>
        <property name="name" value="李四"/>
        <property name="address" value="北京"/>
      </bean>
    </list>
  </property>
</bean>
注入Set集合
<bean id="studentService" class="com.Spring.service.StudentService">
  <!-- Set集合 -->
  <property name="students2">
    <set>
      <bean class="com.Spring.domain.Student">
        <property name="id" value="1"/>
        <property name="name" value="Spring"/>
        <property name="address" value="北京"/>
      </bean>
      <bean class="com.Spring.domain.Student">
        <property name="id" value="2"/>
        <property name="name" value="李四"/>
        <property name="address" value="北京"/>
      </bean>
    </set>
  </property>
</bean>
注入Map集合
簡單數據類型Map集合:
<bean id="studentService" class="com.Spring.service.StudentService">
  <property name="names2">
    <map>
      <entry key="student1" value="李四"/>
      <entry key="student2" value="張三"/>
    </map>
  </property>
</bean>
對象類型Map集合:
<bean id="studentService" class="com.Spring.service.StudentService">
  <property name="students3">
    <map>
      <entry key="student1" value-ref="s1"/>
      <entry key="student2" value-ref="s2"/>
    </map>
  </property>
</bean>


<bean id="s1" class="com.Spring.domain.Student">
  <property name="id" value="1"/>
  <property name="name" value="Spring"/>
  <property name="address" value="北京"/>
</bean>
<bean id="s2" class="com.Spring.domain.Student">
  <property name="id" value="2"/>
  <property name="name" value="李四"/>
  <property name="address" value="北京"/>
</bean>
注入Properties對象
<bean id="studentService" class="com.Spring.service.StudentService">
  <property name="properties">
    <props>
      <prop key="配置1">值1</prop>
      <prop key="配置2">值2</prop>
    </props>
  </property>
</bean>
注解實現IOC
準備工作
注解配置和xml配置對于Spring的IOC要實現的功能都是一樣的,只是配置的形式不一樣。
準備工作
-
創建一個新的Spring項目。
-
編寫pojo,dao,service類。
-
編寫空的配置文件,如果想讓該文件支持注解,需要添加新的約束:
<?xml version="1.0" encoding="UTF-8"?>
<beans xmlns="http://www.springframework.org/schema/beans"
    xmlns:context="http://www.springframework.org/schema/context"
    xmlns:xsi="http://www.w3.org/2001/XMLSchema-instance"
    xsi:schemaLocation="http://www.springframework.org/schema/beans
              http://www.springframework.org/schema/beans/spring-beans.xsd
              http://www.springframework.org/schema/context
              http://www.springframework.org/schema/context/spring-context.xsd">


</beans>
@Component
作用:用于創建對象,放入Spring容器,相當于<bean id="" class="">
位置:類上方
注意:
要在配置文件中配置掃描的包,掃描到該注解才能生效。
<context:component-scan base-package="com.Spring"></context:component-scan>
@Component注解配置bean的默認id是首字母小寫的類名。也可以手動設置bean的id值。// 此時bean的id為studentDaoImpl @Component public class StudentDaoImpl implements StudentDao{ public Student findById(int id) { // 模擬根據id查詢學生 return new Student(1,"張三","北京"); } }// 此時bean的id為studentDao
@Component(“studentDao”)
public class StudentDaoImpl implements StudentDao{
public Student findById(int id) {
// 模擬根據id查詢學生
return new Student(1,“張三”,“北京”);
}
}
@Repository、@Service、@Controller
作用:這三個注解和@Component的作用一樣,使用它們是為了區分該類屬于什么層。
位置:
- @Repository用于Dao層
- @Service用于Service層
- @Controller用于Controller層
@Repository
public class StudentDaoImpl implements StudentDao{}


@Service
public class StudentService {}
@Scope
作用:指定bean的創建策略
位置:類上方
取值:singleton prototype request session globalsession
@Service
@Scope("singleton")
public class StudentService {}
@Autowired
作用:從容器中查找符合屬性類型的對象自動注入屬性中。用于代替<bean>中的依賴注入配置。
位置:屬性上方、setter方法上方、構造方法上方。
注意:
-
@Autowired寫在屬性上方進行依賴注入時,可以省略setter方法。@Component public class StudentService { @Autowired private StudentDao studentDao; public Student findStudentById(int id){ return studentDao.findById(id); } } @Test public void t2(){ ApplicationContext ac = new ClassPathXmlApplicationContext("bean.xml"); StudentService studentService = (StudentService) ac.getBean("studentService"); System.out.println(studentService.findStudentById(1)); } -
容器中沒有對應類型的對象會報錯
// 如果StudentDaoImpl沒有放到容器中會報錯 //@Component("studentDao") public class StudentDaoImpl implements StudentDao{ public Student findById(int id) { // 模擬根據id查詢學生 return new Student(1,"張三","北京"); } } -
容器中有多個對象匹配類型時,會找beanId等于屬性名的對象,找不到會報錯。
// 如果容器中都多個同類型對象,會根據id值等于屬性名找對象
@Component("studentDao")
public class StudentDaoImpl implements StudentDao{
  public Student findById(int id) {
    // 模擬根據id查詢學生
    return new Student(1,"張三","北京");
   }
}


@Component
public class StudentDaoImpl2 implements StudentDao{
  public Student findById(int id) {
    // 模擬根據id查詢學生
    return new Student(1,"張三","北京");
   }
}
@Qualifier
作用:在按照類型注入對象的基礎上,再按照bean的id注入。
位置:屬性上方
注意:@Qualifier必須和@Autowired一起使用。
@Component
public class StudentService {
  @Autowired
  @Qualifier("studentDaoImpl2")
  private StudentDao studentDao;
  public Student findStudentById(int id){
    return studentDao.findById(id);
   }
}
@Value
作用:注入String類型和基本數據類型的屬性值。
位置:屬性上方
用法:
-
直接設置固定的屬性值
@Service public class StudentService { @Value("1") private int count; @Value("hello") private String str; } -
獲取配置文件中的屬性值:
-
編寫配置文件db.properties
jdbc.username=root jdbc.password=123456 -
spring核心配置文件掃描配置文件
<context:property-placeholder location="db.properties"></context:property-placeholder> -
注入配置文件中的屬性值
@Value("${jdbc.username}")
private String username;


@Value("${jdbc.password}")
private String password;
-
@Configuration
此時基于注解的IOC配置已經完成,但是我們依然離不開Spring的xml配置文件。接下來我們脫離bean.xml,使用純注解實現IOC。
在真實開發中,我們一般還是會保留xml配置文件,很多情況下使用配置文件更加方便。
純注解實現IOC需要一個==Java類代替xml文件。==這個Java類上方需要添加@Configuration,表示該類是一個配置類,作用是代替配置文件。
@Configuration
public class SpringConfig {
}
@ComponentScan
作用:指定spring在初始化容器時掃描的包。
位置:配置類上方
@Configuration
@ComponentScan("com.Spring")
public class SpringConfig {
}
@PropertySource
作用:代替配置文件中的<context:property-placeholder>掃描配置文件
位置:配置類上方
注意:配置文件位置前要加關鍵字classpath
@Configuration
@PropertySource("classpath:db.properties")
public class JdbcConfig {
  @Value("${jdbc.username}")
  private String username;


  @Value("${jdbc.password}")
  private String password;

}
@Bean
作用:將方法的返回值對象放入Spring容器中。如果想將第三方類的對象放入容器,可以使用@Bean
位置:配置類的==方法==上方。
屬性:name:給bean對象設置id
注意:@Bean修飾的方法如果有參數,spring會根據參數類型從容器中查找可用對象。
舉例:如果想將jdbc連接對象放入Spring容器,我們無法修改Connection源碼添加@Component,此時就需要使用將@Bean該對象放入Spring容器
-
添加驅動依賴
<dependency> <groupId>mysql</groupId> <artifactId>mysql-connector-java</artifactId> <version>8.0.27</version> </dependency> -
將Connection對象放入Spring容器
@Bean(name = "connection") public Connection getConnection(){ try { Class.forName("com.mysql.cj.jdbc.Driver"); return DriverManager.getConnection("jdbc:mysql:///mysql", "root", "root"); } catch (Exception exception) { return null; } } -
測試
@Test
public void t5(){
  ApplicationContext ac = new AnnotationConfigApplicationContext(SpringConfig.class);
  Connection connection = (Connection) ac.getBean("connection");
  System.out.println(connection);
}
@Import
作用:如果配置過多,會有多個配置類,該注解可以為主配置類導入其他配置類
位置:主配置類上方
// Jdbc配置類
@Configuration
public class JdbcConfig {
  @Bean(name = "connection")
  public Connection getConnection(){
    try {
      Class.forName("com.mysql.cj.jdbc.Driver");
      return DriverManager.getConnection("jdbc:mysql:///mysql", "root", "root");
     } catch (Exception exception) {
      return null;
     }
   }
}

// 主配置類
@Configuration
@ComponentScan("com.Spring")
@Import(JdbcConfig.class)
public class SpringConfig {
}
var code = "815f618f-3e13-4a85-a895-d264e6ba4547"

 浙公網安備 33010602011771號