基于 epoll 的協程調度器——零基礎深入淺出 C++20 協程
 將真實的異步 IO 事件與協程相結合、例子規模控制在 150 行、能編譯能運行的 C++20 協程 demo,見過沒?今天就給各位老鐵整一個,它還支持多協程并發哦~
前言
上一篇《沒有調度器的協程不是好協程》談到協程如何自動運行,然而那個例子里的調度器還是不太自然,考查一下真實場景,掛起的協程一般是在等待異步事件的完成,如果異步事件沒完成就輪到自己執行,它其實還是無法繼續,相當于一次無效喚醒。所以這一篇準備引入異步事件,看看在真實的場景下,調度器是如何運作的。
文章仍然遵守之前的創作原則:
* 選取合適的 demo 是頭等大事
* 以協程為目標,涉及到的新語法會簡單說明,不涉及的不旁征博引
* 若語法的原理非常簡單,也會簡單展開講講,有利于透過現象看本質,用起來更得心應手
上一篇文章里不光引入了初級的調度器,還說明了 final_suspend 與協程自清理的關系、協程句柄通過類型擦除來屏蔽用戶定義承諾對象的差異、以及 lambda 表達式的本質是仿函數等,如果沒有這些內容鋪墊,看本文時會有很多地方難以理解,還沒看過的小伙伴,墻裂建議先看那篇。
工具還是之前介紹過的 C++ Insights ,這里不再用到 Compile Explorer,主要是它的運行環境不支持像文件、網絡之類的異步 IO,為此需要用戶自行搭建開發環境。
基于 epoll 的 IO 多路復用
本文演示的異步 IO 以文件操作為主,相比網絡操作它具有代碼量少、易于測試的優點。為了簡化復雜度,這里沒有接入任何三方庫,而是直接調用操作系統 raw API,閱讀本文需要具有 IO 多路復用 (multiplexing) 的知識基礎,例如 Linux 的 epoll 或 Windows 的 IOCP。
在單線程時代,想要處理多個 IO 事件也不是不行,只要將異步 IO 句柄交給 select / poll / epoll / kqueue 等待即可,當任一 IO 事件到達時,控制權將從阻塞等待中返回,并告知用戶哪個句柄上有何種事件發生,從而方便用戶直接處理那個句柄上的 IO 事件,并且預期將不會被阻塞。這種模型因為檢測完成后,還需要用戶動作一下,也稱為 Reactor 模型;相對的,還有 Proactor 模型,主要是基于 Windows IOCP,當事件完成時,相應的讀、寫動作已由系統完成,不再需要用戶動作,故有此區別,關于這一點,后面在介紹基于 IOCP 的調度器時詳述。
類 Unix 系統上的 IO 多路分離器比較多,早期的 select 就能監控 IO 句柄的讀、寫、異常三個事件集,并且帶超時能力;后面發展的 poll 消除了 select 對句柄數量的限制;Linux 上誕生的 epoll 解決了 select & poll 在句柄數量增長時效能線性下降的問題,主要優化了句柄集合在用戶態與內核態的來回復制、返回時遍歷句柄集等性能開銷;kqueue 則是 BSD 系統上的 epoll 平替,兩者都支持水平觸發與邊緣觸發兩種模式。
水平觸發意味著只要句柄上有事件,分離器就會一直通知,上述四個默認都是水平觸發,適合少量離散數據的場景;邊緣觸發意味著一次通知中如果不將對應的事件處理完,下次不會再通知,除非有新的事件產生,epoll / kqueue 可選邊緣觸發,適合大數據量的場景,可以有效緩解高頻通知導致的數據傳輸低效問題。
惡補了 IO 多路復用機制相關的知識后,考慮到我們是在 Linux 上進行測試,這里選取了 epoll 作為分離器。需要注意的是 epoll 不能直接處理普通文件讀寫,需要借助 fifo 文件,后面我們會看到這一點,話不多說直接上 demo:
#include <coroutine>
#include <unordered_map>
#include <sys/epoll.h>
#include <unistd.h>
#include <fcntl.h>
#include <vector>
#include <stdexcept>
#include <iostream>
#include <sstream>
#define MAX_EVENTS 10
struct Task {
struct promise_type {
Task get_return_object() { return {}; }
std::suspend_never initial_suspend() { return {}; }
std::suspend_never final_suspend() noexcept { return {}; }
void return_void() {}
void unhandled_exception() { std::terminate(); }
};
};
class EpollScheduler {
private:
int epoll_fd;
std::unordered_map<int, std::coroutine_handle<>> io_handles;
public:
EpollScheduler() {
epoll_fd = epoll_create(MAX_EVENTS);
if (epoll_fd == -1) {
std::stringstream ss;
ss << "epoll_create failed, error " << errno;
throw std::runtime_error(ss.str());
}
}
~EpollScheduler() {
close(epoll_fd);
}
void register_io(int fd, std::coroutine_handle<> handle) {
if (io_handles.find(fd) == io_handles.end()) {
io_handles[fd] = handle;
epoll_event event{};
event.events = EPOLLIN | EPOLLET;
event.data.fd = fd;
if (epoll_ctl(epoll_fd, EPOLL_CTL_ADD, fd, &event) == -1) {
std::stringstream ss;
ss << "epoll_ctl failed, error " << errno;
throw std::runtime_error(ss.str());
}
}
}
void run() {
while (true) {
epoll_event events[MAX_EVENTS] = { 0 };
int n = epoll_wait(epoll_fd, events, MAX_EVENTS, -1);
for (int i = 0; i < n; ++i) {
int ready_fd = events[i].data.fd;
if (auto it = io_handles.find(ready_fd); it != io_handles.end()) {
it->second.resume();
}
}
}
}
};
struct AsyncReadAwaiter {
EpollScheduler& sched;
int fd;
std::string buffer;
AsyncReadAwaiter(EpollScheduler& s, int file_fd, size_t buf_size)
: sched(s), fd(file_fd), buffer(buf_size, '\0') {}
bool await_ready() const {
return false;
}
void await_suspend(std::coroutine_handle<> h) {
sched.register_io(fd, h);
}
std::string await_resume() {
ssize_t n = read(fd, buffer.data(), buffer.size());
if (n == -1) {
std::stringstream ss;
ss << "read failed, error " << errno;
throw std::runtime_error(ss.str());
}
buffer.resize(n);
return std::move(buffer);
}
};
Task async_read_file(EpollScheduler& sched, const char* path) {
int fd = open(path, O_RDONLY | O_NONBLOCK);
if (fd == -1) {
std::stringstream ss;
ss << "open failed, error " << errno;
throw std::runtime_error(ss.str());
}
while (true) {
auto data = co_await AsyncReadAwaiter(sched, fd, 4096);
std::cout << "Read " << data.size() << " bytes\n";
// if (data.size() == 0)
// break;
}
close(fd);
}
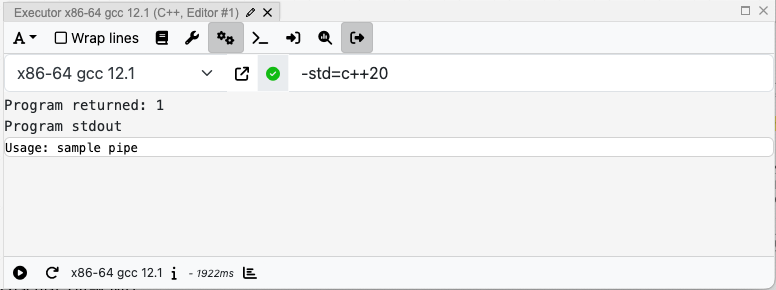
int main(int argc, char* argv[]) {
if (argc < 2) {
std::cout << "Usage: sample pipe" << std::endl;
return 1;
}
EpollScheduler scheduler;
async_read_file(scheduler, argv[1]);
scheduler.run();
return 0;
}先來看編譯,公司的開發環境中安裝的 gcc 最高版本為 12.1:
$ /opt/compiler/gcc-12/bin/g++ --version
/opt/compiler/gcc-12/bin/g++ (GCC) 12.1.0
Copyright (C) 2022 Free Software Foundation, Inc.
This is free software; see the source for copying conditions.  There is NO
warranty; not even for MERCHANTABILITY or FITNESS FOR A PARTICULAR PURPOSE.
經 Compile Explorer 驗證,可用:
一點點降低版本嘗試,發現能編譯這段代碼的最低 gcc 版本是 11.1,如果你需要在本地安裝 gcc 的話,大于等于這個版本就行。
包裝一個簡單的 Makefile:
all: sample

sample : sample.cpp
	/opt/compiler/gcc-12/bin/g++ -std=c++20 -o $@ $^
	mkfifo communication.pipe

clean:
	rm sample communication.pipe
mkfifo 用于管道文件 (communication.pipe) 的創建。啟動 sample 程序后可以在管道另一側用腳本寫一些數據進去:
for ((i=1;i<500;++i)); do echo hello > communication.pipe; done寫入 500 個 hello 字符串,接收端的 sample 輸出如下:
$ ./sample communication.pipe
Read 6 bytes
Read 60 bytes
Read 6 bytes
Read 54 bytes
Read 6 bytes
Read 6 bytes
Read 6 bytes
Read 6 bytes
Read 6 bytes
Read 6 bytes
Read 6 bytes
Read 6 bytes
Read 12 bytes
Read 0 bytes
Read 6 bytes
Read 6 bytes
Read 6 bytes
Read 6 bytes
Read 6 bytes
Read 6 bytes
...
demo 唯一的參數是 pipe 文件路徑。如果使用普通文件做同樣的測試:
$ ./sample sample.cpp
terminate called after throwing an instance of 'std::runtime_error'
  what():  epoll_ctl failed, error 1
Aborted (core dumped)
果然報錯了,這就是開頭所說 epoll 不支持普通文件的特性:對于普通文件,Linux 認為永遠可讀可寫,沒必要通過 epoll 進行等待,所以 epoll_ctl 直接返回 EPERM 了。
這個順便演示了 C++20 編譯器會對協程體代碼進行 try...catch 的邏輯,任何未捕獲的異常終將調用用戶承諾對象的 unhandled_exception 接口,這里調了 terminate 來終止進程,關于這一點,請參考《協程本質是函數加狀態機》。
代碼比較長,下面分段看下:
#include <coroutine>
#include <unordered_map>
#include <sys/epoll.h>
#include <unistd.h>
#include <fcntl.h>
#include <vector>
#include <stdexcept>
#include <iostream>
#include <sstream>

#define MAX_EVENTS 10
返回對象定義,相比之前經典的定義,承諾對象的 final_suspend 未中斷協程、返回對象沒有析構時銷毀協程句柄的動作,意味著協程是個啟動后“不管”的類型
struct Task {
    struct promise_type {
        Task get_return_object() { return {}; }
        std::suspend_never initial_suspend() { return {}; }
        std::suspend_never final_suspend() noexcept { return {}; }
        void return_void() {}
        void unhandled_exception() { std::terminate(); }
    };
};
跳到 main,果然沒有接收協程體 async_read_file 的返回對象,它返回的臨時對象將自動析構,不影響協程體正常運轉
int main(int argc, char* argv[]) {
    if (argc < 2) {
        std::cout << "Usage: sample pipe" << std::endl;
        return 1;
    }

    EpollScheduler scheduler;
    async_read_file(scheduler, argv[1]);
    scheduler.run();
    return 0;
}
回到調度器,構造與析構負責 epoll 句柄的生命周期管理,聯系 main 中 scheduler 的定義,它會貫穿整個進程生命期
class EpollScheduler {
private:
    int epoll_fd;
    std::unordered_map<int, std::coroutine_handle<>> io_handles;
public:
    EpollScheduler() {
        epoll_fd = epoll_create(MAX_EVENTS);
        if (epoll_fd == -1) {
            std::stringstream ss;
            ss << "epoll_create failed, error " << errno;
            throw std::runtime_error(ss.str());
        }
    }

    ~EpollScheduler() {
        close(epoll_fd);
    }
調度器提供協程注冊接口。與之前相比這里不再使用簡單的先進先出隊列,而是將文件句柄與協程句柄通過 map 關聯起來,方便后面根據事件句柄喚醒協程
    void register_io(int fd, std::coroutine_handle<> handle) {
        if (io_handles.find(fd) == io_handles.end()) {
select 或 poll 需要每次檢測前都準備句柄集,epoll 則不同,句柄只需注冊一次,后續就能一直監聽該句柄上的事件,重復注冊還會導致 epoll_ctl 返回失敗,因此這里有判重邏輯
io_handles[fd] = handle;只注冊讀事件 (EPOLLIN),并且使用邊緣觸發模式 (EPOLLET)
            epoll_event event{};
            event.events = EPOLLIN | EPOLLET;
            event.data.fd = fd;
            if (epoll_ctl(epoll_fd, EPOLL_CTL_ADD, fd, &event) == -1) {
                std::stringstream ss;
                ss << "epoll_ctl failed, error " << errno;
                throw std::runtime_error(ss.str());
            }
        }
    }
調度器提供的運行接口,循環 wait IO 事件,有讀事件才喚醒對應的協程
    void run() {
        while (true) {
            epoll_event events[MAX_EVENTS] = { 0 };
            int n = epoll_wait(epoll_fd, events, MAX_EVENTS, -1);
            for (int i = 0; i < n; ++i) {
                int ready_fd = events[i].data.fd;
                if (auto it = io_handles.find(ready_fd); it != io_handles.end()) {
                    it->second.resume();
                }
            }
        }
    }
};
協程體內部打開文件句柄準備進行異步讀取 (O_NONBLOCK),每次通過等待對象讀取數據并展示在控制臺,與之前 co_await 純粹用于掛起協程等待相比,這里可以通過它返回數據
Task async_read_file(EpollScheduler& sched, const char* path) {
    int fd = open(path, O_RDONLY | O_NONBLOCK);
    if (fd == -1) {
        std::stringstream ss;
        ss << "open failed, error " << errno;
        throw std::runtime_error(ss.str());
    }

    while (true) {
        auto data = co_await AsyncReadAwaiter(sched, fd, 4096);
        std::cout << "Read " << data.size() << " bytes\n";
        // if (data.size() == 0)
        //     break;
    }
    close(fd);
}
等待對象是本次的核心:await_ready 返回 false 掛起協程;await_suspend 在協程掛起前注冊協程句柄到調度器;await_resume 在協程恢復后讀取數據,并返回給 co_await 調用者
struct AsyncReadAwaiter {
    EpollScheduler& sched;
    int fd;
    std::string buffer;

    AsyncReadAwaiter(EpollScheduler& s, int file_fd, size_t buf_size)
        : sched(s), fd(file_fd), buffer(buf_size, '\0') {}

    bool await_ready() const {
        return false;
    }

    void await_suspend(std::coroutine_handle<> h) {
        sched.register_io(fd, h);
    }

    std::string await_resume() {
        ssize_t n = read(fd, buffer.data(), buffer.size());
        if (n == -1) {
            std::stringstream ss;
            ss << "read failed, error " << errno;
            throw std::runtime_error(ss.str());
        }

        buffer.resize(n);
        return std::move(buffer);
    }
};
老規矩,下面有請 C++ Insights 上場,看看編譯器底層做的工作與之前相比有何差異,內容比較多,只撿關鍵的看下:
struct __async_read_fileFrame
{
  void (*resume_fn)(__async_read_fileFrame *);
  void (*destroy_fn)(__async_read_fileFrame *);
  std::__coroutine_traits_impl<Task>::promise_type __promise;
  int __suspend_index;
  bool __initial_await_suspend_called;
協程狀態與之前別無二致,注意除了參數外,局部變量如 ss、data 也都放進來了,因此在編寫協程體時需要格外注意,能放在內部調用的變量,不要直接放在協程體
  EpollScheduler & sched;
  const char * path;
  int fd;
  std::basic_stringstream<char> ss;
  std::basic_string<char, std::char_traits<char>, std::allocator<char> > data;
  std::suspend_never __suspend_100_6;
  AsyncReadAwaiter __suspend_109_30;
  std::basic_string<char, std::char_traits<char>, std::allocator<char> > __suspend_109_30_res;
  std::suspend_never __suspend_100_6_1;
};
真正的協程體邏輯被挪到協程 resume 中了
/* This function invoked by coroutine_handle<>::resume() */
void __async_read_fileResume(__async_read_fileFrame * __f)
{
  try
  {
開頭就是 duff device,這個之前已經見識過了
    /* Create a switch to get to the correct resume point */
    switch(__f->__suspend_index) {
      case 0: break;
      case 1: goto __resume_async_read_file_1;
      case 2: goto __resume_async_read_file_2;
      case 3: goto __resume_async_read_file_3;
    }
initial_suspend 返回 suspend_never 直接跳過不掛起
    /* co_await insights.cpp:100 */
    __f->__suspend_100_6 = __f->__promise.initial_suspend();
    if(!__f->__suspend_100_6.await_ready()) {
      __f->__suspend_100_6.await_suspend(std::coroutine_handle<Task::promise_type>::from_address(static_cast<void *>(__f)).operator std::coroutine_handle<void>());
      __f->__suspend_index = 1;
      __f->__initial_await_suspend_called = true;
      return;
    }

    __resume_async_read_file_1:
    __f->__suspend_100_6.await_resume();
打開文件,失敗直接拋異常
    __f->fd = open(__f->path, 0 | 2048);
    if(__f->fd == -1) {
      __f->ss = std::basic_stringstream<char>();
      std::operator<<(__f->ss, "open failed, error ").operator<<((*__errno_location()));
      throw std::runtime_error(std::runtime_error(__f->ss.str()));
    }
循環讀文件,AsyncWaitReader 的 await_ready 返回 false 掛起協程,掛起前調用 await_suspend 注冊協程到調度器
    while(true) {

      /* co_await insights.cpp:109 */
      __f->__suspend_109_30 = AsyncReadAwaiter(__f->sched, __f->fd, 4096);
      if(!__f->__suspend_109_30.await_ready()) {
        __f->__suspend_109_30.await_suspend(std::coroutine_handle<Task::promise_type>::from_address(static_cast<void *>(__f)).operator std::coroutine_handle<void>());
        __f->__suspend_index = 2;
        return;
      }
文件句柄上有可讀數據時,調度器恢復協程運行,AsyncWaitReader 的 await_resume 讀取數據并記錄在 data 中
      __resume_async_read_file_2:
      __f->__suspend_109_30_res = __f->__suspend_109_30.await_resume();
      __f->data = __f->__suspend_109_30_res;
      std::operator<<(std::operator<<(std::cout, "Read ").operator<<(__f->data.size()), " bytes\n");
    }
結束循環前關閉句柄 (目前是個死循環走不到這里),協程終止前調用承諾對象的 return_void,有未捕獲異常時調用承諾對象的 unhandled_exception
    close(__f->fd);
    /* co_return insights.cpp:100 */
    __f->__promise.return_void()/* implicit */;
    goto __final_suspend;
  } catch(...) {
    if(!__f->__initial_await_suspend_called) {
      throw ;
    }

    __f->__promise.unhandled_exception();
  }
final_suspend 返回 suspend_never 直接跳過不掛起,調用 destroy 自動銷毀協程狀態釋放內存
  __final_suspend:

  /* co_await insights.cpp:100 */
  __f->__suspend_100_6_1 = __f->__promise.final_suspend();
  if(!__f->__suspend_100_6_1.await_ready()) {
    __f->__suspend_100_6_1.await_suspend(std::coroutine_handle<Task::promise_type>::from_address(static_cast<void *>(__f)).operator std::coroutine_handle<void>());
    __f->__suspend_index = 3;
    return;
  }

  __resume_async_read_file_3:
  __f->destroy_fn(__f);
}
有上一篇的鋪墊,看起來沒什么尿點,甚至有點老三樣。唯一有新意的地方是 co_await 也能通過 await_resume 獲取返回數據,這與 co_yield & co_return 有異曲同工之妙,體現出 C++20 協程靈活的一面。
多文件并行
上面的例子雖然通過多次讀取展示了協程多次喚醒的過程,但沒有展示多個 IO 句柄并發的能力,下面稍加改造,同時讀取多個 fifo:
Task async_read_file(EpollScheduler& sched, const char* path) {
...
    while (true) {
        auto data = co_await AsyncReadAwaiter(sched, fd, 4096);
        std::cout << "Read [" << data.size() << "] " << data;
        if (data.size() == 0)
            std::cout << std::endl;
    }
...
}

int main(int argc, char* argv[]) {
    if (argc < 3) {
        std::cout << "Usage: sample pipe1 pipe2" << std::endl;
        return 1;
    }

    EpollScheduler scheduler;
    async_read_file(scheduler, argv[1]);
    async_read_file(scheduler, argv[2]);
    scheduler.run();
    return 0;
}
主要的改動是:
* 協程體展示數據內容,便于區分是從哪個 fifo 讀到了數據
* demo 接收兩個 pipe 路徑,分別調用兩個協程進行處理
對應的,修改寫數據的腳本:
$ for ((i=1;i<500;++i)); do if [ $((i%2)) -eq 0 ]; then echo hello > communication.pipe; else echo world > communication2.pipe; fi; done交替在兩個 pipe 上寫入 hello 與 world,下面是程序輸出:
$ ./sample communication.pipe communication2.pipe
Read [6] world
Read [18] world
world
world
Read [24] hello
hello
hello
hello
Read [0]
Read [6] world
Read [12] hello
hello
Read [12] world
world
Read [6] hello
Read [6] world
Read [6] hello
Read [6] world
Read [6] hello
Read [6] world
Read [6] hello
Read [6] world
Read [6] hello
Read [6] world
Read [6] hello
Read [6] world
Read [0]
Read [6] hello
Read [6] world
Read [6] hello
Read [0]
...
讀取看起來并不是嚴格的交替執行,這與 pipe 可讀時積累的數據量有關,如果讀取前發送端已經累計發送了多次,就會出現上面的情況。不論怎樣,這里實現了用協程并行讀取文件的能力,并且不需要對跨協程的公共變量做任何并發防護 (如調度器內部 map),且每個文件的讀取邏輯清晰易懂,這可能就是協程的魅力吧。讀取 N 個文件的場景 (N>2),都可以參考上面的進行拓展,此處就不再贅述了。
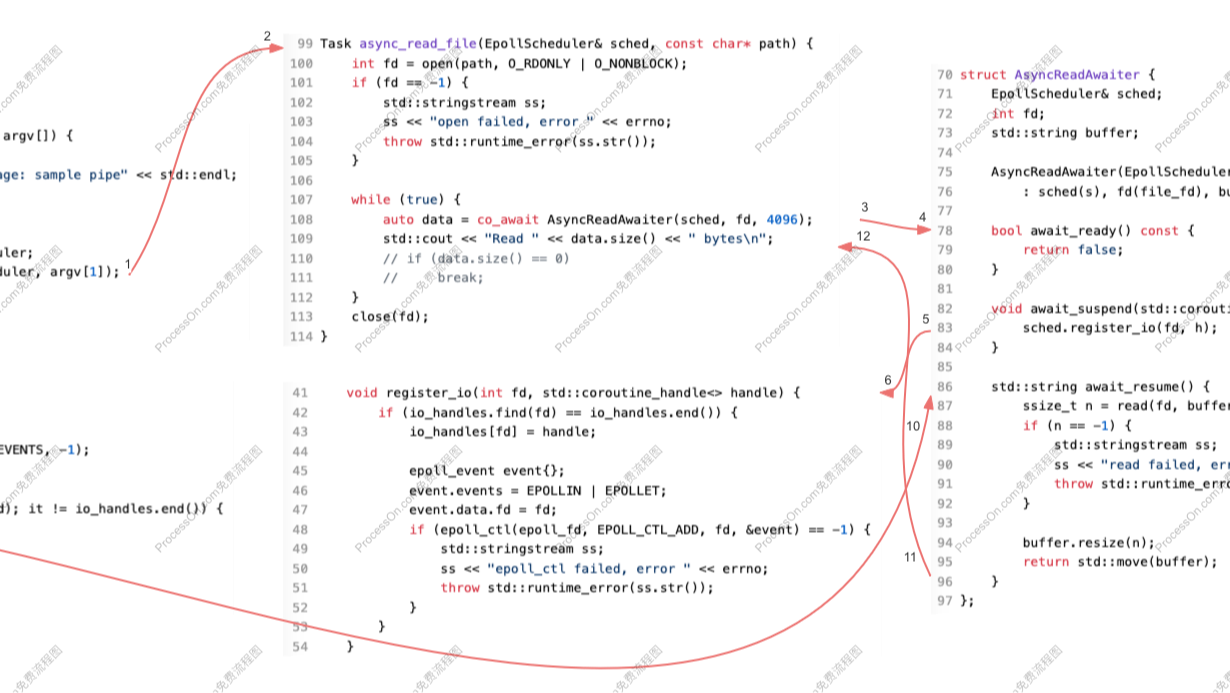
最后補充一張調用順序圖:
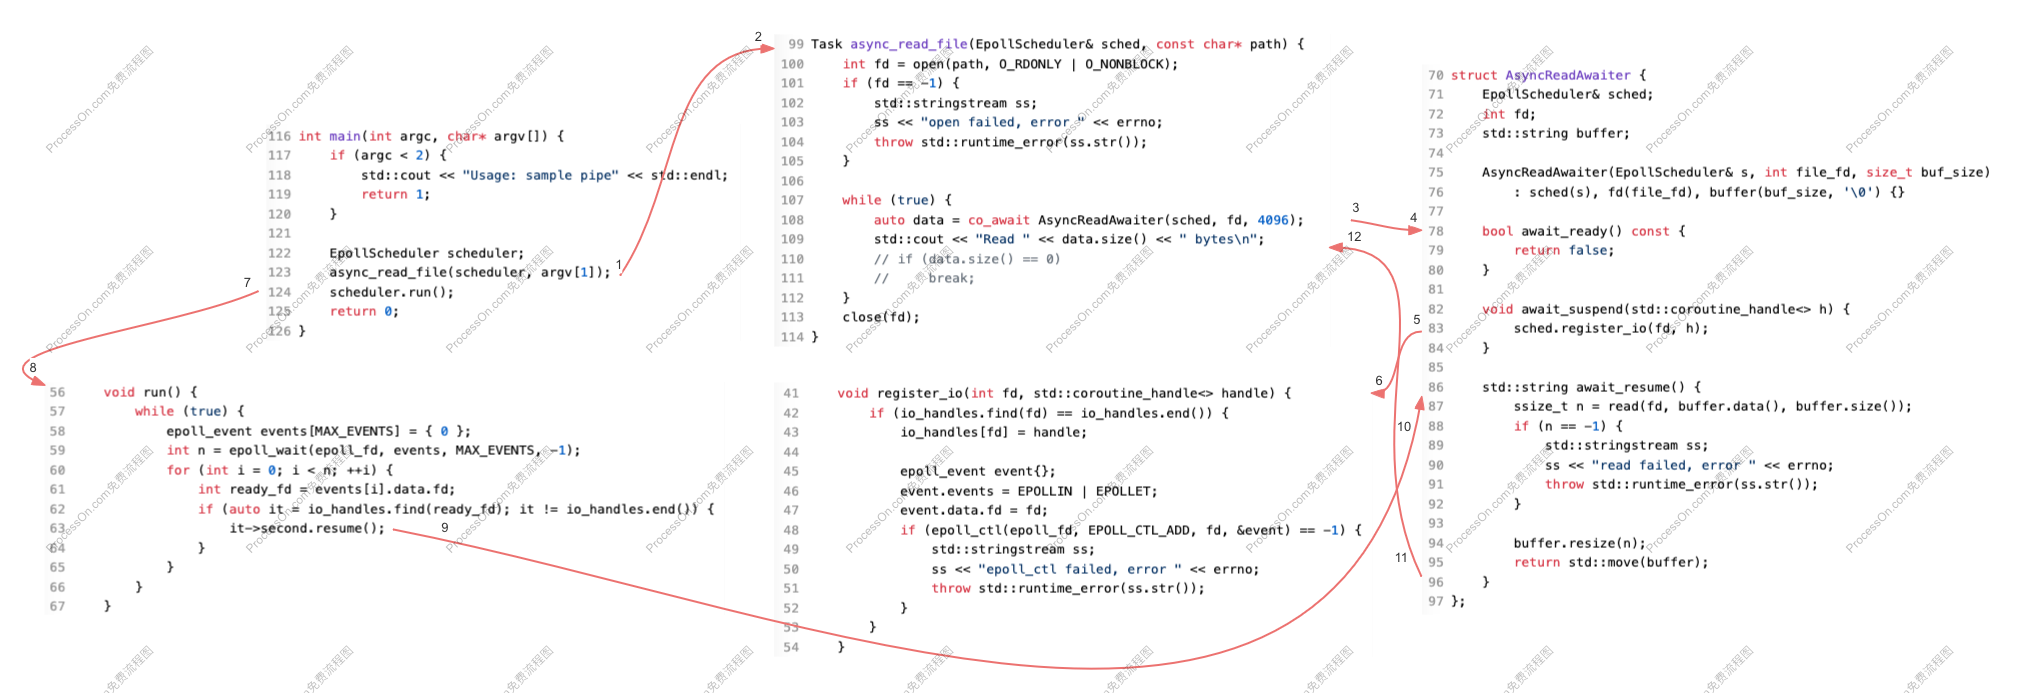
為了便于繪制,調度器的 register_io & run 分開畫了。另外非首次讀取時,沒有 7-8 這條路徑,取而代之的是 run 內部的事件循環。
await_suspend & 試讀
眾所周知讀寫異步 IO 句柄 (O_NONBLOCK) 時不會被阻塞,當系統能滿足用戶請求時,會讀取盡可能多的數據返回;當沒有可用數據時,系統立即返回一個錯誤,一般是 EAGAIN 或 EWOULDBLOCK (Windows),此時再進入 epoll 等待也不遲,當數據比較頻繁時能節約相當可觀的 epoll 等待與喚醒,從而提高吞吐性能。
回到 demo,試讀的結果決定是否掛起協程,因此最佳的判斷位置是在 await_ready,下面是改造后的代碼:
struct AsyncReadAwaiter {
    EpollScheduler& sched;
    int fd;
    int len;
    std::string buffer;

    AsyncReadAwaiter(EpollScheduler& s, int file_fd, size_t buf_size)
        : sched(s), fd(file_fd), len(0), buffer(buf_size, '\0') { }

    bool await_ready()  {
        len = 0;
        ssize_t n = read(fd, buffer.data(), buffer.size());
        if (n > 0) {
            len = n;
            return true;
        } else if (n == -1 && errno != EAGAIN) {
            std::stringstream ss;
            ss << "pre read failed, error " << errno;
            throw std::runtime_error(ss.str());
        }

        return false;
    }

    void await_suspend(std::coroutine_handle<> h) {
        sched.register_io(fd, h);
    }

    std::string await_resume() {
        ssize_t n = read(fd, buffer.data() + len, buffer.size() - len);
        if (n == -1) {
            if (len > 0) {
                buffer.resize(len);
                return std::move(buffer);
            }

            if (errno != EAGAIN) {
                std::stringstream ss;
                ss << "read failed, error " << errno;
                throw std::runtime_error(ss.str());
            }

            n = 0;
        }

        buffer.resize(n + len);
        if (len > 0) {
            std::cout << "pre-read " << len << ", read " << n << std::endl;
        }
        return std::move(buffer);
    }
};
內容不長,不過也分段解讀下:
struct AsyncReadAwaiter {
    EpollScheduler& sched;
    int fd;
增加 len 字段記錄試讀的結果長度
    int len;
    std::string buffer;

    AsyncReadAwaiter(EpollScheduler& s, int file_fd, size_t buf_size)
        : sched(s), fd(file_fd), len(0), buffer(buf_size, '\0') { }

    bool await_ready()  {
        len = 0;
增加一次讀取,若成功記錄讀取的長度,返回 true 繼續協程
        ssize_t n = read(fd, buffer.data(), buffer.size());
        if (n > 0) {
            len = n;
            return true;
非 EAGAIN 錯誤直接拋異常
        } else if (n == -1 && errno != EAGAIN) {
            std::stringstream ss;
            ss << "pre read failed, error " << errno;
            throw std::runtime_error(ss.str());
        }
EAGAIN 無數據,返回 false 掛起協程等待
        return false;
    }
掛起前調用 register_io 注冊協程句柄
    void await_suspend(std::coroutine_handle<> h) {
        sched.register_io(fd, h);
    }
在正式讀取時跳過試讀的長度,避免數據覆蓋
    std::string await_resume() {
        ssize_t n = read(fd, buffer.data() + len, buffer.size() - len);
        if (n == -1) {
若讀取失敗且有試讀數據,直接返回試讀數據
            if (len > 0) {
                buffer.resize(len);
                return std::move(buffer);
            }
若非 EAGAIN 錯誤直接拋出異常,否則重置 n 的長度為 0,防止將 -1 加和到最終長度
            if (errno != EAGAIN) {
                std::stringstream ss;
                ss << "read failed, error " << errno;
                throw std::runtime_error(ss.str());
            }

            n = 0;
        }
若成功,將結果與試讀結果合并后返回給用戶
        buffer.resize(n + len);
        if (len > 0) {
            std::cout << "pre-read " << len << ", read " << n << std::endl;
        }
        return std::move(buffer);
    }
};主要的改動已經在代碼中解讀了,下面是程序運行效果:
$ ./sample communication.pipe communication2.pipe
Read [6] world
pre-read 30, read 0
Read [30] world
world
world
world
world
pre-read 6, read 0
Read [6] world
Read [0]
Read [42] hello
hello
hello
hello
hello
hello
hello
Read [6] world
Read [24] hello
hello
hello
hello
pre-read 6, read 0
Read [6] hello
Read [24] world
world
world
world
Read [0]
Read [6] world
Read [0]
Read [12] hello
hello
Read [12] world
world
Read [0]
Read [6] hello
Read [6] world
Read [6] hello
Read [6] world
Read [6] hello
Read [6] world
Read [6] hello
Read [6] world
Read [6] hello
Read [6] world
Read [6] hello
...
新增的 pre-read 日志就是試讀成功的場景,看起來發生次數并不多,可能是數據量比較小的緣故。一般在試讀成功后,正式讀取時就沒有數據了。
總流程變為兩條路徑:
* 返回 true:await_ready -> await_resume
* 返回 false:await_ready -> await_suspend -> 掛起等待 -> await_resume
注意為了能在 await_ready 中修改成員 len 的內容,將接口 const 修飾符去掉了,編譯器似乎對這些細節沒有要求,只要函數主體簽名能對得上就 ok。
一些細心的讀者可能注意到了,std::string::resize() 會在擴張字符串尺寸時,將當前 size 到新 size 之間的內容重置為 '\0',一般不適用于搭配 read 讀取數據使用,之前的例子可以這樣做,是基于以下幾個事實:
* AsyncReadAwaiter 構造函數中將其初始化為最大尺寸: buffer(buf_size, '\0')
* 讀取成功后調用 resize 屬于尺寸縮小,因此不存在數據重置的問題
* 第二次讀取時會重新構造一個 AsyncReadAwaiter 臨時對象,舊的會隨著作用域的結束自動析構,從而保證了 buffer 每次都始化為最大長度
新例子中 1、3 點保持了延續,第 2 點也得到了妥善的處理:
* 試讀時只記錄讀取長度 len,不進行 resize 操作
* 正式讀取時
??* 若失敗,有試讀內容時,直接 resize(len) 并返回
??* 若成功,resize(n+len) 并返回
換句話說,最終總能保證從最大尺寸縮小到目標尺寸,而不是分別 resize(len) 和 resize (len+n),從而避免 size 增長和內容重置。
經過多輪測試,終于復現了一次試讀與正式讀取都有內容的場景:
$ ./sample communication.pipe communication2.pipe
Read [10] world-war
pre-read 20, read 10
Read [30] world-war
world-war
world-war
Read [0]
Read [24] hello
hello
hello
hello
Read [10] world-war
Read [6] hello
Read [0]
Read [10] world-war
Read [30] hello
hello
hello
hello
hello
Read [40] world-war
world-war
world-war
world-war
pre-read 10, read 0
Read [10] world-war
Read [0]
Read [0]
Read [6] hello
pre-read 6, read 0
Read [6] hello
Read [10] world-war
Read [0]
...
為了避免 hello 與 world 同長度掩蓋問題,這里修改了寫入 communication2.pipe 的內容為 world-war,這樣在讀取 hello 后再讀取 world-war,size 增長了而內容沒有被截斷,可以證明之前的結論 1、3;在第一次 pre-read 過程中,先讀取 20,后讀取 10,總長度 30,size 也增長了,最終輸出的內容沒截斷,證明了結論 2。
可以看到,使用 read 搭配 std::string::resize() 處理數據是非常麻煩的,不建議在真實的環境中使用,這里主要是出于便于演示的目的。
行文至此,本節的主角還沒有登場:其實 await_suspend 這個接口也可以返回 bool 值,true 表示掛起,false 表示繼續,與 await_ready 剛好相反,下面改它試試:
    bool await_ready() const {
        return false;
    }

    bool await_suspend(std::coroutine_handle<> h) {
        len = 0;
        ssize_t n = read(fd, buffer.data(), buffer.size());
        if (n > 0) {
            len = n;
            return false;
        } else if (n == 0 || (n == -1 && errno == EAGAIN)) {
            sched.register_io(fd, h);
            return true;
        } else {
            std::stringstream ss;
            ss << "pre read failed, error " << errno;
            throw std::runtime_error(ss.str());
        }
    }
修改局限于上面兩個接口中,主要是將試讀從 await_ready 移到了 await_suspend 中,其它沒有變化;新的組織形式,讓 await_ready 顯得不那么臃腫了,看起來更協調和具有可讀性,更推薦這種形式。
通過 C++ Insights 看下新 await_suspend 的編譯器中間結果:
    while(true) {

      /* co_await insights.cpp:129 */
      __f->__suspend_129_30 = AsyncReadAwaiter(__f->sched, __f->fd, 4096);
      if(!__f->__suspend_129_30.await_ready()) {
        if(__f->__suspend_129_30.await_suspend(std::coroutine_handle<Task::promise_type>::from_address(static_cast<void *>(__f)).operator std::coroutine_handle<void>())) {
          __f->__suspend_index = 2;
          return;
        }

      }

      __resume_async_read_file_2:
      __f->__suspend_129_30_res = __f->__suspend_129_30.await_resume();
      __f->data = __f->__suspend_129_30_res;
      std::operator<<(std::operator<<(std::operator<<(std::cout, "Read [").operator<<(__f->data.size()), "] "), __f->data);
      if(__f->data.size() == 0) {
        std::cout.operator<<(std::endl);
      }

    }
它被放置到了 if 條件中,總的流程變為:
* 返回 true:await_ready -> await_suspend -> 掛起等待 -> await_resume
* 返回 false:await_ready -> await_suspend -> await_resume
可以期望當 await_suspend 返回 false 時,后續的 await_resume 會被立即調用。
signalfd & 完美退出
上面的 demo 目前只能通過 Ctrl C 強制殺死,畢竟調度器的 run 是個死循環沒法退出。用來做做演示沒問題,但是要用來開發項目就不行了,本著做出工業級強度代碼的使命感,下面對它進行一番改造,看看能否實現完美退出。
核心思路是檢測用戶按下 Ctrl C 讓 epoll_wait 感知并退出 run 循環,按下 Ctrl C 簡單,等價于處理 SIGINT 信號,但讓 epoll 感知比較難,查了下 deepseek 給了三種方案:
* 通過 signalfd 將信號轉化為 IO 事件,交給 epoll 統一處理
* 建立一個進程內的 pipe 通道,注冊到 epoll,在檢測到 SIGINT 事件時寫入一字節以喚醒 epoll_wait 并退出
* 信號處理器設置一個標志位,使用 epoll_wait 的超時功能,定時檢測該標志位
方案 III 有延遲,首先排除;方案 II 就是傳說中的 self-pipe trick,比較通用但不夠高效;方案 I 最直接,也比較適合 Linux,就它了:
#include <signal.h>
#include <sys/signalfd.h>

class EpollScheduler {
private:
    int epoll_fd;
    int signal_fd;
    std::unordered_map<int, std::coroutine_handle<>> io_handles;
public:
    EpollScheduler(int signum) {
        epoll_fd = epoll_create(MAX_EVENTS);
        if (epoll_fd == -1) {
            std::stringstream ss;
            ss << "epoll_create failed, error " << errno;
            throw std::runtime_error(ss.str());
        }

        sigset_t mask;
        sigemptyset(&mask);
        sigaddset(&mask, signum);
        sigprocmask(SIG_BLOCK, &mask, NULL);
        signal_fd = signalfd(-1, &mask, SFD_NONBLOCK);
        if (signal_fd == -1) {
            std::stringstream ss;
            ss << "signalfd failed, error " << errno;
            throw std::runtime_error(ss.str());
        }

        struct epoll_event ev;
        ev.events = EPOLLIN;
        ev.data.fd = signal_fd;
        if (epoll_ctl(epoll_fd, EPOLL_CTL_ADD, signal_fd, &ev) == -1) {
            std::stringstream ss;
            ss << "epoll_ctl failed, error " << errno;
            throw std::runtime_error(ss.str());
        }

        std::cout << "register signal " << signum << " as fd " << signal_fd << std::endl;
    }

    ~EpollScheduler() {
        for(auto handle : io_handles) {
            std::cout << "coroutine destroy" << std::endl;
            handle.second.destroy();
        }
        close(signal_fd);
        close(epoll_fd);
    }

...

    void run() {
        while (true) {
            epoll_event events[MAX_EVENTS] = { 0 };
            int n = epoll_wait(epoll_fd, events, MAX_EVENTS, -1);
            for (int i = 0; i < n; ++i) {
                int ready_fd = events[i].data.fd;
                if (ready_fd == signal_fd) {
                    struct signalfd_siginfo fdsi = { 0 };
                    read(signal_fd, &fdsi, sizeof(fdsi));
                    std::cout << "signal " << fdsi.ssi_signo << " detected, exit..." << std::endl;
                    return;
                }

                if (auto it = io_handles.find(ready_fd); it != io_handles.end()) {
                    it->second.resume();
                }
            }
        }
    }
};
改動主要集中在 EpollScheduler 類的構造、析構與 run 方法。內容不長,分段解讀一下:
class EpollScheduler {
private:
    int epoll_fd;
增加成員記錄信號對應的句柄,方便后續在 epoll_wait 返回時做對比
    int signal_fd;
    std::unordered_map<int, std::coroutine_handle<>> io_handles;
public:
構造函數接收一個信號作為監聽對象,main 中會傳遞 SIGINT 或 SIGQUIT
    EpollScheduler(int signum) {
        epoll_fd = epoll_create(MAX_EVENTS);
        if (epoll_fd == -1) {
            std::stringstream ss;
            ss << "epoll_create failed, error " << errno;
            throw std::runtime_error(ss.str());
        }
構建信號對應的異步文件句柄
        sigset_t mask;
        sigemptyset(&mask);
        sigaddset(&mask, signum);
下面這句是關鍵,如果不屏蔽默認的信號處理方式,默認的信號處理器會讓進程退出,epoll 就沒機會啦
        sigprocmask(SIG_BLOCK, &mask, NULL);
        signal_fd = signalfd(-1, &mask, SFD_NONBLOCK);
        if (signal_fd == -1) {
            std::stringstream ss;
            ss << "signalfd failed, error " << errno;
            throw std::runtime_error(ss.str());
        }
將信號句柄注冊到 epoll,成功時打印一條日志,失敗時拋異常
        struct epoll_event ev;
        ev.events = EPOLLIN;
        ev.data.fd = signal_fd;
        if (epoll_ctl(epoll_fd, EPOLL_CTL_ADD, signal_fd, &ev) == -1) {
            std::stringstream ss;
            ss << "epoll_ctl failed, error " << errno;
            throw std::runtime_error(ss.str());
        }

        std::cout << "register signal " << signum << " as fd " << signal_fd << std::endl;
    }
析構除了增加信號句柄的關閉,還增加了掛起協程的銷毀,如果調度器的生命周期與進程不一致時 (多次初始化與銷毀調度器),這就比較關鍵了,可以防止協程泄漏
    ~EpollScheduler() {
        for(auto handle : io_handles) {
            std::cout << "coroutine destroy" << std::endl;
            handle.second.destroy();
        }
        close(signal_fd);
        close(epoll_fd);
    }

...

    void run() {
        while (true) {
            epoll_event events[MAX_EVENTS] = { 0 };
            int n = epoll_wait(epoll_fd, events, MAX_EVENTS, -1);
            for (int i = 0; i < n; ++i) {
                int ready_fd = events[i].data.fd;
epoll_wait 返回時,優先處理信號句柄上的事件
                if (ready_fd == signal_fd) {
                    struct signalfd_siginfo fdsi = { 0 };
                    read(signal_fd, &fdsi, sizeof(fdsi));
                    std::cout << "signal " << fdsi.ssi_signo << " detected, exit..." << std::endl;
                    return;
                }
之后才是普通 IO 事件及協程的恢復
                if (auto it = io_handles.find(ready_fd); it != io_handles.end()) {
                    it->second.resume();
                }
            }
        }
    }
};
下面是程序運行效果:
$ ./sample communication.pipe communication2.pipe
register signal 2 as fd 4
Read [10] world-war
pre-read 30, read 0
Read [30] world-war
world-war
world-war
pre-read 10, read 0
Read [10] world-war
Read [0]
...
Read [6] hello
Read [10] world-war
Read [6] hello
Read [10] world-war
Read [0]
Read [6] hello
Read [10] world-war
^Csignal 2 detected, exit...
coroutine destroy
coroutine destroy
內容比較長,中間忽略了一部分;開始的 register 日志顯示新增的信號句柄值為 4;最后的 ^C 是用戶按下了 Ctrl C,demo 能正常檢測到信號值為 2 并退出事件循環,析構中還銷毀了兩個掛起的協程,符合預期。
其實不光事件循環存在完美退出的問題,單個 IO 句柄也存在同樣的問題:正常的管道不可能一直讀下去。當 writer 關閉管道或連接斷開時,應該檢測此種場景并加以處理,例如將 fd 從 epoll 中移除,從而讓 IO 句柄也能完美退出。但不幸的是,目前選取的 fifo 文件,在 O_NONBLOCK 模式下,似乎無法感知對端關閉這種操作,傳統的 read 返回 0 并不能代表這種情況,像上面的輸出中,在正常的傳輸過程中,就會出現多次 read 返回 0 的情況,顯然并不是對端關閉管道所致 (也不是 read 返回 EAGAIN 的問題,這個我加日志確認過了)。不過對于 socket,還是可以通過 read 返回 0 來檢測連接斷開的場景,這個就當作課外題就交給感興趣的讀者吧 ~
結語
本文介紹了一種基于真實 IO 事件驅動的協程調度器,通過特定的等待對象,實現協程在沒有異步事件時掛起等待、異步事件到達時恢復運行的邏輯,更加貼近實際應用場景。除此之外,還說明了 await_suspend 與試讀寫、signalfd 與進程完美退出的關系等,可用于構建工業級強度的代碼。
最后,由于本文中 demo 經歷多次迭代,想要復制最終版的代碼進行驗證的小伙伴,可以 follow 這個開源 git 庫獲取:cpp20coroutine。
本文的 demo 是基于 Linux epoll 的,下一篇來看看怎么用 Windows 的 IOCP 實現類似的能力。
參考
[1]. epoll_ctl : Operation not permitted error - c program
[2]. std::string::resize() 對緩沖區一些用處
[4]. Netty - 五種 I/O 多路復用機制 select、poll、epoll、kqueue、iocp(windows) 對比
[5]. 水平觸發和邊緣觸發
本文來自博客園,作者:goodcitizen,轉載請注明原文鏈接:http://www.rzrgm.cn/goodcitizen/p/18965895/epoll_based_multiplexing_coroutine_scheduler

 浙公網安備 33010602011771號