
Java NIO
Java NIO
一、概述
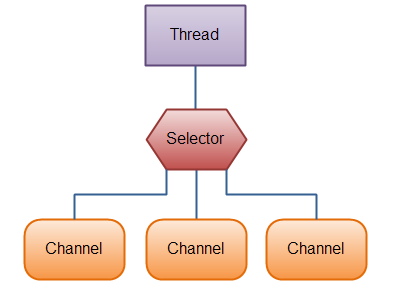
NIO (JDK1.5 new IO) 主要有三大核心部分:
- Channel(通道)
- Buffer(緩沖區)
- Selector(選擇器)
傳統IO 基于 字節流 和 字符流進行操作,而 NIO 基于Channel 和 Buffer(緩沖區)進行操作,數據總是從通道讀取到緩沖區中,或者從緩沖區寫入到通道中。Selector(選擇器)用于監聽多個通道的事件(比如:連接打開,數據到達)。因此,單個線程可以監聽多個數據通道。
NIO 和 傳統IO(一下簡稱IO)之間第一個最大的區別是,IO是面向流的,NIO是面向緩沖區的。 Java IO面向流意味著每次從流中讀一個或多個字節,直至讀取所有字節,它們沒有被緩存在任何地方。此外,它不能前后移動流中的數據。如果需要前后移動從流中讀取的數據,需要先將它緩存到一個緩沖區。NIO的緩沖導向方法略有不同。數據讀取到一個它稍后處理的緩沖區,需要時可在緩沖區中前后移動。這就增加了處理過程中的靈活性。但是,還需要檢查是否該緩沖區中包含所有您需要處理的數據。而且,需確保當更多的數據讀入緩沖區時,不要覆蓋緩沖區里尚未處理的數據。
IO的各種流是阻塞的。這意味著,當一個線程調用 read() 或 write()時,該線程被阻塞,直到有一些數據被讀取,或數據完全寫入。該線程在此期間不能再干任何事情了。 NIO的非阻塞模式,使一個線程從某通道發送請求讀取數據,但是它僅能得到目前可用的數據,如果目前沒有數據可用時,就什么都不會獲取。而不是保持線程阻塞,所以直至數據變得可以讀取之前,該線程可以繼續做其他的事情。 非阻塞寫也是如此。一個線程請求寫入一些數據到某通道,但不需要等待它完全寫入,這個線程同時可以去做別的事情。 線程通常將非阻塞IO的空閑時間用于在其它通道上執行IO操作,所以一個單獨的線程現在可以管理多個輸入和輸出通道(Channel)。
Channel 和 Buffer簡介
基本上,所有的 IO 在NIO 中都從一個Channel 開始。Channel 有點象流。 數據可以從Channel讀到Buffer中,也可以從Buffer 寫到Channel中。如圖所示:

Channel 和 IO中的 Stream(流)是差不多一個等級的。只不過Stream是單向的,譬如:InputStream, OutputStream。 而Channel是雙向的,既可以用來進行讀操作,又可以用來進行寫操作。
NIO中的Channel的主要實現有:
Channel 和 Buffer 有好幾種類型。下面是JAVA NIO中的一些主要 Channel 的實現:
- FileChannel (文件IO)
- DatagramChannel (UDP)
- SocketChannel (Client TCP)
- ServerSocketChannel (Server TCP)
以下是Java NIO里關鍵的 Buffer 實現(Buffer的類型):
- ByteBuffer
- CharBuffer
- DoubleBuffer
- FloatBuffer
- IntBuffer
- LongBuffer
- ShortBuffer
這些Buffer覆蓋了你能通過IO發送的基本數據類型:byte、short、 int、 long、 float、 double 和 char。
Java NIO 還有個 MappedByteBuffer,用于表示內存映射文件。后面會講到。
Selector 簡介
Selector 運行單線程處理多個Channel,如果你的應用打開了多個通道,但每個連接的流量都很低,使用Selector就會很方便。例如在一個聊天服務器中。要使用Selector, 得向Selector注冊Channel,然后調用它的 select()方法。這個方法會一直阻塞到某個注冊的通道有事件就緒。一旦這個方法返回,線程就可以處理這些事件,事件的例子有如新的連接進來、數據接收等。
二、FileChannel (文件IO)
傳統IO 與 FileChannel (NIO) 讀取文件并輸出代碼比較:
傳統:IO
 public static void Io(){
        InputStream in = null;
        try{
            in = new BufferedInputStream(new FileInputStream("src/nomal_io.txt"));
            byte [] buf = new byte[1024];
            // 讀取數據到緩沖區
            int bytesRead = in.read(buf);
            while(bytesRead != -1)
            {
                for(int i=0;i<bytesRead;i++)
                    System.out.print((char)buf[i]);
                bytesRead = in.read(buf);
            }
        }catch (IOException e)
        {
            e.printStackTrace();
        }finally{
            try{
                if(in != null){
                    in.close();
                }
            }catch (IOException e){
                e.printStackTrace();
            }
        }
    }
NIO :
 public static void Nio(){
        RandomAccessFile aFile = null;
        try{
            aFile = new RandomAccessFile("src/nio.txt","rw");
            FileChannel fileChannel = aFile.getChannel();
           //  創建 1024 字節的緩沖區
            ByteBuffer buf = ByteBuffer.allocate(1024);
           // 從通道中讀取數據到 緩沖區中
            int bytesRead = fileChannel.read(buf);
            System.out.println(bytesRead);
            while(bytesRead != -1)
            {
             // 切換緩沖區的模式為讀模式
                buf.flip();
             // 當緩沖區 buf 中有數據則一直循環
                while(buf.hasRemaining())
                {
                    System.out.print((char)buf.get());
                }
              // 清空緩存區
                buf.compact();
              // 繼續讀取文件流到緩沖區中, 返回讀取的字節數
                bytesRead = fileChannel.read(buf);
            }
        }catch (IOException e){
            e.printStackTrace();
        }finally{
            try{
                if(aFile != null){
                    aFile.close();
                }
            }catch (IOException e){
                e.printStackTrace();
            }
        }
}
可以看出,使用 NIO 的實現方式相對復雜一點。
三、Buffer的基本用法
使用Buffer讀寫數據一般遵循以下幾個步驟:
1、分配空間(分配1024 字節capacity ByteBuffer buf = ByteBuffer.allocate(1024); )。
2、寫入數據到 Buffer:
-
- 從Channel 寫到 Buffer ( fileChannel.read(buf) )
-
- 通過 Buffer的 put()方法 (buf.put(…))
3、調用 flip()方法,將Buffer從寫模式切換到讀模式。
4、從 Buffer 中讀取數據:
-
- 從Buffer讀取到Channel ( fileChannel.write(buf) ;)
-
- 使用get()方法從Buffer中讀取數據 (buf.get();)
5、調用 clear()方法或者 compact()方法。 一旦讀完了所有的數據,就需要清空緩沖區,讓它可以再次被寫入。有兩種方式能清空緩沖區:調用clear()或compact()方法。clear()方法會清空整個緩沖區。compact()方法只會清除已經讀過的數據。任何未讀的數據都被移到緩沖區的起始處,新寫入的數據將放到緩沖區未讀數據的后面。
理解 Buffer的 capacity、position和limit 屬性
緩沖區本質上是一塊可以寫入數據,然后可以從中讀取數據的內存。這塊內存被包裝成NIO Buffer對象,并提供了一組方法,用來方便的訪問該塊內存。
capacity:
- 作為一個內存塊,Buffer有一個固定的大小值,也叫“capacity”.你只能往里寫capacity個byte、long,char等類型。一旦Buffer滿了,需要將其清空(通過讀數據或者清除數據)才能繼續寫數據往里寫數據。
position:
- 當你寫數據到Buffer中時,position表示當前的位置。初始的position值為0.當一個byte、long等數據寫到Buffer后, position會向前移動到下一個可插入數據的Buffer單元。position最大可為capacity – 1.
- 當讀取數據時,也是從某個特定位置讀。當將Buffer從寫模式切換到讀模式,position會被重置為0. 當從Buffer的position處讀取數據時,position向前移動到下一個可讀的位置。
limit:
- 在寫模式下,Buffer的limit表示你最多能往Buffer里寫多少數據。 寫模式下,limit等于Buffer的capacity。
- 當切換Buffer到讀模式時, limit表示你最多能讀到多少數據。因此,當切換Buffer到讀模式時,limit會被設置成寫模式下的position值。換句話說,你能讀到之前寫入的所有數據(limit被設置成已寫數據的數量,這個值在寫模式下就是position)
Buffer 的其他方法:
rewind()方法:
Buffer.rewind() 將position設回0,所以你可以重讀Buffer中的所有數據。limit保持不變,仍然表示能從Buffer中讀取多少個元素(byte、char等)。
clear()與compact()方法:
一旦讀完Buffer中的數據,需要讓Buffer準備好再次被寫入。可以通過clear()或compact()方法來完成。
如果調用的是clear()方法,position將被設回0,limit被設置成 capacity的值。換句話說,Buffer 被清空了。Buffer中的數據并未清除,只是這些標記告訴我們可以從哪里開始往Buffer里寫數據。
如果Buffer中有一些未讀的數據,調用clear()方法,數據將“被遺忘”,意味著不再有任何標記會告訴你哪些數據被讀過,哪些還沒有。
如果Buffer中仍有未讀的數據,且后續還需要這些數據,但是此時想要先先寫些數據,那么使用compact()方法。
compact()方法將所有未讀的數據拷貝到Buffer起始處。然后將position設到最后一個未讀元素正后面。limit屬性依然像clear()方法一樣,設置成capacity。現在Buffer準備好寫數據了,但是不會覆蓋未讀的數據。
mark()與reset()方法:
通過調用Buffer.mark()方法,可以標記Buffer中的一個特定position。之后可以通過調用Buffer.reset()方法恢復到這個position。例如:
buffer.mark();
//call buffer.get() a couple of times, e.g. during parsing.
buffer.reset();  //set position back to mark.
四、NIO Channel (通道)間的數據傳輸
在Java NIO中,如果兩個通道中有一個是FileChannel,那你可以直接將數據從一個channel(譯者注:channel中文常譯作通道)傳輸到另外一個channel。
1、 transferFrom()
FileChannel 的 transferFrom() 方法可以將數據從源通道傳輸到FileChannel中(譯者注:這個方法在JDK文檔中的解釋為將字節從給定的可讀取字節通道傳輸到此通道的文件中)。下面是一個簡單的例子:
RandomAccessFile fromFile = new RandomAccessFile("fromFile.txt", "rw");
FileChannel fromChannel = fromFile.getChannel();
RandomAccessFile toFile = new RandomAccessFile("toFile.txt", "rw");
FileChannel toChannel = toFile.getChannel();
// 開始寫入下標
long position = 0;
// 寫入大小
long count = fromChannel.size();
toChannel.transferFrom(position, count, fromChannel);
方法的輸入參數 position 表示從 position 處開始向目標文件寫入數據,count表示最多傳輸的字節數。如果源通道的剩余空間小于 count 個字節,則所傳輸的字節數要小于請求的字節數。
此外要注意,在SoketChannel的實現中,SocketChannel只會傳輸此刻準備好的數據(可能不足count字節)。因此,SocketChannel可能不會將請求的所有數據(count個字節)全部傳輸到FileChannel中。
2、 transferTo()
transferTo() 方法將數據從FileChannel傳輸到其他的channel中。下面是一個簡單的例子:
RandomAccessFile fromFile = new RandomAccessFile("fromFile.txt", "rw");
FileChannel fromChannel = fromFile.getChannel();
RandomAccessFile toFile = new RandomAccessFile("toFile.txt", "rw");
FileChannel toChannel = toFile.getChannel();
long position = 0;
long count = fromChannel.size();
fromChannel.transferTo(position, count, toChannel);
是不是發現這個例子和前面那個例子特別相似?除了調用方法的FileChannel對象不一樣外,其他的都一樣。
上面所說的關于SocketChannel的問題在transferTo()方法中同樣存在。SocketChannel會一直傳輸數據直到目標buffer被填滿。
五、SocketChannel (客戶端 Tcp)
說完了FileChannel和Buffer, 大家應該對Buffer的用法比較了解了,這里使用SocketChannel來繼續探討NIO。NIO的強大功能部分來自于Channel的非阻塞特性,套接字的某些操作可能會無限期地阻塞。例如,對accept()方法的調用可能會因為等待一個客戶端連接而阻塞;對read()方法的調用可能會因為沒有數據可讀而阻塞,直到連接的另一端傳來新的數據。總的來說,創建/接收連接或讀寫數據等I/O調用,都可能無限期地阻塞等待,直到底層的網絡實現發生了什么。慢速的,有損耗的網絡,或僅僅是簡單的網絡故障都可能導致任意時間的延遲。然而不幸的是,在調用一個方法之前無法知道其是否阻塞。NIO的channel抽象的一個重要特征就是可以通過配置它的阻塞行為,以實現非阻塞式的信道。
channel.configureBlocking(false)
在非阻塞式信道上調用一個方法總是會立即返回。這種調用的返回值指示了所請求的操作完成的程度。例如,在一個非阻塞式ServerSocketChannel上調用accept()方法,如果有連接請求來了,則返回客戶端SocketChannel,否則返回null。
這里先舉一個TCP應用案例,客戶端采用NIO實現,而服務端依舊使用BIO實現。
客戶端代碼:
 public static void client(){
        ByteBuffer buffer = ByteBuffer.allocate(1024);
        SocketChannel socketChannel = null;
        try
        {
            socketChannel = SocketChannel.open();
            socketChannel.configureBlocking(false);
            socketChannel.connect(new InetSocketAddress("10.10.195.115",8080));
            if(socketChannel.finishConnect())
            {
                int i=0;
                while(true)
                {
                    TimeUnit.SECONDS.sleep(1);
                    String info = "I'm "+i+++"-th information from client";
                    buffer.clear();
                    buffer.put(info.getBytes());
                    buffer.flip();
                    while(buffer.hasRemaining()){
                        System.out.println(buffer);
                        socketChannel.write(buffer);
                    }
                }
            }
        }
        catch (IOException | InterruptedException e)
        {
            e.printStackTrace();
        }
        finally{
            try{
                if(socketChannel!=null){
                    socketChannel.close();
                }
            }catch(IOException e){
                e.printStackTrace();
            }
        }
    }
服務端代碼:
public static void server(){
        ServerSocket serverSocket = null;
        InputStream in = null;
        try
        {
            serverSocket = new ServerSocket(8080);
            int recvMsgSize = 0;
            byte[] recvBuf = new byte[1024];
            while(true){
                Socket clntSocket = serverSocket.accept();
                SocketAddress clientAddress = clntSocket.getRemoteSocketAddress();
                System.out.println("Handling client at "+clientAddress);
                in = clntSocket.getInputStream();
                while((recvMsgSize=in.read(recvBuf))!=-1){
                    byte[] temp = new byte[recvMsgSize];
                    System.arraycopy(recvBuf, 0, temp, 0, recvMsgSize);
                    System.out.println(new String(temp));
                }
            }
        }
        catch (IOException e)
        {
            e.printStackTrace();
        }
        finally{
            try{
                if(serverSocket!=null){
                    serverSocket.close();
                }
                if(in!=null){
                    in.close();
                }
            }catch(IOException e){
                e.printStackTrace();
            }
        }
    }
方法解析:
Java NIO中的SocketChannel是一個連接到TCP網絡套接字的通道。可以通過以下2種方式創建 SocketChannel:
- 打開一個SocketChannel并連接到互聯網上的某臺服務器。
- 一個新連接到達ServerSocketChannel時,會創建一個SocketChannel。
1、打開 SocketChannel
下面是SocketChannel的打開方式:
SocketChannel socketChannel = SocketChannel.open();
socketChannel.connect(new InetSocketAddress("http://jenkov.com", 80));
2、關閉 SocketChannel
當用完SocketChannel之后調用 SocketChannel.close()關閉SocketChannel:
socketChannel.close();
3、從 SocketChannel 讀取數據
要從SocketChannel中讀取數據,調用一個 read()的方法之一。以下是例子:
ByteBuffer buf = ByteBuffer.allocate(48);
int bytesRead = socketChannel.read(buf);
首先,分配一個Buffer。從SocketChannel讀取到的數據將會放到這個Buffer中。
然后,調用SocketChannel.read()。該方法將數據從SocketChannel 讀到Buffer中。read()方法返回的int值表示讀了多少字節進Buffer里。如果返回的是-1,表示已經讀到了流的末尾(連接關閉了)。
4、寫入 SocketChannel
寫數據到 SocketChannel 用的是 SocketChannel.write()方法,該方法以一個Buffer作為參數。示例如下:
String newData = "New String to write to file..." + System.currentTimeMillis();
ByteBuffer buf = ByteBuffer.allocate(48);
buf.clear();
buf.put(newData.getBytes());
buf.flip();
while(buf.hasRemaining()) {
   channel.write(buf);
}
注意SocketChannel.write()方法的調用是在一個while循環中的。Write()方法無法保證能寫多少字節到SocketChannel。所以,我們重復調用write()直到Buffer沒有要寫的字節為止。
5、非阻塞模式
可以設置 SocketChannel 為非阻塞模式(non-blocking mode).設置之后,就可以在異步模式下調用connect(), read() 和write()了。
5.1、connect()
如果SocketChannel在非阻塞模式下,此時調用connect(),該方法可能在連接建立之前就返回了。為了確定連接是否建立,可以調用finishConnect()的方法。像這樣:
socketChannel.configureBlocking(false);
socketChannel.connect(new InetSocketAddress("http://jenkov.com", 80));
while(! socketChannel.finishConnect() ){
//wait, or do something else...
}
5.2、write()
- 非阻塞模式下,write()方法在尚未寫出任何內容時可能就返回了。所以需要在循環中調用write()。前面已經有例子了,這里就不贅述了。
5.3、read()
非阻塞模式下,read()方法在尚未讀取到任何數據時可能就返回了。所以需要關注它的int返回值,它會告訴你讀取了多少字節。
非阻塞模式與選擇器
非阻塞模式與選擇器搭配會工作的更好,通過將一或多個SocketChannel注冊到Selector,可以詢問選擇器哪個通道已經準備好了讀取,寫入等。Selector與SocketChannel的搭配使用會在后面詳講。
六、ServerSocketChannel
Java NIO中的 ServerSocketChannel 是一個可以監聽新進來的TCP連接的通道, 就像標準IO中的ServerSocket一樣。ServerSocketChannel類在 java.nio.channels包中。
這里有個例子:
ServerSocketChannel serverSocketChannel = ServerSocketChannel.open();
serverSocketChannel.socket().bind(new InetSocketAddress(9999));
while(true){
   SocketChannel socketChannel = serverSocketChannel.accept();
   //do something with socketChannel...
}
1、打開 ServerSocketChannel
通過調用 ServerSocketChannel.open() 方法來打開ServerSocketChannel.如:
ServerSocketChannel serverSocketChannel = ServerSocketChannel.open();
2、關閉 ServerSocketChannel
通過調用ServerSocketChannel.close() 方法來關閉ServerSocketChannel. 如:
serverSocketChannel.close();
3、監聽新進來的連接
通過 ServerSocketChannel.accept() 方法監聽新進來的連接。當 accept()方法返回的時候,它返回一個包含新進來的連接的 SocketChannel。因此, accept()方法會一直阻塞到有新連接到達。
通常不會僅僅只監聽一個連接,在while循環中調用 accept()方法. 如下面的例子:
while(true){
  SocketChannel socketChannel = serverSocketChannel.accept();
  //do something with socketChannel...
}
當然,也可以在while循環中使用除了true以外的其它退出準則。
4、非阻塞模式
ServerSocketChannel可以設置成非阻塞模式。在非阻塞模式下,accept() 方法會立刻返回,如果還沒有新進來的連接,返回的將是null。 因此,需要檢查返回的SocketChannel是否是null.如:
ServerSocketChannel serverSocketChannel = ServerSocketChannel.open();
serverSocketChannel.socket().bind(new InetSocketAddress(9999));
serverSocketChannel.configureBlocking(false);
while(true){
  SocketChannel socketChannel = serverSocketChannel.accept();
  if(socketChannel != null){
   //do something with socketChannel...
  }
}
下面將上面的TCP服務端代碼改寫成NIO的方式:
public class ServerConnect
{
    private static final int BUF_SIZE=1024;
    private static final int PORT = 8080;
    private static final int TIMEOUT = 3000;
    public static void main(String[] args)
    {
        selector();
    }
    public static void handleAccept(SelectionKey key) throws IOException{
        ServerSocketChannel ssChannel = (ServerSocketChannel)key.channel();
        SocketChannel sc = ssChannel.accept();
        sc.configureBlocking(false);
        sc.register(key.selector(), SelectionKey.OP_READ,ByteBuffer.allocateDirect(BUF_SIZE));
    }
    public static void handleRead(SelectionKey key) throws IOException{
        SocketChannel sc = (SocketChannel)key.channel();
        ByteBuffer buf = (ByteBuffer)key.attachment();
        long bytesRead = sc.read(buf);
        while(bytesRead>0){
            buf.flip();
            while(buf.hasRemaining()){
                System.out.print((char)buf.get());
            }
            System.out.println();
            buf.clear();
            bytesRead = sc.read(buf);
        }
        if(bytesRead == -1){
            sc.close();
        }
    }
    public static void handleWrite(SelectionKey key) throws IOException{
        ByteBuffer buf = (ByteBuffer)key.attachment();
        buf.flip();
        SocketChannel sc = (SocketChannel) key.channel();
        while(buf.hasRemaining()){
            sc.write(buf);
        }
        buf.compact();
    }
    public static void selector() {
        Selector selector = null;
        ServerSocketChannel ssc = null;
        try{
            selector = Selector.open();
            ssc= ServerSocketChannel.open();
            ssc.socket().bind(new InetSocketAddress(PORT));
            ssc.configureBlocking(false);
            ssc.register(selector, SelectionKey.OP_ACCEPT);
            while(true){
                if(selector.select(TIMEOUT) == 0){
                    System.out.println("==");
                    continue;
                }
                Iterator<SelectionKey> iter = selector.selectedKeys().iterator();
                while(iter.hasNext()){
                    SelectionKey key = iter.next();
                    if(key.isAcceptable()){
                        handleAccept(key);
                    }
                    if(key.isReadable()){
                        handleRead(key);
                    }
                    if(key.isWritable() && key.isValid()){
                        handleWrite(key);
                    }
                    if(key.isConnectable()){
                        System.out.println("isConnectable = true");
                    }
                    iter.remove();
                }
            }
        }catch(IOException e){
            e.printStackTrace();
        }finally{
            try{
                if(selector!=null){
                    selector.close();
                }
                if(ssc!=null){
                    ssc.close();
                }
            }catch(IOException e){
                e.printStackTrace();
            }
        }
    }
}
七、Selector(選擇器)
Selector(選擇器)是Java NIO中能夠檢測一到多個NIO通道,并能夠知曉通道是否為諸如讀寫事件做好準備的組件。這樣,一個單獨的線程可以管理多個channel,從而管理多個網絡連接。
1、為什么使用Selector?
僅用單個線程來處理多個Channels的好處是,只需要更少的線程來處理通道。事實上,可以只用一個線程處理所有的通道。對于操作系統來說,線程之間上下文切換的開銷很大,而且每個線程都要占用系統的一些資源(如內存)。因此,使用的線程越少越好。
但是,需要記住,現代的操作系統和CPU在多任務方面表現的越來越好,所以多線程的開銷隨著時間的推移,變得越來越小了。實際上,如果一個CPU有多個內核,不使用多任務可能是在浪費CPU能力。在這里,只要知道使用Selector能夠處理多個通道就足夠了。
2、Selector的創建
通過調用Selector.open()方法創建一個Selector,如下:
Selector selector = Selector.open();
3、向Selector注冊通道
為了將Channel和Selector配合使用,必須將channel注冊到selector上。通過SelectableChannel.register()方法來實現,如下
channel.configureBlocking(false);
SelectionKey key = channel.register(selector, Selectionkey.OP_READ);
與Selector一起使用時,Channel必須處于非阻塞模式下。這意味著不能將FileChannel與Selector一起使用,因為FileChannel不能切換到非阻塞模式。而套接字通道都可以。
注意register()方法的第二個參數。這是一個“interest集合”,意思是在通過Selector監聽Channel時對什么事件感興趣。可以監聽四種不同類型的事件:
- Connect
- Accept
- Read
- Write
通道觸發了一個事件意思是該事件已經就緒。所以,某個channel成功連接到另一個服務器稱為“連接就緒”。一個server socket channel準備好接收新進入的連接稱為“接收就緒”。一個有數據可讀的通道可以說是“讀就緒”。等待寫數據的通道可以說是“寫就緒”。
這四種事件用SelectionKey的四個常量來表示:
- SelectionKey.OP_CONNECT
- SelectionKey.OP_ACCEPT
- SelectionKey.OP_READ
- SelectionKey.OP_WRITE
如果你對不止一種事件感興趣,那么可以用“位或”操作符將常量連接起來,如下:
int interestSet = SelectionKey.OP_READ | SelectionKey.OP_WRITE;
在下面還會繼續提到interest集合。
SelectionKey
在上一小節中,當向Selector注冊Channel時,register()方法會返回一個SelectionKey對象。這個對象包含了一些你感興趣的屬性:
- interest集合
- ready集合
- Channel
- Selector
- 附加的對象(可選)
下面我會描述這些屬性:
interest集合
就像向Selector注冊通道一節中所描述的,interest集合是你所選擇的感興趣的事件集合。可以通過SelectionKey讀寫interest集合,像這樣
int interestSet = selectionKey.interestOps();
boolean isInterestedInAccept = (interestSet & SelectionKey.OP_ACCEPT) == SelectionKey.OP_ACCEPT;
boolean isInterestedInConnect = interestSet & SelectionKey.OP_CONNECT;
boolean isInterestedInRead = interestSet & SelectionKey.OP_READ;
boolean isInterestedInWrite = interestSet & SelectionKey.OP_WRITE;
可以看到,用“位與”操作interest 集合和給定的SelectionKey常量,可以確定某個確定的事件是否在interest 集合中。
ready集合
ready 集合是通道已經準備就緒的操作的集合。在一次選擇(Selection)之后,你會首先訪問這個ready set。可以這樣訪問ready集合:
int readySet = selectionKey.readyOps();
可以用像檢測interest集合那樣的方法,來檢測channel中什么事件或操作已經就緒。但是,也可以使用以下四個方法,它們都會返回一個布爾類型:
- selectionKey.isAcceptable();
- selectionKey.isConnectable();
- selectionKey.isReadable();
- selectionKey.isWritable();
Channel + Selector
從SelectionKey訪問Channel和Selector很簡單。如下:
Channel channel = selectionKey.channel();
Selector selector = selectionKey.selector();
附加的對象
可以將一個對象或者更多信息附著到SelectionKey上,這樣就能方便的識別某個給定的通道。例如,可以附加 與通道一起使用的Buffer,或是包含聚集數據的某個對象。使用方法如下:
selectionKey.attach(theObject);
Object attachedObj = selectionKey.attachment();
還可以在用register()方法向Selector注冊Channel的時候附加對象。如:
SelectionKey key = channel.register(selector, SelectionKey.OP_READ, theObject);
4、通過Selector選擇通道
一旦向Selector注冊了一或多個通道,就可以調用幾個重載的select()方法。這些方法返回你所感興趣的事件(如連接、接受、讀或寫)已經準備就緒的那些通道。換句話說,如果你對“讀就緒”的通道感興趣,select()方法會返回讀事件已經就緒的那些通道。
下面是select()方法:
- int select()
- int select(long timeout)
- int selectNow()
select() 阻塞到至少有一個通道在你注冊的事件上就緒了。
select(long timeout)和select()一樣,除了最長會阻塞timeout毫秒(參數)。
selectNow()不會阻塞,不管什么通道就緒都立刻返回(譯者注:此方法執行非阻塞的選擇操作。如果自從前一次選擇操作后,沒有通道變成可選擇的,則此方法直接返回零。)。
select()方法返回的int值表示有多少通道已經就緒。亦即,自上次調用select()方法后有多少通道變成就緒狀態。如果調用select()方法,因為有一個通道變成就緒狀態,返回了1,若再次調用select()方法,如果另一個通道就緒了,它會再次返回1。如果對第一個就緒的channel沒有做任何操作,現在就有兩個就緒的通道,但在每次select()方法調用之間,只有一個通道就緒了。
5、selectedKeys()
一旦調用了select()方法,并且返回值表明有一個或更多個通道就緒了,然后可以通過調用selector的selectedKeys()方法,訪問“已選擇鍵集(selected key set)”中的就緒通道。如下所示:
Set selectedKeys = selector.selectedKeys();
當像Selector注冊Channel時,Channel.register()方法會返回一個SelectionKey 對象。這個對象代表了注冊到該Selector的通道。可以通過SelectionKey的selectedKeySet()方法訪問這些對象。
可以遍歷這個已選擇的鍵集合來訪問就緒的通道。如下:
Set selectedKeys = selector.selectedKeys();
Iterator keyIterator = selectedKeys.iterator();
while(keyIterator.hasNext()) {
SelectionKey key = keyIterator.next();
if(key.isAcceptable()) {
// a connection was accepted by a ServerSocketChannel.
} else if (key.isConnectable()) {
// a connection was established with a remote server.
} else if (key.isReadable()) {
// a channel is ready for reading
} else if (key.isWritable()) {
// a channel is ready for writing
}
keyIterator.remove();
}
這個循環遍歷已選擇鍵集中的每個鍵,并檢測各個鍵所對應的通道的就緒事件。
注意每次迭代末尾的keyIterator.remove()調用。Selector不會自己從已選擇鍵集中移除SelectionKey實例。必須在處理完通道時自己移除。下次該通道變成就緒時,Selector會再次將其放入已選擇鍵集中。
SelectionKey.channel()方法返回的通道需要轉型成你要處理的類型,如ServerSocketChannel或SocketChannel等。
6、wakeUp()
某個線程調用select()方法后阻塞了,即使沒有通道已經就緒,也有辦法讓其從select()方法返回。只要讓其它線程在第一個線程調用select()方法的那個對象上調用Selector.wakeup()方法即可。阻塞在select()方法上的線程會立馬返回。
如果有其它線程調用了wakeup()方法,但當前沒有線程阻塞在select()方法上,下個調用select()方法的線程會立即“醒來(wake up)”。
7、close()
用完Selector后調用其close()方法會關閉該Selector,且使注冊到該Selector上的所有SelectionKey實例無效。通道本身并不會關閉。
完整的示例:
這里有一個完整的示例,打開一個Selector,注冊一個通道注冊到這個Selector上(通道的初始化過程略去),然后持續監控這個Selector的四種事件(接受,連接,讀,寫)是否就緒。
Selector selector = Selector.open();
channel.configureBlocking(false);
SelectionKey key = channel.register(selector, SelectionKey.OP_READ);
while(true) {
int readyChannels = selector.select();
if(readyChannels == 0) continue;
Set selectedKeys = selector.selectedKeys();
Iterator keyIterator = selectedKeys.iterator();
while(keyIterator.hasNext()) {
SelectionKey key = keyIterator.next();
if(key.isAcceptable()) {
// a connection was accepted by a ServerSocketChannel.
} else if (key.isConnectable()) {
// a connection was established with a remote server.
} else if (key.isReadable()) {
// a channel is ready for reading
} else if (key.isWritable()) {
// a channel is ready for writing
}
keyIterator.remove();
}
}
八、MappedByteBuffer (內存映射文件):
JAVA處理大文件,一般用BufferedReader,BufferedInputStream這類帶緩沖的IO類,不過如果文件超大的話,更快的方式是采用MappedByteBuffer。MappedByteBuffer是NIO引入的文件內存映射方案(這里的內存指的是虛擬內存,并不是物理內存),是ByteBuffer的子類,讀寫性能極高。如果我要發送一個1G的文件怎么辦?不可能真的去分配1G的內存.這時就必須使用 MappedByteBuffer。
注:使用MappedByteBuffer有資源釋放的問題:被MappedByteBuffer打開的文件只有在垃圾收集時才會被關閉,而這個點是不確定的。
概念
FileChannel提供了map方法來把文件影射為內存映像文件: MappedByteBuffer map(int mode,long position,long size); 可以把文件的從position開始的size大小的區域映射為內存映像文件,mode指出了 可訪問該內存映像文件的方式:
- READ_ONLY,(只讀): 試圖修改得到的緩沖區將導致拋出 ReadOnlyBufferException.(FileChannel.MapMode.READ_ONLY)
- READ_WRITE(讀/寫): 對得到的緩沖區的更改最終將傳播到文件;該更改對映射到同一文件的其他程序不一定是可見的。 (FileChannel.MapMode.READ_WRITE)
- PRIVATE(專用): 對得到的緩沖區的更改不會傳播到文件,并且該更改對映射到同一文件的其他程序也不是可見的;相反,會創建緩沖區已修改部分的專用副本。 (FileChannel.MapMode.PRIVATE)
MappedByteBuffer是ByteBuffer的子類,其擴充了三個方法:
- force():緩沖區是READ_WRITE模式下,此方法對緩沖區內容的修改強行寫入文件;
- load():將緩沖區的內容載入內存,并返回該緩沖區的引用;
- isLoaded():如果緩沖區的內容在物理內存中,則返回真,否則返回假;
使用案例對比:
  public static void method4(){
        RandomAccessFile aFile = null;
        FileChannel fc = null;
        try{
            aFile = new RandomAccessFile("src/1.ppt","rw");
            fc = aFile.getChannel();
            long timeBegin = System.currentTimeMillis();
            ByteBuffer buff = ByteBuffer.allocate((int) aFile.length());
            buff.clear();
            fc.read(buff);
            //System.out.println((char)buff.get((int)(aFile.length()/2-1)));
            //System.out.println((char)buff.get((int)(aFile.length()/2)));
            //System.out.println((char)buff.get((int)(aFile.length()/2)+1));
            long timeEnd = System.currentTimeMillis();
            System.out.println("Read time: "+(timeEnd-timeBegin)+"ms");
        }catch(IOException e){
            e.printStackTrace();
        }finally{
            try{
                if(aFile!=null){
                    aFile.close();
                }
                if(fc!=null){
                    fc.close();
                }
            }catch(IOException e){
                e.printStackTrace();
            }
        }
    }
    public static void method3(){
        RandomAccessFile aFile = null;
        FileChannel fc = null;
        try{
            aFile = new RandomAccessFile("src/1.ppt","rw");
            fc = aFile.getChannel();
            long timeBegin = System.currentTimeMillis();
            MappedByteBuffer mbb = fc.map(FileChannel.MapMode.READ_ONLY, 0, aFile.length());
            // System.out.println((char)mbb.get((int)(aFile.length()/2-1)));
            // System.out.println((char)mbb.get((int)(aFile.length()/2)));
            //System.out.println((char)mbb.get((int)(aFile.length()/2)+1));
            long timeEnd = System.currentTimeMillis();
            System.out.println("Read time: "+(timeEnd-timeBegin)+"ms");
        }catch(IOException e){
            e.printStackTrace();
        }finally{
            try{
                if(aFile!=null){
                    aFile.close();
                }
                if(fc!=null){
                    fc.close();
                }
            }catch(IOException e){
                e.printStackTrace();
            }
        }
    }
測試一個200M的文件讀取,輸出結果: method3 耗時: 1ms, method4耗時400ms。
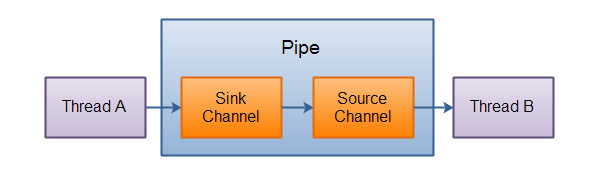
九、Pipe
Java NIO 管道是2個線程之間的單向數據連接。Pipe有一個source通道和一個sink通道。數據會被寫到sink通道,從source通道讀取。
這里是Pipe原理的圖示:
1、創建管道
通過Pipe.open()方法打開管道。例如:
Pipe pipe = Pipe.open();
2、向管道寫數據
要向管道寫數據,需要訪問sink通道。像這樣:
Pipe.SinkChannel sinkChannel = pipe.sink();
通過調用SinkChannel的write()方法,將數據寫入SinkChannel,像這樣:
String newData = "New String to write to file..." + System.currentTimeMillis();
ByteBuffer buf = ByteBuffer.allocate(48);
buf.clear();
buf.put(newData.getBytes());
buf.flip();
while(buf.hasRemaining()) {
   sinkChannel.write(buf);
}
3、從管道讀取數據
從讀取管道的數據,需要訪問source通道,像這樣:
Pipe.SourceChannel sourceChannel = pipe.source();
調用source通道的read()方法來讀取數據,像這樣:
ByteBuffer buf = ByteBuffer.allocate(48);
int bytesRead = sourceChannel.read(buf);
read()方法返回的int值會告訴我們多少字節被讀進了緩沖區。
十、 Scatter/Gather
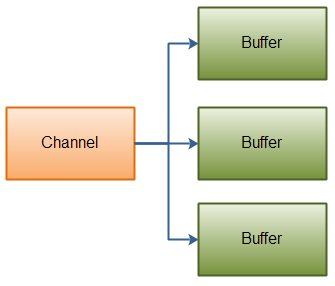
Java NIO開始支持scatter/gather,scatter/gather用于描述從Channel(譯者注:Channel在中文經常翻譯為通道)中讀取或者寫入到Channel的操作。
- 分散(scatter)從Channel中讀取是指在讀操作時將讀取的數據寫入多個buffer中。因此,Channel將從Channel中讀取的數據“分散(scatter)”到多個Buffer中。
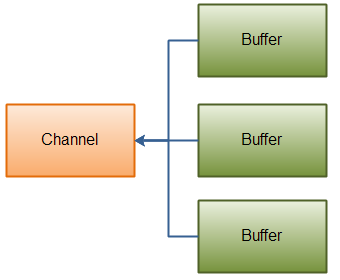
- 聚集(gather)寫入Channel是指在寫操作時將多個buffer的數據寫入同一個Channel,因此,Channel 將多個Buffer中的數據“聚集(gather)”后發送到Channel。
scatter / gather經常用于需要將傳輸的數據分開處理的場合,例如傳輸一個由消息頭和消息體組成的消息,你可能會將消息體和消息頭分散到不同的buffer中,這樣你可以方便的處理消息頭和消息體。
Scattering Reads
Scattering Reads是指數據從一個channel讀取到多個buffer中。如下圖描述:
代碼示例如下:
ByteBuffer header = ByteBuffer.allocate(128);
ByteBuffer body = ByteBuffer.allocate(1024);
ByteBuffer[] bufferArray = { header, body };
channel.read(bufferArray);
注意buffer首先被插入到數組,然后再將數組作為channel.read() 的輸入參數。read()方法按照buffer在數組中的順序將從channel中讀取的數據寫入到buffer,當一個buffer被寫滿后,channel緊接著向另一個buffer中寫。
Scattering Reads在移動下一個buffer前,必須填滿當前的buffer,這也意味著它不適用于動態消息(譯者注:消息大小不固定)。換句話說,如果存在消息頭和消息體,消息頭必須完成填充(例如 128byte),Scattering Reads才能正常工作。
Gathering Writes
Gathering Writes是指數據從多個buffer寫入到同一個channel。如下圖描述:
代碼示例如下:
ByteBuffer header = ByteBuffer.allocate(128);
ByteBuffer body = ByteBuffer.allocate(1024);
//write data into buffers
ByteBuffer[] bufferArray = { header, body };
channel.write(bufferArray);
buffers數組是write()方法的入參,write()方法會按照buffer在數組中的順序,將數據寫入到channel,注意只有position和limit之間的數據才會被寫入。因此,如果一個buffer的容量為128byte,但是僅僅包含58byte的數據,那么這58byte的數據將被寫入到channel中。因此與Scattering Reads相反,Gathering Writes能較好的處理動態消息。

 浙公網安備 33010602011771號