
Mac系統中安裝Nginx
一、前言
本文介紹一下,如何在Mac系統中安裝Nginx,把詳細過程記錄下來,方便以后查看,也方便大家學習。
二、正文
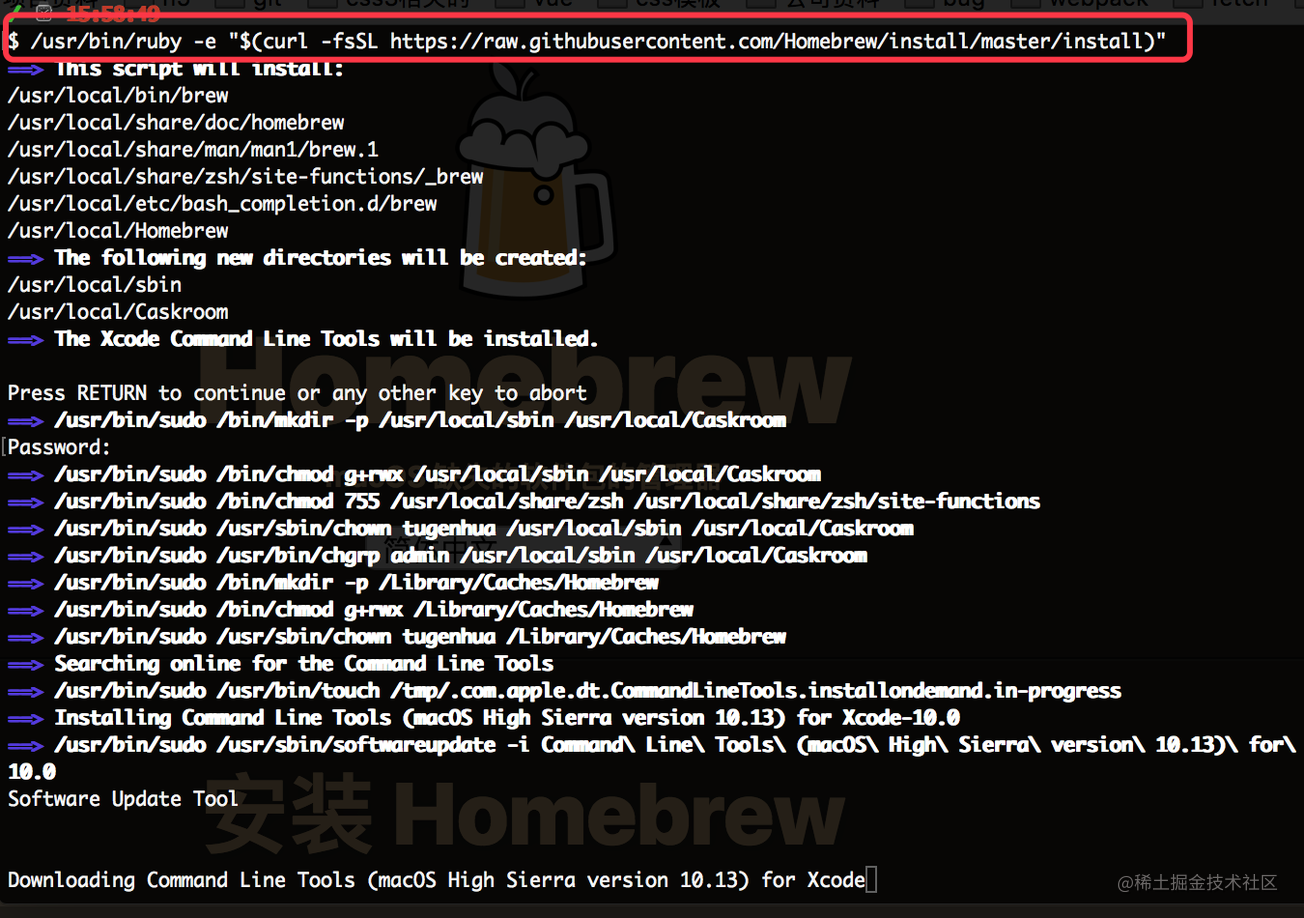
1、安裝 Homebrew
homebrew是什么?它是Mac中的一款軟件包管理工具,通過brew可以很方便的在Mac中安裝軟件或者是卸載軟件。不了解的同學看以看官網(
/usr/bin/ruby -e "$(curl -fsSL https://raw.githubusercontent.com/Homebrew/install/master/install)"
運行,如下所示:
 ?
?
?
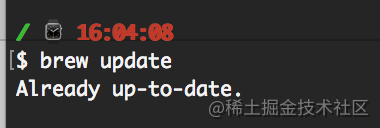
安裝成功后的話,我們可以使用命令 “brew update”更新下;如下命令:
brew update
 ?
?
?
有關brew常用的指令如下:
- brew搜索軟件命令: brew search nginx\
- brew安裝軟件命令: brew install nginx\
- brew卸載軟件命令: brew uninstall nginx\
- brew升級命令: sudo brew update\
- 查看安裝信息(比如查看安裝目錄等) sudo brew info nginx\
- 查看已經安裝的軟件:brew list
2、brew安裝nginx
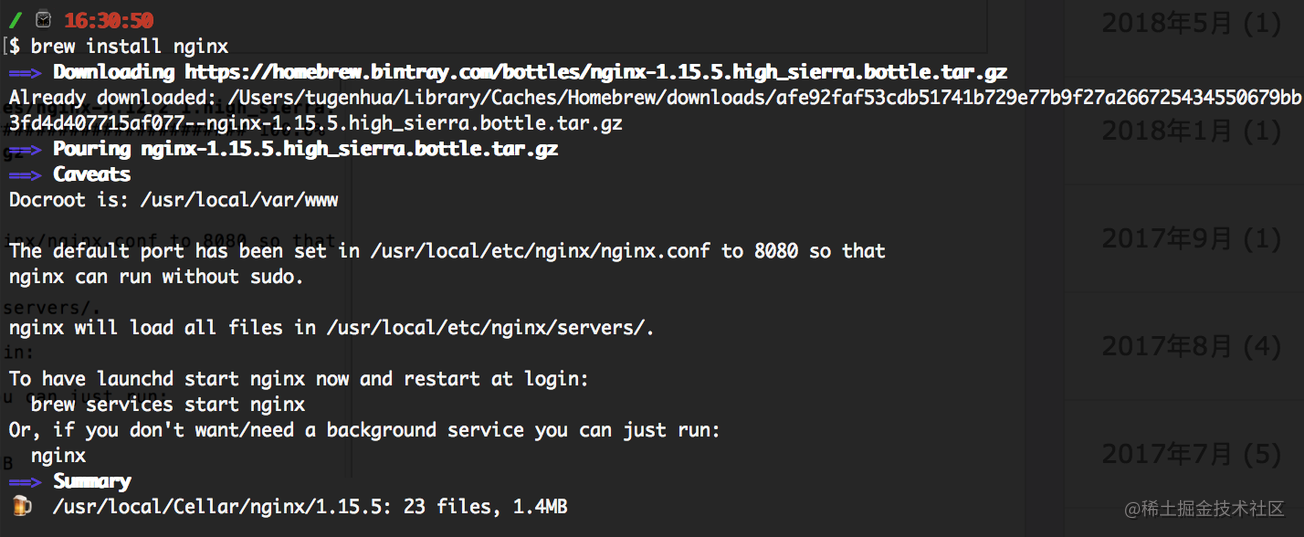
2.1、使用brew安裝nginx,如下命令所示:
brew install nginx
如下圖所示:
 ?
?
?
2.2、查看nginx的配置信息,如下命令:
brew info nginx
 ?
?
?
如上面的截圖,From:xxx 這樣的,是nginx的來源,Docroot默認為 /usr/local/var/www, 在/usr/local/etc/nginx/nginx.conf 配置文件中默認的端口為8080, 且nginx將在/usr/local/etc/nginx/servers 目錄中加載所有文件。并且我們可以通過最簡單的命令'nginx' 來啟動nginx.
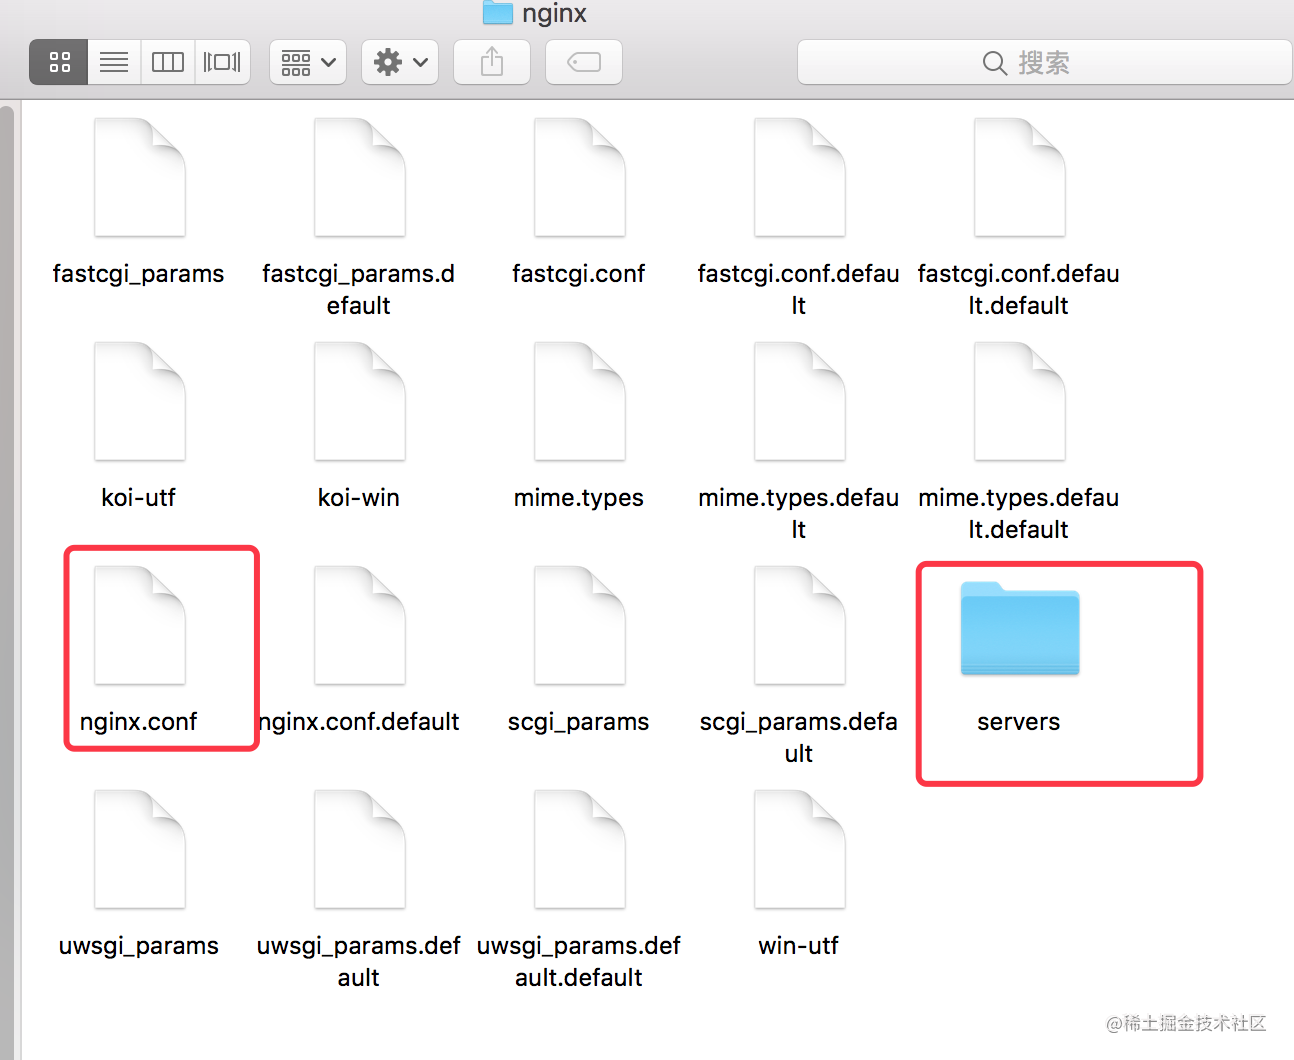
2.3、查看nginx安裝目錄, 如下命令:
open /usr/local/etc/nginx/
如下圖所示:
 ?
?
?
打開nginx目錄后,可以看到我們上面的使用 brew info nginx 查看信息所說的 server目錄以及nginx.conf的配置文件,那么我們的nginx被安裝到什么地方呢?我們從上面的截圖可以看到,是在 這個目錄下 /usr/local/Cellar/nginx,執行如下命令可以查看到:
open /usr/local/Cellar/nginx
會打包目錄,如下圖所示:
 ?
?
?
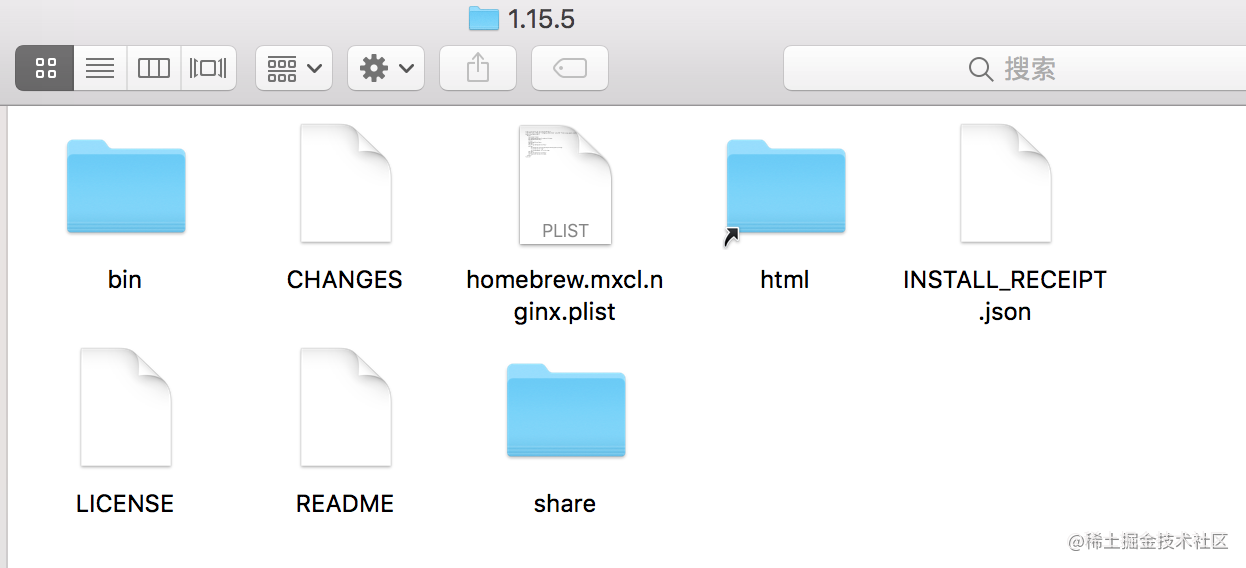
進入上面的 1.15.5文件后,如下圖所示:
 ?
?
?
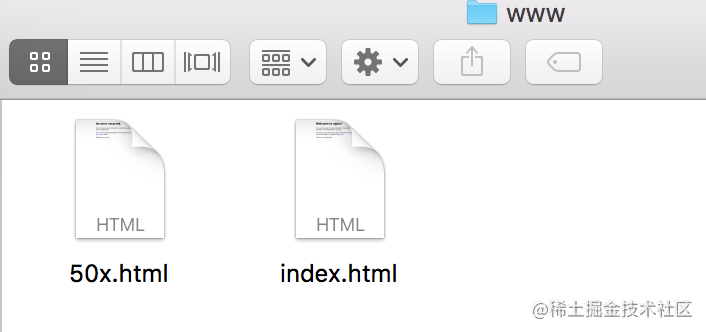
在該目錄下可以看到一個名字為html的快捷方式的文件夾,進入該目錄后,它有兩個文件50.html和index.html,如下圖所示:
 ?
?
?
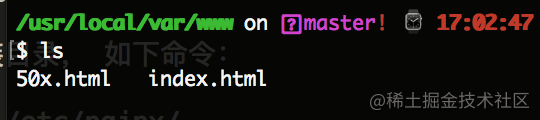
其實它是指向的就是 /usr/local/var/wwww目錄的,為什么這么說,我們來看下進入該命令后,查看下面有哪些文件就可以看到,如下圖:
 ?
?
?
3、啟動nginx服務,如下命令:
brew services start nginx // 重啟的命令是: brew services restart nginx
如下圖所示:
 ?
?
?
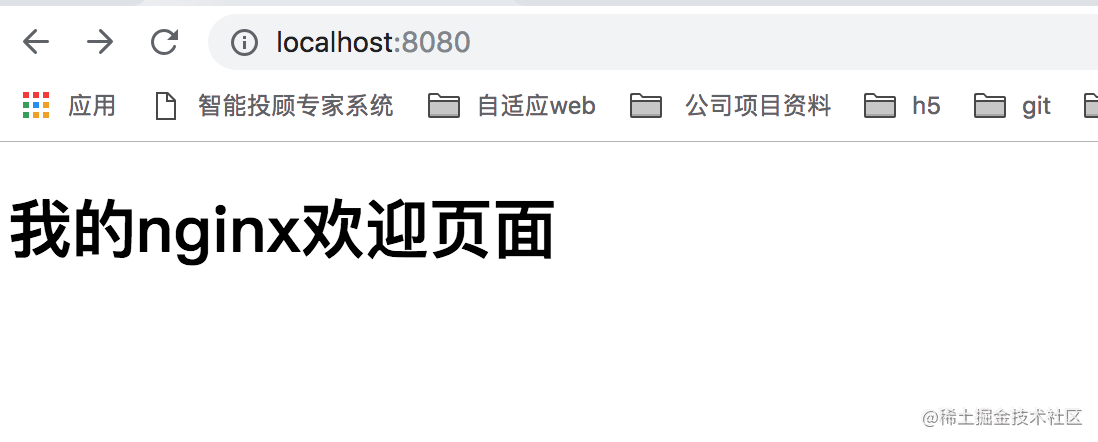
重啟后,我們驗證下,因為nginx默認的端口號是8080,因此我們頁面訪問
 ?
?
?
如果成功的話,一般都是 歡迎的界面(index.html頁面我自己改過),下面我們繼續查看下nginx.conf 配置信息,使用如下命令:
cat /usr/local/etc/nginx/nginx.conf // 或者使用 sudo open /usr/local/etc/nginx/nginx.conf -a 'sublime text' 使用編輯器sublime打開。
如下配置信息:
#user  nginx;
worker_processes  1;

#error_log  logs/error.log;
#error_log  logs/error.log  notice;
#error_log  logs/error.log  info;

#pid        logs/nginx.pid;


events {
    worker_connections  1024;
}


http {
    include       mime.types;
    default_type  application/octet-stream;

    #log_format  main  '$remote_addr - $remote_user [$time_local] "$request" '
    #                  '$status $body_bytes_sent "$http_referer" '
    #                  '"$http_user_agent" "$http_x_forwarded_for"';

    #access_log  logs/access.log  main;

    sendfile        on;
    #tcp_nopush     on;

    #keepalive_timeout  0;
    keepalive_timeout  65;

    #gzip  on;

    server {
        listen       8080;
        server_name  localhost;

        #charset koi8-r;

        #access_log  logs/host.access.log  main;

        location / {
            root   html;
            index  index.html index.htm;
        }

        #error_page  404              /404.html;

        # redirect server error pages to the static page /50x.html
        #
        error_page   500 502 503 504  /50x.html;
        location = /50x.html {
            root   html;
        }

        # proxy the PHP scripts to Apache listening on 127.0.0.1:80
        #
        #location ~ .php$ {
        #    proxy_pass   http://127.0.0.1;
        #}

        # pass the PHP scripts to FastCGI server listening on 127.0.0.1:9000
        #
        #location ~ .php$ {
        #    root           html;
        #    fastcgi_pass   127.0.0.1:9000;
        #    fastcgi_index  index.php;
        #    fastcgi_param  SCRIPT_FILENAME  /scripts$fastcgi_script_name;
        #    include        fastcgi_params;
        #}

        # deny access to .htaccess files, if Apache's document root
        # concurs with nginx's one
        #
        #location ~ /.ht {
        #    deny  all;
        #}
    }

    # another virtual host using mix of IP-, name-, and port-based configuration
    #
    #server {
    #    listen       8000;
    #    listen       somename:8080;
    #    server_name  somename  alias  another.alias;

    #    location / {
    #        root   html;
    #        index  index.html index.htm;
    #    }
    #}


    # HTTPS server
    #
    #server {
    #    listen       443 ssl;
    #    server_name  localhost;

    #    ssl_certificate      cert.pem;
    #    ssl_certificate_key  cert.key;

    #    ssl_session_cache    shared:SSL:1m;
    #    ssl_session_timeout  5m;

    #    ssl_ciphers  HIGH:!aNULL:!MD5;
    #    ssl_prefer_server_ciphers  on;

    #    location / {
    #        root   html;
    #        index  index.html index.htm;
    #    }
    #}
    include servers/*;
}
如上,就可以使用nginx搭建本地服務了。
三、總結nginx常見的配置
nginx的配置文件路徑:/usr/local/etc/nginx/nginx.conf
nginx的服務器默認路徑:/usr/local/var/www
nginx的安裝路徑:/usr/local/Cellar/nginx/1.15.5
1、nginx啟動:
1.1、在終端輸入 ps -ef|grep nginx 命令看是否有啟動,如下:
 ?
?
?
1.2、驗證配置文件是否正確,因此在啟動nginx之前,我們可以先運行下如下命令:
sudo /usr/local/Cellar/nginx/1.15.5/bin/nginx -t -c /usr/local/etc/nginx/nginx.conf
注意:一定要注意路徑是否是自己的安裝路徑。這邊我的nginx是1.15.5版本的。
 ?
?
?
如果出現如下信息,說明配置文件正確。
nginx: the configuration file /usr/local/etc/nginx/nginx.conf syntax is ok
nginx: configuration file /usr/local/etc/nginx/nginx.conf test is successful
重啟nginx有如下幾種方法:
1.3、通過brew,brew services start nginx(啟動nginx) brew services restart nginx(重啟命令), 如下所示:
 ?
?
?
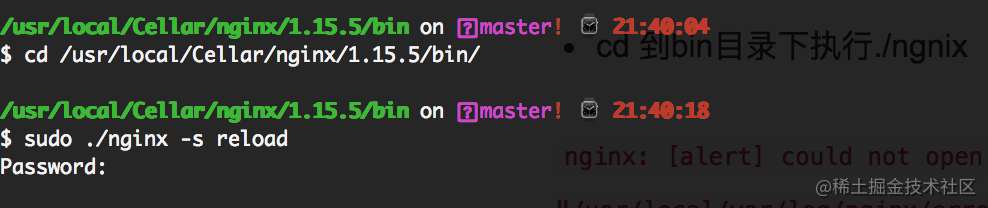
1.4、先進入bin目錄:cd /usr/local/Cellar/nginx/1.15.5/bin/, 然后再執行:./nginx -s reload, 如下所示:
 ?
?
?
1.5、根據進程號重啟,執行命令 kill -HUP 進程號 如下所示:
 ?
?
?
2、nginx停止
終端輸入ps -ef|grep nginx獲取到nginx的進程號, 注意是找到“nginx:master”的那個進程號
 ?
?
?
注意:
kill -QUIT 72 (從容的停止,即不會立刻停止)
Kill -TERM 72 (立刻停止)
Kill -INT 72 (和上面一樣,也是立刻停止)
?

 浙公網安備 33010602011771號