
Kubernetes安裝-kubeadm方式
環(huán)境
1.軟件版本
| 系統(tǒng) | 版本 |
|---|---|
| centos | 7.9(內(nèi)核采用4.19) |
| docker | 20.10.15 |
| kubeadm | 1.22.17 |
2.ip劃分
| 主機(jī)名 | ip地址 | 系統(tǒng)配置 |
|---|---|---|
| kubeadm-master | 10.103.236.201 | 2core_2g |
| kubeadm-node01 | 10.103.236.202 | 1core_2g |
| kubeadm-node02 | 10.103.236.203 | 1core_2g |
| kubeadm-node03 | 10.103.236.204 | 1core_2g |
| pod網(wǎng)段 | 172.16.0.0/12 | |
| service網(wǎng)段 | 192.168.0.0/16 | |
| host網(wǎng)段 | 10.103.236.0/12 |
1.配置kubeadm源
1.1安裝依賴
yum install -y yum-utils device-mapper-persistent-data lvm2 wget jq psmisc vim net-tools telnet
1.2配置aliyun源
curl -o /etc/yum.repos.d/CentOS-Base.repo https://mirrors.aliyun.com/repo/Centos-7.repo

#修改地址
sed -i -e '/mirrors.cloud.aliyuncs.com/d' -e '/mirrors.aliyuncs.com/d' /etc/yum.repos.d/CentOS-Base.repo
1.3配置docker源
yum-config-manager --add-repo https://mirrors.aliyun.com/docker-ce/linux/centos/docker-ce.repo
1.4配置kubernetes源
cat <<EOF > /etc/yum.repos.d/kubernetes.repo
[kubernetes]
name=Kubernetes
baseurl=https://mirrors.aliyun.com/kubernetes/yum/repos/kubernetes-el7-x86_64/
enabled=1
gpgcheck=0
repo_gpgcheck=0
gpgkey=https://mirrors.aliyun.com/kubernetes/yum/doc/yum-key.gpg https://mirrors.aliyun.com/kubernetes/yum/doc/rpm-package-key.gpg
EOF
2.基本環(huán)境配置
文檔,https://kubernetes.io/docs/setup/production-environment/tools/kubeadm/install-kubeadm/
2.1 關(guān)閉selinux等
所有節(jié)點(diǎn)關(guān)閉防火墻、selinux、dnsmasq、swap
systemctl disable --now firewalld
systemctl disable --now dnsmasq
systemctl disable --now NetworkManager

setenforce 0
sed -i 's#SELINUX=enforcing#SELINUX=disabled#g' /etc/sysconfig/selinux
sed -i 's#SELINUX=enforcing#SELINUX=disabled#g' /etc/selinux/config
2.2 關(guān)閉swap
swapoff -a && sysctl -w vm.swappiness=0

sed -ri '/^[^#]*swap/s@^@#@' /etc/fstab
2.3 時間同步
#安裝服務(wù)
yum install chrony -y

#啟動服務(wù)
systemctl enable chronyd --now

#同步時間
[root@kube-master yum.repos.d]# chronyc sources
210 Number of sources = 4
MS Name/IP address         Stratum Poll Reach LastRx Last sample
===============================================================================
^- tock.ntp.infomaniak.ch        1  10   377   283    -10ms[  -10ms] +/-   87ms
^- ntp8.flashdance.cx            2  10   377   192    -18ms[  -18ms] +/-  154ms
^* 139.199.215.251               2  10   377   859   -902us[ -511us] +/-   59ms
^- tick.ntp.infomaniak.ch        1  10   377   27m    +26ms[  +26ms] +/-  133ms
- 或者
安裝ntpdate
rpm -ivh http://mirrors.wlnmp.com/centos/wlnmp-release-centos.noarch.rpm
yum install ntpdate -y

#操作如下
ln -sf /usr/share/zoneinfo/Asia/Shanghai /etc/localtime
echo 'Asia/Shanghai' >/etc/timezone
ntpdate time2.aliyun.com
# 加入到crontab
*/5 * * * * /usr/sbin/ntpdate time2.aliyun.com
2.4 limit配置
ulimit -SHn 65535

#添加配置文件
vim /etc/security/limits.conf
# 末尾添加如下內(nèi)容
* soft nofile 65536
* hard nofile 131072
* soft nproc 65535
* hard nproc 655350
* soft memlock unlimited
* hard memlock unlimited
2.5 內(nèi)核配置
1.升級內(nèi)核
CentOS7 需要升級內(nèi)核至4.18+,本地升級的版本為4.19,所有節(jié)點(diǎn)升級
#下載
wget http://193.49.22.109/elrepo/kernel/el7/x86_64/RPMS/kernel-ml-devel-4.19.12-1.el7.elrepo.x86_64.rpm
wget http://193.49.22.109/elrepo/kernel/el7/x86_64/RPMS/kernel-ml-4.19.12-1.el7.elrepo.x86_64.rpm

#安裝
yum localinstall -y kernel-ml*

#更改內(nèi)核啟動順序
grub2-set-default  0 && grub2-mkconfig -o /etc/grub2.cfg
grubby --args="user_namespace.enable=1" --update-kernel="$(grubby --default-kernel)"

#查看內(nèi)核啟動版本
[root@kube-master yum.repos.d]# grubby --default-kernel
/boot/vmlinuz-4.19.12-1.el7.elrepo.x86_64

#啟動所有節(jié)點(diǎn)
reboot

#查看版本
uname -a
2.安裝ipvsadm
yum install ipvsadm ipset sysstat conntrack libseccomp -y
- 配置ipvs模塊
在內(nèi)核4.19+版本nf_conntrack_ipv4已經(jīng)改為nf_conntrack
在內(nèi)核4.18以下使用nf_conntrack_ipv4
vim /etc/modules-load.d/ipvs.conf
# 加入以下內(nèi)容
ip_vs
ip_vs_lc
ip_vs_wlc
ip_vs_rr
ip_vs_wrr
ip_vs_lblc
ip_vs_lblcr
ip_vs_dh
ip_vs_sh
ip_vs_fo
ip_vs_nq
ip_vs_sed
ip_vs_ftp
ip_vs_sh
nf_conntrack
ip_tables
ip_set
xt_set
ipt_set
ipt_rpfilter
ipt_REJECT
ipip

#啟動
systemctl enable --now systemd-modules-load.service
- 或者其他方式
#啟動時能自動加載模塊
cat > /etc/sysconfig/modules/ipvs.modules <<EOF
#!/bin/bash
modprobe -- ip_vs
modprobe -- ip_vs_rr
modprobe -- ip_vs_wrr
modprobe -- ip_vs_sh
modprobe -- nf_conntrack
EOF

#授權(quán)
chmod 755 /etc/sysconfig/modules/ipvs.modules

#執(zhí)行
sh /etc/sysconfig/modules/ipvs.modules

#查看
[root@kube-master yum.repos.d]# lsmod |grep -e ip_vs -e nf_conntrack
nf_conntrack_netlink    40960  0
nfnetlink              16384  3 nf_conntrack_netlink,ip_set
ip_vs_ftp              16384  0
nf_nat                 32768  2 nf_nat_ipv4,ip_vs_ftp
ip_vs_sed              16384  0
ip_vs_nq               16384  0
ip_vs_fo               16384  0
ip_vs_sh               16384  0
ip_vs_dh               16384  0
ip_vs_lblcr            16384  0
ip_vs_lblc             16384  0
ip_vs_wrr              16384  0
ip_vs_rr               16384  0
ip_vs_wlc              16384  0
ip_vs_lc               16384  0
ip_vs                 151552  24 ip_vs_wlc,ip_vs_rr,ip_vs_dh,ip_vs_lblcr,ip_vs_sh,ip_vs_fo,ip_vs_nq,ip_vs_lblc,ip_vs_wrr,ip_vs_lc,ip_vs_sed,ip_vs_ftp
nf_conntrack          143360  6 xt_conntrack,nf_nat,ipt_MASQUERADE,nf_nat_ipv4,nf_conntrack_netlink,ip_vs
nf_defrag_ipv6         20480  1 nf_conntrack
nf_defrag_ipv4         16384  1 nf_conntrack
libcrc32c              16384  4 nf_conntrack,nf_nat,xfs,ip_vs
3.配置必要參數(shù)
cat <<EOF > /etc/sysctl.d/k8s.conf
net.ipv4.ip_forward = 1
net.bridge.bridge-nf-call-iptables = 1
net.bridge.bridge-nf-call-ip6tables = 1
fs.may_detach_mounts = 1
net.ipv4.conf.all.route_localnet = 1
vm.overcommit_memory=1
vm.panic_on_oom=0
fs.inotify.max_user_watches=89100
fs.file-max=52706963
fs.nr_open=52706963
net.netfilter.nf_conntrack_max=2310720
net.ipv4.tcp_keepalive_time = 600
net.ipv4.tcp_keepalive_probes = 3
net.ipv4.tcp_keepalive_intvl =15
net.ipv4.tcp_max_tw_buckets = 36000
net.ipv4.tcp_tw_reuse = 1
net.ipv4.tcp_max_orphans = 327680
net.ipv4.tcp_orphan_retries = 3
net.ipv4.tcp_syncookies = 1
net.ipv4.tcp_max_syn_backlog = 16384
net.ipv4.ip_conntrack_max = 65536
net.ipv4.tcp_max_syn_backlog = 16384
net.ipv4.tcp_timestamps = 0
net.core.somaxconn = 16384
EOF
- 重新加載
sysctl --system

- 查看模塊是否加載好, 如果不能加載 則嘗試重啟系統(tǒng)
reboot
lsmod | grep --color=auto -e ip_vs -e nf_conntrack
2.6配置hosts
#新添加如下,對應(yīng)關(guān)系錯誤,否則會出現(xiàn)calico啟動錯誤
vim  /etc/hosts
10.103.236.201 kube-master
10.103.236.202 kube-node01
10.103.236.203 kube-node02
10.103.236.204 kube-node03
2.7配置集群命令自動補(bǔ)全
https://kubernetes.io/zh/docs/tasks/tools/included/optional-kubectl-configs-bash-linux/
yum install bash-completion -y

echo 'source <(kubectl completion bash)' >>~/.bashrc
3.Runtime安裝
? 注意 如果安裝的版本低于1.24,選擇Docker和Containerd均可,高于1.24選擇Containerd作為Runtime :::
3.1 Containerd作為Runtime
所有節(jié)點(diǎn)
1.安裝docker-ce-20.10
yum install docker-ce-20.10.* docker-ce-cli-20.10.* -y

#可以無需啟動Docker,只需要配置和啟動Containerd即可
2.配置Containerd所需模塊
cat <<EOF | sudo tee /etc/modules-load.d/containerd.conf
overlay
br_netfilter
EOF

#加載模塊
modprobe -- overlay
modprobe -- br_netfilter
3.配置Containerd所需的內(nèi)核
cat <<EOF | sudo tee /etc/sysctl.d/99-kubernetes-cri.conf
net.bridge.bridge-nf-call-iptables  = 1
net.ipv4.ip_forward                 = 1
net.bridge.bridge-nf-call-ip6tables = 1
EOF

#重新加載內(nèi)核
sysctl --system
4.配置Containerd文件
mkdir -p /etc/containerd
containerd config default | tee /etc/containerd/config.toml
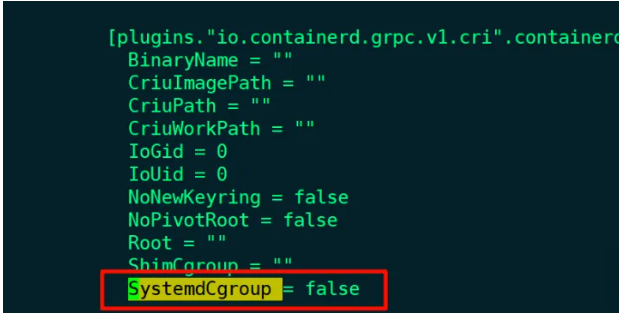
找到containerd.runtimes.runc.options,添加SystemdCgroup = true(如果已存在直接修改,否則會報錯)
- 修改鏡像,否則你懂的
默認(rèn)是, sandbox_image = "registry.k8s.io/pause:3.6",根據(jù)版本進(jìn)行修改
vim /etc/containerd/config.toml
#修改成
sandbox_image = "registry.cn-hangzhou.aliyuncs.com/google_containers/pause:3.6"
5.啟動
systemctl daemon-reload
systemctl enable --now containerd

#配置crictl客戶端連接的運(yùn)行時位置
cat > /etc/crictl.yaml <<EOF
runtime-endpoint: unix:///run/containerd/containerd.sock
image-endpoint: unix:///run/containerd/containerd.sock
timeout: 10
debug: false
EOF
3.2 Docker作為Runtime
? 注意
如果選擇Docker作為Runtime,安裝步驟較Containerd較為簡單,只需要安裝并啟動即可(版本小于1.24)
:::
1.安裝
yum install docker-ce-20.10.* docker-ce-cli-20.10.* -y
新版官方建議,新版Kubelet建議使用systemd,所以把Docker的CgroupDriver也改成systemd
mkdir /etc/docker
cat > /etc/docker/daemon.json <<EOF
{
  "exec-opts": [
   "native.cgroupdriver=systemd"
  ],
  "max-concurrent-downloads": 10,
  "max-concurrent-uploads": 5,
  "live-restore":true,
  "log-driver": "json-file",
  "log-opts": {
   "max-size": "100m",
 "max-file":"5"
  },
  "storage-driver": "overlay2",
  "storage-opts": [
   "overlay2.override_kernel_check=true"
  ],
  "registry-mirrors" : [
  ],
  "data-root": "/data/docker"
}
EOF
2.啟動
systemctl daemon-reload && systemctl enable --now docker
4.安裝Kubernetes組件
1.查看版本
- 在master上面查看最新版本
yum list kubeadm.x86_64 --showduplicates | sort -r
2.安裝
所有節(jié)點(diǎn)安裝,kubeadm、kubelet和kubectl
- 指定版本安裝
yum install -y kubelet-1.22.17 kubeadm-1.22.* kubectl-1.22.17
- 安裝最新
yum install kubeadm-1.22* kubelet-1.22* kubectl-1.22* -y
: ? 注意
如果選擇的是Containerd作為的Runtime,需要更改Kubelet的配置使用Containerd作為Runtime:
:::
cgroup驅(qū)動
cat >/etc/sysconfig/kubelet<<EOF
KUBELET_KUBEADM_ARGS="--cgroup-driver=systemd --container-runtime=remote --runtime-request-timeout=15m --container-runtime-endpoint=unix:///run/containerd/containerd.sock"
EOF
?? 說明
如果不是采用Containerd作為的Runtime,請不要執(zhí)行上述命令
:::
3.啟動
由于還未初始化,沒有kubelet的配置文件,此時kubelet無法啟動,無需擔(dān)心
systemctl daemon-reload
systemctl enable --now kubelet

#查看kubelet 是否以systemd啟動
vim /var/lib/kubelet/config.yaml
5.Kubernetes高可用
省略,此次采用單節(jié)點(diǎn)部署
6.Kubernetes初始化
- 官當(dāng)
https://kubernetes.io/docs/setup/production-environment/tools/kubeadm/high-availability/
? 注意
創(chuàng)建kubeadm-config.yaml配置文件,只在Master01節(jié)點(diǎn)執(zhí)行!!!
Master01:(# 注意,如果不是高可用集群,10.103.236.236:16443改為master01的地址,16443改為apiserver的端口,默認(rèn)是6443,注意更改kubernetesVersion的值和自己服務(wù)器kubeadm的版本一致:kubeadm version)
:::
6.1創(chuàng)建配置文件
vim kubeadm-config.yaml

apiVersion: kubeadm.k8s.io/v1beta2
bootstrapTokens:
- groups:
  - system:bootstrappers:kubeadm:default-node-token
  token: 7t2weq.bjbawausm0jaxury
  ttl: 24h0m0s
  usages:
  - signing
  - authentication
kind: InitConfiguration
localAPIEndpoint:
  advertiseAddress: 10.103.236.201 #master節(jié)點(diǎn)ip,如果是高可用,則填寫高可用地址
  bindPort: 6443
nodeRegistration:
  criSocket: /var/run/dockershim.sock  # 如果是Docker
  #criSocket: /run/containerd/containerd.sock # 如果是Containerd
  name: k8s-master01
  taints:
  - effect: NoSchedule
    key: node-role.kubernetes.io/master
---
apiServer:
  certSANs:
  - 10.103.236.201
  timeoutForControlPlane: 4m0s
apiVersion: kubeadm.k8s.io/v1beta2
certificatesDir: /etc/kubernetes/pki
clusterName: kubernetes
controlPlaneEndpoint: 10.103.236.201:6443
controllerManager: {}
dns:
  type: CoreDNS
etcd:
  local:
    dataDir: /var/lib/etcd
imageRepository: registry.cn-hangzhou.aliyuncs.com/google_containers
kind: ClusterConfiguration
kubernetesVersion: v1.22.17 # 更改此處的版本號和kubeadm version一致
networking:
  dnsDomain: cluster.local
  podSubnet: 172.16.0.0/12
  serviceSubnet: 192.168.0.0/16
scheduler: {}
- 更新配置文件
kubeadm config migrate --old-config kubeadm-config.yaml --new-config new.yaml
6.2拉取鏡像
- 查看所需鏡像
[root@kube-master kubeadm]# kubeadm config images list --kubernetes-version=v1.22.17
registry.k8s.io/kube-apiserver:v1.22.17
registry.k8s.io/kube-controller-manager:v1.22.17
registry.k8s.io/kube-scheduler:v1.22.17
registry.k8s.io/kube-proxy:v1.22.17
registry.k8s.io/pause:3.5
registry.k8s.io/etcd:3.5.6-0
registry.k8s.io/coredns/coredns:v1.8.4
- 手動拉取阿里云
kubeadm config images pull --image-repository registry.aliyuncs.com/google_containers
- 根據(jù)配置文件進(jìn)行拉取
[root@kube-master kubeadm]# kubeadm config images pull --config /root/kubeadm/new.yaml
[config/images] Pulled registry.cn-hangzhou.aliyuncs.com/google_containers/kube-apiserver:v1.22.17
[config/images] Pulled registry.cn-hangzhou.aliyuncs.com/google_containers/kube-controller-manager:v1.22.17
[config/images] Pulled registry.cn-hangzhou.aliyuncs.com/google_containers/kube-scheduler:v1.22.17
[config/images] Pulled registry.cn-hangzhou.aliyuncs.com/google_containers/kube-proxy:v1.22.17
[config/images] Pulled registry.cn-hangzhou.aliyuncs.com/google_containers/pause:3.5
[config/images] Pulled registry.cn-hangzhou.aliyuncs.com/google_containers/etcd:3.5.6-0
[config/images] Pulled registry.cn-hangzhou.aliyuncs.com/google_containers/coredns:v1.8.4
- 所有節(jié)點(diǎn)設(shè)置開機(jī)自啟動kubelet
systemctl enable --now kubelet
6.3master節(jié)點(diǎn)初始化
初始化以后會在/etc/kubernetes目錄下生成對應(yīng)的證書和配置文件,之后其他Master節(jié)點(diǎn)加入Master01即可
[root@kube-master kubeadm]# kubeadm init --config /root/kubeadm/new.yaml  --upload-certs


[init] Using Kubernetes version: v1.22.17
[preflight] Running pre-flight checks
[preflight] Pulling images required for setting up a Kubernetes cluster
[preflight] This might take a minute or two, depending on the speed of your internet connection
[preflight] You can also perform this action in beforehand using 'kubeadm config images pull'
[certs] Using certificateDir folder "/etc/kubernetes/pki"
[certs] Generating "ca" certificate and key
[certs] Generating "apiserver" certificate and key
[certs] apiserver serving cert is signed for DNS names [k8s-master01 kubernetes kubernetes.default kubernetes.default.svc kubernetes.default.svc.cluster.local] and IPs [192.168.0.1 10.103.236.201]
[certs] Generating "apiserver-kubelet-client" certificate and key
[certs] Generating "front-proxy-ca" certificate and key
[certs] Generating "front-proxy-client" certificate and key
[certs] Generating "etcd/ca" certificate and key
[certs] Generating "etcd/server" certificate and key
[certs] etcd/server serving cert is signed for DNS names [k8s-master01 localhost] and IPs [10.103.236.201 127.0.0.1 ::1]
[certs] Generating "etcd/peer" certificate and key
[certs] etcd/peer serving cert is signed for DNS names [k8s-master01 localhost] and IPs [10.103.236.201 127.0.0.1 ::1]
[certs] Generating "etcd/healthcheck-client" certificate and key
[certs] Generating "apiserver-etcd-client" certificate and key
[certs] Generating "sa" key and public key
[kubeconfig] Using kubeconfig folder "/etc/kubernetes"
[kubeconfig] Writing "admin.conf" kubeconfig file
[kubeconfig] Writing "kubelet.conf" kubeconfig file
[kubeconfig] Writing "controller-manager.conf" kubeconfig file
[kubeconfig] Writing "scheduler.conf" kubeconfig file
[kubelet-start] Writing kubelet environment file with flags to file "/var/lib/kubelet/kubeadm-flags.env"
[kubelet-start] Writing kubelet configuration to file "/var/lib/kubelet/config.yaml"
[kubelet-start] Starting the kubelet
[control-plane] Using manifest folder "/etc/kubernetes/manifests"
[control-plane] Creating static Pod manifest for "kube-apiserver"
[control-plane] Creating static Pod manifest for "kube-controller-manager"
[control-plane] Creating static Pod manifest for "kube-scheduler"
[etcd] Creating static Pod manifest for local etcd in "/etc/kubernetes/manifests"
[wait-control-plane] Waiting for the kubelet to boot up the control plane as static Pods from directory "/etc/kubernetes/manifests". This can take up to 4m0s
[apiclient] All control plane components are healthy after 9.504786 seconds
[upload-config] Storing the configuration used in ConfigMap "kubeadm-config" in the "kube-system" Namespace
[kubelet] Creating a ConfigMap "kubelet-config-1.22" in namespace kube-system with the configuration for the kubelets in the cluster
[upload-certs] Storing the certificates in Secret "kubeadm-certs" in the "kube-system" Namespace
[upload-certs] Using certificate key:
1980f439d979e2f4f73105f2230d6c962b811edde47ea7e18bead49e8d284132
[mark-control-plane] Marking the node k8s-master01 as control-plane by adding the labels: [node-role.kubernetes.io/master(deprecated)node-role.kubernetes.io/control-plane node.kubernetes.io/exclude-from-external-load-balancers]
[mark-control-plane] Marking the node k8s-master01 as control-plane by adding the taints [node-role.kubernetes.io/master:NoSchedule]
[bootstrap-token] Using token: 7t2weq.bjbawausm0jaxury
[bootstrap-token] Configuring bootstrap tokens, cluster-info ConfigMap, RBAC Roles
[bootstrap-token] configured RBAC rules to allow Node Bootstrap tokens to get nodes
[bootstrap-token] configured RBAC rules to allow Node Bootstrap tokens to post CSRs in order for nodes to get long term certificate credentials
[bootstrap-token] configured RBAC rules to allow the csrapprover controller automatically approve CSRs from a Node Bootstrap Token
[bootstrap-token] configured RBAC rules to allow certificate rotation for all node client certificates in the cluster
[bootstrap-token] Creating the "cluster-info" ConfigMap in the "kube-public" namespace
[kubelet-finalize] Updating "/etc/kubernetes/kubelet.conf" to point to a rotatable kubelet client certificate and key
[addons] Applied essential addon: CoreDNS
[addons] Applied essential addon: kube-proxy

Your Kubernetes control-plane has initialized successfully!

To start using your cluster, you need to run the following as a regular user:

  mkdir -p $HOME/.kube
  sudo cp -i /etc/kubernetes/admin.conf $HOME/.kube/config
  sudo chown $(id -u):$(id -g) $HOME/.kube/config

Alternatively, if you are the root user, you can run:

  export KUBECONFIG=/etc/kubernetes/admin.conf

You should now deploy a pod network to the cluster.
Run "kubectl apply -f [podnetwork].yaml" with one of the options listed at:
  https://kubernetes.io/docs/concepts/cluster-administration/addons/

You can now join any number of the control-plane node running the following command on each as root:

  kubeadm join 10.103.236.201:6443 --token 7t2weq.bjbawausm0jaxury \
 --discovery-token-ca-cert-hash sha256:89ad2d95b4ffcdbf9370ccc4925f0195a80e98e5436404ecef548091db31b234 \
 --control-plane --certificate-key 1980f439d979e2f4f73105f2230d6c962b811edde47ea7e18bead49e8d284132

Please note that the certificate-key gives access to cluster sensitive data, keep it secret!
As a safeguard, uploaded-certs will be deleted in two hours; If necessary, you can use
"kubeadm init phase upload-certs --upload-certs" to reload certs afterward.

Then you can join any number of worker nodes by running the following on each as root:

kubeadm join 10.103.236.201:6443 --token 7t2weq.bjbawausm0jaxury \
 --discovery-token-ca-cert-hash sha256:89ad2d95b4ffcdbf9370ccc4925f0195a80e98e5436404ecef548091db31b234
如果初始化失敗,重置后再次初始化,命令如下(沒有失敗不要執(zhí)行)
kubeadm reset -f ; ipvsadm --clear ; rm -rf ~/.kube
配置訪問k8s集群配置文件
Master01節(jié)點(diǎn)配置環(huán)境變量,用于訪問Kubernetes集群,如果不配置則提示如下信息:
[root@kube-master kubeadm]# kubectl get node
The connection to the server localhost:8080 was refused - did you specify the right host or port?
添加可以訪問集群的配置
mkdir -p $HOME/.kube
cp -i /etc/kubernetes/admin.conf $HOME/.kube/config
chown $(id -u):$(id -g) $HOME/.kube/config
- 或者
cat <<EOF >> /root/.bashrc
export KUBECONFIG=/etc/kubernetes/admin.conf
EOF
source /root/.bashrc
查看狀態(tài)
[root@kube-master kubernetes]# kubectl get node
NAME           STATUS     ROLES                  AGE     VERSION
k8s-master01   NotReady   control-plane,master   6m19s   v1.22.17
采用初始化安裝方式,所有的系統(tǒng)組件均以容器的方式運(yùn)行并且在kube-system命名空間內(nèi),此時可以查看Pod狀態(tài):
[root@kube-master kubernetes]# kubectl get pod -n kube-system
NAME                                   READY   STATUS    RESTARTS   AGE
coredns-7d89d9b6b8-72nw2               0/1     Pending   0          8m
coredns-7d89d9b6b8-fwkbz               0/1     Pending   0          8m
etcd-k8s-master01                      1/1     Running   0          8m14s
kube-apiserver-k8s-master01            1/1     Running   0          8m14s
kube-controller-manager-k8s-master01   1/1     Running   0          8m14s
kube-proxy-8z6lf                       1/1     Running   0          8m
kube-scheduler-k8s-master01            1/1     Running   0          8m14s
6.4node節(jié)點(diǎn)加入
到node節(jié)點(diǎn)下執(zhí)行如下命令
kubeadm join 10.103.236.201:6443 --token 7t2weq.bjbawausm0jaxury \
--discovery-token-ca-cert-hash sha256:89ad2d95b4ffcdbf9370ccc4925f0195a80e98e5436404ecef548091db31b234
如果node節(jié)點(diǎn)加入失敗,刪除如下文件,重新加入
rm /etc/kubernetes /var/lib/kubelet -rf
6.5master節(jié)點(diǎn)加入
到master節(jié)點(diǎn)下執(zhí)行如下命令
kubeadm join 10.103.236.201:6443 --token 7t2weq.bjbawausm0jaxury \
 --discovery-token-ca-cert-hash sha256:89ad2d95b4ffcdbf9370ccc4925f0195a80e98e5436404ecef548091db31b234 \
 --control-plane --certificate-key 1980f439d979e2f4f73105f2230d6c962b811edde47ea7e18bead49e8d284132
key過期
#查看token過期時間,同new.yaml查看用的是哪個key
[root@kube-master ~]# kubectl get secret -n kube-system |grep 7t2weq
bootstrap-token-7t2weq                           bootstrap.kubernetes.io/token         6      68m

#查看token詳情
[root@kube-master ~]# kubectl get secret -n kube-system bootstrap-token-7t2weq  -oyaml
apiVersion: v1
data:
  auth-extra-groups: c3lzdGVtOmJvb3RzdHJhcHBlcnM6a3ViZWFkbTpkZWZhdWx0LW5vZGUtdG9rZW4=
  expiration: MjAyNC0wNC0xMVQwODozMjowNFo=
  token-id: N3Qyd2Vx
  token-secret: YmpiYXdhdXNtMGpheHVyeQ==
  usage-bootstrap-authentication: dHJ1ZQ==
  usage-bootstrap-signing: dHJ1ZQ==
kind: Secret
metadata:
  creationTimestamp: "2024-04-10T08:32:04Z"
  name: bootstrap-token-7t2weq
  namespace: kube-system
  resourceVersion: "225"
  uid: da1a3e6f-1738-4fc6-a8ef-487a7bb70ec5
type: bootstrap.kubernetes.io/token

#解密,查看時間
[root@kube-master ~]# echo "MjAyNC0wNC0xMVQwODozMjowNFo=" |base64 -d
2024-04-11T08:32:04Z

Token過期后生成新的token:
kubeadm token create --print-join-command

Master需要生成--certificate-key
kubeadm init phase upload-certs  --upload-certs
7.Kubernetes組件安裝
7.1 Calico
Calico可以控制策略,而flannel 不能
以下步驟只在master01執(zhí)行
只修改pod網(wǎng)段
POD_SUBNET=`cat /etc/kubernetes/manifests/kube-controller-manager.yaml | grep cluster-cidr= | awk -F= '{print $NF}'

sed -i "s#POD_CIDR#${POD_SUBNET}#g" calico.yaml

#安裝
kubectl apply -f calico.yaml
- 再次查看狀態(tài),此時已變成ready狀態(tài)
[root@kube-master ~]# kubectl get node
NAME           STATUS   ROLES                  AGE     VERSION
k8s-master01   Ready    control-plane,master   5h16m   v1.22.17
kube-node01    Ready    <none>                 5h4m    v1.22.17
kube-node02    Ready    <none>                 4h51m   v1.22.17
kube-node03    Ready    <none>                 4h49m   v1.22.17
7.2 Metrics部署
將Master01節(jié)點(diǎn)的front-proxy-ca.crt復(fù)制到所有Node節(jié)點(diǎn)
scp /etc/kubernetes/pki/front-proxy-ca.crt kube-node01:/etc/kubernetes/pki/front-proxy-ca.crt


#創(chuàng)建
[root@kube-master kubeadm-metrics-server]# kubectl  create -f comp.yaml
serviceaccount/metrics-server created
clusterrole.rbac.authorization.k8s.io/system:aggregated-metrics-reader created
clusterrole.rbac.authorization.k8s.io/system:metrics-server created
rolebinding.rbac.authorization.k8s.io/metrics-server-auth-reader created
clusterrolebinding.rbac.authorization.k8s.io/metrics-server:system:auth-delegator created
clusterrolebinding.rbac.authorization.k8s.io/system:metrics-server created
service/metrics-server created
deployment.apps/metrics-server created
apiservice.apiregistration.k8s.io/v1beta1.metrics.k8s.io created

#查看狀態(tài)
[root@kube-master kubeadm-metrics-server]# kubectl get po -n kube-system -l k8s-app=metrics-server
NAME                              READY   STATUS    RESTARTS   AGE
metrics-server-54544fbf96-sjbvt   1/1     Running   0          49s

#執(zhí)行監(jiān)控命令
[root@kube-master kubeadm-metrics-server]# kubectl top node
NAME           CPU(cores)   CPU%   MEMORY(bytes)   MEMORY%
k8s-master01   182m         9%     1204Mi          65%
kube-node01    64m          3%     639Mi           34%
kube-node02    63m          6%     659Mi           35%
kube-node03    83m          8%     734Mi           39%
8.Kubernetes集群狀態(tài)測試
8.1創(chuàng)建
kubectl create deployment nginx --image=nginx --replicas=3

#創(chuàng)建負(fù)載均衡
kubectl expose deployment nginx --port=8080 --target-port=80

#查看pod,默認(rèn)命名空間是defalut
[root@kube-master ~]# kubectl get pod
NAME                     READY   STATUS    RESTARTS   AGE
nginx-6799fc88d8-c4w7r   1/1     Running   0          2m18s
nginx-6799fc88d8-j7fvt   1/1     Running   0          2m18s
nginx-6799fc88d8-n5zs8   1/1     Running   0          2m18s

#查看service
[root@kube-master calico]# kubectl get service
NAME         TYPE        CLUSTER-IP      EXTERNAL-IP   PORT(S)    AGE
kubernetes   ClusterIP   192.168.0.1     <none>        443/TCP    6h2m
nginx        ClusterIP   192.168.23.94   <none>        8080/TCP   39s
8.2檢查ip連通性
[root@kube-master calico]# kubectl get pod -o wide
NAME                     READY   STATUS    RESTARTS   AGE   IP              NODE          NOMINATED NODE   READINESS GATES
nginx-6799fc88d8-c4w7r   1/1     Running   0          17m   172.17.74.71    kube-node03   <none>           <none>
nginx-6799fc88d8-j7fvt   1/1     Running   0          17m   172.23.127.65   kube-node02   <none>           <none>
nginx-6799fc88d8-n5zs8   1/1     Running   0          17m   172.30.0.129    kube-node01   <none>           <none>

#在每個節(jié)點(diǎn)上ping其他pod節(jié)點(diǎn)上的ip
ping pod-ip
8.3檢查service可達(dá)性
#在每個節(jié)點(diǎn)上訪問服務(wù)

curl service-ip:port
8.4檢查dns
#進(jìn)入pod容器中去

[root@kube-master calico]# kubectl exec -it nginx-6799fc88d8-c4w7r -- /bin/bash
root@nginx-6799fc88d8-c4w7r:/# 192.168.23.94:8080


root@nginx-6799fc88d8-c4w7r:/# curl nginx:8080


#查看dns解析
root@nginx-6799fc88d8-c4w7r:/# cat /etc/resolv.conf
nameserver 192.168.0.10
search default.svc.cluster.local svc.cluster.local cluster.local
options ndots:5

[root@kube-master calico]# kubectl get service -n kube-system
NAME           TYPE        CLUSTER-IP        EXTERNAL-IP   PORT(S)                  AGE
kube-dns       ClusterIP   192.168.0.10      <none>        53/UDP,53/TCP,9153/TCP   6h24m


[root@kube-master ~]# kubectl exec -it nginx-6799fc88d8-fqrlx -- /bin/bash
root@nginx-6799fc88d8-fqrlx:/# curl nginx.default.svc.cluster.local:8080
9.IPVS
#默認(rèn)是iptables,由于性能不強(qiáng),需更換成ipvs
[root@kube-master ~]# curl 127.0.0.1:10249/proxyMode
iptables

#更新Kube-Proxy的Pod
kubectl patch daemonset kube-proxy -p "{\"spec\":{\"template\":{\"metadata\":{\"annotations\":{\"date\":\"`date +'%s'`\"}}}}}" -n kube-system

#驗證
[root@kube-master ~]# curl 127.0.0.1:10249/proxyMode
ipvs
10.配置文件路徑
/etc/kubernetes/manifests

[root@kube-master manifests]# ls -trl
總用量 16
-rw------- 1 root root 3392 4月  10 16:31 kube-apiserver.yaml
-rw------- 1 root root 2908 4月  10 16:31 kube-controller-manager.yaml
-rw------- 1 root root 1492 4月  10 16:31 kube-scheduler.yaml
-rw------- 1 root root 2322 4月  10 16:31 etcd.yaml

這里面的配置文件,只要修改保存,會自動更新
11.Kubernetes環(huán)境清理
kubeadm reset

ifconfig tunl0 down && ip link delete tunl0

rm -fr /etc/kubernetes/*
rm -fr /var/lib/cni/*
iptables -F && iptables -t nat -F && iptables -t mangle -F && iptables -X
ipvsadm --clear

systemctl stop docker.socket
systemctl stop kubelet


-----卸載
kubeadm reset
iptables -F && iptables -t nat -F && iptables -t mangle -F && iptables -X
ipvsadm --clear
yum remove kubelet* -y
yum remove kubectl* -y
yum remove docker-ce* 
 浙公網(wǎng)安備 33010602011771號