從零開始學Flink:揭開實時計算的神秘面紗
一、為什么需要Flink?
當你在電商平臺秒殺商品時,1毫秒的延遲可能導致交易失敗;當自動駕駛汽車遇到障礙物時,10毫秒的計算延遲可能釀成事故。這些場景揭示了一個殘酷事實:數據的價值隨時間呈指數級衰減。
傳統批處理(如Hadoop)像老式火車,必須等所有乘客(數據)到齊才能發車;而流處理(如Flink)如同磁懸浮列車,每個乘客(數據)上車即刻出發。Flink的誕生,讓數據從"考古材料"變為"新鮮血液"。
二、初識Flink
1. 定義
Apache Flink是由德國柏林工業大學于2009年啟動的研究項目,2014年進入Apache孵化器,現已成為實時計算領域的事實標準。其核心能力可用一句話概括:對無界和有界數據流進行有狀態計算。
2. 核心特性
流處理優先:批處理是流處理的特例(有界數據流)
事件時間語義:按數據真實發生時間處理(而非系統接收時間)
精確一次語義:確保計算結果100%準確
亞秒級延遲:處理延遲可控制在毫秒級
3. 技術架構
Flink運行時架構包含三個關鍵角色:
- JobManager:大腦中樞,負責任務調度與檢查點管理
- TaskManager:肌肉組織,執行具體計算任務
- Dispatcher:網關系統,提供REST接口提交作業
三、環境搭建
環境要求
?1. ?Windows 10 2004 或更高版本??(建議使用 Windows 11)
?2. ?已啟用 WSL 2??
3. 存儲空間:至少 1GB 可用空間
詳細安裝步驟
步驟 1:啟用 WSL
在 PowerShell 中以管理員身份運行以下命令:
  # 啟用 WSL 功能
  dism.exe /online /enable-feature /featurename:Microsoft-Windows-Subsystem-Linux /all /norestart

  # 啟用虛擬機平臺
  dism.exe /online /enable-feature /featurename:VirtualMachinePlatform /all /norestart

  # 設置 WSL 2 為默認版本
  wsl --set-default-version 2

  # 重啟電腦(必須步驟)
步驟 2:安裝 Ubuntu
?1. 打開 Microsoft Store
?2. 搜索安裝 ??Ubuntu 22.04 LTS??
3. 啟動 Ubuntu 并創建用戶名和密碼
步驟 3:安裝 Java 17
在 Ubuntu 終端執行:
  # 更新軟件包列表
  sudo apt update

  # 安裝 Java 17
  sudo apt install -y openjdk-17-jdk
  # 設置環境變量
  echo 'export JAVA_HOME=/usr/lib/jvm/java-17-openjdk-amd64' >>  /etc/profile
  echo 'export PATH=$PATH:$JAVA_HOME/bin' >> /etc/profile
  source /etc/profile
  # 驗證安裝
  java -version
  # 應顯示類似:OpenJDK Runtime Environment (build 17.0.14+...)
步驟 4:下載并安裝 Flink 1.20.1
  # 下載 Flink
  wget https://archive.apache.org/dist/flink/flink-1.20.1/flink-1.20.1-bin-scala_2.12.tgz

  # 解壓安裝包
  tar xzf flink-1.20.1-bin-scala_2.12.tgz

  # 移動到安裝目錄
  sudo mv flink-1.20.1 /opt/flink

  # 設置環境變量

  echo 'export FLINK_HOME=/opt/flink' >>  /etc/profile
  echo 'export PATH=$PATH:$FLINK_HOME/bin' >> /etc/profile
  source /etc/profile
步驟 5:修改內存配置
編輯配置文件:
vi /opt/flink/conf/conf.yaml
修改以下關鍵參數:
  jobmanager:
    bind-host: 0.0.0.0
    rpc:
      address: localhost
      port: 6123
    memory:
      process:
        size: 1600m
    execution:
      failover-strategy: region

  taskmanager:
    bind-host: 0.0.0.0
    host: localhost
    numberOfTaskSlots: 2
    memory:
      process:
        size: 2048m
  parallelism:
    default: 2

  rest:
    address: localhost
    bind-address: 0.0.0.0
    port: 8081
步驟 6:啟動 Flink 集群
# 啟動集群(JobManager + TaskManager)
$FLINK_HOME/bin/start-cluster.sh

# 檢查運行狀態
jps
步驟 7:訪問 Web UI
在 Windows 瀏覽器中訪問:
http://localhost:8081
四、實戰第一個Flink程序:BatchWordCount
下面將詳細介紹如何在Flink環境中創建并運行第一個WordCount程序。這個經典示例將帶你從項目創建到代碼執行,全面體驗Flink開發流程。
項目結構設計
采用多模塊Gradle項目,結構清晰:
  flink-learning/
  ├── build.gradle                 # 根項目構建配置
  ├── settings.gradle              # 多模塊配置
  ├── libraries.gradle            # 依賴統一管理
  ├── data/                        # 數據文件夾
  │   ├── input.txt               # 輸入文件
  │   └── output.txt              # 輸出文件
  └── wordcount/                  # WordCount模塊
      ├── build.gradle            # 模塊構建配置
      └── src/main/java           # 源代碼目錄
          └── cn/com/daimajiangxin/flink/wordcount
              └── BatchWordCount.java # 主程序
核心文件配置
詳細配置參考代碼倉庫:https://gitee.com/daimajiangxin/flink-learning.git
WordCount代碼實現
package cn.com.daimajiangxin.flink.wordcount;

import org.apache.flink.api.common.RuntimeExecutionMode;
import org.apache.flink.api.common.eventtime.WatermarkStrategy;
import org.apache.flink.api.common.functions.FlatMapFunction;
import org.apache.flink.api.common.functions.ReduceFunction;
import org.apache.flink.api.common.typeinfo.TypeHint;
import org.apache.flink.api.common.typeinfo.TypeInformation;
import org.apache.flink.api.java.tuple.Tuple2;
import org.apache.flink.connector.file.src.FileSource;
import org.apache.flink.connector.file.src.reader.TextLineFormat;
import org.apache.flink.core.fs.Path;
import org.apache.flink.streaming.api.datastream.DataStream;
import org.apache.flink.streaming.api.datastream.SingleOutputStreamOperator;
import org.apache.flink.streaming.api.environment.StreamExecutionEnvironment;
import org.apache.flink.util.Collector;

import java.nio.charset.StandardCharsets;
import java.time.Duration;
import java.util.Arrays;

public class BatchWordCount {

    public static void main(String[] args) throws Exception {
        // 轉換Windows路徑格式
        args = convertWindowsPaths(args);

        // 參數校驗
        if (args.length < 2) {
            System.err.println("Usage: BatchWordCount <input> <output> [--parallelism=N]");
            System.err.println("Example: BatchWordCount input.txt output.txt --parallelism=4");
            System.exit(1);
        }

        final String inputPath = args[0];
        final String outputPath = args[1];
        int parallelism = 1; // 默認并行度

        // 1. 創建流批一體執行環境
        final StreamExecutionEnvironment env = StreamExecutionEnvironment.getExecutionEnvironment();

        // 明確指定批處理模式
        env.setRuntimeMode(RuntimeExecutionMode.BATCH);

        // 設置并行度和作業名稱
        env.setParallelism(parallelism);
        env.getConfig().enableObjectReuse();

        // 2. 使用最新的FileSource API讀取輸入數據
        DataStream<String> text = createFileSource(env, inputPath, parallelism);

        // 3. 定義處理邏輯
        SingleOutputStreamOperator<Tuple2<String, Integer>> counts = text
                .flatMap(new Tokenizer())
                .name("Tokenizer")
                .setParallelism(parallelism)
                .keyBy(value -> value.f0)
                .reduce(new SumReducer())
                .name("SumReducer")
                .setParallelism(parallelism)
                .returns(TypeInformation.of(new TypeHint<Tuple2<String, Integer>>() {}));

        // 4. 輸出結果到文件
        counts.writeAsText(outputPath)
                .name("FileSink")
                .setParallelism(1);

        // 5. 執行作業
        try {
            System.out.println("Starting Flink WordCount job...");
            System.out.println("Input path: " + inputPath);
            System.out.println("Output path: " + outputPath);
            System.out.println("Parallelism: " + parallelism);

            env.execute("Flink Batch WordCount Example");
            System.out.println("Job completed successfully!");

        } catch (Exception e) {
            System.err.println("Job execution failed: " + e.getMessage());
            e.printStackTrace();
        }
    }

    // Windows路徑轉換
    private static String[] convertWindowsPaths(String[] args) {
        if (args.length >= 1) {
            args[0] = "file:///" + args[0]
                .replace("\\", "/")
                .replace(" ", "%20");
        }
        if (args.length >= 2) {
            args[1] = "file:///" + args[1]
                .replace("\\", "/")
                .replace(" ", "%20");
        }
        return args;
    }

    // 創建文件源
    private static DataStream<String> createFileSource(
            StreamExecutionEnvironment env,
            String path,
            int parallelism) {
        // 使用file://前綴
        Path filePath = new Path(path);

        System.out.println("Loading file from: " + filePath);

        TextLineFormat format = new TextLineFormat(StandardCharsets.UTF_8);

        FileSource<String> fileSource = FileSource
                .forRecordStreamFormat(format, filePath)
                .build();

        WatermarkStrategy<String> watermarkStrategy = WatermarkStrategy
                .<String>forMonotonousTimestamps()
                .withIdleness(Duration.ofSeconds(10));

        return env.fromSource(
                fileSource,
                watermarkStrategy,
                "FileSource"
        )
        .name("FileSource")
        .setParallelism(1);
    }

    // 分詞器
    public static final class Tokenizer implements FlatMapFunction<String, Tuple2<String, Integer>> {
        @Override
        public void flatMap(String value, Collector<Tuple2<String, Integer>> out) {
            // 過濾空行
            if (value == null || value.trim().isEmpty()) return;

            // 轉換為小寫并分割單詞
            String[] words = value.toLowerCase().split("\\W+");

            for (String word : words) {
                if (!word.isEmpty()) {
                    out.collect(Tuple2.of(word, 1));
                }
            }
        }
    }

    // 累加器
    public static final class SumReducer implements ReduceFunction<Tuple2<String, Integer>> {
        @Override
        public Tuple2<String, Integer> reduce(Tuple2<String, Integer> v1, Tuple2<String, Integer> v2) {
            return Tuple2.of(v1.f0, v1.f1 + v2.f1);
        }
    }
}
輸入文件示例 (input.txt)
input.txt參考代碼倉庫:https://gitee.com/daimajiangxin/flink-learning.git
運行Flink作業
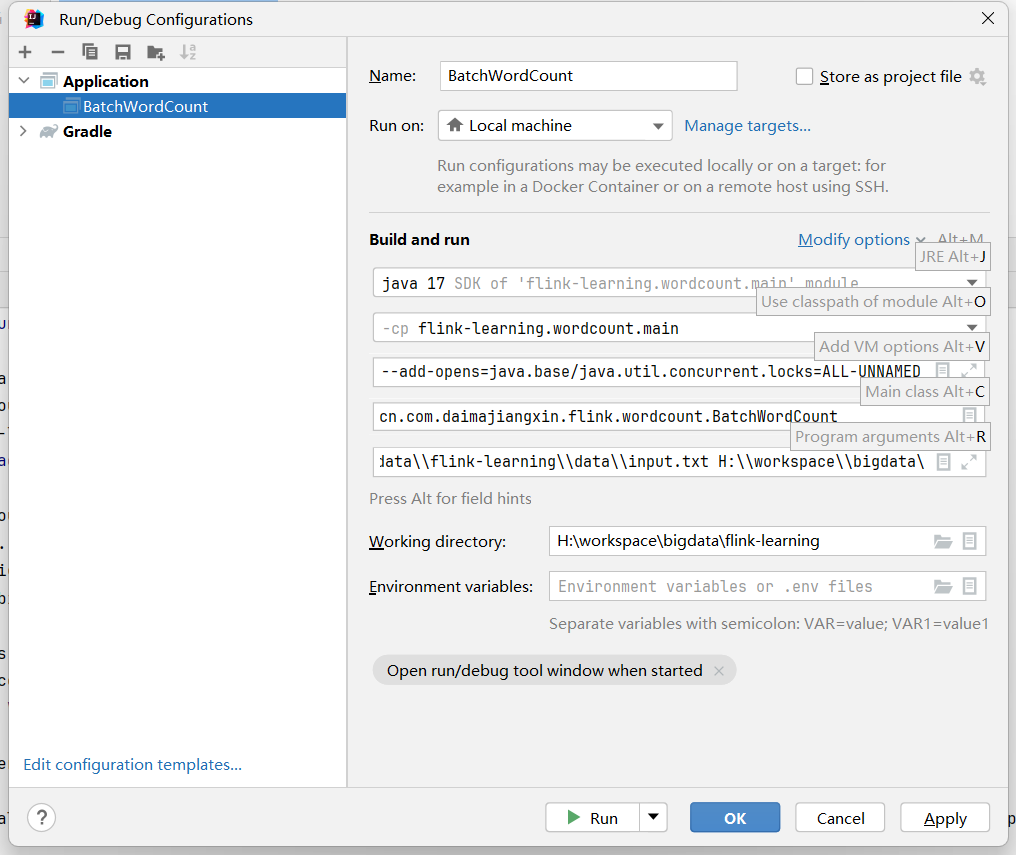
這里講述在IDEA中運行剛剛寫的BatchWordCount 任務,配置IDEA的APPlication。
VM選項配置
  --add-exports=java.base/sun.net.util=ALL-UNNAMED
  --add-exports=java.rmi/sun.rmi.registry=ALL-UNNAMED
  --add-exports=jdk.compiler/com.sun.tools.javac.api=ALL-UNNAMED
  --add-exports=jdk.compiler/com.sun.tools.javac.file=ALL-UNNAMED
  --add-exports=jdk.compiler/com.sun.tools.javac.parser=ALL-UNNAMED
  --add-exports=jdk.compiler/com.sun.tools.javac.tree=ALL-UNNAMED
  --add-exports=jdk.compiler/com.sun.tools.javac.util=ALL-UNNAMED
  --add-exports=java.security.jgss/sun.security.krb5=ALL-UNNAMED
  --add-opens=java.base/java.lang=ALL-UNNAMED
  --add-opens=java.base/java.net=ALL-UNNAMED
  --add-opens=java.base/java.io=ALL-UNNAMED
  --add-opens=java.base/java.nio=ALL-UNNAMED
  --add-opens=java.base/sun.nio.ch=ALL-UNNAMED
  --add-opens=java.base/java.lang.reflect=ALL-UNNAMED
  --add-opens=java.base/java.text=ALL-UNNAMED
  --add-opens=java.base/java.time=ALL-UNNAMED
  --add-opens=java.base/java.util=ALL-UNNAMED
  --add-opens=java.base/java.util.concurrent=ALL-UNNAMED
  --add-opens=java.base/java.util.concurrent.atomic=ALL-UNNAMED
  --add-opens=java.base/java.util.concurrent.locks=ALL-UNNAMED
程序參數
 代碼放置路徑\\flink-learning\\data\\input.txt
 代碼放置路徑\bigdata\\flink-learning\\data\\output.txt
運行BatchWordCount類
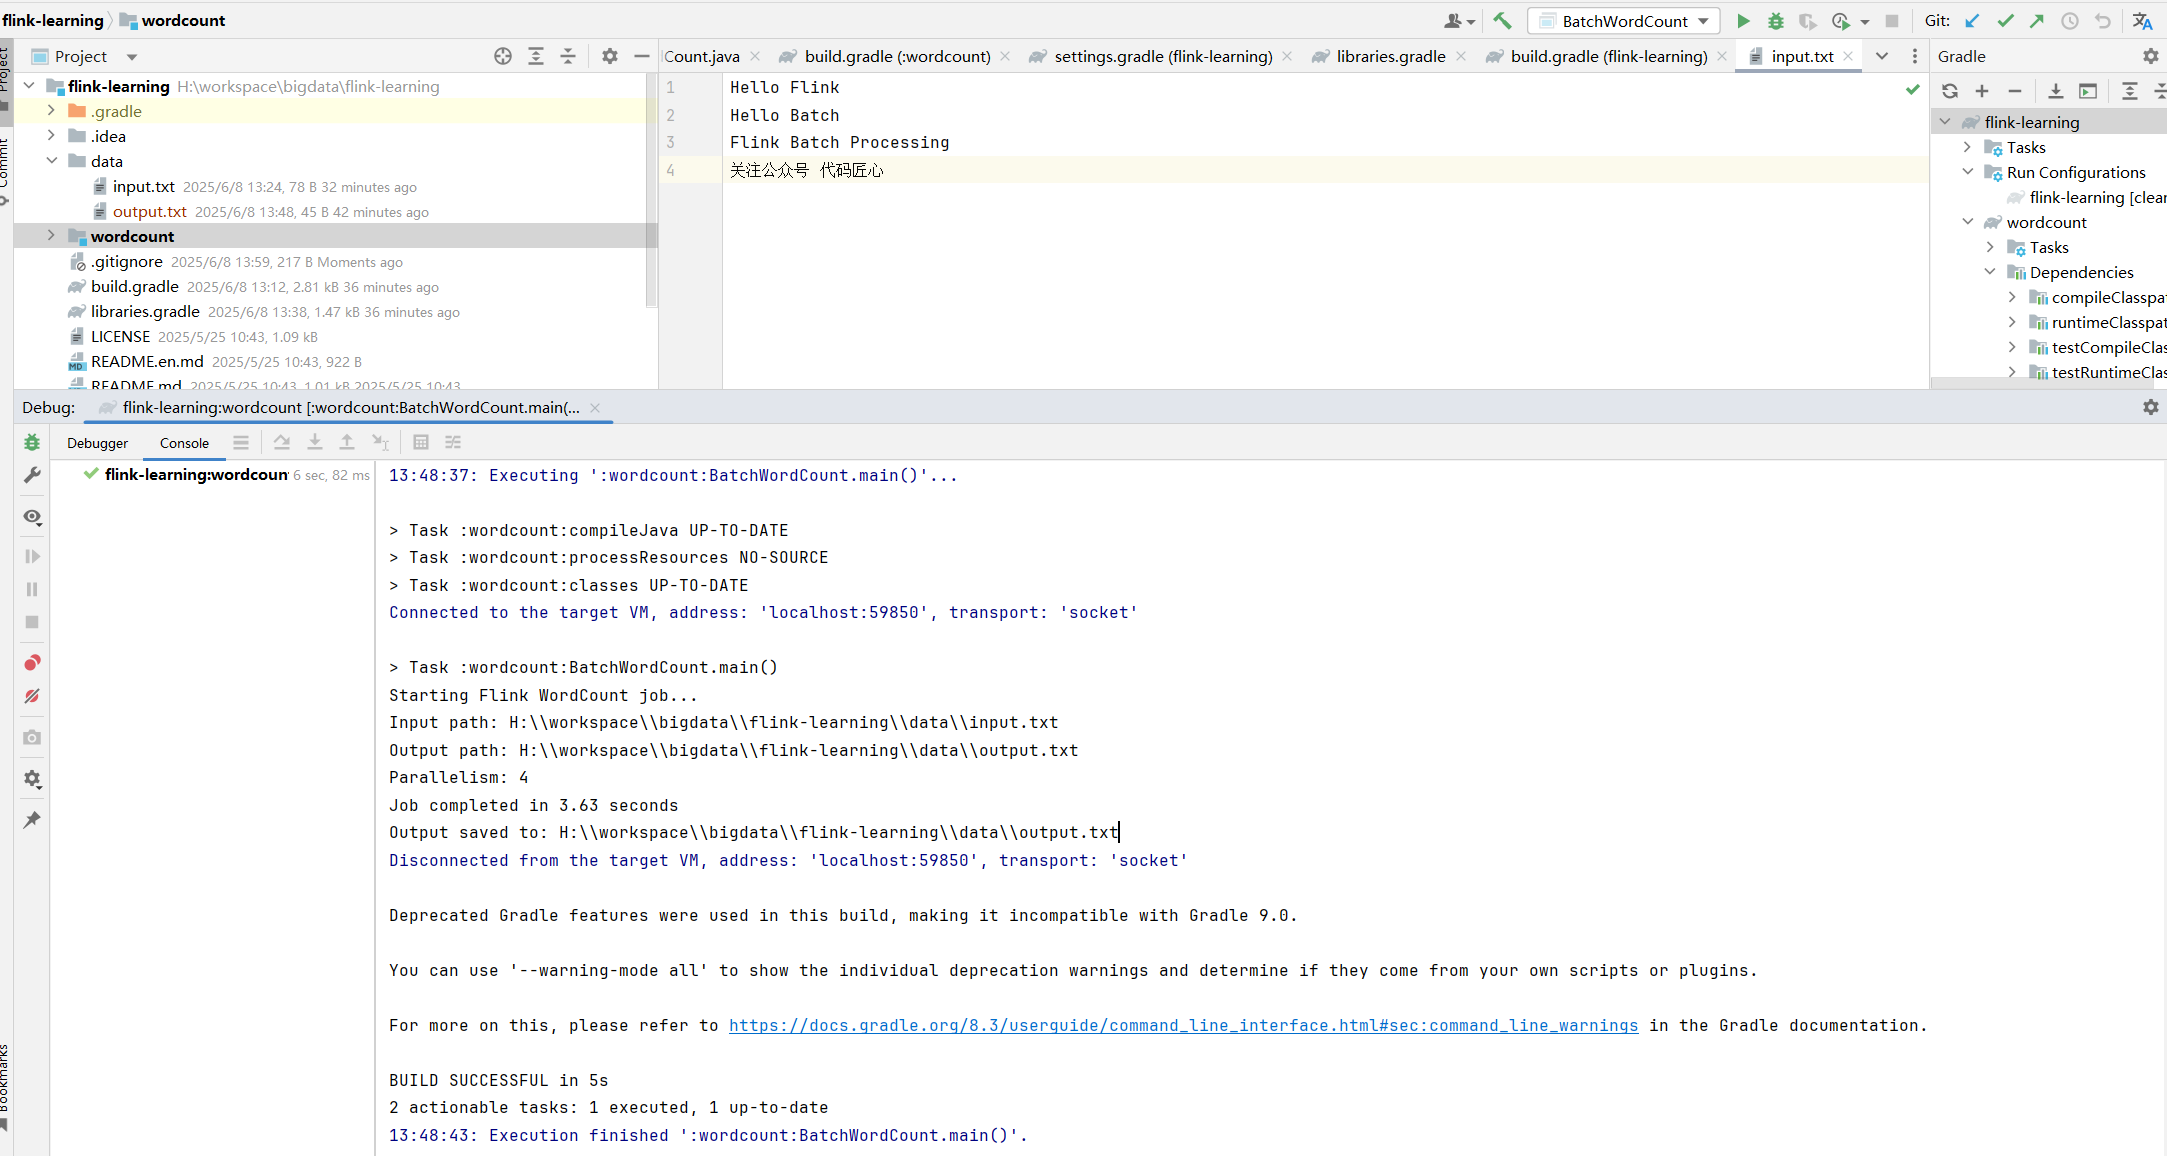
Run 或者Debug BatchWordCount的 APPlication.

預期輸出
運行成功data目錄下會生成output的文件。
(processing,1)
(batch,2)
(flink,2)
(hello,2)

五、技術要點解析
- 流批一體API:Flink 1.20+使用StreamExecutionEnvironment統一處理批流
- 文件源:使用FileSource API
- 精確一次處理:批處理天然支持Exactly-Once語義
- 并行度控制:通過setParallelism控制任務并行度
- Windows路徑適配:統一轉換為file:///開頭的URI格式
六、學習路線建議
完成WordCount后,可逐步探索:
- 實時流處理(SocketWordCount)
- 狀態管理(StatefulProcessing)
- 事件時間處理(EventTimeProcessing)
- 窗口計算(TumblingWindow、SlidingWindow)
- CEP復雜事件處理
- Table API和SQL
通過這個完整的BatchWordCount實例,你已經掌握了Flink項目的搭建、編碼和運行全流程。隨著Flink在實時數據處理領域的廣泛應用,這些技能將成為大數據開發的寶貴資產。


 傳統批處理(如Hadoop)像老式火車,必須等所有乘客(數據)到齊才能發車;而流處理(如Flink)如同磁懸浮列車,每個乘客(數據)上車即刻出發。Flink的誕生,讓數據從"考古材料"變為"新鮮血液"。

 浙公網安備 33010602011771號