
Embedding and retrieving resources in custom controls
Introduction
The custom controls that you develop not only contain the logic and data but also things such as images and JavaScript files. One easy way to make these images and script files available to your control at run time is to deploy them along with your control. This approach, though easy, is error prone. What if somebody deletes the images after the deployment? What if someone replaces the script files with malicious script? The best way is to embed such files in your control assembly itself and retrieve them in your code. Formally such files (images, script, multilingual strings etc.) are called as Resources. In this article we are going to learn various approaches taken to embed and retrieve resources in a custom control.
Embedding resources in a custom control
There are two ways to embed resources in a custom control:
- Using a resource file
- Directly
Resource files are actually XML files with extension of .resx. At compile time they get embedded in the assembly being compiled. You can retrieve them at run time in your code.
In order to add a resource to a resource file you first need to add a resource file to your web site. They you can add resources of the following types:
- Strings
- Images
- Icons
- Audio
- Files
For may of the above types VS.NET allows you to either create a new resource or add existing resource.
You can also embed files directly in the assembly by setting its Build Action to" Embedded Resource". Figure 1 shows the VS.NET property window for an image file with this option.
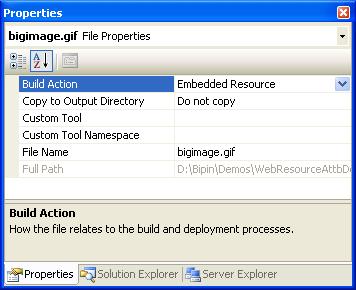
Figure 1: Build Action property of a file
Example 1 - Adding and retrieving a resource from resource file
Create a new project in VS.NET of type "Web Control Library". Right click on the project and choose "Add > New Item...". Select "Resource File" and give the name of the file as Resource1.resx. Double click on Resource1.resx to open the resource editor. Add a string resource with name as "myclientfunction". Add a small JavaScript function as the value of the above resource string. The JavaScript function looks as shown below:
function DisplayMsg()
{
alert("Hello World");
}
Double click on the web control class and override its Render method as shown below:
public class WebCustomControl3 : WebControl
{
protected override void Render(HtmlTextWriter output)
{
ResourceManager m=new ResourceManager
("WebResourceDemo.Resource1",
typeof(WebCustomControl3).Assembly);
output.Write("<script>" +
m.GetString("myclientfunction") + "</script>");
output.Write("<input type='submit' value='Click Me'
name='button1' OnClick='DisplayMsg();'>");
}
}
We created an instance of System.Resources.ResourceManager class by passing two parameters in its constructor - the resource that we want to work with and the assembly in which the resource is embedded. Note that the fully qualified name of your resource is <namespace_of_app>.<resource_file_name_without_ext>. Also, note how we retrieved the assembly in which the resource is embedded using Assembly property of System.Type class.
Once you have resource manager ready with you then you can retrieve various resources from the resource file. In order to retrieve string resources you will use GetString() method of the ResourceManager class by passing the resource name (mycliebtname in our case) to it.
We finally emit an <INPUT> tag of type button and set its OnClick attribute to our JavaScript function name. This way when the user clicks on the button DisplayMsg() function will be called.
In order to test our control, add a new web site in the same solution. Open the Toolbox and drag and drop the control (it will appear towards the top of the Toolbox as shown in Figure 2

Figure 2: Custom web controls being displayed on the toolbox
If you wish you can manually add the control on the toolbox by right clicking on the toolbox and selecting "Choose items...".
Drag and drop our control on a web form and run. You should see something as shown in Figure 3.
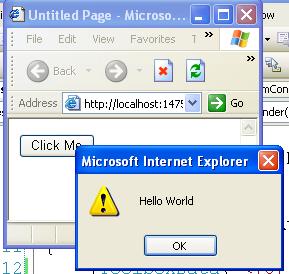
Figure 3: Sample run of our control
The [WebResource] attribute
Though the above approach works well for multilingual strings, logos and images; it has one flaw. Imagine a case where you have a .JS file containing lot of reusable JavaScript functions. You want to use many of these functions in your custom control. As per above approach you need to add many separate string resources and retrieve them in your code. This may become complex if there are hundreds of functions in the file. Take another example, imagine that you are developing a custom image control inheriting from inbuilt Image web control and want to display image that is embedded in the assembly. That means somewhere in your code you need to set ImageUrl property to the URL of the image. But in this case there is no specific URL as such because the image is embedded in the assembly and does not have independent existence.
To tackle such problems ASP.NET 2.0 provides a great mechanism via an attribute called [WebResource]. The [WebResource] attribute essentially makes your embedded resources URL accessible. It is an assembly level attribute and takes two parameters:
- Fully qualified name of the embedded resource
- Content type such as "text/javascript", "image/gif" etc.
Now that we know what [WebResource] attribute is, let's see it in action.
Linking resources using [WebResource] attribute
Add a new web control class to the same project. Also, add a new JavaScript file called JScript1.js and write the DisplayMsg() function inside the file. Set the "Build Action" for this file to "Embedded Resource" (see Figure 1).
Open the AssemblyInfo.cs file of the project and add the [WebResource] attribute as shown below:
[assembly:WebResource
("WebResourceDemo.JScript1.js","text/javascript")]
Note the way we specified the fully qualified name of the JavaScript file. Since the file is a script file we set its content type to "text/javascript".
What we would like to do is - when the control is rendered on the page it should generate the following markup in addition to the control markup.
<script src="pointer_to_our_js_file"></script>
Since our JavaScript file is embedded inside the control assembly we can not provide any URL to it directly in the Render() method. That is where we will add some code to make our JavaScript file URL accessible. See the following code
protected override void Render(HtmlTextWriter output)
{
output.WriteBeginTag("script");
output.WriteAttribute("src",this.Page.ClientScript.
GetWebResourceUrl(typeof(WebCustomControl1),
"WebResourceAttbDemo.JScript1.js"));
output.Write(">");
output.WriteEndTag("script");
output.Write("<input type='submit' value='Click Me'
name='button1' OnClick='DisplayMsg();'>");
}
In order to get URL accessible equivalent of the embedded resource we used a function of the ClientScript object of the Page class called called GetWebResourceUrl(). The URL returned by this method will look something as shown below:
<script src="/Web/WebResource.axd?d=Bu2-WXK
to6cGZTn2FzkIj-_GiUio31H3UndVDtgmtv3ib7PDDBK
yDxzYbRooSIbfXivayEyjNJqqGIvCqOjh5A 2&t=6327
98305400000000">
</script>
Note how ASP.NET adds a link to WebResource.axd tool. This tool internally grabs the resource embedded in the assembly and returns to the client.
To test the [WebResource] attribute, add a new web form in the web site we developed previously. Drag and drop the new control on it and run the web form. The output should be identical to Figure 3. View the HTML source of the page and observe the <script> block generated along with the src attribute pointing to the URL as shown above.
Using substitution with [WebResource] attribute
The [WebResource] attribute allows you to perform an interesting thing called "Substitution" with the resources. Imagine a case that you have an HTML page that is embedded as a resource. This HTML page contains a reference to an image which is also embedded. How do you represent URLs to the embedded file inside the HTML page? That is where the substitution comes handy.
In order to see how substitution works, add a new web control class to the web control library. Also, add a new HTML page and an image to the project. Set build Action for both to "Embedded Resource".
Add the following markup to the HTML page:
<body>
Here is the big image:<br />
<img src='<%= WebResource
("WebResourceAttbDemo.image.gif") %>' />
</body>
Note the markup carefully. In place of the image URL we used a special syntax - WebResource(full_name_of_resource). This is a kind of macro or placeholder for the resource and ASP.NET will replace it with the actual URL at runtime.
Modify the AssemblyInfo.cs file as shown below:
[assembly: WebResource("WebResourceAttbDemo.HTMLPage1.htm",
"text/html", PerformSubstitution = true)]
[assembly: WebResource("WebResourceAttbDemo.image.gif",
"image/gif")]
We used the same [WebResource] attribute with one difference. The [WebResource] attribute for the HTML page contains one additional property called PerformSubstitution. Setting this attribute to true tells ASP.NET to perform substitution inside the HTML page.
Now, add the following code to the Render() method of the control.
public class WebCustomControl2 : HyperLink
{
protected override void AddAttributesToRender
(HtmlTextWriter writer)
{
this.NavigateUrl = this.Page.ClientScript.
GetWebResourceUrl(typeof(WebCustomControl2),
"WebResourceAttbDemo.HTMLPage1.htm");
this.Text = "Here is the link";
base.AddAttributesToRender(writer);
}
}
Here we created a class that inherits from HyperLink as the base class. Then we set the NavigateUrl property of the base class to the HTML page using GetWebResourceUrl() method.
In order to test our code, add a new web form to the web site and drag and drop the latest control on it. Run the web form and click on the hyperlink that is displayed. You should see something like Figure 4.

Figure 4: Substitution of resources
Summary
Embedding resource is flexible, powerful and safe way to ship your images and script files along with your custom controls. You can either add resources in resource files or directly mark individual files as "embedded resource". In order to retrieve resources from resource files you use ResourceManager class. In order to make the embedded resource URL accessible so that they can be referred in your markup and code you use [WebResource] assembly level attribute.
張志敏所有文章遵循創作共用版權協議,要求署名、非商業 、保持一致。在滿足創作共用版權協議的基礎上可以轉載,但請以超鏈接形式注明出處。
本博客已經遷移到 GitHub , 圍觀地址: https://beginor.github.io/

 浙公網安備 33010602011771號