

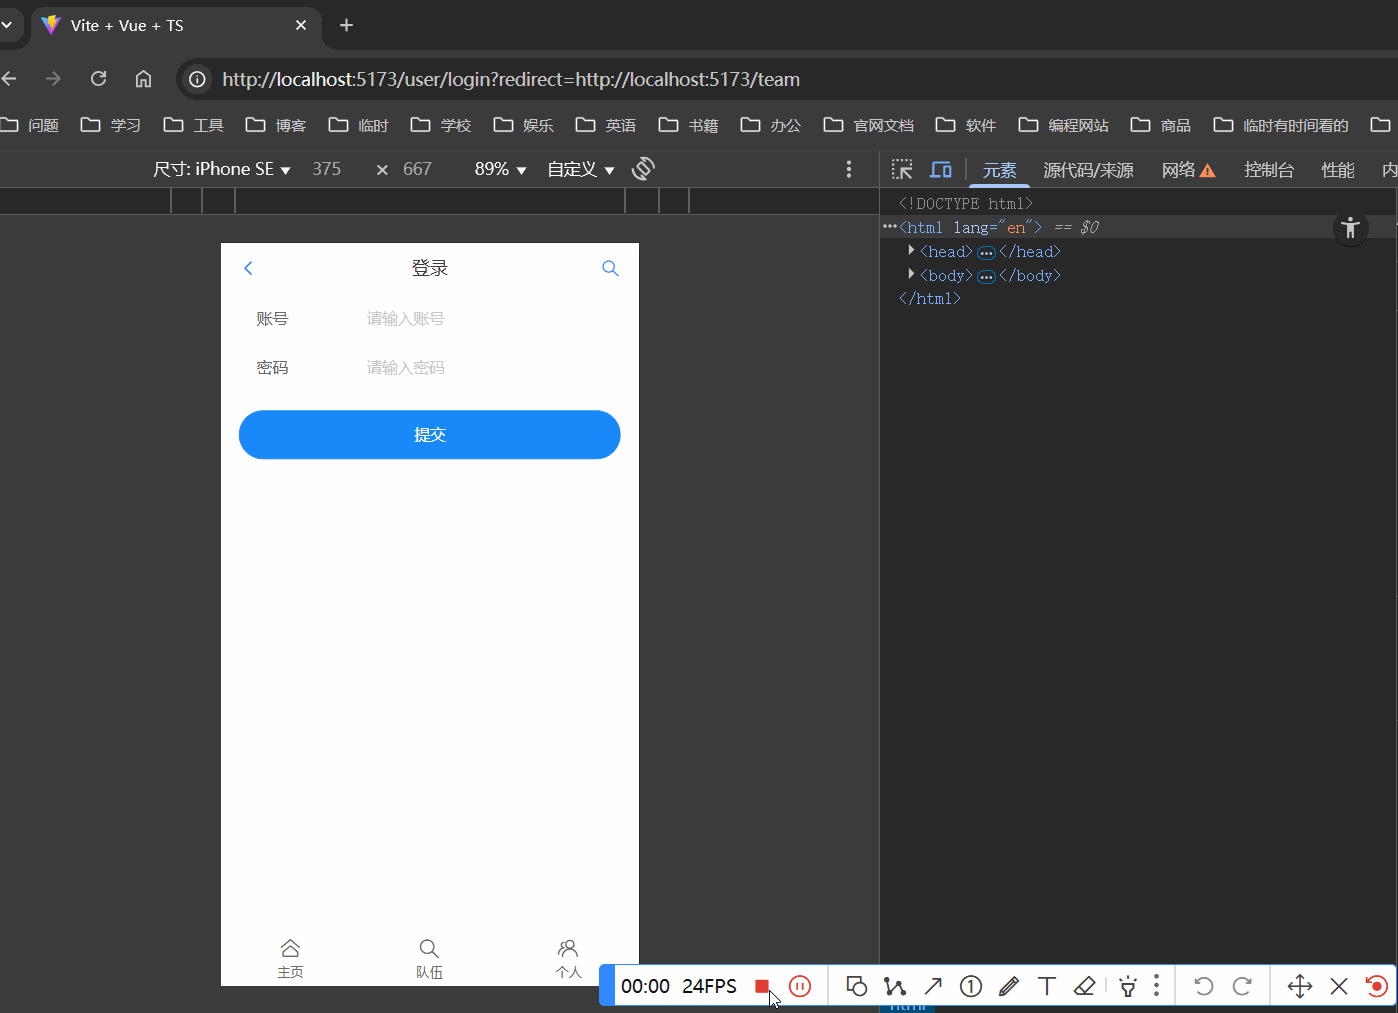
伙伴匹配系統(移動端 H5 網站(APP 風格)基于Spring Boot 后端 + Vue3 - 04
@
伙伴匹配系統(移動端 H5 網站(APP 風格)基于Spring Boot 后端 + Vue3 - 04
項目地址:
補充:問題:CORS ,跨域問題
我這邊的解決方法是:

myAxios.defaults.withCredentials = true; // 配置為true,表示前端向后端發送請求的時候,需要攜帶上憑證cookie
整體的:
import axios from "axios";


// axios.defaults.withCredentials = true; // 允許攜帶憑證
// const isDev = process.env.NODE_ENV === 'development';

// 創建實例時配置默認值
const myAxios = axios.create({
    LookupAddress: undefined, LookupAddressEntry: undefined,
    baseURL: 'http://localhost:8080/api'
});

// const myAxios: AxiosInstance = axios.create({
//     baseURL: isDev ? 'http://localhost:8080/api' : '線上地址',
// });

myAxios.defaults.withCredentials = true; // 配置為true,表示前端向后端發送請求的時候,需要攜帶上憑證cookie
// 創建實例后修改默認值


// 添加請求攔截器
myAxios.interceptors.request.use(function (config) {
    // 在發送請求之前做些什么
    console.log('我要發請求了')
    return config;
}, function (error) {
    // 對請求錯誤做些什么
    return Promise.reject(error);
});

// 添加響應攔截器
myAxios.interceptors.response.use(function (response) {
    // 2xx 范圍內的狀態碼都會觸發該函數。
    // 對響應數據做點什么
    console.log('我收到你的響應了',response)
    return response.data;
}, function (error) {
    // 超出 2xx 范圍的狀態碼都會觸發該函數。
    // 對響應錯誤做點什么
    return Promise.reject(error);
});

// Add a request interceptor
// myAxios.interceptors.request.use(function (config) {
//     console.log('我要發請求啦', config)
//     // Do something before request is sent
//     return config;
// }, function (error) {
//     // Do something with request error
//     return Promise.reject(error);
// });
//
//
// // Add a response interceptor
// myAxios.interceptors.response.use(function (response) {
//     console.log('我收到你的響應啦', response)
//     // 未登錄則跳轉到登錄頁
//     if (response?.data?.code === 40100) {
//         const redirectUrl = window.location.href;
//         window.location.href = `/user/login?redirect=${redirectUrl}`;
//     }
//     // Do something with response data
//     return response.data;
// }, function (error) {
//     // Do something with response error
//     return Promise.reject(error);
// });

export default myAxios;
后端配置:

在 Spring Boot 中,可以通過在配置類中添加 <font style="color:rgb(199, 37, 78);background-color:rgb(249, 242, 244);">@CrossOrigin</font> 注解或實現 <font style="color:rgb(199, 37, 78);background-color:rgb(249, 242, 244);">WebMvcConfigurer</font> 接口并重寫 <font style="color:rgb(199, 37, 78);background-color:rgb(249, 242, 244);">addCorsMappings</font> 方法來允許特定來源的跨域請求:
package com.rainbowsea.yupao.config;


import org.springframework.context.annotation.Configuration;
import org.springframework.web.servlet.config.annotation.CorsRegistry;
import org.springframework.web.servlet.config.annotation.WebMvcConfigurer;

/**
 * 跨域配置
 *
 */
@Configuration
public class WebMvcConfg implements WebMvcConfigurer {

    @Override
    public void addCorsMappings(CorsRegistry registry) {
        //設置允許跨域的路徑
        registry.addMapping("/**")
                //設置允許跨域請求的域名
                //當**Credentials為true時,**Origin不能為星號,需為具體的ip地址【如果接口不帶cookie,ip無需設成具體ip】
                .allowedOrigins("http://localhost:9527", "http://127.0.0.1:9527", "http://127.0.0.1:8082", "http" +
                        "://127.0.0.1:8083","http://127.0.0.1:8080","http://127.0.0.1:5173")
                //是否允許證書 不再默認開啟
                .allowCredentials(true)
                //設置允許的方法
                .allowedMethods("*")
                //跨域允許時間
                .maxAge(3600);
    }
}
相關博客鏈接:
- https://blog.csdn.net/yuanlong12178/article/details/147143201 參考該 blog 解決的
- https://blog.csdn.net/xhmico/article/details/122338365 這篇也不錯。
緩存預熱
緩存預熱:問題:第一個用戶訪問還是很慢(加入第一個老板),比如:雙十一,第一次就是很多用戶呢,也能一定程度上保護數據庫。
緩存預熱的優點:
- 解決上面的問題,可以讓用戶始終訪問很快。
缺點:
- 增加了開發成本,訪問人數不多。(你要額外的開發,設計)
- 預熱的時機和時間如果錯了,有可能你緩存的數據不對或者數據太舊了
- 需要占用空間。拿空間換時間。
分析優缺點的時候,要打開思路,從整個項目從 0 到 1 的鏈路上分析。
怎么緩存預熱,預熱操作
兩種方式:
- 定時任務預熱。
- 模擬觸發(手動觸發)
這里我們采用定時任務預熱:
定時任務實現:
- Spring Scheduler (Spring Boot 默認整合了)
- Quartz (獨立于 Spring 存在的定時任務框架)
- XXL-Job 之類的分布式任務調度平臺(界面+sdk)
用定時任務,每天刷新所有用戶的推薦列表
注意點:
- 緩存預熱的意義(新增少,總用戶多)
- 緩存的空間不能太大,要預留給其他緩存空間
- 緩存數據的周期(此處每天一次)
采用第一種方式:步驟:
- 主類開啟:
@EnableScheduling - 給要定時執行的方法添加上
@Scheduling注解,指定 cron 表達式或者執行頻率。
不需要去背 cron 表達式,用現成的工具即可:
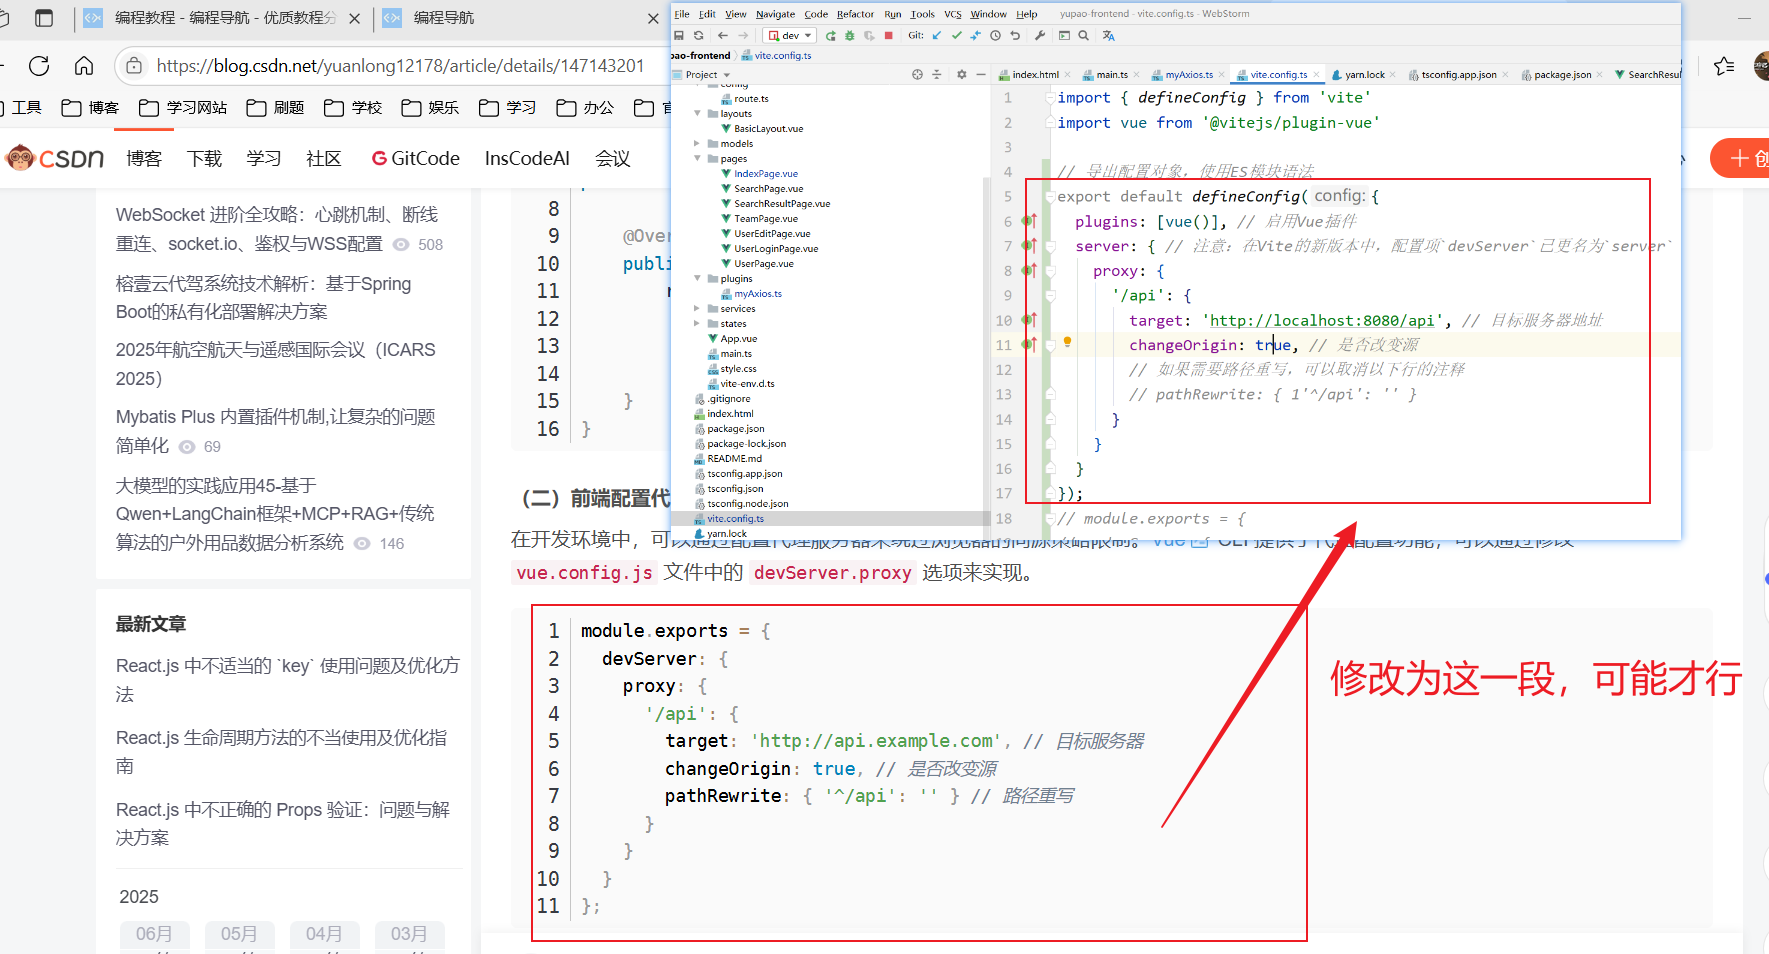
import { defineConfig } from 'vite'
import vue from '@vitejs/plugin-vue'

// 導出配置對象,使用ES模塊語法
export default defineConfig({
  plugins: [vue()], // 啟用Vue插件
  server: { // 注意:在Vite的新版本中,配置項`devServer`已更名為`server`
    proxy: {
      '/api': {
        target: 'http://localhost:8080/api', // 目標服務器地址
        changeOrigin: true, // 是否改變源
        // 如果需要路徑重寫,可以取消以下行的注釋
        // pathRewrite: { 1'^/api': '' }
      }
    }
  }
});

server:
  port: 8080
  servlet:
    context-path: /api
    session:
      cookie:
        domain: localhost
        secure: true
        same-site: none # 上述方法不行,就配置上
spring:
    # session 失效時間
  session:
    timeout: 86400
    store-type: redis
  # Redis 配置
  redis:
    port: 6379
    host: localhost
    database: 1
控制定時任務的執行
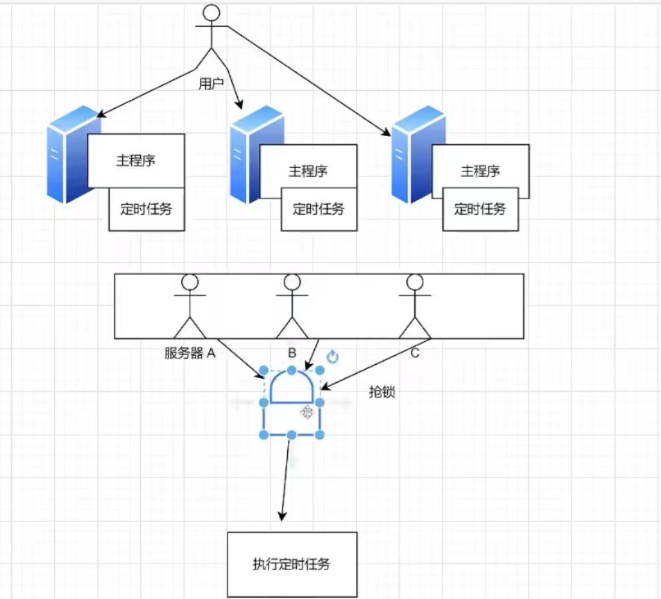
要控制定時任務在同一時間只有 1 個 服務器能執行。
為什么呢?
- 浪費資源,想象 1W 臺服務器能執行。
- 臟數據,比如重復插入。
怎么做?幾種方案:
- 分離定時任務程序和主程序,只在 1 個服務器運行定時任務,成本太大。
- 寫死配置,每個服務器都執行定時任務,但是只有 IP 符合配置的服務器才真實執行業務邏輯,其他的直接返回。成本最低;但是我們的 IP 可能不是固定的,把 IP 寫死的方式太死了。
- 動態配置:配置是可以輕松的,很方便地更新的(代碼無需重啟),但是只有 IP 符合配置的服務器才真實執行業務邏輯。可以使用
- 數據庫
- Redis
- 配置中心(Nacos,Apollo,Spring Cloud Config)
問題:服務器多了,IP 不可控還是很麻煩,還是要人工修改。
- 分布式鎖,只有搶到鎖的服務器才能執行業務邏輯,壞處:增加成本;好處:就是不用手動配置,多少個服務器都一樣。
注意:只要是單機,就會存在單點故障。
鎖
有限資源的情況下,控制同一時間(段)只有某些線程(用戶/服務器)能訪問到資源。
Java 實現鎖:sychronized 關鍵字,并發包的類
但存在問題:只對單個 JVM 有效。
分布式鎖實現的關鍵
槍鎖機制:
怎么保證同一時間只有 1 個服務器能搶到鎖?
核心思想:就是:先來的人先把數據改成自己的標識(服務器 IP),后來的人發現標識已存在,就搶鎖失敗,繼續等待。
等先來的人執行方法結束,把標識清空,其他的人繼續搶鎖。
MySQL 數據庫:select for update 行級鎖(最簡單),或者樂觀鎖
Redis 實現:內存數據庫,讀寫速度快,支持 setnx,lua 腳本,比較方便我們實現分布式鎖。
setnx:set if not exists 如果不存在,則設置;只有設置成功才會返回 true,否則返回 false。
分布式鎖的注意事項:
- 用完鎖一定要釋放鎖
- 一定要設置鎖的過期時間,防止對應占用鎖的服務器宕機了,無法釋放鎖。導致死鎖。
- 如果方法執行過長的話,鎖被提前過期,釋放了,怎么辦。——續期
boolean end = false;  // 方法沒有結束的標志

new Thread(() -> {
    if (!end)}{  // 表示執行還沒結束,續期
    續期
})

end = true;  // 到這里,方法執行結束了
問題:
- 連鎖效應:釋放掉別人的鎖
- 這樣還是會存在多個方法同時執行的情況。
- 釋放鎖的時候(判斷出是自己的鎖了,準備執行釋放的鎖的過程中時,很巧的時,鎖過期了,然后,這個時候就有一個新的東東插入進來了,這樣鎖就刪除了別人的鎖了)。
解決方案:Redis + lua 腳本保證操作原子性
// 原子操作
if(get lock == A) {
    // set lock B
    del lock
}
步驟:緩存預熱數據:
- 在項目啟動類上,添加上
@EnableScheduling注解。表示啟動定時任務。


- 編寫具體要執行的定時任務,程序,這里我們名為
PreCacheJob
注意:這里我們使用上 注解,使用 cron 表達式表示一個定時時間上的設置
這里往下看,我們使用 Redisson 進行一個實現分布式鎖的操作。
相關 Redissson 配置使用如下:
Redisson-實現分布式鎖
Redisson 是一個 Java 操作的 Redis 的客戶端,提供了大量的分布式數據集來簡化對 Redis 的操作和使用,可以讓開發者像使用本地集合一樣使用 Redis,完全感知不到 Redis 的存在,提供了大量的 API 。
2 種引入方式:
- Spring boot starter 引入(不推薦,因為版本迭代太快了,容易發生版本沖突):https://github.com/redisson/redisson/tree/master/redisson-spring-boot-starter
- 直接引入(推薦):https://github.com/redisson/redisson#quick-start
<!--https://github.com/redisson/redisson#quick-start -->
<dependency>
    <groupId>org.redisson</groupId>
    <artifactId>redisson</artifactId>
    <version>3.17.5</version>
</dependency>
使用 Ression
- 配置 Ression 配置類:

package com.rainbowsea.yupao.config;


import lombok.Data;
import org.redisson.Redisson;
import org.redisson.api.RedissonClient;
import org.redisson.config.Config;
import org.springframework.boot.context.properties.ConfigurationProperties;
import org.springframework.context.annotation.Bean;
import org.springframework.context.annotation.Configuration;

/**
 * Redisson 配置
 *
 */
@Configuration
@ConfigurationProperties(prefix = "spring.redis")  // 同時這個獲取到 application.yaml 當中前綴的配置屬性
@Data
public class RedissonConfig {

    private String host;

    private String port;

    @Bean
    public RedissonClient redissonClient() {
        // 1. 創建配置
        Config config = new Config();
        String redisAddress = String.format("redis://%s:%s", host, port);
        config.useSingleServer().setAddress(redisAddress).setDatabase(3);
        // 2. 創建實例
        RedissonClient redisson = Redisson.create(config);
        return redisson;
    }
}
- 操作 Redis : 測試是否,能操作 Redis ,通過 Ression
// list,數據存在本地 JVM 內存中
List<String> list = new ArrayList<>();
list.add("yupi");
System.out.println("list:" + list.get(0));

list.remove(0);

// 數據存在 redis 的內存中
RList<String> rList = redissonClient.getList("test-list"); // redis操作的 key 的定義
rList.add("yupi");
System.out.println("rlist:" + rList.get(0));
rList.remove(0);

package com.rainbowsea.yupao.service;


import org.junit.jupiter.api.Test;
import org.redisson.api.RList;
import org.redisson.api.RedissonClient;
import org.springframework.boot.test.context.SpringBootTest;

import javax.annotation.Resource;
import java.util.ArrayList;
import java.util.List;

@SpringBootTest
public class RedissonTest {

    @Resource
    private RedissonClient redissonClient;


    @Test
    void test() {
        // list 數據存在代 本地 JVM 內存中
        List<String> list = new ArrayList<>();
        list.add("yupi");
        list.get(0);
        System.out.println("list: " + list.get(0));
        list.remove(0);


        // 數據存入 redis 的內存中
        RList<Object> rList = redissonClient.getList("test-list");  // 表示 redis 當中的 key
        rList.add("yupi");
        System.out.println("rlist:" + rList.get(0));
    }
}

其中 Redisson 操作 Redis 當中的 set,map 都是一樣的道理,就不多贅述了。
分布式鎖保證定時任務不重復執行:
實現代碼如下:
void testWatchDog() {
    RLock lock = redissonClient.getLock("yupao:precachejob:docache:lock");
    try {
        // 只有一個線程能獲取到鎖
        if (lock.tryLock(0, -1, TimeUnit.MILLISECONDS)) {
            // todo 實際要執行的方法
            doSomeThings();
            System.out.println("getLock: " + Thread.currentThread().getId());
        }
    } catch (InterruptedException e) {
        System.out.println(e.getMessage());
    } finally {
        // 只能釋放自己的鎖
        if (lock.isHeldByCurrentThread()) { // 判斷該鎖是不是當前線程創建的鎖
            System.out.println("unLock: " + Thread.currentThread().getId());
            lock.unlock();
        }
    }
}
注意:
- waitTime 設置為 0,其他線程不會去等待這個鎖的釋放,就是搶到了就用,沒搶到就不用了,只搶一次,搶不到就放棄。
if (lock.tryLock(0, -1, TimeUnit.MILLISECONDS)) {
- 注意釋放鎖要放到 finally 中,不然,發生了異常就被中斷,無法釋放鎖了。
緩存預熱,定時執行具體的任務的具體代碼:
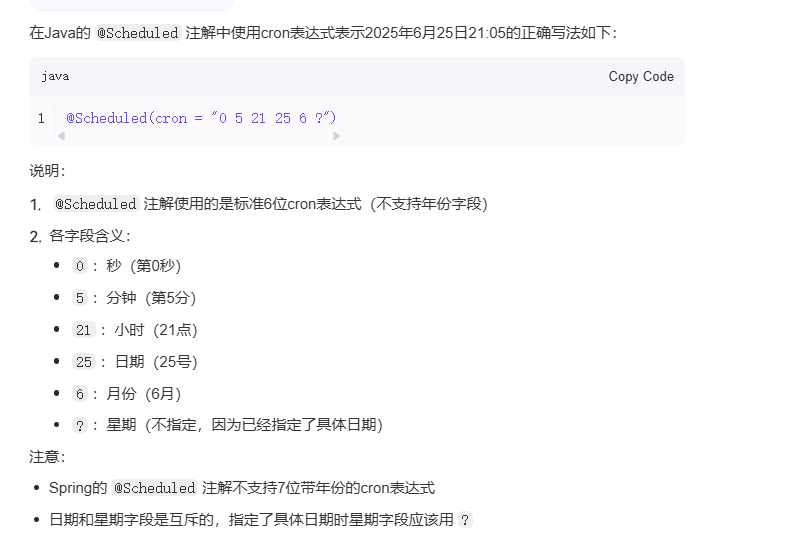
@Scheduled(cron = "0 5 21 25 6 ?")

package com.rainbowsea.yupao.job;

import com.baomidou.mybatisplus.core.conditions.query.QueryWrapper;
import com.baomidou.mybatisplus.extension.plugins.pagination.Page;

import com.rainbowsea.yupao.model.User;
import com.rainbowsea.yupao.service.UserService;
import lombok.extern.slf4j.Slf4j;
import org.redisson.api.RLock;
import org.redisson.api.RedissonClient;
import org.springframework.data.redis.core.RedisTemplate;
import org.springframework.data.redis.core.ValueOperations;
import org.springframework.scheduling.annotation.Scheduled;
import org.springframework.stereotype.Component;

import javax.annotation.Resource;
import java.util.ArrayList;
import java.util.Arrays;
import java.util.List;
import java.util.concurrent.TimeUnit;

/**
 * 緩存預熱任務
 *
 */
@Component
@Slf4j
public class PreCacheJob {

    @Resource
    private UserService userService;

    @Resource
    private RedisTemplate<String, Object> redisTemplate;

    @Resource
    private RedissonClient redissonClient;

    // 重點用戶
    private List<Long> mainUserList = Arrays.asList(1L);

    // 每天執行,預熱推薦用戶,每個月的 31號,0:00執行
    @Scheduled(cron = "0 31 0 * * *")
    public void doCacheRecommendUser() {
        RLock lock = redissonClient.getLock("yupao:precachejob:docache:lock");
        try {
            // 只有一個線程能獲取到鎖
            if (lock.tryLock(0, -1, TimeUnit.MILLISECONDS)) {
                System.out.println("getLock: " + Thread.currentThread().getId());
                for (Long userId : mainUserList) {
                    QueryWrapper<User> queryWrapper = new QueryWrapper<>();
                    Page<User> userPage = userService.page(new Page<>(1, 20), queryWrapper);
                    String redisKey = String.format("yupao:user:recommend:%s", userId);
                    ValueOperations<String, Object> valueOperations = redisTemplate.opsForValue();
                    // 寫緩存
                    try {
                        valueOperations.set(redisKey, userPage, 30000, TimeUnit.MILLISECONDS);
                    } catch (Exception e) {
                        log.error("redis set key error", e);
                    }
                }
            }
        } catch (InterruptedException e) {
            log.error("doCacheRecommendUser error", e);
        } finally {
            // 只能釋放自己的鎖
            if (lock.isHeldByCurrentThread()) {
                System.out.println("unLock: " + Thread.currentThread().getId());
                lock.unlock();
            }
        }
    }

}
運行測試:


\yupao\yupao-backend\target>java -jar .\yupao-backend-0.0.1-SNAPSHOT.jar --server.port=9090

Redisson 看門狗機制:
Redisson 中提供的續期機制。
開一個監聽線程,如果方法還沒執行完,就幫你重置 Redis 鎖的過期時間。
原理:
- 監聽當前線程, 默認過期時間是 30 秒,每 10 秒續期一次(補到 30 秒)
- 如果線程掛掉(注意 debug 模式也會被它當成服務器宕機),則不會續期。
為什么 Redisson 續期時間是 30 秒
因為方式 Redis 宕機了,就成了,占著茅坑不拉屎。


(Redis 如果是集群(而不是只有一個 Redis),如果分布式鎖的數據不同步怎么辦 )如果 Reids 分布式鎖導致數據不一致的問題——> Redis 紅鎖。
組隊
用戶可以創建一個隊伍,設置隊伍的人數、隊伍名稱(標題)、描述、超時時間PO。
隊長、剩余的人數
聊天?
公開或private或加密
用戶創建隊伍最多5個
展示隊伍列表,根據名稱搜索隊伍PO,信息流中不展示已過期的隊伍
修改隊伍信息PO~P1
用戶可以加入隊伍(其他人、未滿、未過期),允許加入多個隊伍,但是要有個上限PO
是否需要隊長同意?篩選審批?
用戶可以退出隊伍(如果隊長退出,權限轉移給第二早加入的用戶——先來后到)P1
隊長可以解散隊伍PO
分享隊伍=>邀請其他用戶加入隊伍P1
業務流程:
- 生成分享鏈接 (分享二維碼)
- 用戶訪問鏈接,可以點擊加入
數據庫表設計
隊伍表 team
字段:
- id 主鍵bigint (最簡單、連續,放 url 上比較簡短,但缺點是爬蟲)
- name 隊伍名稱
- description 描述
- maxNum最大人數
- expireTime 過期時間)userld 創建人 id
- status 0-公開,1-私有,2-加密
- password 密碼)
- createTime 創建時間
- updateTime 更新時間
- isDelete是否刪除
create table team
(
    id           bigint auto_increment comment 'id'
        primary key,
    name   varchar(256)                   not null comment '隊伍名稱',
    description varchar(1024)                      null comment '描述',
    maxNum    int      default 1                 not null comment '最大人數',
    expireTime    datetime  null comment '過期時間',
    userId            bigint comment '用戶id',
    status    int      default 0                 not null comment '0 - 公開,1 - 私有,2 - 加密',
    password varchar(512)                       null comment '密碼',

        createTime   datetime default CURRENT_TIMESTAMP null comment '創建時間',
    updateTime   datetime default CURRENT_TIMESTAMP null on update CURRENT_TIMESTAMP,
    isDelete     tinyint  default 0                 not null comment '是否刪除'
)
    comment '隊伍';
用戶-隊伍表 user_team
兩個關系:
- 用戶加入了哪些隊伍?
- 隊伍有哪些用戶?
兩種實現方式:
- 建立用戶-隊伍關系表 teamid userid(便于修改,查詢性能高一點,可以選擇這個,不用全表遍歷)
- 用戶表補充已加入的隊伍字段,隊伍表補充已加入的用戶字段(便于查詢,不用寫多對多的代碼,可以直接根據隊伍查用戶,根據用戶查隊伍)。
字段:
- id 主鍵
- userld 用戶 id
- teamld 隊伍 id
- joinTime 加入時間
- createTime 創建時間
- updateTime 更新時間
- isDelete是否刪除
create table user_team
(
    id           bigint auto_increment comment 'id'
        primary key,
    userId            bigint comment '用戶id',
    teamId            bigint comment '隊伍id',
    joinTime datetime  null comment '加入時間',
    createTime   datetime default CURRENT_TIMESTAMP null comment '創建時間',
    updateTime   datetime default CURRENT_TIMESTAMP null on update CURRENT_TIMESTAMP,
    isDelete     tinyint  default 0                 not null comment '是否刪除'
)
    comment '用戶隊伍關系';
為什么需要請求參數包裝類?
- 請求參數名稱 / 類型和實體類不一樣。
- 有些參數用不到,如果要自動生成接口文檔,會增加理解成本。
- 對個實體類映射到同一個對象。
為什么需要包裝類?
- 可能有些字段需要隱藏,不能返回給前端。
- 或者有些字段某些方法是不關心的。
前端不同頁面傳遞數據
- url querystring(xxx?id=1)比較適用于頁面跳轉
- url (/team/:id, xxx/1)
- hash (/team#1)
- localStorage
- context(全局變量,同頁面或整個項目要訪問公共變量)
最后:
“在這個最后的篇章中,我要表達我對每一位讀者的感激之情。你們的關注和回復是我創作的動力源泉,我從你們身上吸取了無盡的靈感與勇氣。我會將你們的鼓勵留在心底,繼續在其他的領域奮斗。感謝你們,我們總會在某個時刻再次相遇。”


 浙公網安備 33010602011771號