
NestJs 快速入門
npm i -g @nestjs/cli(以后更新用npm update @nestjs/cli -g),nest new car-report創建car-report項目。src目錄下的main.ts,它監聽3000端口,服務器都會監聽一個端口,因此它是整個項目的入口文件。main.ts import了AppModule,這個類比較特殊,它什么都不做,只是用@Module裝飾。@Module接收一個對象,有三個屬性,imports、controllers和providers。controllers提供(注冊)控制器,控制器來源于MVC架構,接受請求,返回響應。來到AppController類,它裝飾@Controller,getHello方法裝飾了@Get。但它是怎么接受請求,返回響應的?就是怎么就定義了路由呢? 一個路由通常包含三部分,請求方法(如GET、POST)、請求的URL和處理函數(當匹配的請求到達時會被執行)。@Get、@Post等裝飾器定義請求方法,并且裝飾到類方法上,類方法就成了路由處理函數,類方法的參數接受請求參數,方法體返回響應。@Controller()和@Get()都能接收參數,請求的URL就是它們參數的拼接。如果都沒有參數,那就是根URL。所從在Nest.js中,處理請求(定義路由),就是寫一個@Controller() 裝飾的類,用@Get,@Post參數定義URL,然后裝飾類方法上,類方法來處理具體請求,最后把這個類注冊到@Module的controllers屬性中。
import 'reflect-metadata';
/* Reflect.defineMetadata 和 Reflect.getMetadata 分別用于設置和獲取某個類的元數據,如果最后傳入了屬性名,還可以單獨為某個屬性設置元數據。*/
function Controller(prefix: string) {
    // constructor 類的構造函數
    return function(constructor: Function) {
        Reflect.defineMetadata('prefix', prefix, constructor)
    }
}

function Get(path: string) {
    //  target 是 the prototype of the class,property是類的方法名
    return function(target, propertyKey) {
        Reflect.defineMetadata('route', {method: 'GET', path}, target, propertyKey)
    }
}

function Post(path: string) {
    return function(target, propertyKey) {
        Reflect.defineMetadata('route', {method: 'POST', path}, target, propertyKey)
    }
}

@Controller('/useers')
class UserController {
    @Get('/')
    getAllUser() {}

    @Post('/')
    createUser() {}
}

function handleRequest(controllerClass: any, requestMethod: string, requestPath: string) {
    const prefix = Reflect.getMetadata('prefix', controllerClass);
    const controllerInstance = new controllerClass();

    Object.getOwnPropertyNames(controllerClass.prototype).forEach(methodName => {
        // 定義的Metadata  {method: 'GET', path}
        const route = Reflect.getMetadata('route', controllerClass.prototype, methodName)

        if(route && route.method === requestMethod && (prefix + route.path) === requestPath) {
            controllerInstance[methodName]()
        }
    })
}

// 處理請求
handleRequest(UserController, 'GET', '/users')
provider只是一個用Injectable() 裝飾的純TypeScript類,這個類也稱之為服務,這意味著這個類的實例可以注入到其他類中,這也是getHello方法中,直接調用了this.appService的原因,appService實例對象被注入到構造函數中。A對象中方法依賴B對象,它不是直接創建B對象,而是用參數聲明它依賴B對象,使用A對象的方法前,要先把B對象注入進來(提供對象)。依賴注入:組件只聲明使用某個或某些依賴,依賴相當于變成了參數,需要傳入,在組件內部不會創建依賴對象,在使用組件的時候,給它注入依賴。
class B {
    sayHello() {console.log( 'Hello World')}
}

/*  不使用依賴注入 */
class A {
    constructor() {this.b = new B()} // 創建依賴的實例對象
    sayHello() { this.b.sayHello()}
}

(new A()).sayHello() // 直接使用A對象

/* 使用依賴注入 */
class A {
    constructor(b) {this.b = b;} // 聲明使用的依賴,沒有創建依賴對象
    sayHello() { this.b.sayHello()}
}

const b = new B();
const a = new A(b) // 創建A對象時,要把它的依賴注入進去
a.sayHello() // 再調用A對象的方法
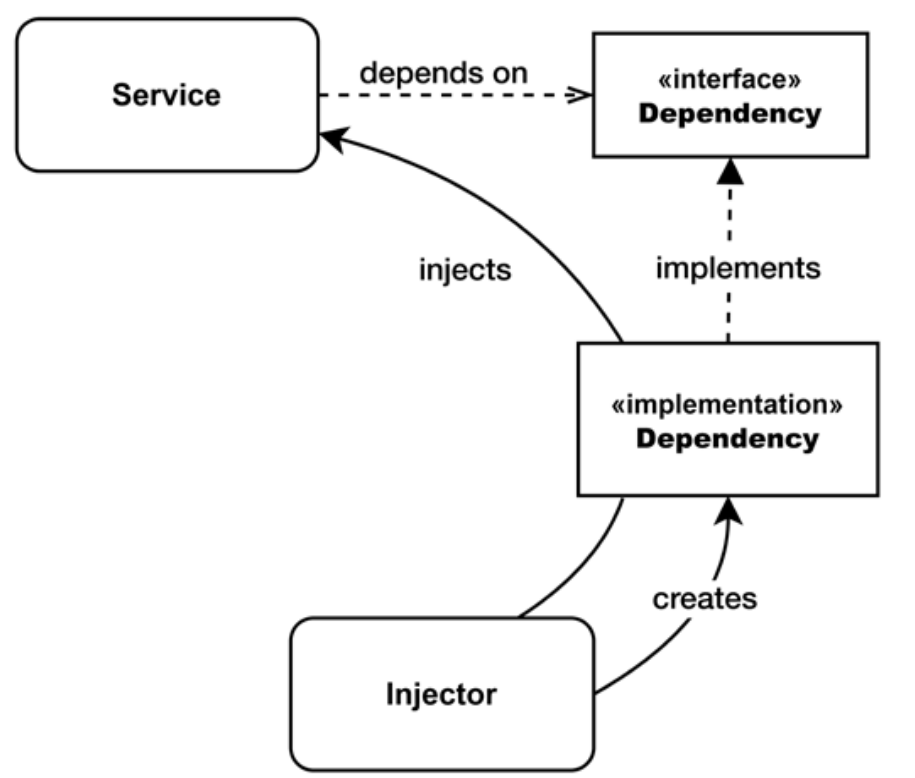
但手動管理依賴很麻煩,于是出現了控制翻轉。依賴的管理(創建和注入)交由第三方,通常是一個容器。NestJs就是實現了這么一個容器。依賴注入如下圖所示,Service類只聲明了它依賴特定接口的dependency, injector(容器)創建了一個實現接口的實例,把它注入到service中。
@Module中的provider是告訴NestJs,如果你碰到AppService,就把AppService的實例注入進去。什么叫碰到AppService, @inject
constructor(@Inject(AppService) private readonly appService: AppService) {}
只是@Inject中的參數和方法參數都是AppService,前面的@Inject(AppService)被省略了。providers其實接受的是一個對象,對象的一個key是provide,表示提供什么,真實的作用就是一個token標示符,用于@inject。另外一個key是useValue或useClass或useFactory,當NestJs遇到provider指定的token后,就會用useValue指定的value,或useClass指定的類的實例對象,或useFactory返回的對象(工廠方法創建對象),來注入到@Inject(token)修飾的參數。
寫一個登錄注冊的模塊。通常在服務端開發時,controller負責接受客戶端請求,service負責處理業務邏輯,repository負責和數據庫打交道,controller調用service,service調用repository。新建users目錄,目錄里面users.controller.ts,users.module.ts, users.service.ts, users.repository.ts。controller調用service,依賴service, users.controller.ts
import { Controller, Get, Post } from '@nestjs/common';
import { UsersService } from './users.service';
@Controller('users')
export class UsersController {
constructor(private usersService: UsersService) { } // 聲明需要的依賴
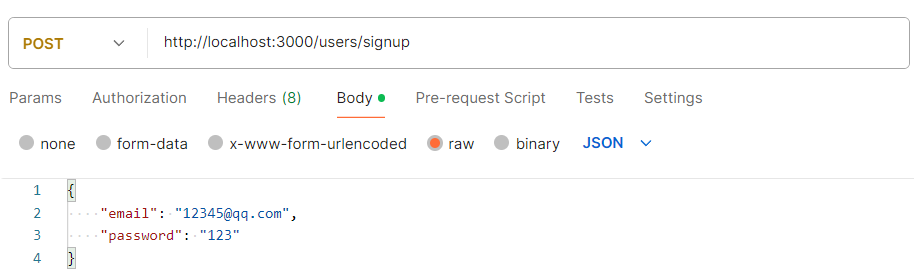
@Post('/signup')
async createUser() { }
@Post('/signin')
async singin() { }
@Get('/:id')
async getUser() { }
}
Post請求要接受請求體,Get請求要接受params。做過Express開發,都知道到有請求對象和響應對象來獲取這些內容。在Nest.js中,方法的參數用@Req和@Res進行裝飾,就成了請求對象和響應對象。
@Post('/signup')
async createUser(@Req() request: Request, @Res() response: Response) {
    const body = request.body;
    response.json({body})
}
request.body, request.params太常見了,于是Nest.js又有了@Body,@Param裝飾器來修飾方法的參數,直接就能獲取到對應的內容。如果POST請求要接受一個復雜的對象作為請求體,參數的類型是一個類類型,定義請求體的形狀和期望的數據。這個類也稱為DTO(數據傳輸對象),創建用戶需要email和password, 那就創建一個類,有email 和password屬性,createUser參數就是這個類類型。user目錄下創建User.ts
export class User {
    email: string;
    password: string
}
然后
@Post('/signup')
async createUser(@Body() body: User) { }
客戶端通過JSON.stringfy()把email和password對象通過字符串的形式傳遞過來,服務端用JSON.parse進行解析,然后創建User類一個實例對象,把解析出來的數據賦值給對象,然后再把對象賦值給body,body是User的一個實例對象。此外還要對數據進行驗證。NestJs有一個pipe的概念,數據到達路由處理函數之前要經過一系列過程,pipe就是其中之一,ValidationPipe用于驗證。Class-validation 包使用注解驗證,然后把驗證結果給到validation pipe。npm install class-transformer class-validator, User 類添加驗證
import { Transform } from "class-transformer";
import { IsNotEmpty, IsOptional, IsString } from "class-validator";

export class User {
    @IsString()
    @IsNotEmpty()
    // @IsNotEmpty({ groups: ['create'] }) groups限制 @IsNotEmpty() 規則何時應用。僅當{ groups: ['create']顯式傳遞到驗證管道時才會執行驗證。
    email: string;

    @IsString()
    @IsNotEmpty()
    password: string;

    @IsOptional()
    description?: string; // 可選

    @IsOptional()
    @Transform(({ value }) => value.toUpperCase()) // 簡單的數據轉換
    title?: string;
}
然后
@Post('/signup')
async createUser(@Body(new ValidationPipe({
    transform: true, // 當validation 有transform 的時候,要開啟transform
    // groups: ['create'] // 有條件時,開啟條件判斷
})) body: User) { }
如果對每個客戶端數據都進行驗證,在每一個路由處理函數都添加ValidationPipe,比較麻煩,可以開啟全局驗證。useGlobalPipes(new ValidationPipe()), useGlobalPipes對所有的請求都應用它包含的pipe。ValidationPipe 驗證每一個請求,如果DTO類沒有添加驗證規則,也不會對請求進行驗證。main.ts
import { ValidationPipe } from "@nestjs/common";

async function bootstrap() {
  const app = await NestFactory.create(AppModule);
  app.useGlobalPipes(new ValidationPipe({
   transform: true,
    whitelist: true
  }))
  await app.listen(3000);
}
bootstrap();
有個問題,validation pipe是怎么知道使用哪個驗證的規則的來驗證哪一個路由的?尤其是typescript 編譯成js,類型擦除后?ts 配置emitDecoratorMetadata, 把類型信息添加到js中, 編譯后在js代碼,dist目錄,users下面的users.controller.js
exports.UsersController = UsersController;
__decorate([
    (0, common_1.Post)('/signup'),
    __param(0, (0, common_1.Body)(common_1.ValidationPipe)),
    __metadata("design:type", Function),
    __metadata("design:paramtypes", [create_user_1.CreateUser]),
    __metadata("design:returntype", Promise)
], UsersController.prototype, "createUser", null);
現在把接受到的參數存儲到數據庫,調用userService中的create 方法,
async createUser(@Body(ValidationPipe) body: CreateUser) {
    await this.usersService.create(body.email, body.password)
    return {message: 'create successfully'}  // 當controller的方法返回基本數據類型時,直接返回。當返回對象或數組時,會序列化為json
}
sign和createUser方法一樣,getUser要接受id,
@Get('/:id') // 兩種使用方式,不帶參數,獲取整個對象,帶參數,獲取指定的某個參數。
    async getUser(@Param('id') id: string, @Param('sex') sex: string, @Param() all: any) { }
users.service.ts創建UsersService類,添加create方法,servcie被依賴,所以它能夠被注入,需要@Injectable()裝飾,同時調用repository,需要聲明依賴
import { Injectable } from "@nestjs/common";
import { UserRepo } from "./users.repository";

@Injectable()
export class UsersService {
    constructor(private userRepo: UserRepo) { this.userRepo = userRepo } // 聲明需要的依賴,
    async create(email: string, password: string) {
        return this.userRepo.create({ email, password, admin: true });
    }
}
repository比較麻煩,它需要連接數據庫。數據庫的連接是一個單獨的功能,需要新建一個模塊,可以看出模塊起到組織代碼的作用。創建db目錄,再創建db.module.ts。但User模塊下,怎么使用DB模塊的功能?service(provider)都屬于自己的module,如果要被其他module使用時,就要被export 出去
import { Module } from '@nestjs/common';
import {Pool} from 'pg'

const dbProvider = {
    provide: 'PG_CONNECTION',
    useValue: new Pool({
        user: 'postgres',
        host: 'localhost',
        database: 'postgres',
        password: '123456',
        port: 5432
    })
}

@Module({
  providers: [dbProvider],
  exports: [dbProvider]
})
export class DBModule {}
其次一個模塊要使用另一個模塊的service,就要把另一個模塊引入。import只能引入其他模塊,所以DB功能,也只能創建模塊,這也證明模塊是創建NestJs應用的基礎。引入一個模塊,這個模塊export出來的provider,就相當于自己模塊寫了這個provider,和本模塊中的其他provider,沒有什么區別。在本模塊中碰到@inject的token,就會注入進來。users.repository.ts 需要從數據庫中查數據
import { Inject, Injectable } from "@nestjs/common";

@Injectable()
export class UserRepo {
    constructor(@Inject('PG_CONNECTION') private connect: any) { }
    async create({ email, password, admin }: any) {
        /* pg中創建users表
        CREATE TABLE users (
        id SERIAL PRIMARY KEY,
        email VARCHAR(50),
        password VARCHAR(50),
        admin BOOLEAN
    );
        */
        const text = 'INSERT INTO users(email, password, admin) VALUES($1, $2, $3) RETURNING *'
        const values = [email, password, admin]

        const res = await this.connect.query(text, values)
        console.log(res.rows[0])
        return res.rows[0]
    }
}
Users
import { Module } from '@nestjs/common';
import { DBModule } from 'src/db/db.module';
import { UsersController } from './users.controller';
import { UserRepo } from './users.repository';
import { UsersService } from './users.service';

@Module({
    imports: [DBModule], // 使用db模塊的功能
    providers: [UsersService, UserRepo], //service和repository都是被注入,要在module的provider中,表明遇到哪個token才注入
    controllers: [UsersController]
})
export class UsersModule { }
還差最后一步,怎么使用創建的Users模塊?main.tsx啟動文件中,只import了AppModule。AppModule的@Module裝飾器中有import,可以引入其他module
import { Module } from '@nestjs/common';
import { UsersModule } from './users/users.module';

@Module({
  imports: [UsersModule]
})
export class AppModule {}
用TypeORM操作MySQL,npm install --save @nestjs/typeorm typeorm mysql2 安裝依賴。TypeORM有實體(Entity)的概念,對應MySql的一張表,它是一個類,代表表名,屬性代表列。創建users目錄,user目錄下創建users.entity.ts
import { Entity, Column, PrimaryGeneratedColumn } from 'typeorm';

@Entity()
export class User {
  @PrimaryGeneratedColumn()
  id: number;

  @Column({default: true})
  admin: boolean;

  @Column()
  email: string;

  @Column()
  password: string;
}
連接數據庫,在AppModule
import { Module } from '@nestjs/common';
import { TypeOrmModule } from '@nestjs/typeorm';
import { User } from './users/users.entity';

@Module({
  imports: [TypeOrmModule.forRoot({
    type: 'mysql',
    host: 'localhost',
    port: 3306,
    username: 'root',
    password: '123',
    database: 'test',
    entities: [User],
    synchronize: true,
  })]
})
export class AppModule { }
TypeORM模塊的import方式不太一樣,它是調用forRoot方法返回一個模塊,這種模塊稱為動態模塊,相對應的,MessagesModule 稱為靜態模塊。靜態模塊功能是固定的,由@Module定義,import的時候,直接import 模塊名,不用調用方法。不管是靜態模塊還是動態模塊,模塊一旦創建,它是單例的,存在某個地方,但又不全局可用(every module has its own set of imported modules in its scope)。Typeorm模塊在AppMoule 中創建,它就已經存在,連接到數據庫了,users模塊中只使用user功能,所以在users中,Typeorm.forfeature('user'),讓user功能在users模塊中使用。當使用一個動態module 的時候,要么配置module的行為,要么引入某個feature。users目錄下,創建users.module.ts
import { Module } from '@nestjs/common';
import { UsersController } from './users.controller';
import { TypeOrmModule } from '@nestjs/typeorm';
import { User } from './users.entity';
import { UsersService } from './users.service';

@Module({
  imports: [TypeOrmModule.forFeature([User])],
  controllers: [UsersController],
  providers: [UsersService]
})
export class UsersModule { }
創建users.service.ts,本來是要創建users.repository.ts的,但有了實體,TypeORM會自動創建對應的repostiory對象來操作表,不用手動創建Repository類了,只需要在service中注入創建好的repostiory對象,users.service.ts 如下
import { Injectable } from "@nestjs/common";
import { InjectRepository } from "@nestjs/typeorm";
import { Repository } from "typeorm";
import { User } from "./users.entity";

@Injectable()
export class UsersService {
    constructor(
        @InjectRepository(User)
        private usersRepository: Repository<User>,
      ) {}
}
Repositoy類型使用泛型Repository<User>。
,Typeorm生成的repository對象有create,save,insert,update,delete,find等方法。向數據庫中插入數據,有兩種實現方式,create之后調用save,
async create(email: string, password: string) {
  const user = this.usersRepository.create({ email, password, admin: true });
  await this.usersRepository.save(user);
}
和直接調用insert。
async create(email: string, password: string) {await this.usersRepository.insert({ email, password, admin: false })
}
在AppModule中import UserModule, npm run start:dev啟動服務,
同樣的,update也有兩種方式,先findOne,再調用save方式,或直接調用update 方法。delete也有兩種方式,先findOne,再調用remove方法,或直接調用delete方法。為什么會有save和remove 方法呢?因為在Entity 中可以定義一些hooks,@AfterInsert, @AfterUpdate, 只有調用這兩個方法的時候,它們才會執行,直接調用insert,update,delete不會執行,但save 方法,性能可能不高,因為,當實體不存在時,它執行insert操作,當實體存在時,它執行update操作,每天都要執行兩次query查詢,先find,再insert或update。
登錄singin,都會返回token,以后每一個請求都帶有token,就知道誰在請求。npm install --save @nestjs/jwt。在UserModule中,
import { JwtModule } from '@nestjs/jwt';
export const secret = 'addfsdsfdf'

imports: [TypeOrmModule.forFeature([User]), JwtModule.register({
  global: true,
  secret: secret,
  signOptions: { expiresIn: '1h' },
})]
再UserService中注入JwtService,實現signIn方法
import { JwtService } from '@nestjs/jwt';
import { Injectable, UnauthorizedException } from "@nestjs/common";

constructor(
  @InjectRepository(User)
  private usersRepository: Repository<User>,
  private jwtService: JwtService
) { }

async signIn( email: string, password: string) {
    const user = await this.usersRepository.findOne({where: { email }});
    if (user?.password !== password) {
      throw new UnauthorizedException();
    }
    const payload = { sub: user.id };
    return await this.jwtService.signAsync(payload)
  }
在UserController 中
@Post('/signin')
async singin(@Body(ValidationPipe) body: CreateUser) {
    const token = await this.usersService.signIn(body.email, body.password)
    return {
        access_token: token
    };
}
getUser方法,只有用戶登錄,才能調用訪問,有些路由是要保護起來的,如果沒有登錄,就不能訪問,這要用到guard,有一個canActivate(), 返回true or false,true表示允許訪問,false表示不允許訪問。守衛決定請求是否應該繼續進行到其路由處理程序。用戶登錄就是驗證token,創建AuthGuard.ts
import { CanActivate, ExecutionContext, Injectable, UnauthorizedException } from '@nestjs/common';
import { JwtService } from '@nestjs/jwt';
import { secret } from './users.module';
import { Request } from 'express';

@Injectable()
export class AuthGuard implements CanActivate {
    constructor(private jwtService: JwtService) { }

    async canActivate(context: ExecutionContext): Promise<boolean> {
        const request = context.switchToHttp().getRequest();
        const token = this.extractTokenFromHeader(request);
        if (!token) {
            throw new UnauthorizedException();
        }
        try {
            await this.jwtService.verifyAsync(token,{secret});
        } catch {
            throw new UnauthorizedException();
        }
        return true;
    }

    private extractTokenFromHeader(request: Request): string | undefined {
        const [type, token] = request.headers.authorization?.split(' ') ?? [];
        return type === 'Bearer' ? token : undefined;
    }
}
getUser方法,那就使用UseGuard進行保護
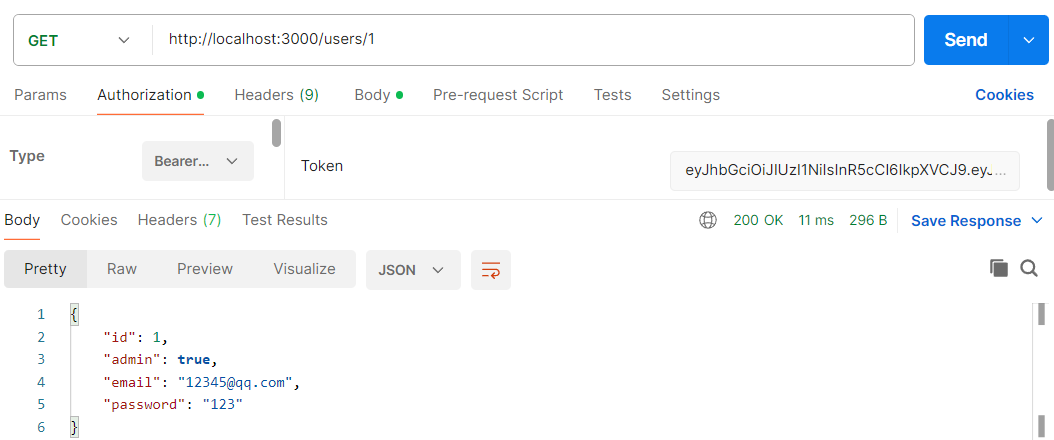
@Get('/:id')
@UseGuards(AuthGuard)
async getUser() { }
實現getUser,獲取id參數,用@Param裝飾器,
async getUser(@Param('id') id: string) {
    return await this.usersService.findOne(id);
}
userService實現findOne,
findOne(id: number) {
  if (!id) return null;
  return this.usersRepository.findOneBy({ id });
}
但這時有一個問題,controller中調用findOne的id是string類型,但service中,id接受的是number類型,這是可以用pipe,@param('id', ParseIntPipe) 把id轉換成int 類型。
async getUser(@Param('id', ParseIntPipe) id: number) {
    return await this.usersService.findOne(id);
}
pipe通常做兩件事情,一個是類型轉換,一個是驗證用戶的輸入。在以上的方法中,拋出了異常,比如throw new UnauthorizedException(),NestJs有一層Exception filter,當應用程序中拋出了異常,而沒有被捕獲時,它會把異常轉換成合適response,比如 throw NotFoundExeption 時, nextJs會返回404,not found。對exception 進行過濾,返回合適的響應。
但返回值中有password,應該要去掉才對,這樣用到攔截器。攔截器實現一個NestInterface,intercept 里面正常寫,攔截請求,return next.handle() 對攔截響應,對路由處理器的返回值進行處理。它返回的是rxjs的observer,有map等操作,map中的data 就是路由處理器返回的data。 返回值去掉password,創建serialInteceptor.ts
import { CallHandler, ExecutionContext, NestInterceptor, UseInterceptors } from "@nestjs/common";
import { Observable, map } from "rxjs";

export class SerializeIntercepter implements NestInterceptor {
    intercept(context: ExecutionContext,
        next: CallHandler<any>): Observable<any> | Promise<Observable<any>> {
        return next.handle().pipe(
            map(data => {
                Reflect.deleteProperty(data, 'password'); // true
                return data;
            })
        )
    }
}
getUser用userInterceptor.
@Get('/:id')
@UseGuards(AuthGuard)
@UseInterceptors(SerializeIntercepter)
async getUser(@Param('id', ParseIntPipe) id: number) {
    return await this.usersService.findOne(id);
}
可以把攔截器包起來,形成一個裝飾器,serialInteceptor.ts
export function Serialize() {
    return UseInterceptors(SerializeIntercepter);
}
getUser 去掉@UseInterceptors(SerializeIntercepter), 直接使用@Serialize()。再創建一個report 模塊,一輛汽車的報告,用戶創建它,admin 用戶批準它。nest cli 提供了一些命令來創建module,controller和service, nest g module reports,nest g controller reports, nest g service reports,手動在reports目錄建reports.entity.ts
import { Entity, Column, PrimaryGeneratedColumn, ManyToOne } from 'typeorm';

@Entity()
export class Report {
  @PrimaryGeneratedColumn()
  id: number;

  @Column({default: false})
  approved: boolean;

  @Column()
  price: number;

  @Column()
  year: number

  @Column()
  mileage: number
}
然后在AppModule 中,Typeorm的配置項entities中,添加Report
entities: [User, Report],
用戶創建report, createReport 中要知道用戶的信息,admin批準report,那還要判斷登錄的用戶是不是admin,如要不是,批準的api就不能被調用,需要創建AdminGuard。從客戶端請求中,只能得到userId,所以其它信息還要從數據庫里面取。這里要用到中間件,這是由中間件,guard,攔截器的執行順序決定的。

在中間件中,調用userService,獲取到用戶信息,然后把信息添加到request對象上,后面執行的guard,攔截器,路由處理器都能獲取到request對象上在user信息。在src目錄下,創建current-user.middlewire.ts
import { Injectable, NestMiddleware } from '@nestjs/common';
import { Request, Response, NextFunction } from 'express';
import { UsersService } from './users/users.service';
import { JwtService } from '@nestjs/jwt';
import { secret } from './users/users.module';

@Injectable()
export class CurrentUserMiddleware implements NestMiddleware {
    constructor(private user: UsersService, private jwtService: JwtService) { }

    async use(req: Request, res: Response, next: NextFunction) {
        const [, token] = req.headers.authorization?.split(' ') ?? [];
        if (token) {
            try {
                const result = await this.jwtService.verify(token, { secret });
                const user = await this.user.findOne(result.sub);
                // @ts-ignore
                req.currentUser = user;
            } catch (error) {
                console.log(error)
            }
        }
        next();
    }
}
中間件的使用比較特別,使用中間件的module要實現NestModule, 在configure中配置,比如在AppModule中配置中間件
import { CurrentUserMiddleware } from './current-user.middlewire';
import { MiddlewareConsumer, NestModule } from '@nestjs/common';

export class AppModule implements NestModule  {
  configure(consumer: MiddlewareConsumer) {
    consumer
      .apply(CurrentUserMiddleware)
      .forRoutes('*'); // 或for('/reports')
  }
}
由于中間件在AppModule中引入的,使用了UserService,UserModule還要exports 出去UserService。
@Module({
  // ....
  providers: [UsersService],
  exports: [UsersService]
})
export class UsersModule { }
現在createReport可以獲取到user信息了,但怎么在report中保存user信息呢?這涉及到了關系,report和user有1對多的關系,
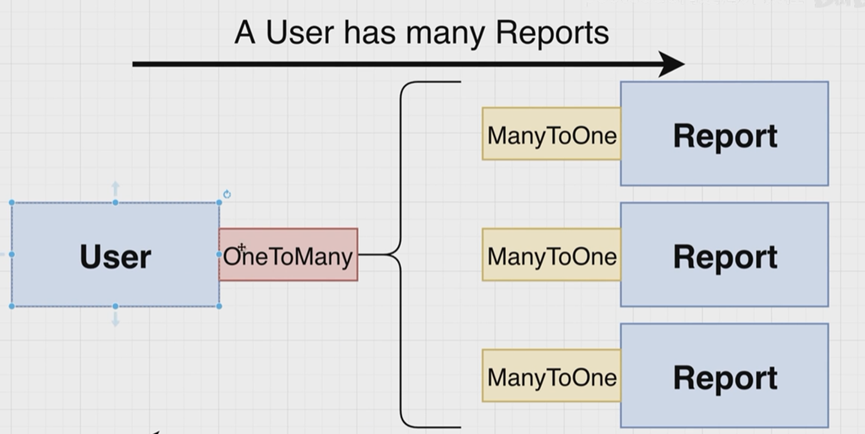
在user實體中, 添加屬性
@Entity()
export class User {
  // ...
  @OneToMany(() => Report, (report) => report.user )
  reports: Report[] // 數組表示多個report
}
在report 實體添加屬性
@Entity()
export class Report {
  // ...
  @ManyToOne(() => User, (user) => user.reports)
  user: User
}
oneToMany或ManyToOne為什么第一個參數是函數。這是因為,User Entity中使用Report Entity, Report Entity 中又使用User Entity,循環依賴了,不能直接使用,所以要用函數包起來,以后執行,而不是加載文件的時候執行。第二個函數參數的意思是關聯的實體,返回值是定義的實體, 通過關聯的實體report怎么找回到定義report的實體(User),report entity 有一個user字段,就是定義reports的實體(User實體中有reports屬性)。Report實體有一個user字段,存儲report時,給report的user屬性賦值一個user實體,當真正存儲到數據庫時,會從user實體中取出id,存儲到數據庫。ReporstController
import { Body, Controller, Post, Req, UseGuards } from '@nestjs/common';
import { AuthGuard } from '../users/AuthGuard';
import { ReportsService } from './reports.service';

@Controller('reports')
export class ReportsController {
    constructor(private readonly reportsService: ReportsService) { }

    @Post()
    @UseGuards(AuthGuard)
    async createReport(@Body() body: any, @Req() req: any) { //body 的類型本來是一個DTO類型,簡單起見,寫了any
        const userReturn = await this.reportsService.create(body, req.currentUser)
        return userReturn
    }
}
ReportsService
import { Injectable } from '@nestjs/common';
import { InjectRepository } from '@nestjs/typeorm';
import { User } from 'src/users/users.entity';
import { Repository } from 'typeorm';
import { Report } from './reports.entity'

@Injectable()
export class ReportsService {
    constructor(
        @InjectRepository(Report)
        private reportsRepository: Repository<Report>,
    ) { }
    create(reportDto: any, user: User) {
        const report = this.reportsRepository.create(reportDto);
        // @ts-ignore
        report.user = user;
        return this.reportsRepository.save(report)
    }
}
由于在Service中注入了Report,所以在ReportsModule中 imports: [TypeOrmModule.forFeature([Report])],
repository的save方法把整個關聯的user 實體都返回了。還有就是controller 接收了@req參數,能不能也像@Body一樣,直接獲取user?這要自定義一個參數裝飾器createParaDecorator. 在src目錄下,currentUser.ts
import {createParamDecorator, ExecutionContext} from '@nestjs/common'

export const CurrentUser = createParamDecorator(
    (data: never, context: ExecutionContext) => {
        const request = context.switchToHttp().getRequest();
        return request.currentUser
    }
)
controller
import { CurrentUser } from '../currentUser';
import { User } from '../users/users.entity';

@Post()
@UseGuards(AuthGuard)
async createReport(@Body() body: any,  @CurrentUser() user: User) {
    const userReturn = await this.reportsService.create(body, user)
    // @ts-ignore
    const newUser = { ...userReturn, userId: userReturn.user.id };
    // @ts-ignore
    delete newUser.user;
    return newUser
}
現在寫一個approve, 就是把report的approve屬性,改成true. 它需要admin權限,寫一個AdminGuard。在report目錄下,admin.guard.ts
import { CanActivate,  ExecutionContext} from '@nestjs/common'

export class AdminGuard implements CanActivate {
    canActivate(context: ExecutionContext): boolean {
        const request = context.switchToHttp().getRequest();
        if(!request.currentUser) {
            return false
        }

        if(request.currentUser.admin) {
            return true
        } else {
            return false
        }
    }
}
ReportsController 添加一個patch 路由
@Patch('/:id')
@UseGuards(AdminGuard)
async approveReport(@Param('id') id: number, @Body() body: { approved: boolean }) {
    return await this.reportsService.changeApproval(id, body.approved);
}
ReportsService 添加 changeApproval 方法
async changeApproval(id: number, approved: boolean) {
    const report = await this.reportsRepository.findOne({ where: { id } })
    if (!report) {
        throw new NotFoundException('not found')
    }

    report.approved = approved;

    return this.reportsRepository.save(report)
}
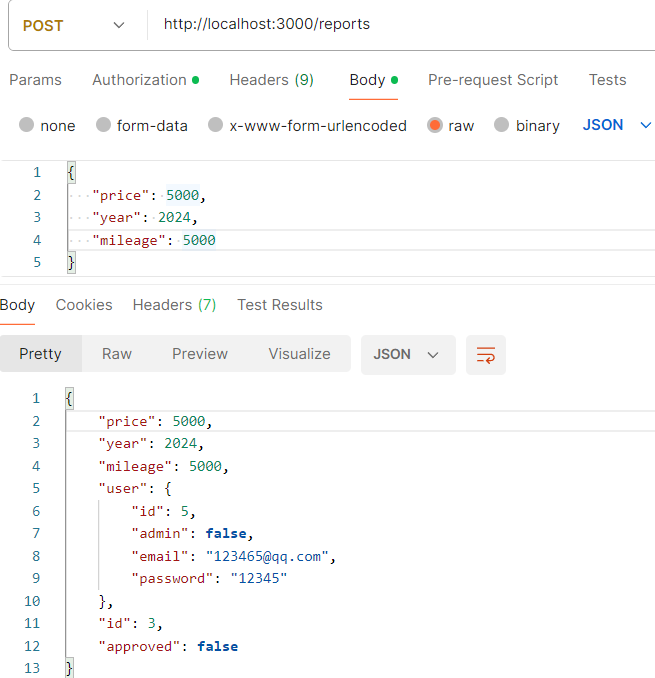
當查詢條件比較復雜的時候,就不能簡單地用findOne和find了,就要使用createQueryBuilder,比如查詢price是5000, mileage 也是5000等。在Controller 中,
@Get()
async getOneReport() {
   return this.reportsService.getReport();
}
在Service 中
async getReport() {
  return await this.reportsRepository.createQueryBuilder('report')
        .where('report.price= :price', {price: 5000})
        .andWhere("report.mileage = :mileage", { mileage: 5000 })
        .getOne()

}
當fetch reprot時,不會自動fetch user。同樣的,當fetch user的時候,也不會自動fetch report。
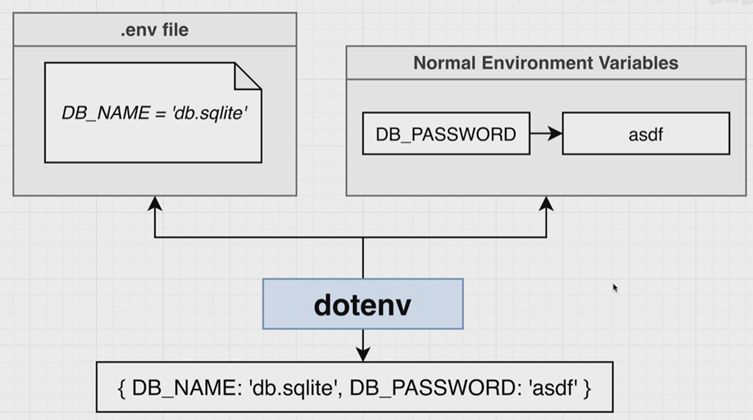
配置環境變量,npm i @nestjs/config, @nestjs/config內部使用dotenv。Dotenv的目的是, 把不同的環境變量(命令行定義的環境變量, .env 文件定義的環境變量)收集起來, 形成一個對象(process.env),返回給你。 如果各個方法定義的環境變量有沖突,命令行中定義的優先級高。
"start:dev": "cross-env ENV=dev nest start --watch",
"start:prod": "cross-env ENV=prod node dist/main",
A good approach for using this technique in Nest is to create a ConfigModule that exposes a ConfigService which loads the appropriate .env file.
@nestjs/config 提供了依賴注入的功能。 每一個環境不同的.env 文件,然后,configroot.forRoot() 加載不同的配置文件(命令行配置env環境變量),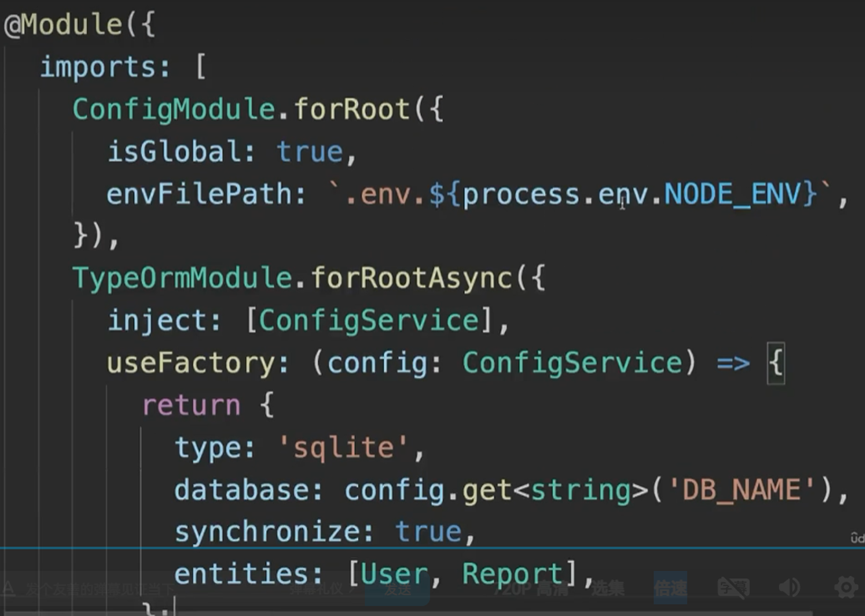
isGlobal全局模塊。envFilePath加載哪一個環境變量配置文件。
    // my-service.service.ts
    import { Injectable } from '@nestjs/common';
    import { ConfigService } from '@nestjs/config';

    @Injectable()
    export class MyService {
      constructor(private readonly configService: ConfigService) {}

      getDatabaseHost(): string {
        return this.configService.get<string>('DATABASE_HOST');
      }
    }
異常過濾器讓您可以控制應用程序拋出的異常。通過擴展 ExceptionFilter 基類,您可以定義發生錯誤時的自定義響應。Nest’s hierarchical injector
NestJS not only leverages DI but also elevates it with its hierarchical injector system. This system
works in layers, ensuring that each module and its components get their dependencies from the closest
injector, be it module-specific or global.
NestJS provides a mechanism called forwardRef() that allows you to
reference classes before they are defined, hence resolving the cyclic dependency issue.
Once defined
as global, a module doesn’t need to be imported into other modules; its providers and controllers
become instantly accessible everywhere:
Middleware is great for tasks that do not involve decision-making concerning the continuation of the request-response cycle based on business logic. 中間件非常適合那些不涉及基于業務邏輯的請求-響應周期延續的決策的任務。
Route guards are a fundamental part of the NestJS framework, crucial for ensuring that a certain set of
logic is fulfilled before a route handler is executed. These guards are particularly vital for implementing
authorization and authentication logic in an application.

日志的作用,記錄錯誤并定位問題,比如什么時候發生的,發生了什么事情,錯誤是什么?日志的等級,waring,error。按照功能分,錯誤日志,調試日志,請求日志,通常記錄到文件中,比較敏感的日志,記錄到數據庫中。生產環境通常用第三方日志庫,Winston。
VS Code 調試
點擊調試圖標(Ctrl+Shift+D),簡單的,面板中點擊"Show all automatic debug configurations", 選Node.js...,彈出Run Script命令,選“Run Script: start:debug” 開啟調試。復雜的,面板中點擊“創建launch.json文件”,選Node.js,自己配置。configurations 數組中,輸入npm,彈出提示
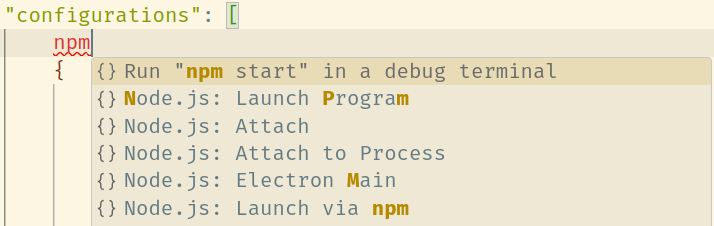
選擇Node.js: Launch via npm
{
    "name": "Launch via NPM",
    "request": "launch",
    "runtimeArgs": [
        "run-script",
        "start:debug" // npm 要執行的命令
    ],
    "runtimeExecutable": "npm",
    "runtimeVersion": "18", // 如果是nvm切換過版本,要指定本項目使用的node版本
    "internalConsoleOptions": "neverOpen", // 要不要打開VS code 內置的debug console
    "skipFiles": [
        "<node_internals>/**"
    ],
    "type": "node"
}

 浙公網安備 33010602011771號